Managing Costumes
This serves as a guide for managing costumes in your build using the BrawlInstaller plugin suite.
To start with this guide, you'll first want to follow the installation instructions on the main page. Afterward, open BrawlCrate and navigate to Plugins > BrawlInstaller Plugins > Install > Install Costume.
For the examples in this guide, we will be using the Brawlified Smash 2 Sonic costume by MetalLegacy. You can find this costume here. You can really use any costume you want, though, as long as you have all the necessary files.
Note that the costume plugins rely on builds containing Ex configs (used in BrawlEx builds like P+Ex) or masquerade files (used in builds like Project+). If your build does not use these, these plugins will not work for you.
Upon opening the Install Costume plugin, you are presented with the Install Costume Prompt.

There are several ID fields on this form. All ID fields allow you to enter the ID or use an ID Picker by clicking the button on the right-hand side. These fields accept either hex values or decimal values, but if you choose to enter hex values, you must ensure they are prefixed with 0x.
- Fighter ID - The fighter ID of the character you wish to install a costume to. This is the ID that appears on your character's Fighter config file.
-
Cosmetic ID - The cosmetic ID, as it appears in files like
sc_selcharacter.pac, used for the fighter you wish to install the costume to. This is not to be confused with the cosmetic config ID, which is the ID used on the Cosmetic config file of your fighter. - CSS Slot ID/MASQ ID - The CSS slot ID or MASQ ID of the character you wish to install a costume to. For Ex builds, this is the ID that appears on your character's CSS Slot config file. For builds that use masquerade files, this is the ID that appears on their masquerade file.
If your ID picker doesn't show the character ID you want, you can update it to do so by following the directions in the previously linked ID picker guide. Otherwise, you can use the plugin "Output Fighter Info to Text" to generate a text file with a list of fighter IDs. For more info, see the "Plugins" wiki page.
Along with the ID fields, there are several fields for choosing files. Each of these is a list with a button next to it. Clicking the button will bring up a menu allowing you to select the appropriate files. You may select multiple files at once.
All files chosen are installed in alphabetical order, so make sure all of your files are in the same order.
These fields are as follows:
- CSPs - This represents the character-select portraits, or CSPs, that will be installed with your costume.
- BPs - This represents the battle portraits, or BPs, that will be installed with your costume.
- Stocks - These are the stock icons that will be installed with your costume.
-
PAC Files - The
.pacfiles associated with your costume. These are the actual files used by the game for your costume in a match. This includes the basic .pac file for the costume (e.g. FitSonic00.pac), but also any extra .pac files associated with that costume (e.g. FitSonicEtc00.pac, FitSonicEntry00.pac). - Update Config - If this box is checked, entries will be added to the character's CSSSlotConfig/Masquerade file. Typically you'd only uncheck this for characters who share a config, such as Wario-Man or Giga Bowser.
Note that while you can select multiple files, CSPs and stocks will be color smashed, meaning they will be converted to share pixel data. This means that you should only import multiple costumes if they are all recolors of the same costume. If they are different, the cosmetics will end up looking strange in-game. If you wish to install multiple costumes that are not recolors of one another, you should do each one separately.
Also, you should ensure cosmetic files are not named the way they would be internally. For instance, importing a cosmetic named MenSelchrFaceB.001 onto Mario could cause problems because this is how his CSPs are named in sc_selcharacter.pac. This can cause palettes to get assigned to the wrong textures.
For our example, we are going to fill in the ID fields with Sonic's IDs - from top-to-bottom, 0x2F, 46, and 0x27. We'll navigate to the Renders and Cosmetics > CSProject Pose folder, for our CSPs we will choose the first five images from the CSPs folder in there. We will repeat this using the BPs folder for our BPs and the STCs folder for our stocks. Finally, we will select all the .pac files located in the root folder of our download, from FitSonic00.pac to FitSonicEtc04.pac. For more info on how those Etc files are read by the plugin, see the note below.
Once you've filled in all fields, you can hit Install to proceed to the next form.
When selecting .pac files, the plugin can automatically pair a base costume file with it's corresponding Final, Result, Entry, MotionEtc, or Etc files if they are included. It can even do this for the Kirby hats that require per-costume files - KirbyDonkey, KirbyFalco, KirbyMewtwo, KirbyPikmin, KirbyPurin, and KirbySnake. However, this functionality only works if the files are named exactly the same except for the modifier. For instance, FitSonic00.pac and FitSonicEtc00.pac would be paired since they are exactly the same except for Etc, but if they were FitSonicAdventure00.pac and FitSonicEtc00.pac, they would not be paired, because they would not match if the Etc was removed from the latter file.
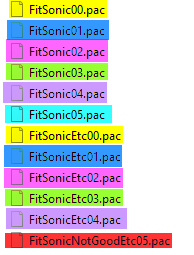
In this image, you can see that every FitSonic .pac file has a corresponding Etc, except FitSonic05.pac - because there is no FitSonicEtc05.pac, only FitSonicNotGoodEtc05.pac.
Casing matters here, too. If one file is all caps and its corresponding Etc is not, for instance, they will not be matched. Finally, for Kirby hats, the base file and the corresponding hat files must both have Kirby in the name - e.g. FitKirby00.pac and FitKirbyDonkey00.pac.
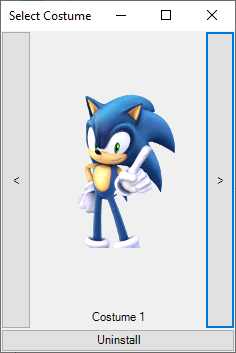
This next form is quite simple. You're presented with a form that displays the fighter's portrait and several controls.

Here are the components of this form:
- Portrait - A portrait of the costume, so you can tell what you're doing.
- Arrow Buttons - Arrow buttons on the left and right of the form that allow you to cycle through the character's costumes.
- Starting ID - A dropdown with a list of available costume IDs for this fighter. These costume IDs matter internally for certain characters such as Zelda and Sheik, whose costumes need to correspond to one another by ID. The ID chosen in this box will be the ID of the first costume you are importing, and any subsequent costumes imported will use the next available ID. This value defaults to whatever the lowest available ID is, so unless you want to do something specific, you don't need to change it. If you want to force the costume to use an unlisted ID, you can enter the ID manually in hex or decimal format.
- Insert Before - Clicking this button inserts your new costume so it will appear before the costume currently displaying on the form.
- Insert After - Clicking this button inserts your new costume so it will appear after the costume currently displaying on the form.
- Replace - Clicking this button will replace the costume currently displaying on the form with your new costume.
Note that this form only displays the first costume in any color smash group, not every individual color. This is to prevent users breaking their color smash groups and causing issues. The plugin actually bases these groups off of both the CSPs and the stock icons, so if your stock icons have fewer color smash groups than your CSPs, for instance, you will see fewer costumes. If you insert a costume after one of these options, it will be inserted after the entire color smash group, and if you replace one of these options, the entire color smash group will be removed and your new costume will take its place.
For our example, use the arrow buttons to reach the last costume on your list. For unmodified P+ builds, this would be costume 4. Then, click "Insert After" to insert your costumes. You'll see a progress bar and some forms flashing, and eventually you'll be presented with the last set of prompts.
When installing a costume, except in special circumstances, the plugin will prompt you to ask what color a costume is.
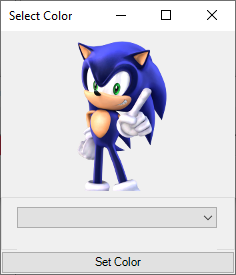
This form just has two controls - a dropdown with a list of colors, and a button. Whichever color you select from the dropdown is what the game will see the costume as internally - this is only really important for the Red, Blue, and Green colors which are used for team modes. If you do not select a color, the plugin will default to Grey. You'll receive a prompt for each costume you're installing in one run, so simply select the color that most closely matches and hit Set Color for each one.
For our example, Sonic's costumes should be Blue, Red, Green, Yellow, and Black.
You can actually bypass the color prompt entirely if you name your .pac files a specific way. Any .pac file with a name that ends in a color will automatically be set to that color without prompting. For instance, FitSonic00.pac will ask prompt you for a color, but FitSonic00 - Blue.pac will automatically be set to the color Blue without prompting. The colors must be written exactly as they appear on the dropdown of the color prompt for this to work, and don't forget that if you have costume-specific Etc, Entry, or other files that their names must still match. Below is a list of the colors as they must be written for this functionality to work.
Color List
- Red
- Blue
- Yellow
- Green
- Purple
- LightBlue
- Pink
- Brown
- Black
- White
- Orange
- Grey
Once you've finished this, you're done! You should be able to see your costume in-game, added to the end of Sonic's costume list.
Uninstalling costumes is very simple. To start, navigate to Plugins > BrawlInstaller Plugins > Uninstall > Uninstall Costume. You'll be presented with the Uninstall Costume prompt.

Just like installing costumes, this prompt has three ID fields again. These are filled in exactly the same way as installing a costume. The "Update Config" checkbox here toggles whether or not entries will be removed from the character's CSSSlotConfig/Masquerade file, and like with the installer form, is typically only used for characters who share configs. When you click "Uninstall", you will be presented with a simplified version of the costume select form.
This form works exactly the same as when installing a costume, except that there is only one option instead of inserting or replacing costumes: uninstall. This button simply removes the costume that you is visible on the screen. Like with installing a costume, the image represents the entire color smash group of that costume, so uninstalling it will uninstall the rest of its set as well.
When you click uninstall, you will see some progress bars and then receive a message indicating success. If you go in-game, you should see the costume set is no longer an option.