Managing Stages
This serves as a guide for managing stages in your build using the BrawlInstaller plugin suite.
To start with this guide, you'll first want to follow the installation instructions on the main page. Afterward, open BrawlCrate and navigate to Plugins > BrawlInstaller Plugins > Manage > Manage Stages.
For the examples in this guide, we will be using the files from the Qbert stage by RedipsTheCooler and Kapedani. You can find this stage here. You'll want to extract its contents before proceeding, if you intend to follow along.
If you haven't already, you may want to view the Managing Music guide first, to prepare the tracklist for your stage.
Note that the stage manager only supports builds using the modern Project+ stage system. If your build does not use this system, it may not function correctly for you.
You may also add additional stage lists using the customStageLists setting in your build's settings.ini file. More information on this page.
Upon opening the Manage Stages plugin, you are presented with the Stage List menu.
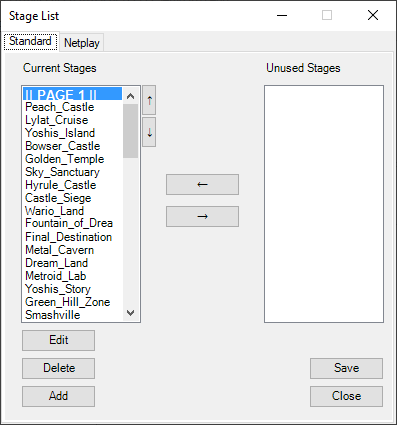
This screen has several components.
- Standard/Netplay Tabs - The tabs at the top of the screen indicate whether you are editing the offline or netplay stage lists.
- Current Stage List - On the left side of the screen is the list of stages currently present in the selected stage list. There are also entries for each page of the stage select screen. Any changes made using the buttons affect the currently selected stage. The up and down controls on this list box allow you to adjust the order that stages appear on the stage select screen. Stages below a specific page entry will appear on that page in the stage select screen.
- Unused Stage List - On the right side of the screen is the list of stages that are currently set up in your build, but are not present on the selected stage list. Stages from this list can be moved onto the stage list using the left arrow button.
- Arrow Buttons - These buttons appear in the center of the screen. The ← button moves the selected entry on the "Unused Stages" list to the "Current Stages" list. The → button moves the selected entry on the "Current Stages" list to the "Unused Stages" list.
- Edit - Opens the stage editor form for the currently selected stage entry in the current stage list.
- Delete - Deletes the stage currently selected on the current stage list entirely, deleting it's slot, parameters, and cosmetics. You will also be prompted if you wish to delete other files associated with the entry from the build.
- Add - Opens the stage editor form for a brand new entry to the stage list.
- Save - Saves all changes you've made to your build and runs GCTRealmate to compile edited codes.
- Close - Closes the window without saving changes.
This screen is primarily used for reordering your stage lists and for deleting stages from the build entirely as needed. Note that any stages added or deleted are accessible to both the netplay and standard tabs, but the actual stage order of each are independent from one another. This means you can make only certain stages show up in netplay, for example.
For this guide, we wish to add a new entry, so click the Add button in the bottom left corner to populate the stage editor form.

Note: This window will look different for you upon first opening.
The stage editor allows you to edit the stage you selected on the previous form, or to add a whole new stage. This lets you manage all of the components of a stage slot, such as the cosmetics associated with it, alt stages, and their parameters.
First, you'll notice the cosmetics panel. This has sections for the stage preview, stage name, and stage icon images, along with Import buttons for each. It also has optional fields for stage replay icons and stats, if your build uses them. Note that replay icons won't work for custom stage slots! If you click the import buttons and select a .png file, these files will be imported into your build upon saving. If you're adding a new stage, they will be added and associated with the new stage slot. If you're editing an existing one, they will replace the existing cosmetics.
Below, you will see sections for the alt layout name, franchise icon, and game icon images. The alt layout name is what appears above your stage on the stage select screen, indicating what layout the R-alt stage has. The franchise icon is the logo for the franchise the stage is from, and the game icon is the title card representing the game the stage is from. All of these feature drop down lists that allow you to select images that already exist in your build. For the franchise icon and game icon, you can select the Add buttons to import new icons into your build, which will be imported into your build on save. Doing so will only affect the selected stage entry - they will not replace the icons for any already existing stages.
To the right is the parameters section. Here you will see several controls.
-
Stage Entry List - On the left side, a list of all stage entries associated with this stage slot. Whichever entry is selected is the one that will be edited using the other controls. The list also has a
+and-button that can be used to add new entries and remove entries. If you remove an entry, you will be asked if you wish to delete associated files upon save. - Import Params - Below the stage entry box, this button allows you to import a stage .param file, which will be automatically added as an entry in the stage entry list.
- Name - The name of the currently selected stage entry. Changing this will update the stage entry name upon save.
-
PAC File - The name used for the .pac file associated with the stage, without STG or the .pac extension. For instance,
STGQBERT.pacwould appear in this box asQBERT. Next to this field is aBrowse...button, clicking which will open a file selector that allows you to choose a .pac file. The chosen .pac file will be copied into your build upon save, and the PAC file field will be updated appropriately. -
Module - The module file associated with the stage. Next to this field is a
Browse...button, clicking which will open a file selector that allows you to choose a .rel file. The chosen .rel file will be copied into your build upon save, and the module file field will be updated appropriately. - Tracklist - A dropdown list allowing you to select the tracklist associated with the stage. You can add new tracklists using the music manager. For more info, see this guide.
-
Sound Bank - The hex ID (e.g. 0x21) of the sound bank associated with this stage entry. Most stages use
0xFFFF, but some stages may have custom soundbanks. Next to this field is aBrowse...button, clicking which will open a file selector that allows you to choose a .sawnd file. The chosen .sawnd file will be copied into your build upon save, and the sound bank file field will be updated appropriately. -
Effect Bank - The hex ID (e.g. 0x21) of the effect bank associated with this stage entry. Most stages use
0x32, but some stages may use a different one. -
Button Combination - A control with various checkboxes representing the different buttons on a GameCube controller. Checking these boxes will make it so the currently selected stage entry can only be accessed by holding that button when selecting the stage slot on the stage select screen. For instance, checking the
Rbox will make it so the entry is accessed by holdingRwhen choosing your stage.
For this guide, we wish to add everything necessary for our QBert stage. Click the import buttons under the stage preview, name, and icon, and select the appropriate images from the QBert stage files you downloaded earlier. We don't have an alternate stage layout, so leave the Alt Layout Name as the entry 00.
For the franchise icon and game icon, click the Add buttons underneath each, and once again select the appropriate files. Both dropdowns should update automatically.
You don't need to add a replay icon or stats. Since this is a new stage slot, a replay icon won't work anyway, and most builds don't use stage stats.
In the parameters section, click the Import Params button. Select the Qbert.param file. This will automatically add it as an entry to the list, fill in some of the fields, and enable the controls.
There is still one more step to finish editing our stage. While the parameters are now set up, we still need to import the associated files. Click the Browse... button next to the PAC File field and select STGQBERT.pac from your files. Do the same for the Module field with st_qbert.rel and the Sound Bank field with 05F_QBert.sawnd.
Once you've done all this, your screen should look like the above screenshot, except with some filepaths in some of the fields. Click Save and Close to save your changes. A progress bar will appear, and eventually you will be brought back to the stage list, with a message indicating success.
Though your stage is added now, it will not yet appear on the stage select screen. You will notice it is on the "Unused Stages" box in the stage list on both the "Standard" and "Netplay" tabs. To get it into your stage list, select it in the "Unused Stages" box and click the ← button. This will move it to the stage list, and then you will want to use the ↑ button on the stage list to move it somewhere above || PAGE 4 ||, and below || PAGE 3 ||. You can repeat these steps on the Netplay tab if you wish for it to appear on the netplay stage list as well, then click "Save" to save your changes. GCTRealMate will run. After this, you can close the window.
That's it! Whatever method you use to load up your build, upon doing so, you should see your stage on page 3 of the stage select screen, with all of the cosmetics and parameters you defined.