This workshop is to help you get started with Steamlink. The first version of this workshop was run at the Toronto Public Library, Fort York branch in May 2018 as part of a series on P2P networks.
Steamlink is a low-power netwoking platform. The Steamlink vision is to give makers the ability to rapidly and easily deploy fully self-hosted, robust, and secure networks of low-powered devices. Currently, Steamlink is in active development.
Before the workshop, the facilitator will need to set up:
- An instance of the Steamlink store on a unix machine
- Atleast one WiFi to LoRa bridge on the same network as the Steamlink store
- Provide kits for participants to set up nodes
The store repository can be found here but we recommend installing from pypi. SteamLink is best installed in a Python virtual environment. It requires python version 3.6 or better, and the python pip module.
NB: For the May 2018 workshop, v0.9.2 was used
$ python3 -m venv sl
$ . sl/bin/activate
$ pip3 install --upgrade steamlink
Alternatively, if you have cloned the githup repository, you can install SteamLink with
$ python3 setup.py install
Steamlink will run with configuration defaults, if you don't specify a config file. We recommend creating a default config file with the command:
$ steamlink --createconfig
It will create steamlink.yaml in your home directory. You can use the -c option to specify different name and/or location, both for creating and for running steamlink. Use the -h flag for help on available command options.
After editing the config you can start steamlink with
$ steamlink
Open up a browser on a machine that's on the same local network as the store and navigate to steamlink.local
If there's a problem with mDNS, the default host is localhost:5050
Steamlink Arduino can be found at this repository. It can be installed like any other Arduino library (Adafruit has a useful guide).
NB: For the May 2018 workshop, v0.3.0 was used
You can either purchase an ESP + LoRa combo boards (search for "Heltec LoRa" on AliExpress) or build one yourself. Here's a schematic if you want a DIY board:

Adafruit feather M0 with RFM95 is an excellent beginner friendly board that plays well with the Arduino environment. You could also use the cheaper Chinese boards, including the Heltec ones (which can serve the dual purpose of running as bridges).
-
Locate the sample bridge code under the
SteamLink Library/Examples/SL_bridge0directory, and make a copy in your workspace. It should include two files:SL_bridge0.inoandSL_Credentials.h-sample -
Remove the
-samplefrom the extention of the SL_Credentials file and update your WiFi and MQTT credentials from the store here. Make sure your store MQTT server can accept connections with these credentials. -
Use the Arduino IDE to flash your bridge hardware
-
Power up the board and see if it works
There is code for 7 workshop nodes in this repository, named after locations in Toronto.
You can make additional ones by copying and renaming the node directory (eg. bathurst) and updating the SL_ID and config struct.
Use the Arduino IDE to flash each node individually
See above for instructions.
Each kit should include:
- A breadboard
- A flashed LoRa board such as the Adafruit feather M0 with RFM95
- An LED
- A 10K ohm resistor
- A push button
- Atleast 5 M-M jumper cables
- A power cable for the LoRa board
- Feather Pin 5 connects to the LED +’ve side (longer leg)
- Feather Pin 6 connects to the micro-switch
- -’ve side of the LED connects to a resistor to ground
- Make sure all the grounds are connected
- Power up using power cable

- Pressing the button should send a message to the console
- Try sending ‘1’ or ‘0’ to your node from the web console to turn on and off the LED
- Observe the RSSI (ie. the Received Signal Strength Indicator): move the node and see how the RSSI is affected
Use an SDR to visualize LoRa packets. You should be able to see something like this:
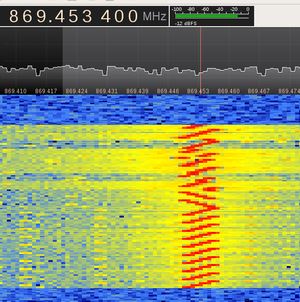
Image credit bertrik