Display subpages in a flexible, sortable and searchable table.
This plugin is completely free and published under the MIT license. However, if you are using it in a commercial project and want to help me keep up with maintenance, please consider making a donation of your choice or purchasing your license(s) through my affiliate link.
- 1. Installation
- 2. Setup
- 3. Global options
- 4. Column options
- 5. Complete example
- 6. License
- 7. Credits
If you are looking for a Kirby 2 version of this field, please check out the index field.
Download and copy this repository to /site/plugins/pagetable
Alternatively, you can install it with composer: composer require sylvainjule/pagetable
The pagetable section can replace any pages section you have already set:
sections:
  mypagetable:
    headline: My PageTable
type: pagetableThese options work exactly the same way they do for the pages section, please refer to its documentation:
- create
- headline
- image
- max
- min
- parent
- sortBy
- statusYou can limit the initial number of displayed pages the same way you could with the usal pages section, only pagination will happen on the front-end.
Default is 25.
sections:
  mypagetable:
    type: pagetable
    limit: 25
You can also set the limit options displayed in the select input at the bottom of the section. Default is [10, 25, 50].
sections:
  mypagetable:
    type: pagetable
    limitOptions:
      - 10
      - 25
- 50Pagetable ships with translated strings for its placeholders / buttons / etc. You can change any of them to whatever you'd like in your blueprint:
sections:
  mypagetable:
    type: pagetable
    translations:
      # single language
      empty: You have not added any products yet
      # or translated
      empty:
        en: You have not added any projects yet
        fr: Vous n'avez actuellement aucun projet à afficher
      # All available keys and their default english strings
      empty: No pages yet
      rowsPerPage: Pages displayed
      all: All
      filterPages: Filter pages…
reset: ResetThe plugin allows you to choose the columns you want to display, and fine-tune their behaviour. A column with all options explicitely set will look like:
columns:
  title:
    label: Page title
    text: '{{ page.title }}'
    type: text
    width: 1/2
    class: my-title-class
    sortable: true
    searchable: true
  modified:
...type:
string, default: the option's key
The column's title, displayed in the head / first row of the table.
# Single-language
columns:
  title:
    label: Page title

# Multi-language
columns:
  title:
    label:
      en: Page title
fr: Titre de la pagetype:
string
Defines the information displayed in each row of the column. You will need to inject information from the current page there, with the help of template placeholders:
columns:
  title:
    text: '{{ page.title }}'
Note that the only limitation here is to always return a string. This string can either contain plain text or html markup, it will be rendered accordingly. Which means, for example, that your can format the returned string with a field method:
// site/plugins/my-methods/index.php
Kirby::plugin('your/plugin', [
    'fieldMethods' => [
        'toBlue' => function($field) {
            return '<span style="color: #384d9d">' . $field->value . '</span>';
        }
    ]
]);
In your blueprint:
columns:
  title:
    text: '{{ page.title.toBlue }}'
Will display blue titles in the table:

type:
string, default:text
The content type of the column. Most of the time you will want to keep the default type, but in a few cases is crucial to set it explicitely in order to get the sorting and alignement right. Options are:
text: default, left alignednumber: right aligneddecimal: right aligned, 2 decimal placespercentage: right aligned, expects a decimal between 0 and 1 (like 0.03) and formats it as 3.00%boolean: right aligneddate: right aligned, expects a string representation of date, as well as a two other required options.
The table needs to know the format in which your are passing the date (dateInputFormat) and how you want it to display them (dateOutputFormat). There is a little subtlety here, because syntax differs between php dates and the JS dates library, date-fns. For example :
columns:
  title:
    type: date
    # return the date as 2018-12-24
    text: '{{ page.modified("Y-m-d") }}'
    # tell the table to expect a date formated as 2018-12-24
    dateInputFormat: 'YYYY-MM-DD'
    # output it as Dec 24th 2018
dateOutputFormat: 'MMM Do YYYY'type:
string, default:auto
The width of the column in the table. Available widths: 1/6, 1/4, 1/3, 1/2, 2/3, 3/4
columns:
  title:
width: 3/4type:
string, default:null
Allows you to add a custom class to the column.
A class myClass will be added as .head-myClass to its th, and .row-myClass to its td.
columns:
  title:
class: myClasstype:
Boolean, default:true
Enable / disable sorting of the column.
columns:
  title:
sortable: truetype:
Boolean, default:true
If false, this column will be ignored by the global search.
columns:
  title: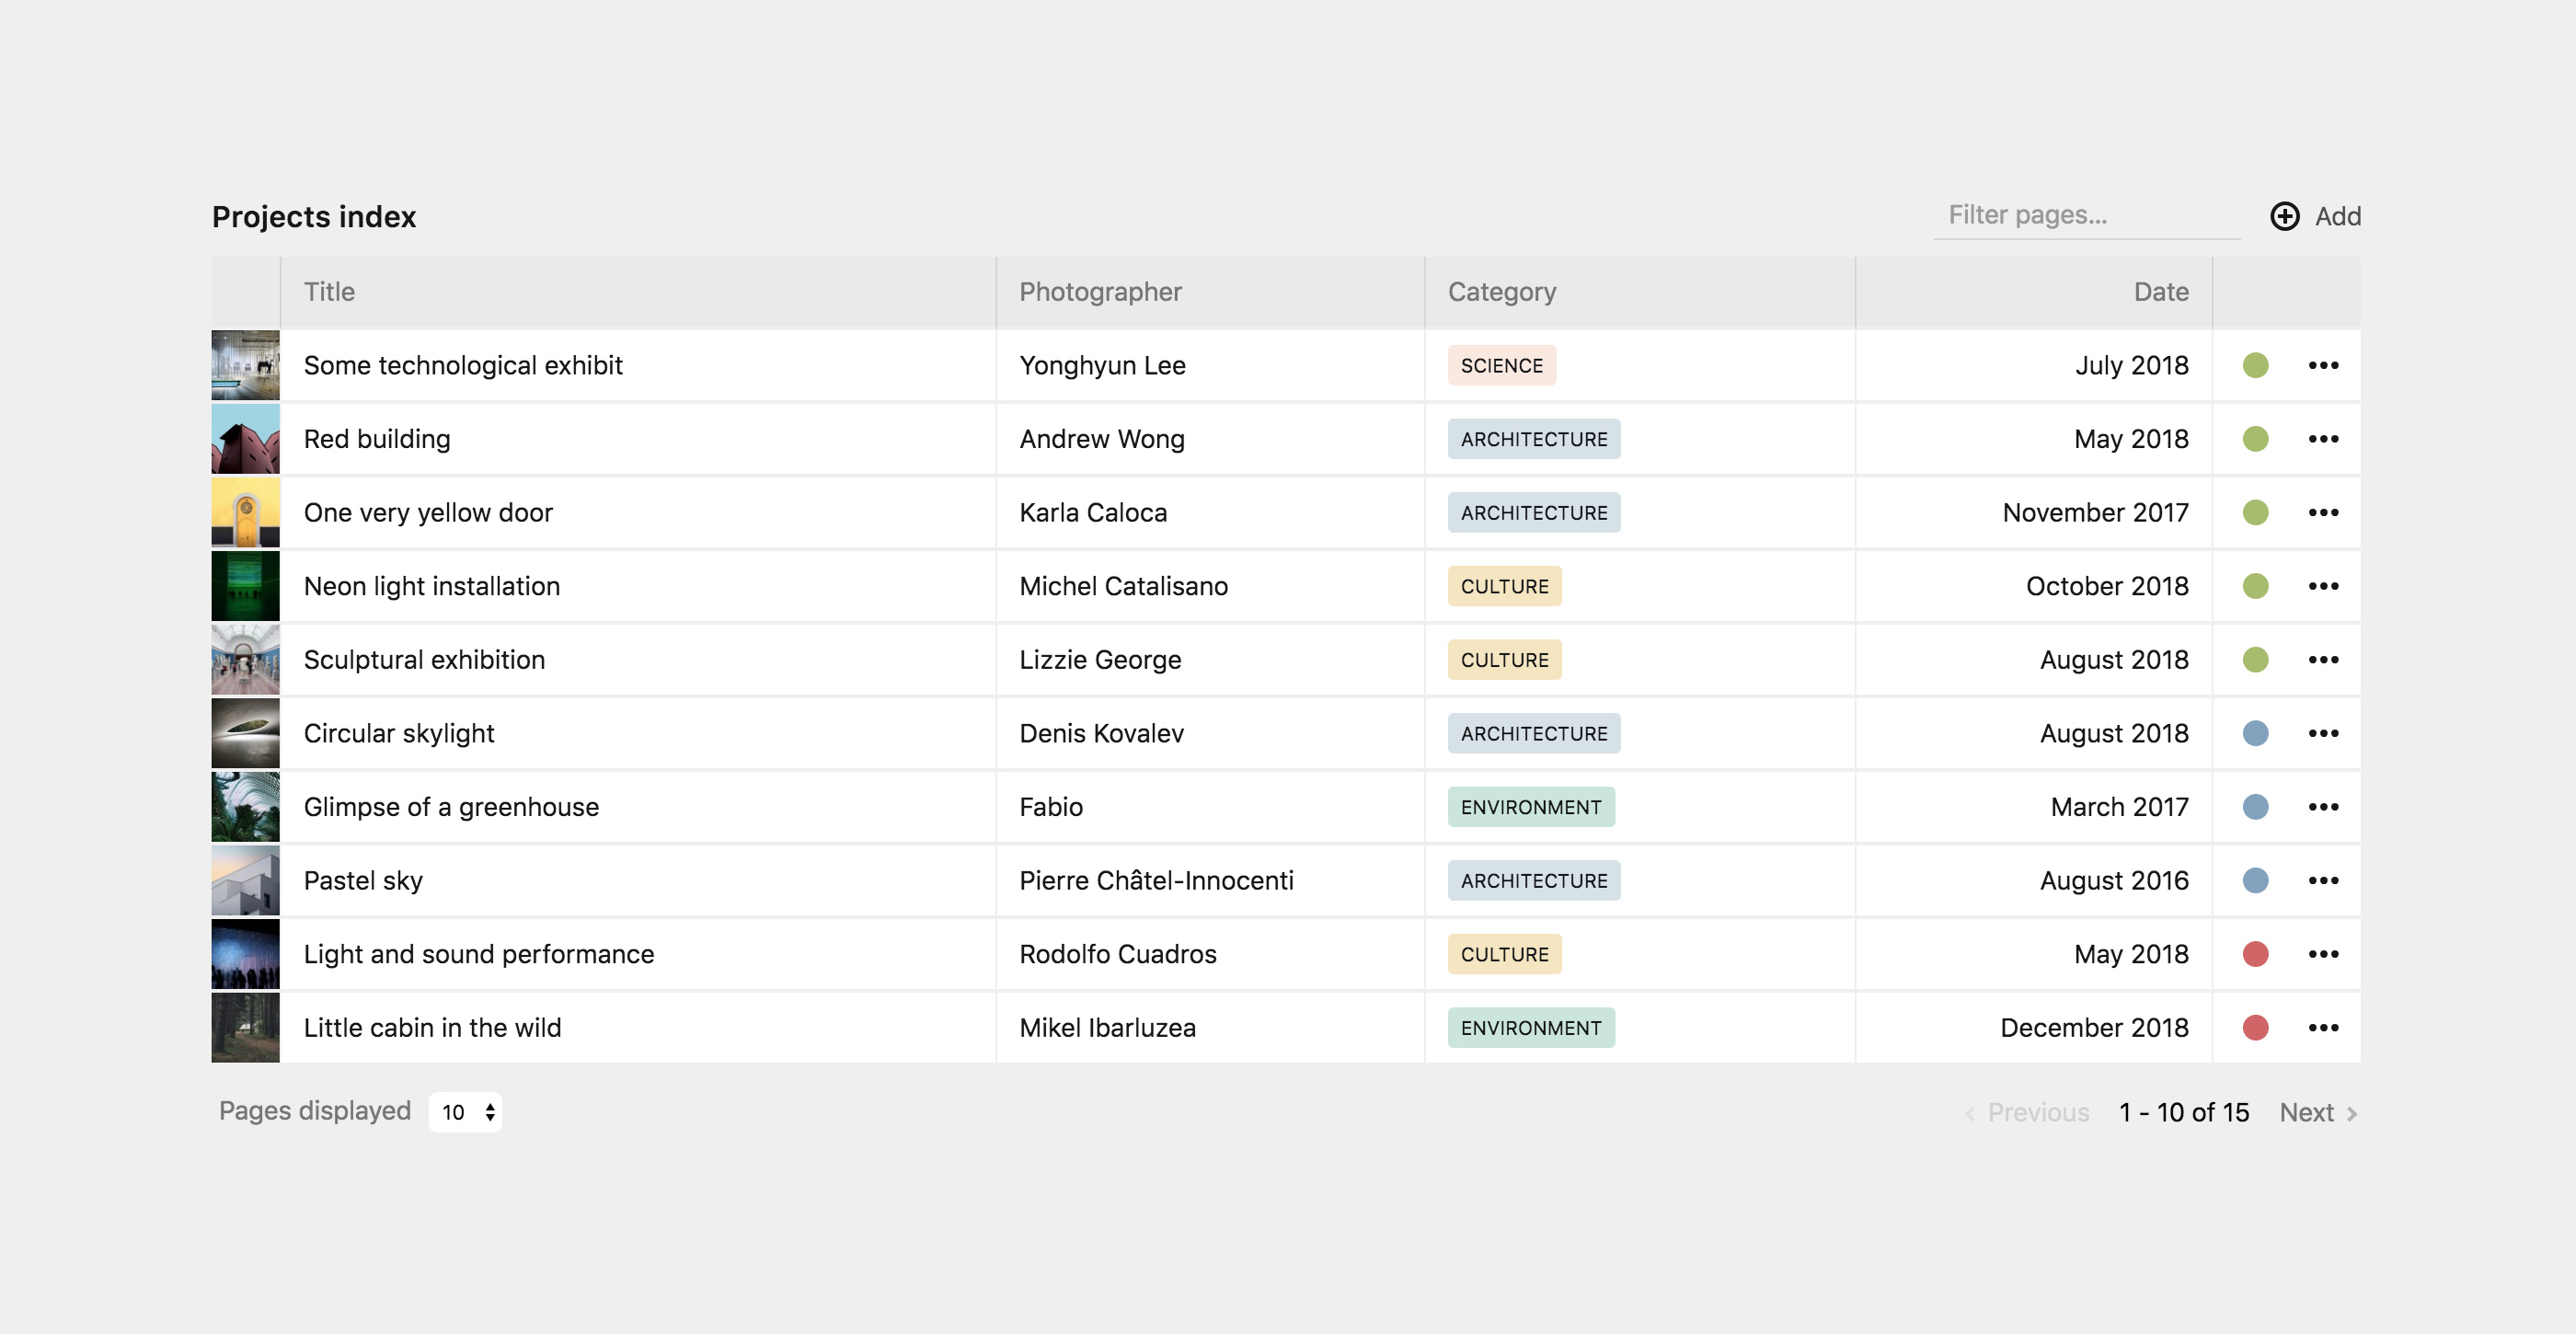
searchable: trueHere's how to reproduce the screenshot on top of this README:
First, we need to have a few fields available in our children's blueprint (photographer's name, category, project's date):
...
fields:
  photographer:
    type: text
  category:
    type: select
    options:
      architecture: Architecture
      culture: Culture
      environment: Environment
      gastronomy: Gastronomy
      science: Science
  date:
    type: date
We then create our pagetable section, and set the associated columns:
sections:
  mypagetable:
    headline: Projects index
    type: pagetable
    status: all
    image:
      cover: true
    columns:
      title:
        label: Title
        text: '{{ page.title }}'
        width: 1/3
      photographer:
        label: Photographer
        text: '{{ page.photographer }}'
      category:
        label: Category
        text: '{{ page.category }}'
      date:
        label: Date
        type: date
        text: '{{ page.date.toDate("Y-m-d") }}'
        dateInputFormat: 'YYYY-MM-DD'
        dateOutputFormat: 'MMMM YYYY'
        width: 1/6
At this point, every information should be displayed but categories still lack any kind of styling. We need to call a field method here, that we need to register in a custom plugin. We'll create a site/plugins/my-methods/index.php and write:
Kirby::plugin('your/plugin', [
    'fieldMethods' => [
        'toLabel' => function($field) {
          $value = $field->value;
          return '<span class="category-label" data-category="'. $value .'">' . $value . '</span>';
        },
    ]
]);
Now every label will be rendered as:
<span class="category-label" data-category="architecture">architecture</span>We're on our way but there is still no styling. Let's create an assets/css/panel.css stylesheet (if you have none yet), and add some rules there:
.k-section[type="pagetable"] .category-label {
  font-size: 0.65rem;
  text-transform: uppercase;
  padding: 5px 7px;
  border-radius: 3px;
}
.k-section[type="pagetable"] .category-label[data-category="architecture"] {
  background: #d7e1e9;
}
.k-section[type="pagetable"] .category-label[data-category="culture"] {
  background: #f5e6bf;
}
.k-section[type="pagetable"] .category-label[data-category="environment"] {
  background: #cae5dd;
}
.k-section[type="pagetable"] .category-label[data-category="gastronomy"] {
  background: #e0d7dd;
}
.k-section[type="pagetable"] .category-label[data-category="science"] {
  background: #f9e9e0;
}
Don't forget to tell the panel that you want to load the stylesheet by adding it in your site/config/config.php:
<?php

return array(
  'panel' => array('css' => 'assets/css/panel.css'),
);
Last step is changing the column's text in our blueprint, and append our new toLabel method:
category:
  label: Category
  text: '{{ page.category.toLabel }}'
You should now end up with the exact same setup than illustrated in the above screenshot.
MIT
- This section is built on top of vue-good-table.
- Please have a look at https://github.com/jongacnik/kirby-index-field for a K2 version.