HowTo_OperateLowCostOutlets
There are generally five common kinds of outlet switches and two type of light controls
- "Type A" is configured with a 10 pole DIP switch.
- "Type B" is configured with two rotary (or sliding) switches with four setting possibilities each.
- "Type C" is made by Intertechno
- "Type D" like Status brand learn their RF codes each time they are powered on.
- "Type E" like ProElec (sold bt RS in the UK) are factory set with codes but can learn new codes
- "Slampher" these in light sockets made by Sonoff can be controlled via 433mHz they can be programmed to re
- "Funry" these light switches can be controlled via 433mHz
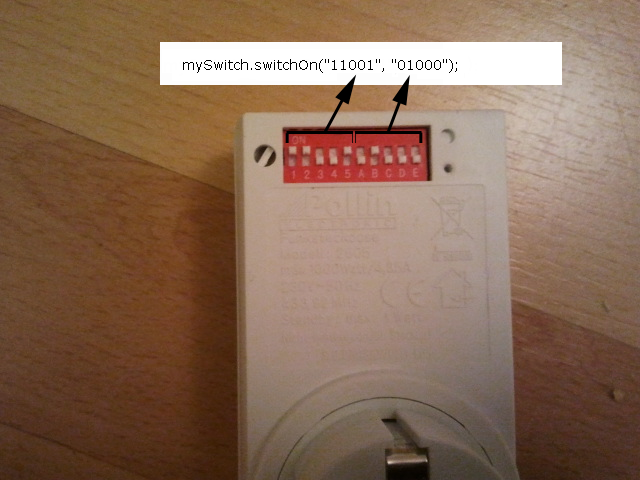
RCSwitch::switchOn("11001", "01000");
The first parameter represents the setting of the first 5 DIP switches. In this example it's ON-ON-OFF-OFF-ON.
The second parameter represents the setting of the last 5 DIP switches. In this example the last 5 DIP switches are OFF-ON-OFF-OFF-OFF.
#include <RCSwitch.h>

RCSwitch mySwitch = RCSwitch();

void setup() {

  // Transmitter is connected to Arduino Pin #10
  mySwitch.enableTransmit(10);

}

void loop() {

  mySwitch.switchOn("11001", "01000");

  // Wait a second
  delay(1000);

  // Switch off
  mySwitch.switchOff("11001", "01000");

  // Wait another second
  delay(1000);

}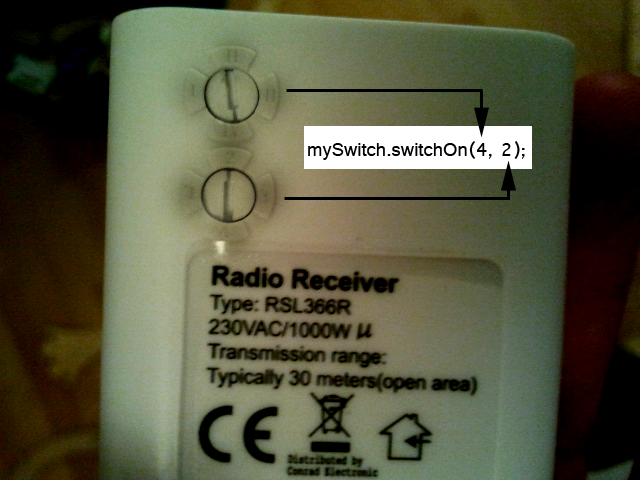
RCSwitch::switchOn(4, 2);
The first parameter represents the setting of the first rotary switch. In this example it's switched to "4" or "D" or "IV".
The second parameter represents the setting of the second rotary switch. In this example it's switched to "2" or "B" or "II".
#include <RCSwitch.h>

RCSwitch mySwitch = RCSwitch();

void setup() {

  // Transmitter is connected to Arduino Pin #10
  mySwitch.enableTransmit(10);

}

void loop() {

  mySwitch.switchOn(4, 2);

  // Wait a second
  delay(1000);

  // Switch off
  mySwitch.switchOff(4, 2);

  // Wait another second
  delay(1000);

}RCSwitch::switchOn('a', 1, 2);
Status brand units learn their RF codes each time they are powered on. When power is applied to these units the first time, they boot into a programming mode and wait for a 433mHz signal. When received they unit can be controlled with the codes programmed. There is no need to program the off code the unit will derive the off code from the on code.
   mySwitch.setProtocol(1);
   mySwitch.setPulseLength(306);
   mySwitch.setRepeatTransmit(7);
mySwitch.send("001010011001111101011011");This brand is sold by RS compoents in the UK are factory set with codes but can learn new codes if you transmit the new code when power is first applied. You will notice the LED flashes for the first 3-5 seconds that power is applied. During this time send a 433mHz signal and the unit will learn the code. The 433mHz signal must be from a ProElect remote once programmed the unit will power on and off via the code used to program the unit at power on time. There is no need to program the off code the unit will derive the off code from the on code.
    mySwitch.setProtocol(1);
    mySwitch.setPulseLength(175);
    mySwitch.setRepeatTransmit(7);
mySwitch.send("010101010001010100110011");Made my Sonoff. These units can be linked via wifi to a Sonoff Phone app, which supports Alexa and Google home. The units also support 433mHz control. The unit is an E27 male to female light socket. Shipped with no 433mHz codes they can be programmed to respond to 433mHz control units. I could not get the remote that came with my Slampher to work reliably, however, the Funry codes (see below) worked fine. The firmware on these devices uses a proprietary protocol for the Wifi control but there is a range of open source firmware e.g. with MQTT support and support for device polling - you can ask the switch if its on or off! Excellent. Alas the 433mHz support is very basic a SINGLE code for toggling ON and OFF. I used a repeating transmit code to ensure my command gets through for my application which is a simple dawn/dusk use case
A nice range of low cost, high spec light switches. Make sure you purchase the model for your region. E.g. in the UK we do not have LIVE / NEUTRAL in light switches only a switches live. Amazingly Funry support this as well as the traditional EU and US wiring/voltage schemes. Better still these light switches can be controlled via 433mHz with separate codes for ON and OFF - Ideal where you have a mix of automation and human operation of the same switch. The user guide is not great for these switches, you have to hold down the switch to program when the light is off:
- beep On code
- beeps Off code
- beeps Clear codes
Its a bit confusing as the units can learn >1 code for each function e.g. you can have 3 different remotes all capable of powering on the switch! Useful perhaps, confusing definitely ;)
    mySwitch.setProtocol(1);
    mySwitch.setPulseLength(250);
    mySwitch.setRepeatTransmit(7);
mySwitch.send(8989656, 24);There are 3 important factors for the range of any 433mHz transmitter/receiver pair
-
Transmitter antenna, the small 433mHz transmitter with onboard antennas have a range of around 10m. This can be increased with an air core antenna. Basically a length of single strand solid copper wire with around 17 turns and a few cms each side. I had issued with range on some old Status units and adding this simple wire antenna to my set up allowed be to cover 2 floors of the house, the stock antenna had trouble covering one large room! More Info here http://forum.elektor.com/download/file.php?id=2428034&sid=e5435be69d352a5ba6e669d3b676cd25
-
Receiver antenna. These are normally sealed in the powered units that control appliance. It's not recommended to open these units, let alone change the circuitry due to the risk that you might short out the main voltages inside the unit.
-
Transmit code. Use the sample receiver demo for RCSwitch to grab a FEW SAMPLES of the code you want to replicate. Then set the pulse length to match what you see. e.g mySwitch.setPulseLength(306); also try setting the Repeat count e.g. mySwitch.setRepeatTransmit(7); It's with adding a delay of at least 2 seconds AFTER each transmit command when testing. For batch commands, you can then reduce this to a lower value. Remember if you are powering devices on and off make sure you don't do this too frequently as the power spikes can damage equipment and wear out relays. It's also worth checking the rating on units BEFORE you use them!