feat: KServe Inference #21
Comments
Run your first InferenceServiceKFServing InferenceService 배포와 예측KFServing - Deep dive서버리스란?서버리스(serverless)란 개발자가 서버를 관리할 필요 없이 애플리케이션을 빌드하고 실행할 수 있도록 하는 클라우드 네이티브 개발 모델입니다. Python SDK for building, training, and deploying ML modelsOverview of Kubeflow FairingKubeflow Fairing is a Python package that streamlines the process of building, training, and deploying machine learning (ML) models in a hybrid cloud environment. By using Kubeflow Fairing and adding a few lines of code, you can run your ML training job locally or in the cloud, directly from Python code or a Jupyter notebook. After your training job is complete, you can use Kubeflow Fairing to deploy your trained model as a prediction endpoint. Use Kubeflow Fairing SDKTo install the SDK: pip install kubeflow-fairingTo quick start, you can run the E2E MNIST sample. DocumentationTo learn how Kubeflow Fairing streamlines the process of training and deploying ML models in the cloud, read the Kubeflow Fairing documentation. To learn the Kubeflow Fairing SDK API, read the HTML documentation. |
Getting Started with KServeInstall the KServe "Quickstart" environment You can get started with a local deployment of KServe by using KServe Quick installation script on Kind: First, download quick_install.sh file. wget https://raw.githubusercontent.com/kserve/kserve/release-0.8/hack/quick_install.shInsert the following relevant shell at the first line in quick_install.sh file. #!/usr/bin/zsh
...
set -e
############################################################
# Help #
############################################################
Help()
...Then, execute the shell file (base) ╭─sungsoo@sungsoo-HP-Z840 ~/kubeflow
╰─$ quick_install.shYou can see the following console outputs. |
주요 오류microk8s 재설치 경고 메세지파드 시큐리티 폴리시파드시큐리티폴리시(PodSecurityPolicy)는 쿠버네티스 v1.21부터 더 이상 사용되지 않으며, v1.25에서 제거될 예정이다. Juju 삭제 관련Removal termsThere is a distinction between the similar sounding commands
These command terms/prefixes do not apply to all commands in a generic way. The explanations above are merely intended to convey how a command generally operates and what its severity level is. Forcing removalsJuju object removal commands do not succeed when there are errors in the multiple steps that are required to remove the underlying object. For instance, a unit will not remove properly if it has a hook error, or a model cannot be removed if application units are in an error state. This is an intentionally conservative approach to the deletion of things. However, this policy can also be a source of frustration for users in
certain situations (i.e. “I don’t care, I just want my model gone!”).
Because of this, several commands have a Furthermore, even when utilising the
Caution:
The As of
When a command has There is a distinction between the similar sounding commands unregister, detach, remove, destroy, and kill. These commands are ordered such that their effect increases in severity: These command terms/prefixes do not apply to all commands in a generic way. The explanations above are merely intended to convey how a command generally operates and what its severity level is. Juju object removal commands do not succeed when there are errors in the multiple steps that are required to remove the underlying object. For instance, a unit will not remove properly if it has a hook error, or a model cannot be removed if application units are in an error state. This is an intentionally conservative approach to the deletion of things. However, this policy can also be a source of frustration for users in certain situations (i.e. “I don’t care, I just want my model gone!”). Because of this, several commands have a --force option. Furthermore, even when utilising the --force option, the process may take more time than an administrator is willing to accept (i.e. “Just go away as quickly as possible!”). Because of this, several commands that support the --force option have, in addition, support for a --no-wait option. Caution: The --force and --no-wait options should be regarded as tools to wield as a last resort. Using them introduces a chance of associated parts (e.g., relations) not being cleaned up, which can lead to future problems. As of v.2.6.1, this is the state of affairs for those commands that support at least the --force option: When a command has --force but not --no-wait, this means that the combination of those options simply does not apply. |
Juju deploy 시 오류Juju deploy 명령 실행 후, 아래와 같은 오류가 생길 때, (base) ╭─sungsoo@sungsoo-HP-Z840 ~
╰─$ juju deploy kubeflow --trust 1 ↵
ERROR The charm or bundle "kubeflow" is ambiguous.다음과 같이 해당 소스에 대한 네임스페이스를 넣어서 실행하자. (base) ╭─sungsoo@sungsoo-HP-Z840 ~
╰─$ juju deploy cs:kubeflow --trustJuju uninstallation# Hard reinstall of clients
snap remove --purge juju
rm -rf ~/.local/share/juju
snap install juju --classic
# Hard re-install of controllers or machines needs a bit more
# Gladly juju leaves a helper to do so
$ sudo /usr/sbin/remove-juju-services |
KServe: 견고하고 확장 가능한 클라우드 네이티브 모델 서버
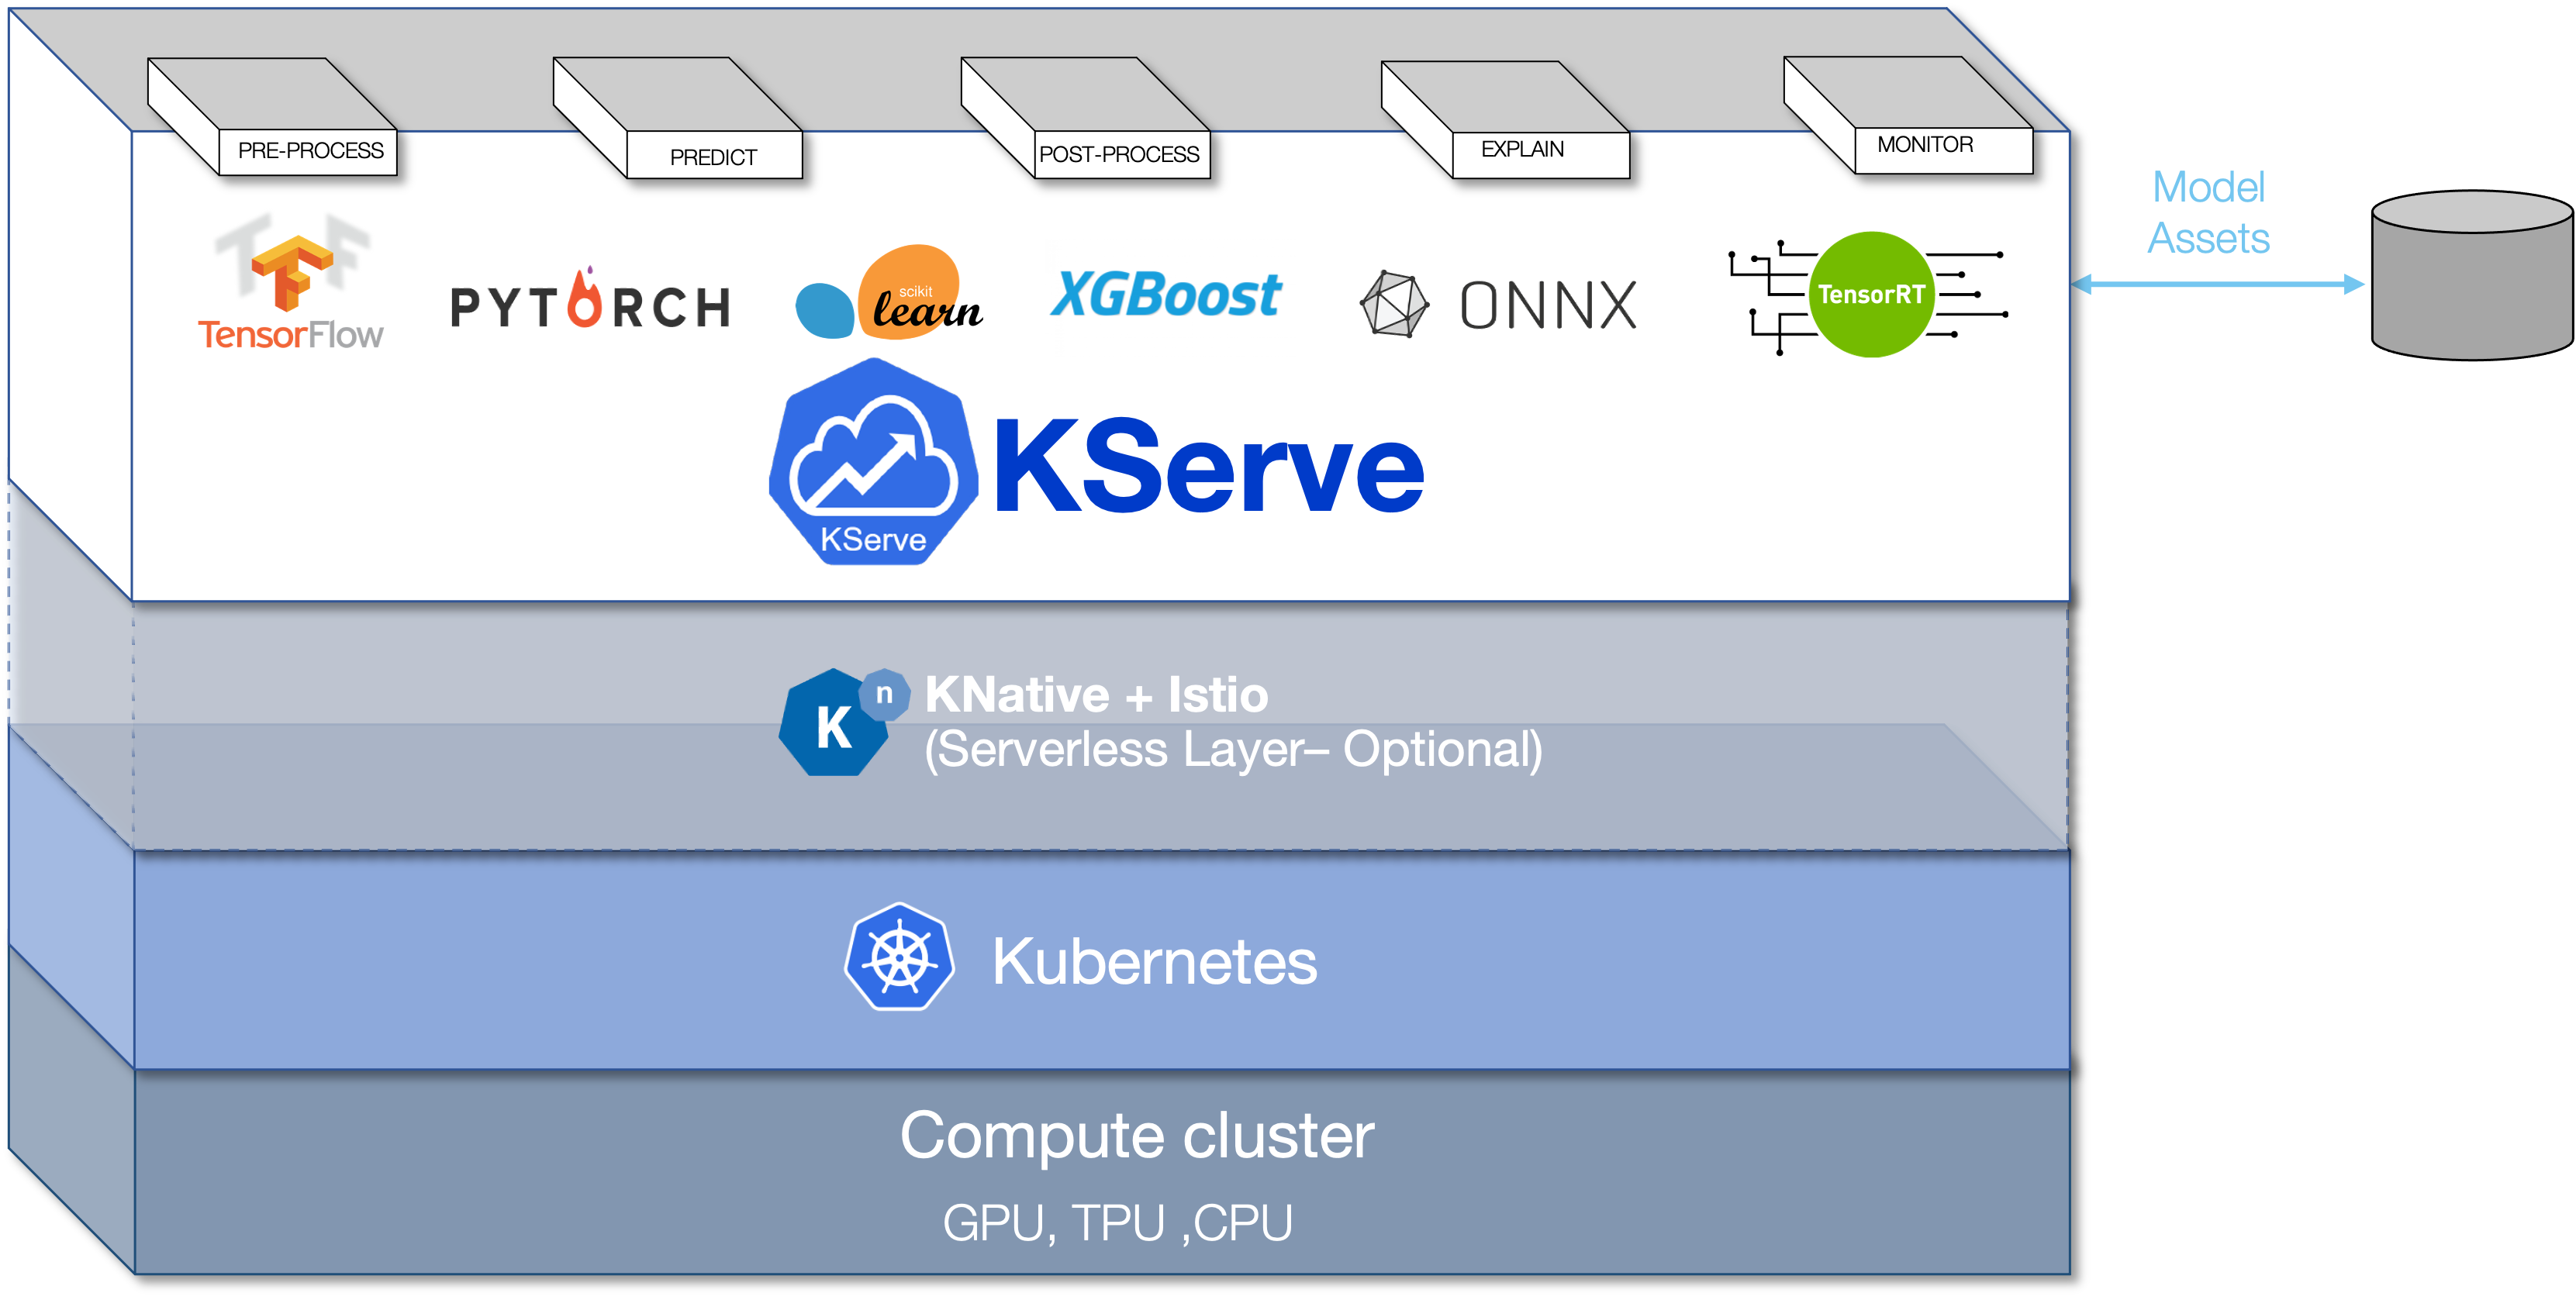
Kubeflow에 익숙하다면 KFServing을 플랫폼의 모델 서버 및 추론 엔진으로 알고 있을 것이다. 2021년 9월 KFServing 프로젝트는 KServe로 변모했다. KServe는 현재 Kubeflow 프로젝트를 졸업한 독립 컴포넌트이며 명칭 변경은 별개이다. 이러한 분리를 통해 KServe는 독립형 모델 서버로 구축된 별도의 클라우드 네이티브 추론 엔진으로 발전할 수 있다. 물론 Kubeflow와의 긴밀한 통합은 계속되겠지만, 독립적인 오픈 소스 프로젝트로 취급되고 유지된다. KServe는 Google, IBM, Bloomberg, Nvidia 및 Seldon이 Kubernetes의 오픈 소스 클라우드 네이티브 모델 서버로 공동으로 개발했다. 최신 버전인 0.8에서는 분류법 및 명명법이 변경되어 모델 서버를 독립형 컴포넌트로 전환하는 데 초점을 맞췄다. KServe의 핵심 기능에 대해 알아보겠다. 모델 서버는 머신러닝 모델에게 어플리케이션이 바이너리를 코드화하는 것과 같은 역할을 한다. 둘 다 배포에 런타임 및 실행 컨텍스트를 제공한다. KServe는 모델 서버로서 머신러닝 및 딥러닝 모델을 규모에 맞게 제공할 수 있는 기반을 제공한다. KServe는 기존 Kubernetes 배포 또는 scale-to-zero를 지원하는 서버리스로 배포할 수 있다. 서버리스에서는 자동 스케일업 및 스케일다운 기능을 갖춘 서버리스용 Knative Serving를 활용한다. Istio는 서비스 엔드포인트를 API 소비자에게 공개하기 위한 인그레스로 사용된다. Istio와 Knative Serving의 조합으로 모델의 블루/그린 및 카나리 배포와 같은 흥미로운 시나리오가 가능하다.
KServe를 Knative Serving 없이 사용할 수 있는 RawDeployment Mode는 HPA(수평 포드 자동스케일러)와 같은 기존 스케일링 기술을 지원하지만 scale-to-zero는 지원하지 않는다. KServe 아키텍처KServe 모델 서버에는 컨트롤 플레인과 데이터 플레인이 있다. 컨트롤 플레인은 추론을 담당하는 커스텀리소스를 관리하고 조정한다. 서버리스 모드에서는 Knative 리소스와 연계하여 자동 스케일을 관리한다.
KServe 컨트롤 플레인의 중심에는 추론 서비스의 라이프 사이클을 관리하는 KServe 컨트롤러가 있다. 서비스, 인그레스 리소스, 모델 서버 컨테이너, 요청/응답 로깅을 위한 모델 에이전트 컨테이너, 배치 및 모델 저장소에서 모델을 풀림 업무를 담당한다. 모델 저장소는 모델 서버에 등록된 모델의 저장소이다. 일반적으로 Amazon S3, Google Cloud Storage, Azure Storage 또는 MinIO와 같은 오브젝트 스토리지 서비스이다. 데이터 플레인은 특정 모델을 대상으로 하는 요청/응답 주기를 관리한다. 여기에는 predictor, transformer, explainer이 있다. AI 애플리케이션은 REST 또는 gRPC 요청를 predictor 엔드포인트로 전송한다. predictor는 transformer 컴포넌트를 호출하는 추론 파이프라인으로서 작동한다. transformer 컴포넌트는 inbound 데이터의 전처리(요청)와 outbound 데이터의 후처리(응답)를 실행할 수 있다. 옵션으로 호스트된 모델에 AI 설명 가능성을 제공하는 explainer 컴포넌트가 있을 수 있다. KServe는 상호 운용성과 확장이 가능한 V2 프로토콜의 사용을 권장한다. 데이터 플레인에는 모델의 준비 상태와 아상 존재 여부 상태를 확인할 수 있는 엔드포인트도 있다. 또한 모델 메타데이터를 검색하기 위한 API도 제공한다. 지원되는 프레임워크 및 런타임KServe는 광범위한 머신러닝 및 딥러닝 프레임워크를 지원한다. 딥러닝 프레임웍과 런타임은 TensorFlow Serving, TorchServe, Triton Inference Server와 같은 기존의 서빙 인프라와 함께 작동한다. KServe는 Triton을 통해 TensorFlow, ONNX, PyTorch, TensorRT를 호스트할 수 있다. SKLearn, XGBoost, Spark MLLib 및 LightGBM KServe를 기반으로 하는 기존 머신러닝 모델의 경우 Seldon의 MLServer를 사용한다. KServe의 확장 가능한 프레임워크는 V2 추론 프로토콜을 준수하는 모든 런타임에 플러그인할 수 있도록 한다. ModelMesh와 함께 제공되는 멀티모델 서빙KServe는 추론당 1개의 모델을 도입하여 플랫폼의 확장성을 사용 가능한 CPU 및 GPU로 제한한다. 이 제한은 비용이 많이 들고 컴퓨팅 리소스가 부족한 GPU에서 추론을 실행할 때 명백해진다. 멀티모델 서비스를 이용하면 컴퓨팅 리소스, 최대 파드, 최대 IP 주소 등 인프라의 제약을 극복할 수 있다. IBM이 개발한 ModelMesh Serving은 ML/DL 모델을 실시간으로 제공하기 위한 Kubernetes 기반 플랫폼으로, 높은 volume/density 사용 사례에 최적화되어 있다. 사용 가능한 리소스를 최적으로 활용하기 위해 프로세스를 관리하는 운영 체제와 마찬가지로 ModelMesh는 클러스터 내에서 효율적으로 실행되도록 배포된 모델을 최적화한다.
배포된 파드의 클러스터 전체에서 인메모리 모델 데이터를 인텔리전트하게 관리하고, 이러한 모델을 장기간에 걸쳐 사용함으로써 시스템은 사용 가능한 클러스터 리소스를 최대한 활용할 수 있다. ModelMesh Serving은 KServe v2 데이터 플레인 API에 기반하여 NVIDIA Triton Inference Server와 유사한 런타임으로 배포할 수 있다. 요청이 KServe 데이터 플레인에 도달하면, ModelMesh Serving에 위임된다. ModelMesh Serving과 KServe의 통합은 현재 Alpha 테스트 단계에 있다. 두 프로젝트가 성숙함에 따라 통합이 강화되어 두 플랫폼의 특징과 기능을 혼재시킬 수 있게 된다. 모델 서빙이 MLOps의 핵심 빌딩 블록이 되면서 KServe와 같은 오픈 소스 프로젝트가 중요해졌다. KServe는 기존 런타임과 향후 런타임에 사용할 수 있는 확장성이 가능한 고유한 모델 서빙 플랫폼이다. https://github.com/kserve/kserve |


Kserve Istio dex 우회하기Article Source요즈음 kubeflow 등 MLOps적인 부분들을 회사에서 작업하고 있다. 원래는 모델 배포 쪽은 기존 방식대로 진행하려 했지만 데이터 분석팀에서 모델 배포 과정을 빠르게 진행하고 싶어 해 kserve도 함께 사용하기로 했다. 온프레미스 환경에서 관련한 테스트를 진행하다 dex 인증 관련 문제를 만나 이를 해결하는 방법에 대해 간단하게 정리한다. kubeflow와 istio 구성, 공식문서 Kubeflow를 배포하면서 istio와 dex를 함께 배포했다. istio는 서비스 간의 연결을 위해서 사용하고, dex는 인증을 위해서 사용한다. istio를 port forward해서 kubeflow dashboard에 접속해보면 가장 먼저 dex login 창이 연결된다. 그러니까 istio 게이트웨이에 연결하기 위해서는 이 인증 정보가 필요한 것이다. kserve를 serveless한 구성으로 배포하기 위해서는 knative를 함께 배포해야 한다. 이 knative는 다시 istio를 이용해 서로를 연결한다. 문제는 여기서 발생하는데 api 요청이 istio 게이트웨이를 거치면서 인증 정보가 필요한 것이다. 클러스터 바깥에서 연결하는 경우에만 인증을 요구하면 괜찮은데, 클러스터 내에서 서비스를 통해 연결해도 이러한 인증을 요구한다. 설치kubeflow 배포는 모두의 MLOps를 참조했다. kserve 설치의 경우에는 공식 문서를 참조해 진행했다. 이때 kubeflow 배포 과정에서 이미 istio가 배포되어 있으므로 istio 배포는 제외하고 진행했다. 문제우선 클러스터 내에 아무 동작도 하지 않는 단순한 파드를 하나 생성해보자. 이 파드에 연결해 내부 서비스로 curl을 보낼 것이므로 curl이 설치되어 있는 이미지를 파드로 배포한다. apiVersion: v1
kind: Pod
metadata:
name: myapp-pod
labels:
app: myapp
spec:
containers:
- name: myapp-container
image: curlimages/curl:7.82.0
command: ['sh', '-c', 'echo Hello k8s! && sleep 3600']kserve의 경우에는 공식 홈페이지에 있는 예제대로 간단한 iris 예측 모델을 배포한다. apiVersion: "[serving.kserve.io/v1beta1](http://serving.kserve.io/v1beta1)"
kind: "InferenceService"
metadata:
name: "sklearn-iris"
spec:
predictor:
sklearn:
storageUri: "gs://kfserving-examples/models/sklearn/1.0/model"서비스를 확인해보면 이 모델에 대한 서비스가 존재하는 걸 확인할 수 있다. kubectl get svc -n kserve-test
NAME TYPE CLUSTER-IP EXTERNAL-IP PORT(S) AGE
sklearn-iris ExternalName <none> knative-local-gateway.istio-system.svc.cluster.local <none> 133m이제 이 서비스의 이름으로 요청을 보내보자. 우선 위에서 생성한 파드에 연결해야한다. kubectl exec --stdin --tty myapp-pod -- /bin/sh그 다음에 예제에 나와 있는 json파일을 생성하고 서비스로 요청을 전송해보자. cat <<EOF > "./iris-input.json"
{
"instances": [
[6.8, 2.8, 4.8, 1.4],
[6.0, 3.4, 4.5, 1.6]
]
}
EOF
curl -v http://sklearn-iris.kserve-test.svc.cluster.local/v1/models/sklearn-iris:predict -d @./iris-input.json그러면 아마 응답 코드로 302번과 함께 dex 인증 관련한 정보가 나올 것이다. 사실 이 문제를 해결하려면 요구하는 대로 dex 인증에 관련한 정보를 함께 담아 요청을 보내면 된다. 공식 레포에 친절한 예시도 있다. 나와있는 대로 CLI에서 지지고 볶을 수도 있고, 심지어는 kubeflow 대시보드에 로그인하고 거기서 사용하는 정보를 가져와 헤더에 담아 요청을 보낼 수도 있다. 하지만 이것만으로 충분할까? 여기서 문제는 istio를 사용하는 모든 어플리케이션이 이 dex 정보를 요구한다는 데 있다. 만약 백엔드 팀에서 istio를 사용한다면 머신러닝 팀에서 사용하는 dex를 위해 그때마다 키를 생성해야만 할까? 비슷한 문제를 겪는 사람들의 이슈도 종종 있는 것 같다(#1 #2, 첫번째는 2019년에 올라온 이슈지만 두번째는 당장 며칠 전에 올라온 이슈다) 원인왜 이런 문제가 발생할까? 우선 istio virtual service 정보를 확인해보자. kubectl get virtualservices.networking.istio.io --all-namespaces그러면 dex에 관한 버추얼 서비스와 이 서비스가 사용하는 게이트웨이를 확인할 수 있다. dex는 kubeflow에서 인증을 위해 사용하니 kubeflow-gateway에 연결된 것을 확인할 수 있다. 이번엔 이 게이트웨이의 정보를 확인해보자. kubectl get gateways.networking.io -n kubeflow kubeflow-gateway -o yaml
spec:
selector:
istio: ingressgateway
servers:
- hosts:
- '*'
port:
name: http
number: 80
protocol: HTTP그러면 셀렉터로 기본 컨트롤러를 사용하고 있는 것을 볼 수 있다. 이 기본 컨트롤러를 사용하는 모든 게이트웨이는 dex의 영향을 함께 받게 된다. knative의 게이트웨이 정보도 한 번 확인해보자. kubectl get gateways.networking.istio.io -n knative-serving knative-local-gateway -o yaml
spec:
selector:
istio: ingressgateway마찬가지로 기본 컨트롤러를 사용하고 있는 것을 확인할 수 있다. 해결이 인증을 우회하는 과정이 필요하다. Envoy filter를 사용하는 방법을 찾긴 했는데, 버전이 다른지 잘 안된다. 시도해보고 싶다면 아래 처럼 patch를 수정해야할 수도 있다. patch:
operation: MERGE
value:
name: envoy.ext_authz_disabled
typed_per_filter_config:
envoy.ext_authz:
"@type": [type.googleapis.com/envoy.extensions.filters.http.ext_authz.v3.ExtAuthzPerRoute](http://type.googleapis.com/envoy.extensions.filters.http.ext_authz.v3.ExtAuthzPerRoute)
disabled: true깃헙 이슈에서 찾은 내용으로 시도하니 해결되었다. istio 문서를 보면 External Authorization이라는 내용이 있다. 우리는 이미 dex가 배포되어있으니 authorizer를 추가 배포해줄 필요는 없다. 우선 auth가 필요한 부분을 configmap에 명시해주자. 먼저 configmap을 연다. kubectl edit configmap istio -n istio-system그리고 dex 관련한 정보를 여기에 추가해준다. extensionProviders:
- name: dex-auth-provider
envoyExtAuthzHttp:
service: "authservice.istio-system.svc.cluster.local"
port: "8080"
includeHeadersInCheck: ["authorization", "cookie", "x-auth-token"]
headersToUpstreamOnAllow: ["kubeflow-userid"]깃헙 이슈에서는 kf가 사용하는 호스트만을 딱 명시해주는데, 지금 구성에서는 따로 호스트를 사용하고 있지 않아서 그런가 그대로 사용하면 안된다. 따라서 kserve가 사용하는 경로를 제외해주는 방식으로 접근한다. 아래 정책을 생성한다. apiVersion: [security.istio.io/v1beta1](http://security.istio.io/v1beta1)
kind: AuthorizationPolicy
metadata:
name: dex-auth
namespace: istio-system
spec:
selector:
matchLabels:
istio: ingressgateway
action: CUSTOM
provider:
# The provider name must match the extension provider defined in the mesh config.
name: dex-auth-provider
rules:
# The rules specify when to trigger the external authorizer.
- to:
- operation:
notPaths: ["/v1*"]그리고 나서 원래 존재하던 authn-filter를 삭제하고 istiod를 재시작한다. kubeclt delete -n istio-system envoyfilters.networking.istio.io authn-filter
kubectl rollout restart deployment/istiod -n istio-system이제 아까 연결해둔 파드에서 다시 요청을 보내보면 코드 200과 함께 정상적으로 응답이 나오는 것을 확인할 수 있다. 사실 이 방식은 사용할 경로를 그때마다 추가해주어야 하는 문제가 있다. 다만 아직까지 fancy하게 kubeflow에만 authorization을 요구하는 방법을 찾지 못했다. 추후 더 좋은 방법을 알게 되면 업데이트할 예정이다. |

KServe Python ServerKServe's python server libraries implement a standardized library that is extended by model serving frameworks such as Scikit Learn, XGBoost and PyTorch. It encapsulates data plane API definitions and storage retrieval for models. It provides many functionalities, including among others:
It supports the following storage providers:
|
KServe ClientGetting StartedKServe's python client interacts with KServe control plane APIs for executing operations on a remote KServe cluster, such as creating, patching and deleting of a InferenceService instance. See the Sample for Python SDK Client to get started. Documentation for Client API
KServe's python client interacts with KServe control plane APIs for executing operations on a remote KServe cluster, such as creating, patching and deleting of a InferenceService instance. See the Sample for Python SDK Client to get started. |
KServe Installation and Examplekubectl apply -f https://github.com/kserve/kserve/releases/download/v0.8.0/kserve.yaml관련 설치 실패 사례 |
KServe Installation LogThis document describes the log for KServe installation and testing. Installation(pytorch) ╭─sungsoo@sungsoo-HP-Z840 ~
╰─$ kubectl apply -f https://github.com/cert-manager/cert-manager/releases/download/v1.8.0/cert-manager.yaml
(pytorch) ╭─sungsoo@sungsoo-HP-Z840 ~
╰─$ kubectl apply -f https://github.com/kserve/kserve/releases/download/v0.8.0/kserve.yamlCheck pod status of KServe controller(pytorch) ╭─sungsoo@sungsoo-HP-Z840 ~
╰─$ kubectl get pods -A
NAMESPACE NAME READY STATUS RESTARTS AGE
kube-system coredns-7f9c69c78c-tgwrz 1/1 Running 0 25h
중간 생략
cert-manager cert-manager-b4d6fd99b-m6l64 1/1 Running 0 22m
cert-manager cert-manager-cainjector-74bfccdfdf-wp5t4 1/1 Running 0 22m
cert-manager cert-manager-webhook-65b766b5f8-s7lpj 1/1 Running 0 22m
kserve kserve-controller-manager-0 2/2 Running 4 11m(pytorch) ╭─sungsoo@sungsoo-HP-Z840 ~
╰─$ kubectl get pods -n kserve
NAME READY STATUS RESTARTS AGE
kserve-controller-manager-0 2/2 Running 1 3m46sKServe Inference Service Example1. Create test InferenceServiceThe following YAML file(iris-sklearn.yaml) describes the inference service for sklearn-based iris. apiVersion: "serving.kserve.io/v1beta1"
kind: "InferenceService"
metadata:
name: "sklearn-iris"
spec:
predictor:
sklearn:
storageUri: "gs://kfserving-samples/models/sklearn/iris"(pytorch) ╭─sungsoo@sungsoo-HP-Z840 ~
╰─$ kubectl apply -f iris-sklearn.yaml -n traindb-ml ↵
inferenceservice.serving.kserve.io/sklearn-iris created2. Check InferenceService status.(pytorch) ╭─sungsoo@sungsoo-HP-Z840 ~
╰─$ k get inferenceservices -A
NAMESPACE NAME URL READY PREV LATEST PREVROLLEDOUTREVISION LATESTREADYREVISION AGE
traindb-ml sklearn-iris 108s |
Knative and microk8sArticle SourceInstall multipass Install For qemu install For hyperkit install Using multipass create a new ubuntu VM Create a multipass vm with 3 CPU, 2 GB, and 8GB of disk Set the primary name to Login into the vm Install [microk8s])(https://microk8s.io/docs/getting-started) or from github/ubuntu/microk8s Join the group Logout to refresh groups Login into the vm again Check status Check access Set alias Enable dns Install Knative Serving from knative.dev Check the status of the knative network layer load balancer If the You can use the metalb addon, with a small range of ip addresses, use
Check again Output should look like this Check knative is up Configure Knative DNS Install the Copy the kubeconfig to Create your first knative service Get the url of your new service Curl the url You sould see the nginx output List the pods for your service After a minute your pod should be deleted automatically (ie scale to zero) Access the url again |
Istio Installation시도 1istoctl을 이용해서 간단히 설치를 시도해 봄 Istio 설치시 오류가 발생한다. (base) ╭─sungsoo@sungsoo-HP-Z840 ~
╰─$ istioctl install
This will install the Istio 1.14.1 default profile with ["Istio core" "Istiod" "Ingress gateways"] components into the cluster. Proceed? (y/N) y
✔ Istio core installed
✔ Istiod installed
✘ Ingress gateways encountered an error: failed to wait for resource: resources not ready after 5m0s: timed out waiting for the condition
Deployment/istio-system/istio-ingressgateway (containers with unready status: [istio-proxy])
- Pruning removed resources Error: failed to install manifests: errors occurred during operation시도 2microk8s.disable을 통해 istio 삭제 후, istoctl로 재설치해 봄. (pytorch) ╭─sungsoo@sungsoo-HP-Z840 ~
╰─$ microk8s.disable istio
Disabling Istio
Error from server (NotFound): namespaces "istio-system" not found
(pytorch) ╭─sungsoo@sungsoo-HP-Z840 ~
╰─$ istioctl install
This will install the Istio 1.14.1 default profile with ["Istio core" "Istiod" "Ingress gateways"] components into the cluster. Proceed? (y/N) y
✔ Istio core installed
✔ Istiod installed
✔ Ingress gateways installed
✔ Installation complete Making this installation the default for injection and validation.
Thank you for installing Istio 1.14. Please take a few minutes to tell us about your install/upgrade experience! https://forms.gle/yEtCbt45FZ3VoDT5A시도 3Istio Ingress gateway validation설치 제대로 되었는지 확인해 보자. ‘istio-system’ 네임스페이스로 istio 객체가 제대로 로딩되었는지 확인해 봄 (pytorch) ╭─sungsoo@sungsoo-HP-Z840 ~
╰─$ kubectl get pods -n istio-system
NAME READY STATUS RESTARTS AGE
istiod-6d67d84bc7-dbzbk 1/1 Running 0 5m59s
istio-ingressgateway-778f44479-rq4j4 1/1 Running 0 5m51s
(pytorch) ╭─sungsoo@sungsoo-HP-Z840 ~
╰─$ kubectl get services -n istio-system
NAME TYPE CLUSTER-IP EXTERNAL-IP PORT(S) AGE
istiod ClusterIP 10.152.183.182 <none> 15010/TCP,15012/TCP,443/TCP,15014/TCP 6m18s
istio-ingressgateway LoadBalancer 10.152.183.49 10.64.140.45 15021:31348/TCP,80:31128/TCP,443:32300/TCP 6m10s |
Kubernetes: microk8s with multiple Istio ingress gatewaysArticle Sourcemicrok8s has convenient out-of-the-box support for MetalLB and an NGINX ingress controller. But microk8s is also perfectly capable of handling Istio operators, gateways, and virtual services if you want the advanced policy, security, and observability offered by Istio. In this article, we will install the Istio Operator, and allow it to create the Istio Ingress gateway service. We follow that up by creating an Istio Gateway in the default namespace, then create a Deployment and VirtualService projecting unto the Istio Gateway. To exercise an even more advanced scenario, we will install both a primary and secondary Istio Ingress gateway, each tied to a different MetalLB IP address. This can emulate serving your public customers one set of services, and serving a different set of administrative applications to a private internal network for employees. This article builds off my previous article where we built a microk8s cluster using Ansible. There are many steps required for Istio setup, so I have wrapped this up into Ansible roles. PrerequisitesThis article builds off my previous article where we built a microk8s cluster using Ansible. If you used Terraform as described to create the microk8s-1 host, you already have an additional 2 network interfaces on the master microk8-1 host (ens4=192.168.1.141 and ens5=192.168.1.142). However, a microk8s cluster is not required. You can run the steps in this article on a single microk8s node. But you MUST have an additional two network interfaces and IP addresses on the same network as your host (e.g. 192.168.1.0/24) for the MetalLB endpoints. Istio PlaybookFrom the previous article, your last step was running the playbook that deployed a microk8s cluster, playbook_microk8s.yml. We need to build on top of that and install the Istio Operator, Istio ingress gateway Service, Istio Gateway, and test Virtual Service and Deployment. Run this playbook. ansible-playbook playbook_metallb_primary_secondary_istio.ymlAt the successful completion of this playbook run, you will have Istio installed, two Istio Ingress services, two Istio Gateways, and two independent versions of the sample helloworld deployment served up using different endpoints and certificates. The playbook does TLS validation using curl as a success criteria. However, it is beneficial for learning to step through the objects created and then execute a smoke test of the TLS endpoints manually. The rest of this article is devoted to these manual validations. MetalLB validationView the MetalLB objects. $ kubectl get all -n metallb-system
NAME READY STATUS RESTARTS AGE
pod/speaker-9xzlc 1/1 Running 0 64m
pod/speaker-dts5k 1/1 Running 0 64m
pod/speaker-r8kck 1/1 Running 0 64m
pod/controller-559b68bfd8-mtl2s 1/1 Running 0 64m
NAME DESIRED CURRENT READY UP-TO-DATE AVAILABLE NODE SELECTOR AGE
daemonset.apps/speaker 3 3 3 3 3 beta.kubernetes.io/os=linux 64m
NAME READY UP-TO-DATE AVAILABLE AGE
deployment.apps/controller 1/1 1 1 64m
NAME DESIRED CURRENT READY AGE
replicaset.apps/controller-559b68bfd8 1 1 1 64mShow the MetalLB configmap with the IP used. $ kubectl get configmap/config -n metallb-system -o yaml
apiVersion: v1
data:
config: |
address-pools:
- name: default
protocol: layer2
addresses:
- 192.168.1.141-192.168.1.142
kind: ConfigMap
metadata:
annotations:
kubectl.kubernetes.io/last-applied-configuration: ....
creationTimestamp: "2021-07-31T10:07:56Z"
name: config
namespace: metallb-system
resourceVersion: "38015"
selfLink: /api/v1/namespaces/metallb-system/configmaps/config
uid: 234ad41d-cfde-4bf5-990e-627f74744aadIstio Operator validationView the Istio Operator objects in the ‘istio-operator’ namespace. $ kubectl get all -n istio-operator
NAME READY STATUS RESTARTS AGE
pod/istio-operator-1-9-7-5d47654878-jh5sr 1/1 Running 1 65m
NAME TYPE CLUSTER-IP EXTERNAL-IP PORT(S) AGE
service/istio-operator-1-9-7 ClusterIP 10.152.183.120 8383/TCP 65m
NAME READY UP-TO-DATE AVAILABLE AGE
deployment.apps/istio-operator-1-9-7 1/1 1 1 65m
NAME DESIRED CURRENT READY AGE
replicaset.apps/istio-operator-1-9-7-5d47654878 1 1 1 65mThe Operator should be ‘Running’, now check the Istio Operator logs for errors. $ kubectl logs --since=15m -n istio-operator $(kubectl get pods -n istio-operator -lname=istio-operator -o jsonpath="{.items[0].metadata.name}")
...
- Processing resources for Ingress gateways.
✔ Ingress gateways installed
...Istio Ingress gateway validationView the Istio objects in the ‘istio-system’ namespace. These are objects that the Istio Operator has created. $ kubectl get pods -n istio-system
NAME READY STATUS RESTARTS AGE
istiod-1-9-7-656bdccc78-rr8hf 1/1 Running 0 95m
istio-ingressgateway-b9b6fb6d8-d8fbp 1/1 Running 0 94m
istio-ingressgateway-secondary-76db9f9f7b-2zkcl 1/1 Running 0 94m
$ kubectl get services -n istio-system
NAME TYPE CLUSTER-IP EXTERNAL-IP PORT(S) AGE
istiod-1-9-7 ClusterIP 10.152.183.198 15010/TCP,15012/TCP,443/TCP,15014/TCP 95m
istio-ingressgateway LoadBalancer 10.152.183.92 192.168.1.141 15021:31471/TCP,80:32600/TCP,443:32601/TCP,31400:32239/TCP,15443:30571/TCP 94m
istio-ingressgateway-secondary LoadBalancer 10.152.183.29 192.168.1.142 15021:30982/TCP,80:32700/TCP,443:32701/TCP,31400:31575/TCP,15443:31114/TCP 94mNotice we have purposely created two istio ingress gateways, one is for our primary access (such as public customer traffic), and the other is to mimic a secondary access (perhaps for employee-only management access). In the services, you will see reference to our MetalLB IP endpoints which is how we will ultimately reach the services projected unto these gateways. Service and Deployment validationIstio has an example app called helloworld. Our Ansible created two independent deployments that could be projected unto the two Istio Gateways. Let’s validate these deployments by testing access to the pods and services, without any involvement by Istio. Service=helloworld, Deployment=helloworld-v1
Service=helloworld2, Deployment=helloworld-v2To reach the internal pod and service IP addresses, we need to be inside the cluster itself so we ssh into the master before running these commands: ssh -i tf-libvirt/id_rsa ubuntu@192.168.122.210Let’s view the deployments, pods, and then services for these two independent applications. $ kubectl get deployments -n default
NAME READY UP-TO-DATE AVAILABLE AGE
helloworld2-v2 1/1 1 1 112m
helloworld-v1 1/1 1 1 112m
$ kubectl get pods -n default -l 'app in (helloworld,helloworld2)'
NAME READY STATUS RESTARTS AGE
helloworld2-v2-749cc8dc6d-6kbh7 2/2 Running 0 110m
helloworld-v1-776f57d5f6-4gvp7 2/2 Running 0 109m
$ kubectl get services -n default -l 'app in (helloworld,helloworld2)'
NAME TYPE CLUSTER-IP EXTERNAL-IP PORT(S) AGE
helloworld2 ClusterIP 10.152.183.251 5000/TCP 113m
helloworld ClusterIP 10.152.183.187 5000/TCP 113mFirst, let’s pull from the private pod IP directly. # internal ip of primary pod
$ primaryPodIP=$(microk8s kubectl get pods -l app=helloworld -o=jsonpath="{.items[0].status.podIPs[0].ip}")
# internal IP of secondary pod
$ secondaryPodIP=$(microk8s kubectl get pods -l app=helloworld2 -o=jsonpath="{.items[0].status.podIPs[0].ip}")
# check pod using internal IP
$ curl http://${primaryPodIP}:5000/hello
Hello version: v1, instance: helloworld-v1-776f57d5f6-4gvp7
# check pod using internal IP
$ curl http://${secondaryPodIP}:5000/hello
Hello version: v2, instance: helloworld2-v2-749cc8dc6d-6kbh7With internal pod IP proven out, move up to the Cluster IP defined at the Service level. # IP of primary service
$ primaryServiceIP=$(microk8s kubectl get service/helloworld -o=jsonpath="{.spec.clusterIP}")
# IP of secondary service
$ secondaryServiceIP=$(microk8s kubectl get service/helloworld2 -o=jsonpath="{.spec.clusterIP}")
# check primary service
$ curl http://${primaryServiceIP}:5000/hello
Hello version: v1, instance: helloworld-v1-776f57d5f6-4gvp7
# check secondary service
$ curl http://${secondaryServiceIP}:5000/hello
Hello version: v2, instance: helloworld2-v2-749cc8dc6d-6kbh7These validations proved out the pod and service independent of the Istio Gateway or VirtualService. Notice all these were using insecure HTTP on port 5000, because TLS is layered on top by Istio. Exit the cluster ssh session before continuing. exitValidate TLS certsThe Ansible scripts created a custom CA and then key+certificates for “microk8s.local” and “microk8s-secondary.local”. These are located in the /tmp directory of the microk8s-1 host. These will be used by the Istio Gateway and VirtualService for secure TLS. # show primary cert info
$openssl x509 -in /tmp/microk8s.local.crt -text -noout | grep -E "CN |DNS"
Issuer: CN = myCA.local
Subject: CN = microk8s.local
DNS:microk8s.local, DNS:microk8s-alt.local
# show secondary cert info
$ openssl x509 -in /tmp/microk8s-secondary.local.crt -text -noout | grep -E "CN |DNS"
Issuer: CN = myCA.local
Subject: CN = microk8s-secondary.local
DNS:microk8s-secondary.localValidate Kubernetes TLS secretsThe keys and certificates will not be used by Istio unless they are loaded as Kubernetes secrets available to the Istio Gateway. # primary tls secret for 'microk8s.local'
$ kubectl get -n default secret tls-credential
NAME TYPE DATA AGE
tls-credential kubernetes.io/tls 2 10h
# primary tls secret for 'microk8s-secondary.local'
$ kubectl get -n default secret tls-secondary-credential
NAME TYPE DATA AGE
tls-secondary-credential kubernetes.io/tls 2 10h
# if needed, you can pull the actual certificate from the secret
# it requires a backslash escape for 'tls.crt'
$ kubectl get -n default secret tls-credential -o jsonpath="{.data.tls\.crt}"
| base64 --decodeValidate Istio GatewayThe Istio Gateway object is the entity that uses the Kubernetes TLS secrets shown above. $ kubectl get -n default gateway
NAME AGE
gateway-ingressgateway-secondary 3h2m
gateway-ingressgateway 3h2mDigging into the details of the Gateway object, we can see the host name it will be processing as well as the kubernetes tls secret it is using. # show primary gateway
$ kubectl get -n default gateway/gateway-ingressgateway -o jsonpath="{.spec.servers}" | jq
[
{
"hosts": [
"microk8s.local",
"microk8s-alt.local"
],
"port": {
"name": "http",
"number": 80,
"protocol": "HTTP"
}
},
{
"hosts": [
"microk8s.local",
"microk8s-alt.local"
],
"port": {
"name": "https",
"number": 443,
"protocol": "HTTPS"
},
"tls": {
"credentialName": "tls-credential",
"mode": "SIMPLE"
}
}
]
# show secondary gateway
$ kubectl get -n default gateway/gateway-ingressgateway-secondary -o jsonpath="{.spec.servers}" | jq
[
{
"hosts": [
"microk8s-secondary.local"
],
"port": {
"name": "http-secondary",
"number": 80,
"protocol": "HTTP"
}
},
{
"hosts": [
"microk8s-secondary.local"
],
"port": {
"name": "https-secondary",
"number": 443,
"protocol": "HTTPS"
},
"tls": {
"credentialName": "tls-secondary-credential",
"mode": "SIMPLE"
}
}
]Notice the first Gateway uses the ‘tls-credential’ secret, while the second uses ‘tls-secondary-credential’. Validate VirtualServiceThe bridge that creates the relationship between the purely Istio objects (istio-system/ingressgateway,default/Gateway) and the application objects (pod,deployment,service) is the VirtualService. This VirtualService is how the application is projected unto a specific Istio Gateway. $ kubectl get -n default virtualservice
NAME GATEWAYS HOSTS AGE
hello-v2-on-gateway-ingressgateway-secondary ["gateway-ingressgateway-secondary"] ["microk8s-secondary.local"] 3h14m
hello-v1-on-gateway-ingressgateway ["gateway-ingressgateway"] ["microk8s.local","microk8s-alt.local"] 3h14mDigging down into the VirtualService, you can see it lists the application’s route, port, path, the expected HTTP Host header, and Istio gateway to project unto. # show primary VirtualService
$ kubectl get -n default virtualservice/hello-v1-on-gateway-ingressgateway -o jsonpath="{.spec}" | jq
{
"gateways": [
"gateway-ingressgateway"
],
"hosts": [
"microk8s.local",
"microk8s-alt.local"
],
"http": [
{
"match": [
{
"uri": {
"exact": "/hello"
}
}
],
"route": [
{
"destination": {
"host": "helloworld",
"port": {
"number": 5000
}
}
}
]
}
]
}
# show secondary VirtualService
$ kubectl get -n default virtualservice/hello-v2-on-gateway-ingressgateway-secondary -o jsonpath="{.spec}" | jq
{
"gateways": [
"gateway-ingressgateway-secondary"
],
"hosts": [
"microk8s-secondary.local"
],
"http": [
{
"match": [
{
"uri": {
"exact": "/hello"
}
}
],
"route": [
{
"destination": {
"host": "helloworld2",
"port": {
"number": 5000
}
}
}
]
}
]
}Validate URL endpointsWith the validation of all the dependent objects complete, you can now run the ultimate test which is to run an HTTPS against the TLS secured endpoints. The Gateway requires that the proper FQDN headers be sent by your browser, so it is not sufficient to do a GET against the MetalLB IP addresses. The ansible scripts should have already created entries in the local /etc/hosts file so we can use the FQDN. # validate that /etc/hosts has entries for URL
$ grep '\.local' /etc/hosts
192.168.1.141 microk8s.local
192.168.1.142 microk8s-secondary.local
# test primary gateway
# we use '-k' because the CA cert has not been loaded at the OS level
$ curl -k https://microk8s.local/hello
Hello version: v1, instance: helloworld-v1-776f57d5f6-4gvp7
# test secondary gateway
$ curl -k https://microk8s-secondary.local/hello
Hello version: v2, instance: helloworld2-v2-749cc8dc6d-6kbh7
Notice from the /etc/hosts entries, we have entries corresponding the MetalLB endpoints. The tie between the MetalLB IP addresses and the Istio ingress gateway objects was shown earlier, but for convenience is below.
# tie between MetalLB and Istio Ingress Gateways
$ kubectl get -n istio-system services
NAME TYPE CLUSTER-IP EXTERNAL-IP PORT(S) AGE
istiod-1-9-7 ClusterIP 10.152.183.198 15010/TCP,15012/TCP,443/TCP,15014/TCP 3h30m
istio-ingressgateway LoadBalancer 10.152.183.92 192.168.1.141 15021:31471/TCP,80:32600/TCP,443:32601/TCP,31400:32239/TCP,15443:30571/TCP 3h30m
istio-ingressgateway-secondary LoadBalancer 10.152.183.29 192.168.1.142 15021:30982/TCP,80:32700/TCP,443:32701/TCP,31400:31575/TCP,15443:31114/TCP 3h30mValidate URL endpoints remotelyThese same request can be made from your host machine as well since the MetalLB endpoints are on the same network as your host (all our actions so far have been from inside the microk8s-1 host). But the Istio Gateway expects a proper HTTP Host header so you have several options:
I’ve provided a script that you can run from the host for validation: ./test-istio-endpoints.shConclusionUsing this concept of multiple ingress, you can isolate traffic to different source networks, customers, and services. nREFERENCES
|
Microk8s puts up its Istio and sails awayArticle SourceIstio almost immediately strikes you as enterprise grade software. Not so much because of the complexity it introduces, but more because of the features it adds to your service mesh. Must-have features packaged together in a coherent framework:
Since microk8s positions itself as the local Kubernetes cluster developers prototype on, it is no surprise that deployment of Istio is made dead simple. Let’s start with the microk8s deployment itself: > sudo snap install microk8s --classicIstio deployment available with: > microk8s.enable istioThere is a single question that we need to respond to at this point. Do we want to enforce mutual TLS authentication among sidecars? Istio places a proxy to your services so as to take control over routing, security etc. If we know we have a mixed deployment with non-Istio and Istio enabled services we would rather not enforce mutual TLS: > microk8s.enable istio
Enabling Istio
Enabling DNS
Applying manifest
service/kube-dns created
serviceaccount/kube-dns created
configmap/kube-dns created
deployment.extensions/kube-dns created
Restarting kubelet
DNS is enabled
Enforce mutual TLS authentication (https://bit.ly/2KB4j04) between sidecars? If unsure, choose N. (y/N): yBelieve it or not we are done, Istio v1.0 services are being set up, you can check the deployment progress with: > watch microk8s.kubectl get all --all-namespacesWe have packaged > microk8s.istioctl get all --all-namespaces
NAME KIND NAMESPACE AGE
grafana-ports-mtls-disabled Policy.authentication.istio.io.v1alpha1 istio-system 2m
DESTINATION-RULE NAME HOST SUBSETS NAMESPACE AGE
istio-policy istio-policy.istio-system.svc.cluster.local istio-system 3m
istio-telemetry istio-telemetry.istio-system.svc.cluster.local istio-system 3m
GATEWAY NAME HOSTS NAMESPACE AGE
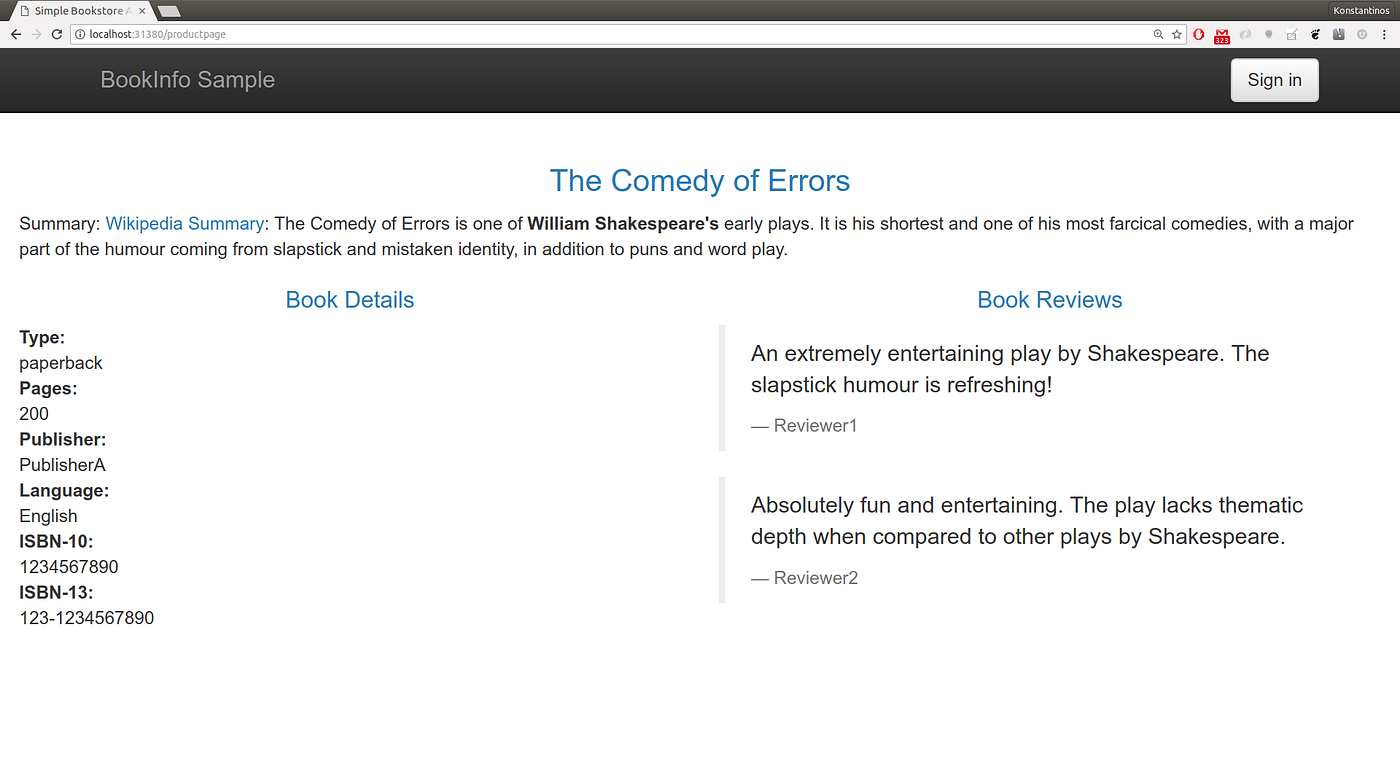
istio-autogenerated-k8s-ingress * istio-system 3mDo not get scared by the amount of services and deployments, everything is under the Demo Time!Istio needs to inject sidecars to the pods of your deployment. In microk8s auto-injection is supported so the only thing you have to label the namespace you will be using with > microk8s.kubectl label namespace default istio-injection=enabledLet’s now grab the bookinfo example from the v1.0 Istio release and apply it: > wget https://raw.githubusercontent.com/istio/istio/release-1.0/samples/bookinfo/platform/kube/bookinfo.yaml
> microk8s.kubectl create -f bookinfo.yamlThe following services should be available soon: > microk8s.kubectl get svc
NAME TYPE CLUSTER-IP EXTERNAL-IP PORT(S) details ClusterIP 10.152.183.33 <none> 9080/TCP kubernetes ClusterIP 10.152.183.1 <none> 443/TCP productpage ClusterIP 10.152.183.59 <none> 9080/TCP ratings ClusterIP 10.152.183.124 <none> 9080/TCP reviews ClusterIP 10.152.183.9 <none> 9080/TCPWe can reach the services using the ClusterIP they have; we can for example get to the > wget https://raw.githubusercontent.com/istio/istio/release-1.0/samples/bookinfo/networking/bookinfo-gateway.yaml
> microk8s.kubectl create -f bookinfo-gateway.yamlTo get to the > microk8s.kubectl -n istio-system get service istio-ingressgateway -o jsonpath='{.spec.ports[?(@.name=="http2")].nodePort}'
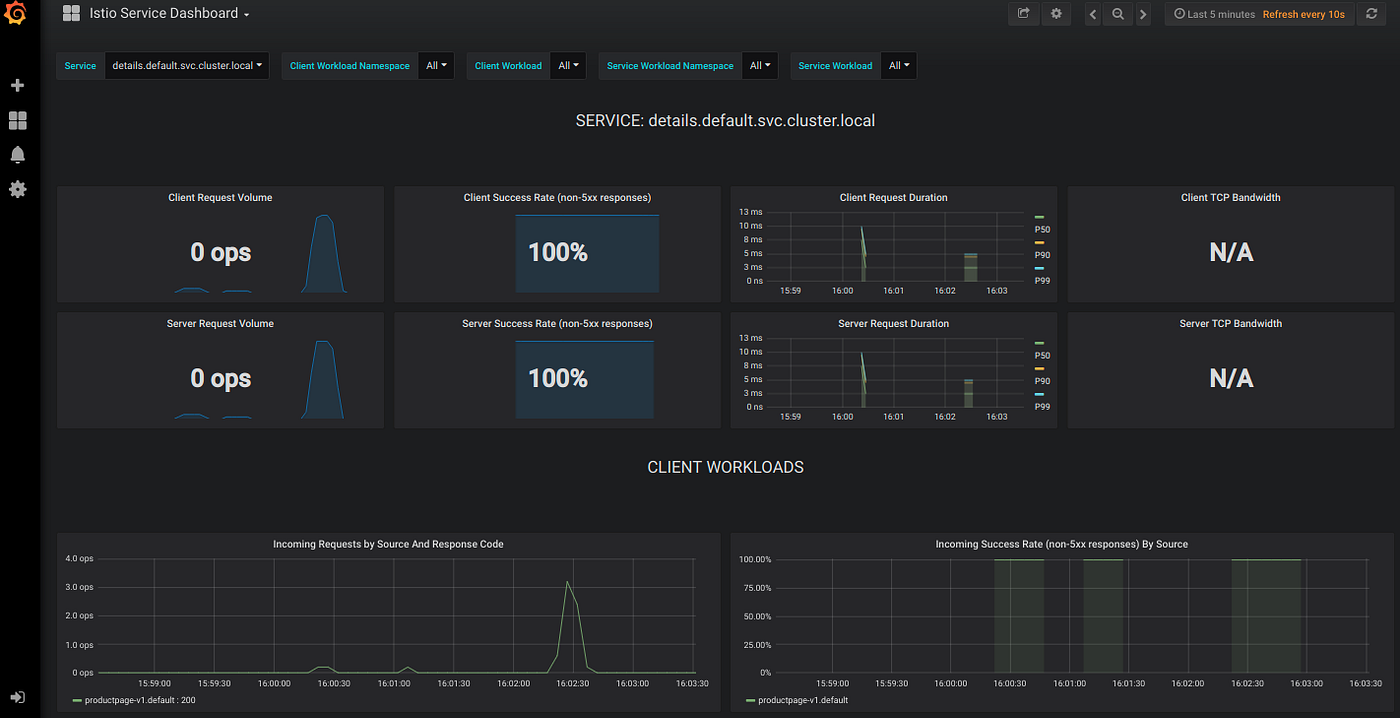
31380And our node is the localhost so we can point our browser to http://localhost:31380/productpage Show me some graphs!Of course graphs look nice in a blog post, so here you go.
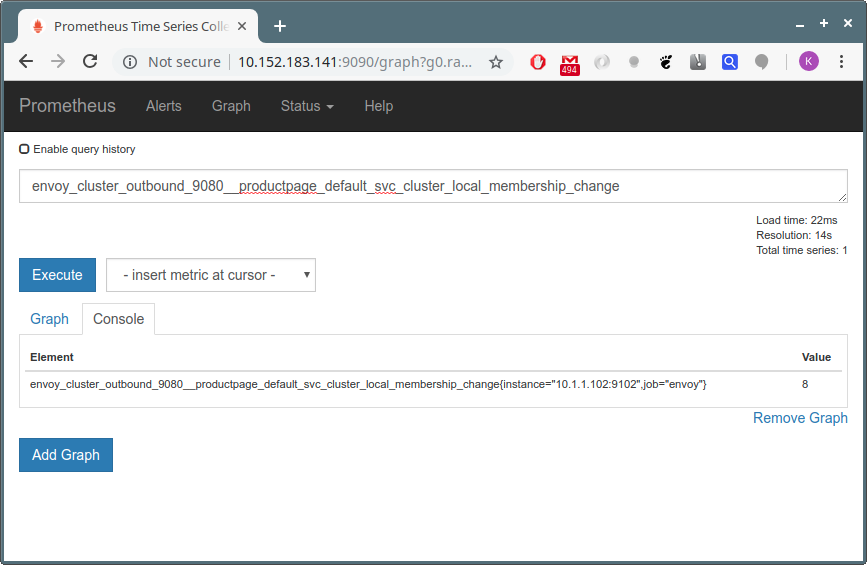
You will need to grab the ClusterIP of the Grafana service: microk8s.kubectl -n istio-system get svc grafanaPrometheus is also available in the same way. microk8s.kubectl -n istio-system get svc prometheus
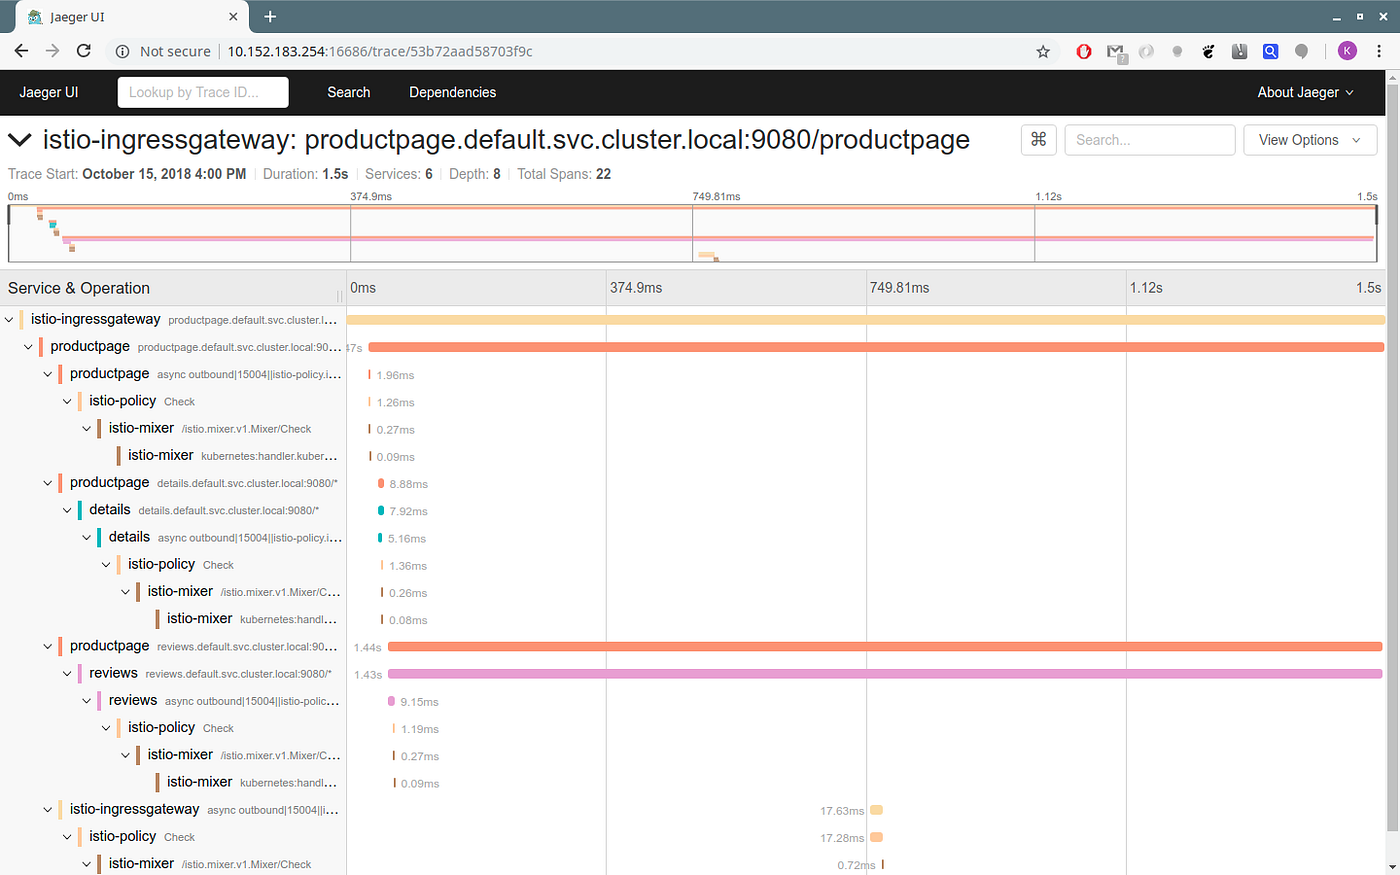
And for traces you will need to look at the microk8s.kubectl -n istio-system get service/jaeger-query
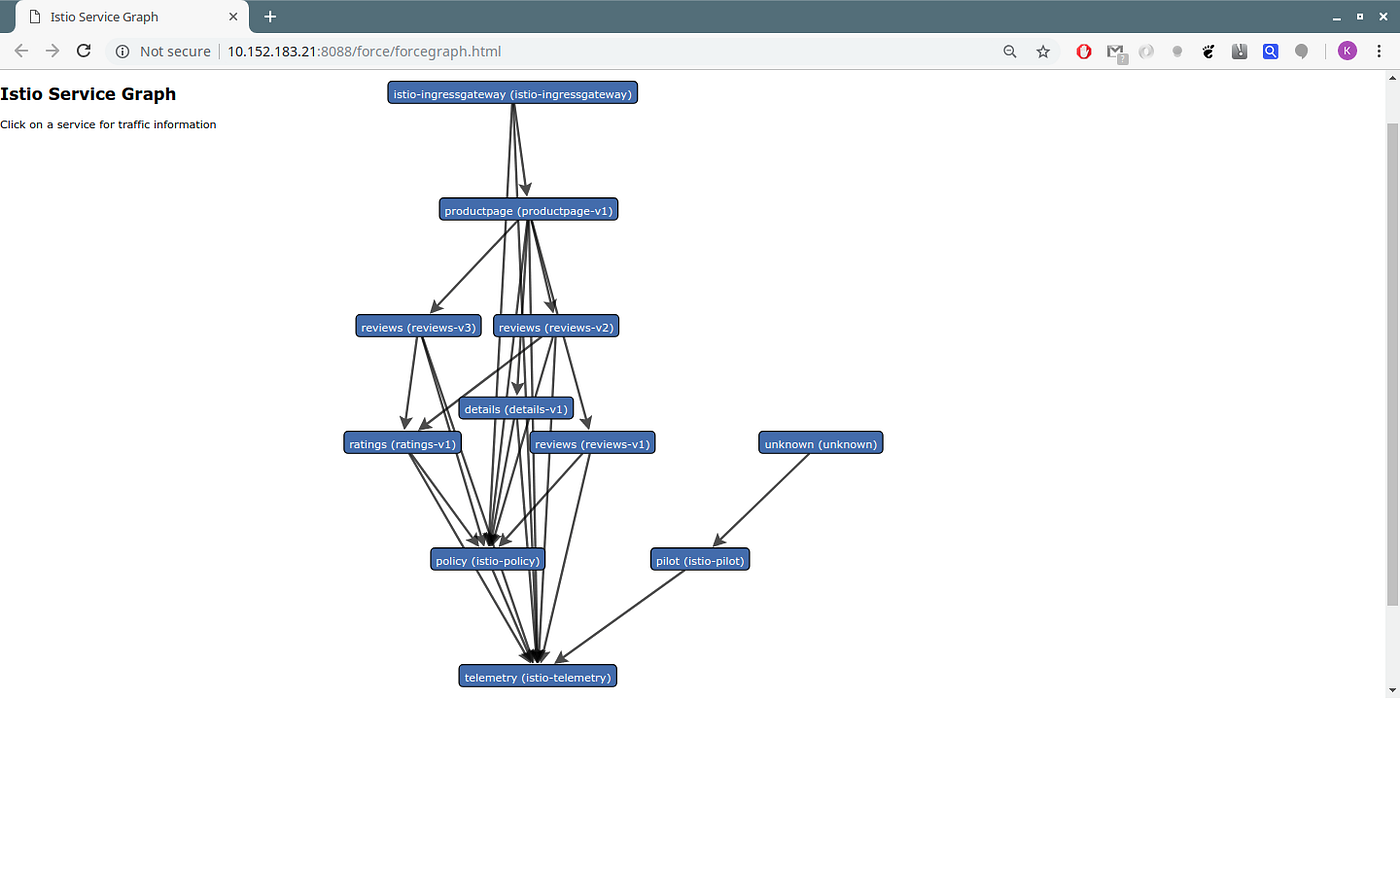
The servicegraph endpoint is available with: microk8s.kubectl -n istio-system get svc servicegraph
I should stop here. Go and checkout the Istio documentation for more details on how to take advantage of what Istio is offering. What to keep from this post
References |
KServe 설치 확인KServe Quick Start를 참고(quick_install.sh)하여 설치 후, 설치가 제대로 되었는지 확인 (pytorch) ╭─sungsoo@sungsoo-HP-Z840 ~
╰─$ k get pod -n kserve
NAME READY STATUS RESTARTS AGE
kserve-controller-manager-0 2/2 Running 0 3d21h |
Microk8s 다루기microk8s reset 하기 (pytorch) ╭─sungsoo@sungsoo-HP-Z840 ~
╰─$ microk8s reset
Disabling all addons.
Disabling addon : ambassador
Disabling addon : cilium
Disabling addon : dashboard
Disabling addon : dns
Disabling addon : fluentd
Disabling addon : gpu
Disabling addon : helm
Disabling addon : helm3
Disabling addon : host-access
Disabling addon : ingress
Disabling addon : istio
Disabling addon : jaeger
... |
KServe setup and testing (starting from 5 July)Prerequests
0. Installing KubeflowWe assume that you have already installed Kubeflow by using the following guide.
1. KServe Installation
Note If you are looking to use PodSpec fields such as nodeSelector, affinity or tolerations which are now supported in the v1beta1 API spec, you need to turn on the corresponding feature flags in your Knative configuration.
Note Cert manager is required to provision webhook certs for production grade installation, alternatively you can run self signed certs generation script. kubectl apply -f https://github.com/kserve/kserve/releases/download/v0.8.0/kserve.yamlkubectl apply -f https://github.com/kserve/kserve/releases/download/v0.8.0/kserve-runtimes.yamlNote ClusterServingRuntimes are required to create InferenceService for built-in model serving runtimes with KServe v0.8.0 or higher. |
재설치 Microk8s 오류 생길 때microk8s를 재설치하고 istio를 설치하려고 할 때, 아래와 같은 오류가 생긴다. (base) ╭─sungsoo@z840 ~/kubeflow/istio-1.11.0
╰─$ bin/istioctl install
Error: fetch Kubernetes config file: Get "http://localhost:8080/api?timeout=32s": dial tcp 127.0.0.1:8080: connect: connection refused아래 명령을 실행하여 config 를 갱신하자. (base) ╭─sungsoo@z840 ~/kubeflow/istio-1.11.0
╰─$ microk8s config > ~/.kube/config |
|
I wanted to bypass the Dex when accessing Inference Services from the outside. Also, these actions seem to lead to future crashes: |
KServer Inference
First InferenceService
Run your first InferenceService
In this tutorial, you will deploy a ScikitLearn InferenceService.
This inference service loads a simple iris ML model, send a list of attributes and print the prediction for the class of iris plant."
Since your model is being deployed as an InferenceService, not a raw Kubernetes Service, you just need to provide the trained model and it gets some super powers out of the box 🚀.
1. Create test InferenceService
Once you've created your YAML file (named something like "sklearn.yaml"):
You can verify the deployment of this inference service as follows.
2. Check InferenceService status.
If your DNS contains example.com please consult your admin for configuring DNS or using custom domain.
3. Determine the ingress IP and ports
Execute the following command to determine if your kubernetes cluster is running in an environment that supports external load balancers
or @microk8s with kubeflow
(base) ╭─sungsoo@sungsoo-HP-Z840 ~
╰─$ kubectl get svc istio-ingressgateway -n kubeflow
NAME                   TYPE           CLUSTER-IP       EXTERNAL-IP    PORT(S)                                                                                                                                                                   AGE
istio-ingressgateway   LoadBalancer   10.152.183.116   10.64.140.43   15020:32267/TCP,80:32425/TCP,443:31890/TCP,15029:31587/TCP,15030:31591/TCP,15031:32223/TCP,15032:32596/TCP,15443:32307/TCP,15011:32504/TCP,8060:32176/TCP,853:30715/TCP   12h
Load Balancer
If the EXTERNAL-IP value is set, your environment has an external load balancer that you can use for the ingress gateway.
or @microk8s with kubeflow
Node Port
If the EXTERNAL-IP value is none (or perpetually pending), your environment does not provide an external load balancer for the ingress gateway. In this case, you can access the gateway using the service’s node port.
Port Forward
Alternatively you can do Port Forward for testing purpose
4. Curl the InferenceService
First prepare your inference input request
{
  "instances": [
    [6.8,  2.8,  4.8,  1.4],
    [6.0,  3.4,  4.5,  1.6]
  ]
}
Once you've created your json test input file (named something like "iris-input.json"):
Real DNS
If you have configured the DNS, you can directly curl the InferenceService with the URL obtained from the status print. e.g
이 부분에서 오류가 생긴다. DNS 문제인 듯...
살펴보자!
curl -v http://sklearn-iris.kserve-test.${CUSTOM_DOMAIN}/v1/models/sklearn-iris:predict -d @./iris-input.json

curl -v http://sklearn-iris.kserve-test.example.com/v1/models/sklearn-iris:predict -d @./iris-input.json
Magic DNS
If you don't want to go through the trouble to get a real domain, you can instead use "magic" dns xip.io. The key is to get the external IP for your cluster.
Look for the EXTERNAL-IP column's value(in this case 35.237.217.209)
Next step is to setting up the custom domain:
Now in your editor, change example.com to {{external-ip}}.xip.io (make sure to replace {{external-ip}} with the IP you found earlier).
With the change applied you can now directly curl the URL
From Ingress gateway with HOST Header
If you do not have DNS, you can still curl with the ingress gateway external IP using the HOST Header.
From local cluster gateway
If you are calling from in cluster you can curl with the internal url with host {{InferenceServiceName}}.{{namespace}}
6. Run Performance Test
# use kubectl create instead of apply because the job template is using generateName which doesn't work with kubectl apply
kubectl create -f https://raw.githubusercontent.com/kserve/kserve/release-0.7/docs/samples/v1beta1/sklearn/v1/perf.yaml -n kserve-test
Expected Outpout
The text was updated successfully, but these errors were encountered: