Deploy secure OpenVPN tunnel to an existing AWS VPC in 2 minutes.
Open source OpenVPN software. No license required. Unlimited simultaneous connections. Auto-generated config.
Click on the AWS QuicKstart URLs below to deploy different AWS regions. They will open the AWS CloudFormnation stacks page, the you need just give a few options and start it.
Ireland: AWS: eu-west-1
London: AWS: eu-west-2
Paris: AWS: eu-west-3
Frankfurt: AWS: eu-central-1
Stockholm: AWS: eu-north-1
US North Virginia: AWS: us-east-1
US Ohio: AWS: us-east-2
US North California: AWS: us-west-1
US Oregon: AWS: us-west-2
Canada Central: AWS: ca-central-1
Sao Paulo: AWS: sa-east-1
Mumbai, India: AWS: ap-south-1
Seoul, South Korea: AWS: ap-northeast-2
Singapore: AWS: ap-southeast-1
Sydney, Australia: AWS: ap-southeast-2
Tokyo, Japan: AWS: ap-northeast-1
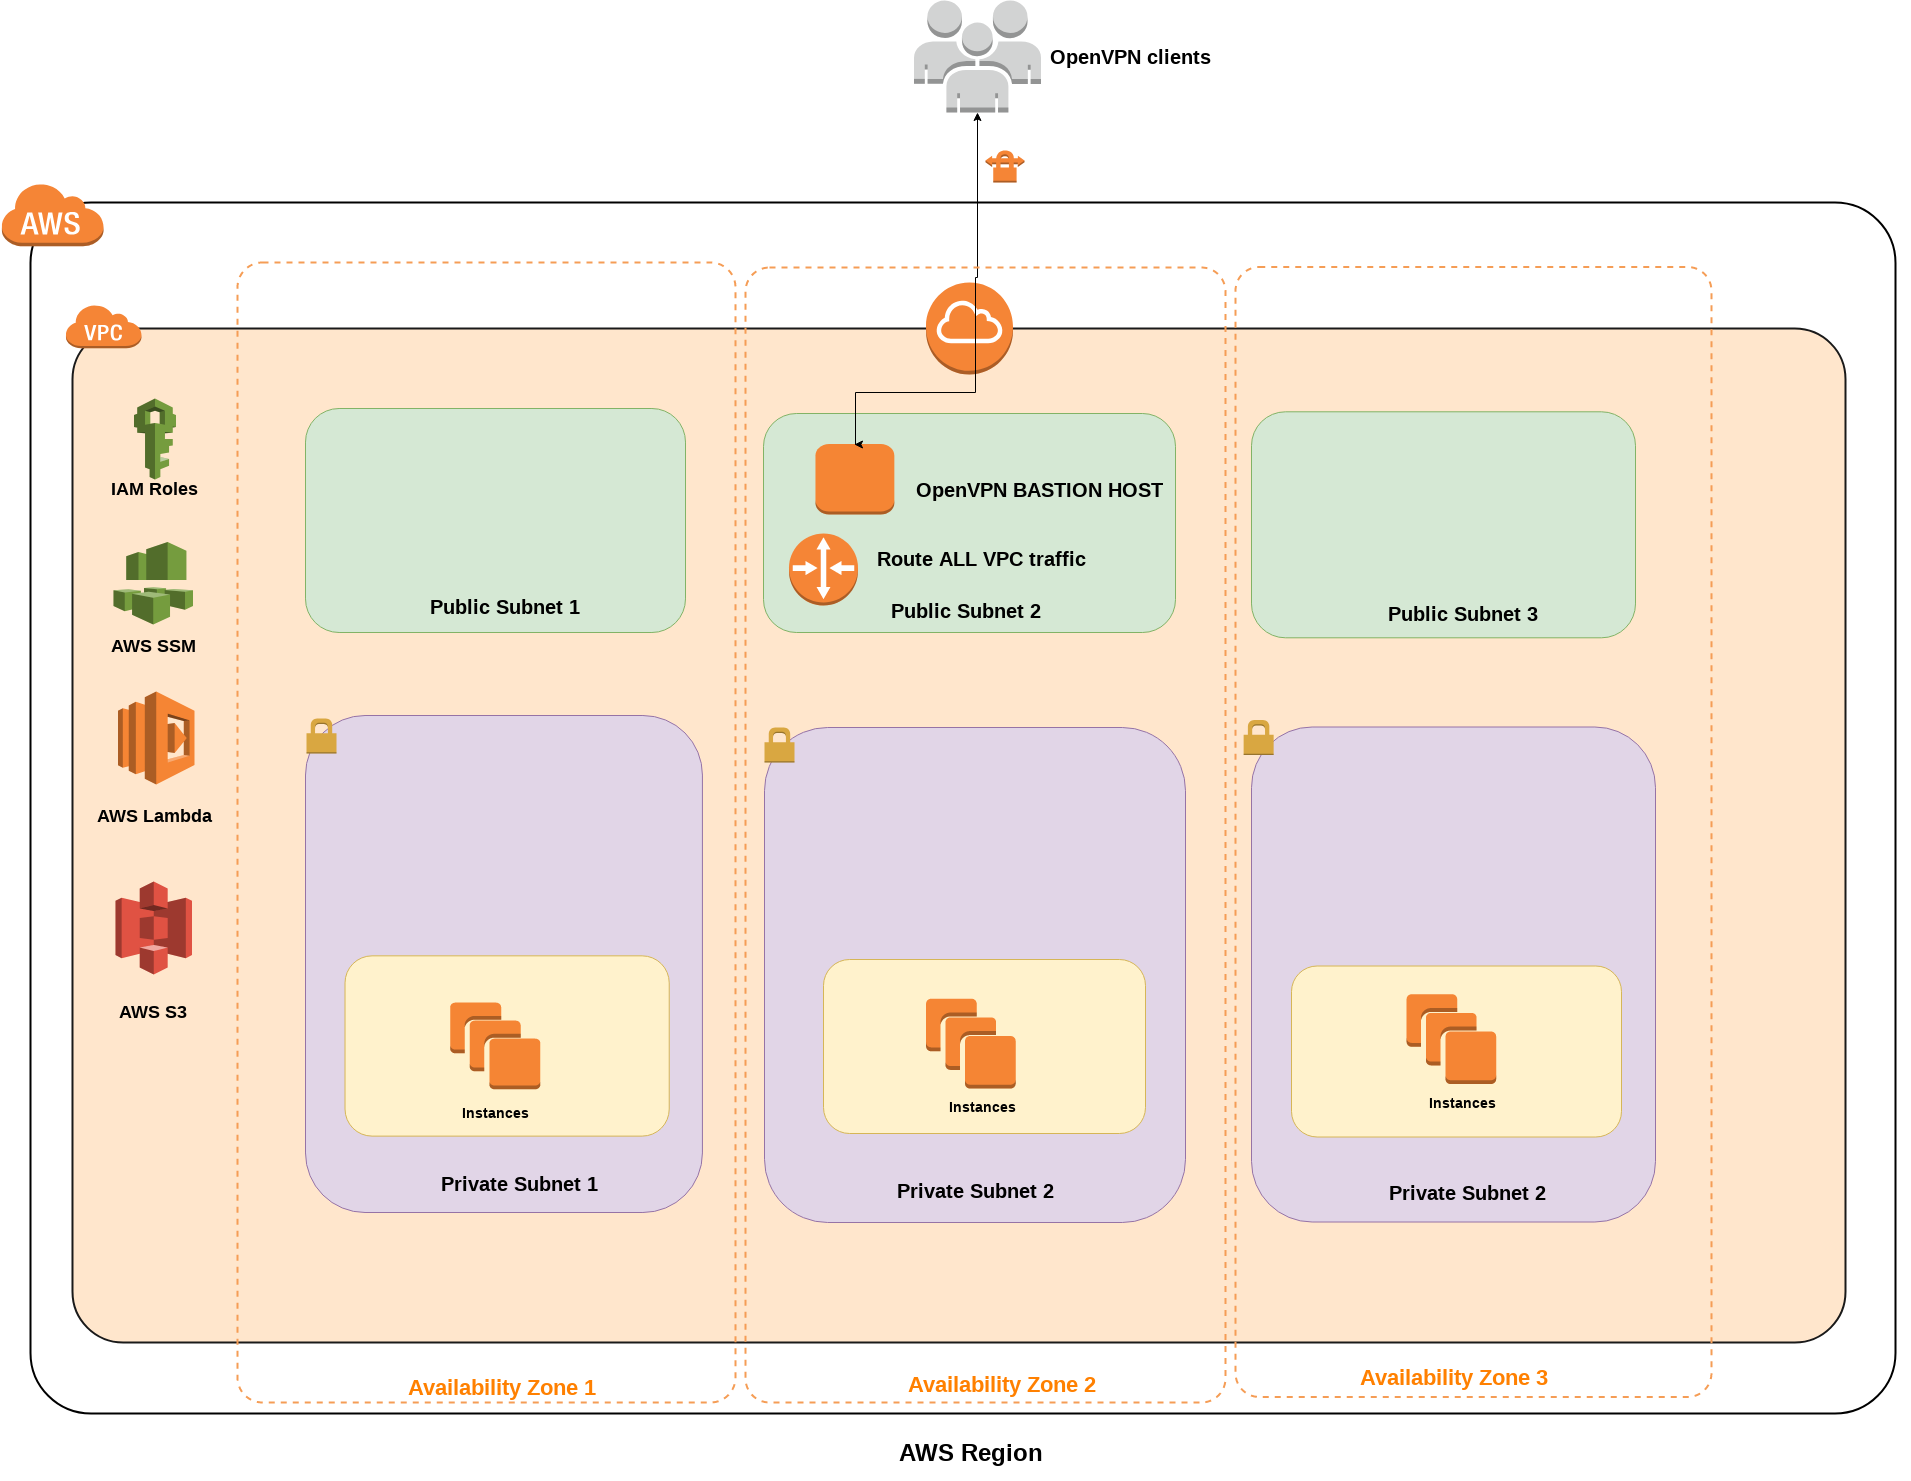
Here is an example deployment architecture: where previously deployed EC2 instances running in multiple private subnets, and the public subnet deployed OpenVPN bastion provides accessibility through the secure VPN tunnel for the clients.
-
very easy to deploy via AWS Quickstart URLs and AWS CloudFormation (see below),
-
one-click download openvpn config via an S3 signed URL (no need to SSH to host) from CloudFormation Output tab,
-
embedded vpn config file: contains everything you need, muliple config file created at once (up to 100),
-
tested on: Windows 10, Linux (Ubuntu), Android, Mac OSX (tunnelblick),
-
secure: SHA512 channel auth, AES-256-CBC encryption, TLS 1.2 forced (openvpn > v2.3.10 or higher client versions needed!), NO SSH, access instance via AWS SSM,
-
traffic routing options: gateway/TCP443 (HTTPS) or VPC only/UDP443,
-
anonymous: no VPN log files on servers, use local+AWS DNS server forced through the tunnel,
-
fast caching DNS: caching dnsmasq installed and used on server side, pushed to VPN client,
-
seamless teardown with AWS Lambda,
-
ALL AWS regions supported by dynamic AMI selection with AWS Lambda,
-
based on Ubuntu 18.04LTS latest version.
You need an AWS account and full EC2 and IAM rights.
Stack Name: choose a sdtack name (QS default: OpenVPN-Bastion),
VPC ID: choose an existing VPC where the OpenVPN instance going to be deployed,
VPC Public Subnet: choose a public subnet within the VPC above (public is important, otherwise the bastion won't be accessible),
Limit external access to CIDR: optional, you can limite which IPs can connect to the bastion, 0.0.0.0/0 accessible from everywhere,
AWS EC2 Instance Type: choose an instance type from t2 and t3 Ec2 calsses (t2.micro is default because it is eligible for FREE TIER),
The number of generated OpenVPN connection profiles: how many openvpn config will be generated, multiple one means many hosts can use simultaneously the VPN conection (default: 10, max: 200),
Traffic routing: choose you ALL traffic, including the VPC and public Internet, (default gateway mode) ALL_GATEWAY_TCP443 routed through the tunnel, OR only the AWS VPC internal traffic: VPC_ONLY_UDP443.
IMPORTANT: in ALL_GATEWAY_TCP443 everything is going throug the VPN, it can be slower for remote desktop connections, but suitable for secure VPN tunnel from public places like a Hotel, hotspot, airport, etc...
Cloudformation Steps:
-
Choose a link above, click "Next",
-
Fill CloudFormation parameters, then Click "Next",
-
Click "Next",
-
Scroll down, check checkbox: "I acknowledge that AWS CloudFormation might create IAM resources."
-
Click "Create"
Then wait the stack to be GREEN status: CREATE_COMPLETE.
After the stack completd, download the OpenVPN config profile ZIP file by the S3 URL you can find below the CloudFormation stack's Outputs tab.
DownloadOpenVPNProfilesURL: S3 signed URL
Copy the URL to tyour browser and download the file.
IMPORTANT: by default the link is available for 12 hours after creation, for securiry reasons.
NOTE on Windows 10: ZIP files does not work natively anymnore, Microsoft baffted handling them correctly (not the ZIp files invalid!), I recommend download and install the Open Source alternative: 7-ZIP or WinZIP to extract the config files.
UNZIP the downloaded ZIP file and save the *.ovpn files to a folder. Pick a one, or share with other devices to connect.
Linux:
openvpn --config *.ovpn
Windows:
-
Start it
-
Open systray icon with right click, Import files.., add *.ovpn confiog files and connect it.
MAC OSX:
Android:
Open app, import profile, import the *.ovpn file.
Simple delete the AWS CloudFormation stack. It will delete the S3 config folder with the openvpn configuration files as well.
You can connect to the OpenVPN EC2 instance console, using the AWS SSM Session manager (WEB or CLI) to have a remote console.
Go to:
OpenVPN base path: /etc/openvpn/keygen/
Generate certificates:
Download fenerated keys: /etc/openvpn/keys/{config_name}
All of here is open source software, licensed under Apache 2.0 license.