
Welcome to the test.ai Selenium Python demo!
This repository contains a pre-configured project and basic tutorial, so you can hit the ground running with test.ai enhanced Selenium!
👉 This tutorial uses Google Chrome, but you will be able to use test-ai-selenium with any other browser that supports Selenium.
Before we get started, please ensure that you have installed the following software on your computer:
- Python - version
3.7or newer - Google Chrome
You will also need a test.ai account, please visit https://sdk.test.ai (it's free!) to register.
In the following tutorial, you will learn how to set up and run AI-enhanced Selenium with test.ai.
Now that you have the pre-requisites installed, let's get started.
Please begin by cloning this repository to your computer.
git clone https://github.com/testdotai/python-selenium-sdk-demo.gitNow, we'll install the required python dependencies to run this demo.
Please cd into the directory you just cloned
👉 you may optionally create a venv to run this demo
(click to expand)
👉 depending on how your python installation is configured, you may need to replace the python command in the lines below with python3
On Mac/Linux, run the following commands in your Terminal:
# create the virtual environment
python -m venv venv_selenium_demo

# activate the virtual environment
source venv_selenium_demo/bin/activate
If using Windows, in PowerShell, run the following commands:
# create the virtual environment
python -m venv venv_selenium_demo

# activate the virtual environment
venv_selenium_demo\Scripts\Activate.ps1
Next, run the following command to configure the dependencies for this demo project:
pip install -r requirements.txtPlease visit https://sdk.test.ai, and log into your account. Please copy your API key (in the upper right corner of your screen), you will need this for the next step.

Next, cd into the root directory of this project and run the following command, replacing the text YOUR_API_KEY with your test.ai API key.
python -m demo.basic YOUR_API_KEY👉 depending on how your python installation is configured, you may need to replace the python command in the line above with python3
If everything worked, an instance of the Chrome browser will be started and open to the test.ai Store (no, it's not a real store!). Then, the sample code in this demo will click the Accesories navbar link, click on the image for Anchor Bracelet, add it to the cart, and then visit the cart.
Thus far, the demo is using the standard Selenium selectors without any AI, which is how apps today are commonly tested. However, selectors such as these are fragile and break easily, as even minor changes to a website may cause them to immediately stop working. Fortunately, the test.ai SDK is equipped to help you avoid this unecessary hassle.
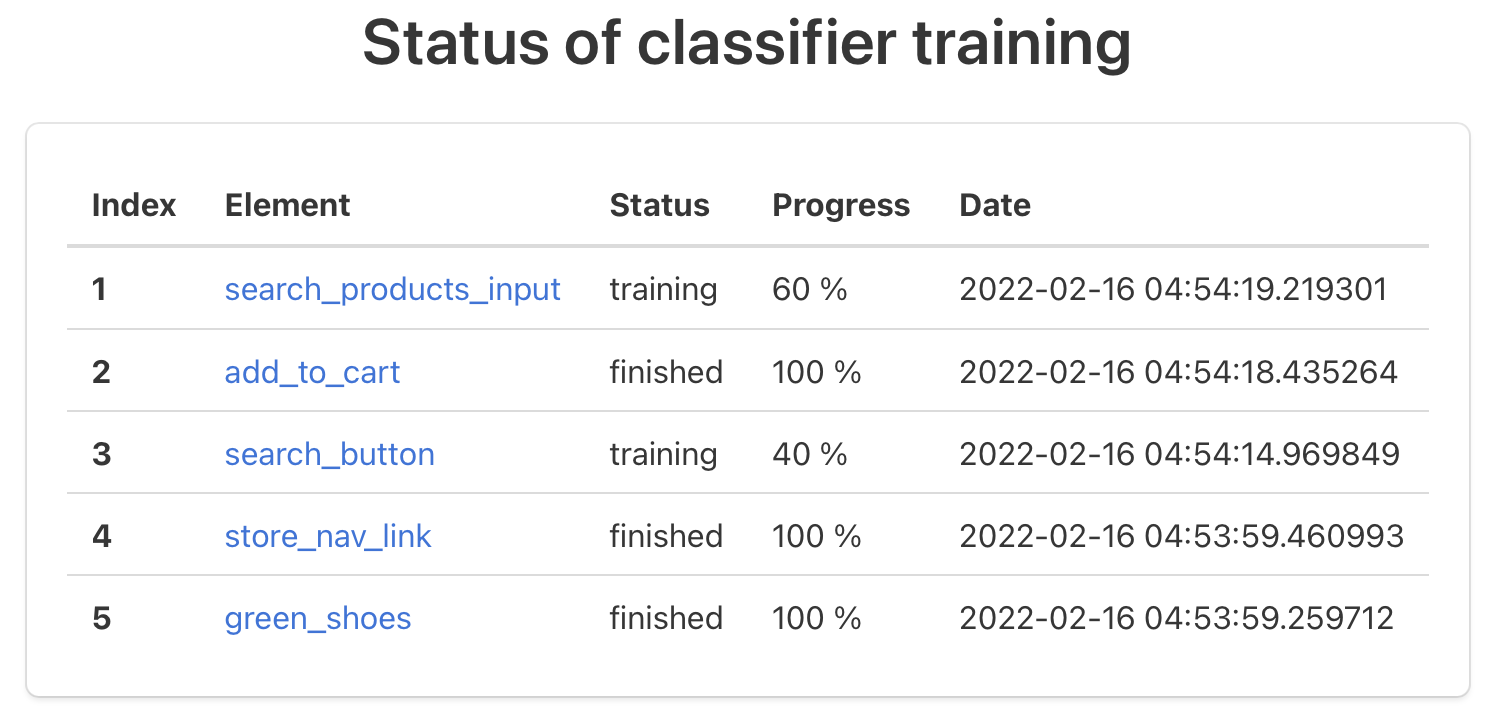
The test cases you just ran also uploads elements to https://sdk.test.ai for training the AI element classifier. This means that even if a developer makes a change that breaks one of your selectors, test.ai can step in and still find that element.
Training takes a few minutes, you can check training status by visiting https://sdk.test.ai/training_status
Now let's simulate what happens when a developer changes a web application's code.
In the IDE of your choice, please open demo/basic/main.py. This Python file contains an abridged form of what you might find in typical Selenium-based test suite.
A few noteworthy items in this file:
- The
Chromedriver gets passed as a parameter to aTestAiDriver, along with your API key. - Each call to a "
find_element_by" method contains a second parameter, which is used to give the returned element an optional, human-readable label for use at https://sdk.test.ai
As you can see, it is very easy to integrate test.ai into your existing Selenium-based test cases.
Now, let's change a couple of the selenium selectors:
# Change this line:
accessories_nav_link = driver.find_element_by_id("menu-item-671", "accessories_nav_link")

# to:
accessories_nav_link = driver.find_element_by_id("my-developers-changed-this", "accessories_nav_link")
# Change this line:
anchor_bracelet = driver.find_element_by_xpath('//*[@id="main"]/div/ul/li[1]/div[1]/a', "anchor_bracelet")
# to:
anchor_bracelet = driver.find_element_by_xpath('//*[@id="main"]/my/developers/also/changed/this', "anchor_bracelet")# Change this line:
view_cart = driver.find_element_by_css_selector("#main > div > div.woocommerce-notices-wrapper > div > a", "view_cart")
# to:
view_cart = driver.find_element_by_css_selector("#main > wow > these > developers > have > been > busy", "view_cart")As you may have already guessed, a standard Selenium test would certainly fail, but test.ai won't!
Save your changes, and using your terminal, cd into the root directory of this project. Then, run the following command, replacing the text YOUR_API_KEY with your test.ai API key.
python -m demo.basic YOUR_API_KEYThe demo will repeat the same steps that it performed previously, only this time, it's using test.ai! The "developer's breaking changes" we introduced in the code have no effect on the test's ability to run, all thanks to test.ai AI.
Let's take things a step further.
In the section above, we learned that the selenium selectors doesn't even have to be correct in order for test.ai to work, so let's just rid of them completely.
Please make the following change to demo/basic/main.py:
# Change this code:
accessories_nav_link = driver.find_element_by_id("my-developers-changed-this", "accessories_nav_link")
accessories_nav_link.click()

sleep(2)

anchor_bracelet = driver.find_element_by_xpath('//*[@id="main"]/my/developers/also/changed/this', "anchor_bracelet")
anchor_bracelet.click()

sleep(2)

add_to_cart = driver.find_element_by_xpath('//*[@id="product-2707"]/div[2]/form/button', "add_to_cart")
add_to_cart.click()

sleep(2)

view_cart = driver.find_element_by_css_selector("#main > wow > these > developers > have > been > busy", "view_cart")
view_cart.click()


# to:
accessories_nav_link = driver.find_by_element_name("accessories_nav_link")
accessories_nav_link.click()

sleep(2)

anchor_bracelet = driver.find_by_element_name("anchor_bracelet")
anchor_bracelet.click()

sleep(2)

add_to_cart = driver.find_by_element_name("add_to_cart")
add_to_cart.click()

sleep(2)

view_cart = driver.find_by_element_name("view_cart")
view_cart.click()
Save your changes, and using your terminal, cd into the root directory of this project. Then, run the following command, replacing the text YOUR_API_KEY with your test.ai API key.
python -m demo.basic YOUR_API_KEYAs you can see, the test continues to run as if nothing happened, despite the complete absence of selenium selectors!
This is the power that test.ai AI brings to your tests. Say goodbye forever to fragile, breaking selenium selectors.
But, we're not done yet! The test.ai SDK also includes a novel, exciting way to create test cases using an GUI, minimaial code, and no fragile Selenium selectors.
Before we begin, let's remove the elements from our last test.
Visit https://sdk.test.ai (if prompted to login, please do so) and delete all the elements on the screen.
Next, in the IDE of your choice, please open demo/interactive/main.py.
This is a simple test which starts at https://testaistore.com/, clicks on the Store navbar link, searches for Shoes, and adds a pair of green shoes to the cart.
🎥 Click here to see a video of the expected behavior.
You'll notice that there are no selenium selectors in this python file! This is because test.ai includes an interactive test composer which allows you to visually select the elements to use in your tests.
Let's get started. cd into the root directory of this project. Then, run the following command, replacing the text YOUR_API_KEY with your test.ai API key.
On Mac/Linux, run the following commands in your Terminal:
TESTAI_INTERACTIVE=1 python -m demo.interactive YOUR_API_KEYIf using Windows, in PowerShell, run the following commands:
set TESTAI_INTERACTIVE=1
python -m demo.interactive YOUR_API_KEY
After a few seconds, a new browser window pointing to https://sdk.test.ai will open.
👉 If you are prompted to login to your test.ai account, please do so.
On this new page, find the navbar link for Store. Using your mouse, click and drag a box around the link. A green box will appear as you drag your mouse. Release your mouse button to save the selection.
Believe it or not, you just used AI! test.ai is visual-based, so there's no need to mess around with Selenium selectors. The test.ai classifier will train itself using the element inside the box you just drew with your mouse, and now, when it encounters this element in the future, it will be able to recognize it!
👉 If you made a mistake while drawing your box, that's totally okay! Just move your mouse to the correct location and simply click and drag to draw a new box.
At this point, the test will continue, and your browser window will be refreshed when its time to identify the next element.
When prompted, please draw boxes around the elements, as demonstrated below:
(click to expand)
(click to expand)
(click to expand)
(click to expand)
At this point, the test is complete, and all the elements you just selected will be used to train the test.ai AI classifier.
Let's re-run this test.
cd into the root directory of this project. Then, run the following command, replacing the text YOUR_API_KEY with your test.ai API key.
python -m demo.interactive YOUR_API_KEYYou'll see that the test runs to completion, interacting with all the elements you drew boxes over! test.ai AI is 100% based on computer-vision, which means that even if your developers make changes to the underlying HTML/CSS of your web application, the tests you just definied will continue to work!
And that's all folks, you've made it to the end of the tutorial! 🎉
Please feel free to experiment more with this code and try out some of the other selectors. Good luck and have fun!
Questions? Comments? We'd love to hear from you!
- ✉️ Email us:
sdk {at} test.ai - 💬 Chat with us on Discord: https://sdk.test.ai/discord