Capture Workflow
Contents:
Required software:
- Garmin VIRB Edit
- FFMPEG : for extracting audio files
- Python + fitparse : for extracting full sensor FIT sensor data
The key components of our capture devices are:
-
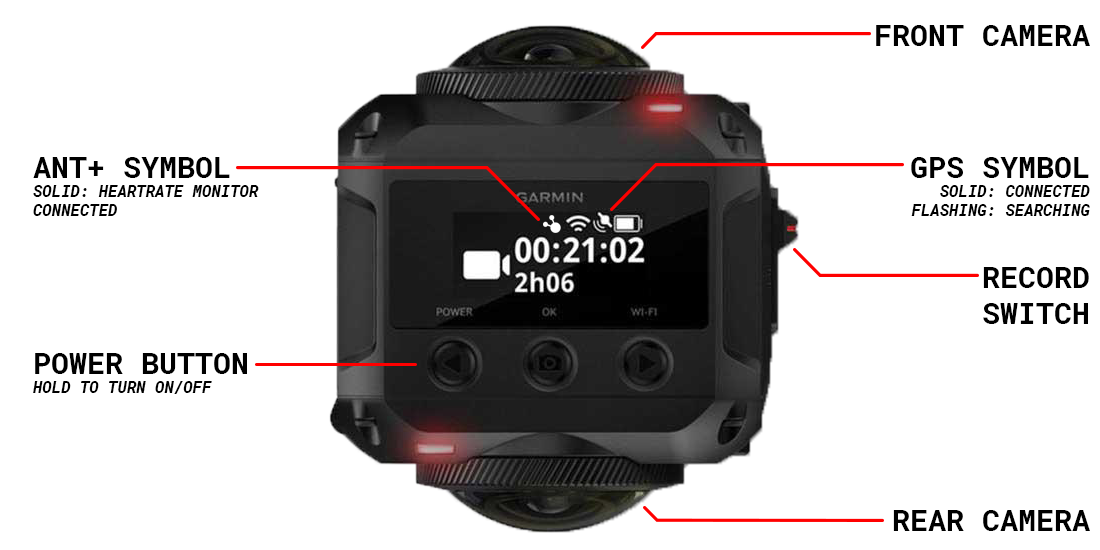
Garmin VIRB 360 Camera
- 360 Video
- Audio (Directional, 4-channel)
- GPS Location & Elevation
- Manual (Web)
- Manual (PDF)
-
Garmin Heart-rate sensor
- Heart rate
- Manual (PDF)
We will cover the usage of these devices in the workshop, but you can also check out the manuals for each for more information.
Camera settings can be changed using the buttons on the top of the camera. We will be capturing in RAW mode, which will output two fisheye videos (2880x2880px, front & back) which we will stitch together using Garmin VIRB Edit software. The cameras for the workshop will be pre-set to the correct settings and will already be paired with a heartrate monitor.
To start recording, slide the recording switch forward (the red lines will be aligned). To stop recording, slide the switch back.
The heartrate monitor measures instantaneous heartrate (@ 1hz) through your skin using the 4 pads on the strap. Wet the pads before putting on the sensor to ensure good skin contact, and follow the manual for correct positioning.
The monitor will turn on automatically when the 4 contacts are touching the skin, and you should see the ANT+ symbol light up on the camera LCD to indicate that the sensor is connected and working.
IMPORTANT NOTE: Before beginning any capture, ensure that the ANT+ symbol and the GPS icons are visible and not flashing. A solid ANT+ icon indicates the camera is connected to the heartrate monitor, and the solid (non-flashing) GPS symbol indicated that the camera is connected to the GPS network. If you fail to check these before starting recording, you may not capture any sensor data beyond the video.
Source video files are generated in VIRB Edit, which will stitch the RAW footage into a 360 and also extract out the FIT file containing the sensor data.
Insert the microSD card into the reader and open VIRB Edit. Select import footage. Select the following settings for the stitching your scene:
- Target Resolution: 4K
- Quality: High
- Stitch Distance: Far
Right-click on the stitched video in the VIRB Edit Media Library, and select Export G-Metrix and choose a directory to export the FIT file. This output FIT file will be trimmed to the start and stop time of the video.
Use ffmpeg to extract the audio as an AAC file.
$ ffmpeg -i /path/to/video.MP4 -vn -acodec copy /path/to/video.MP4.audio.aacThe -i flag points to the source video, the -vn flag ignores the video track, and the -acodec copy flag copies the audio track as-is from the file.
See the fitparse documentation for more info about the FIT message structure, and the FIT SDK for details about the data types and structure. To automatically extract all data in the FIT file, use scripts/fitdump.py.
$ python /path/to/scripts/fitdump.py -i /path/to/fitfile.fit -o /path/to/output_dir/The -i flag should point to your FIT file, and the -o flag to your preferred output directory. If the output directory does not exist, it will be created.
The script will extract all messages from the FIT file, and generate separate JSON files for each type as a list of message objects in standard JSON notation. Some message types and fields are not part of the standard SDK and will be prefixed with unknown_xxx.
Source files should be placed in a folder with the following structure:
your_reconstruction/
-- inputs/
---- your_360_video.mp4
---- your_fit_file.fit
---- clip_times.txt
Note the start & end times (in seconds) you'd like to reconstruct in the clip_times.txt file.