Quickstart Guide
In this guide, we'll go from zero Aspen experience to a graph database populated with data!
| Assumption | Test | Solution |
|---|---|---|
| You are familiar with the command line. | Follow parts 1-2 of the 18F Terminal Guide | |
| You have Ruby (>= 2.6) and Bundler (>= 2.1) installed. | $ ruby -v && bundle -v |
Install Ruby. When Ruby is installed, run $ gem install bundler
|
| You have Docker or Neo4j Desktop installed. | For Docker, make sure the Docker application is running, then $ docker-compose -v. For Neo4j Desktop, just have the application running. |
Install Docker or Install Neo4j Desktop |
If you need help after searching and using Stack Overflow, ask for help in Discussions.
First, install Aspen by running:
gem install aspen-cliIf you get an error related to permissions, you can try running:
gem install aspen-cli --user-installThen add to your path:
export PATH=$PATH:/Users/{your username here}/.gem/ruby/{version, e.g. 2.6.0}/bin(Source)
If this doesn't work, you may need to install a Ruby using Homebrew, asdf, or another Ruby manager.
Once Aspen is installed, run:
aspen new quickstart(You could replace "quickstart" with anything you want—whatever word comes after aspen new is the project name, but we recommend using "quickstart" for simplicity when doing this tutorial.)
This command creates a bunch of files in a folder called quickstart/. Move into the folder by running
cd quickstartOpen this folder with your code editor. Here's a quick rundown of everything you're seeing.
-
binholds the executable files. Insidebinis aconvertscript, which, if necessary, helps you convert non-Aspen files like spreadsheets into Aspen -
buildholds the latest "build" of your project. Every time you runaspen build, this project will hold the transpiled files generated from your Aspen code (like Cypher, GEXF, JSON, etc.) -
configholds project configuration, like database credentials indb.yml, and credentials to include external resources like Airtable or Google Sheets. -
db(you may or may not have this folder) contains the bind mounts that support a Dockerized instance of Neo4j. Someday we'll replace these with volumes. -
srccontains all of your Aspen files—including narratives, discourses, and grammars—and non-Aspen data files, like spreadsheets. We'll get into what each of those are later.
Create a new file in src called main.aspen. In it, include this content:
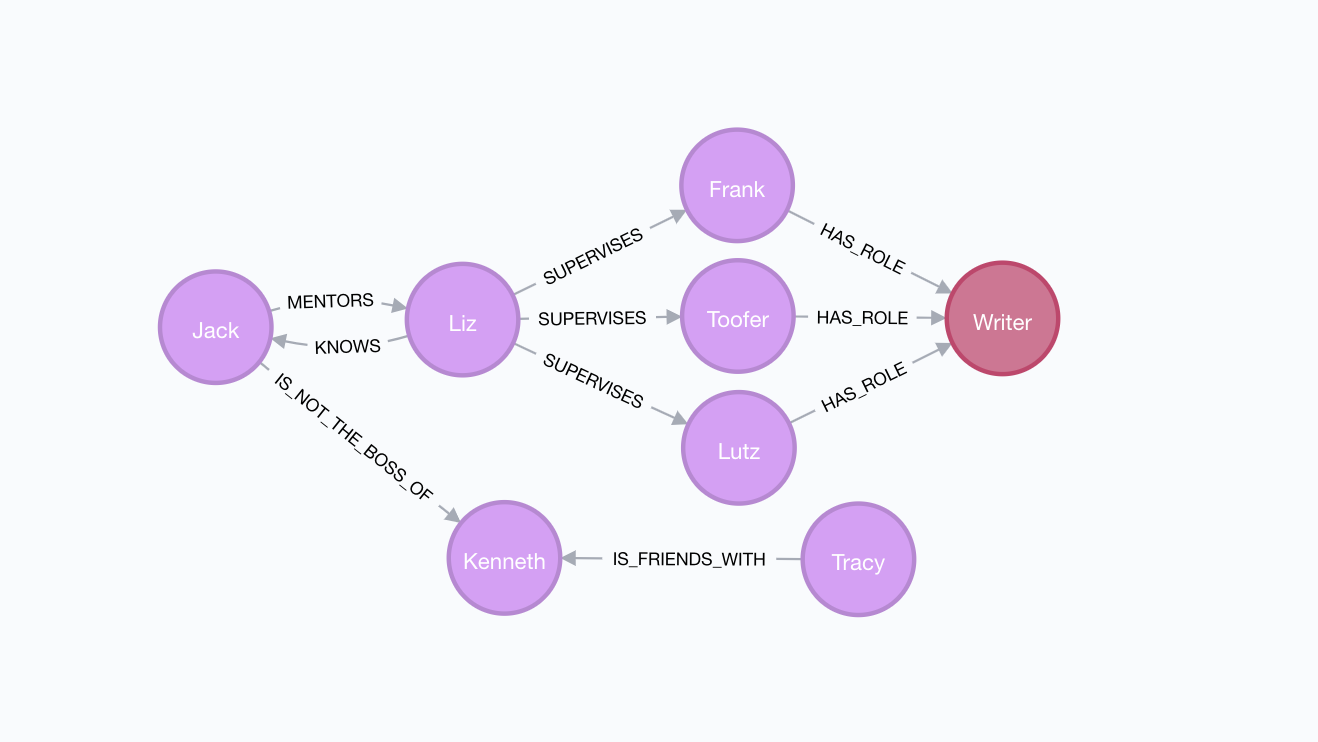
(Liz) [knows] (Jack).
(Jack) [mentors] (Liz).
(Tracy) [is friends with] (Kenneth).
Lutz, Toofer, and Frank are writers.

(Liz) [supervises]:
  - Frank
  - Toofer
  - Lutz

(Jack) [is not the boss of] (Kenneth).
In Aspen, this is called a narrative. Simply put, narratives describe the information we want to turn into graph data.
Inspired by Cypher, the "vanilla" Aspen syntax has entities (people, things, ideas) wrapped in () parentheses, while connecting words are wrapped in [] square brackets.
Notice that the entire fourth line, doesn't have parentheses or brackets. This line is special, and we'll come back to this when we cover Grammars. In certain cases, like in this example, list items also don't need parentheses.
How does Aspen know that Liz, Jack, Tracy, and everyone else are people, and that the string "Liz" is a name and not a barcode ID, car model, or other piece of data?
It doesn't—until you tell it!
A discourse in Aspen describes the narrative and helps Aspen understand how to interpret the data.
In src/discourses (the discourses folder inside the src folder), create a new file called main.aspen. This will be our main discourse file.
In this file, add the following content:
default:
  label: Person
  attribute: name

reciprocal: knows, is friends with
This is saying that, by default, we should interpret nodes (entities) as people, with a type Person. We should also assume that strings like "Liz" and "Jack" are to be assigned to an attribute called name.
We can assume that since Tracy is friends with Kenneth, Kenneth is also friends with Tracy—there's a reciprocity here, and it's not one-sided. By listing knows and is friends with after reciprocal, we're telling Aspen to interpret these types of relationships as mutual.
The last line in the narrative doesn't have the "vanilla" Aspen syntax of (Subject) [relationship] (Object).
Lutz, Toofer, and Frank are writers.
To capture relationships like these that are more than just a simple connecting relationship, we have to write what Aspen calls a "Custom Grammar".
A custom grammar is a small pattern-matching program that explains how to turn complex sentences into data.
Create a file in src/grammars called main.aspen. Add this block of code:
grammar:
  -
    match:
      - (Person a), (Person b), and (Person c) are writers.
    template: |
      (writer:Role { type: "Writer" })
      {{{a}}}-[:HAS_ROLE]->(writer)<-[:HAS_ROLE]-{{{b}}}
      {{{c}}}-[:HAS_ROLE]->(writer)
This tells Aspen to interpret "Frank", "Toofer", and "Lutz" as names of Person nodes, and to run the Cypher in the template: section. Custom grammars let you write much more complex relationships than is possible in vanilla Aspen.
If we wanted to be able to write a line like "A, B, and C are video editors" by replacing "writers" with a matcher, we can—but we'll leave that to the Grammar documentation page to go in depth.
Now that we've written our narrative, our discourse, and our grammar, it's time to turn them into Cypher and put them in a Neo4j database.
The Aspen command-line tool includes a build command that transpiles Aspen to other languages, much in the way Markdown transpiles to HTML. (This is technically different from compiling, but we use "compile" and "transpile" interchangeably throughout the documentation.)
From inside the quickstart folder, run:
aspen buildNow, look inside the build folder. You should see a few files, one ending in .cql—this is the Cypher file. Open it up and you'll find the Cypher that came from our Aspen file.
Note how much longer the Cypher is, even for a small project like this! That's one major benefit of Aspen.
Now that we have our Cypher file, it's time to push that to a database.
If you're using Docker, follow along with the section With Docker Compose.
If you're using Neo4j Desktop, follow along with the section With Neo4j Desktop.
First, make sure the Docker application is running.
From the quickstart folder, run:
docker-compose upIf, after a minute or two, a Neo4j database is booted up, our test has passed! We just wanted to make sure it booted. Press Ctrl+C to shut down the database for now.
Then, to run the database in the background, run:
docker-compose up -dWait a minute for the database to boot, refreshing http://localhost:7474/browser.
Make sure to connect to the database with username "neo4j" and password "pass". Then skip to the section Push the Data.
Open the Neo4j Desktop application, then click "+ Add Database". Set the name to "Aspen Playground", the password to "pass", and the version to 3.5.17. Click the Start Database button.
If the "Conflicts occurred" window pops up, note the numbers next to "http". It will show something like:
- http: 7474 -> 11007 (this number may be different)
In the quickstart/ folder, go to config/db.yml. In the line starting with url, replace 7474 with the second number. In this example, that's 11007. So, your config/db.yml should now look like:
url: http://neo4j:pass@localhost:11007/Save the file, and in Neo4j Desktop, click "Fix configuration" to continue.
To push the built data to the database, run:
aspen pushIf you get an error that mentions Faraday, that probably means your database isn't running or you're pointing to the wrong URL in quickstart/config/db.yml.
This will replace all the data in the sandbox database we have running in Docker with the data from the freshly-transpiled Cypher.
Keep in mind never to use this tool with a production database—it deletes absolutely everything.
In the Neo4j browser, run this in the prompt at the top of the window to see all of your data:
MATCH (n) RETURN nYou should see data that looks like this:
Run docker-compose down when you're ready to shut down the sandbox database.
You just learned the basics of Aspen! Nice work! High five! 💥 🙏🏼 💥
To keep learning, go back to the Wiki homepage.
If you have a question, need help, etc., pop over to the Discussions tab and ask away!