
This repository was built to speed up the process of creating a Rancher server and a RKE cluster for Calico Cloud trial. It provides the steps to create a RKE (Rancher Kubernetes Engine) cluster through a Rancher server on AWS using EC2 instances. Also, you can find here the steps for deploying the Online Boutique as an example application, and connecting your cluster to Calico Cloud.
This section will guide you through the initial steps of setting up a RKE cluster using Rancher on AWS EC2 instances. The Terraform code presented here consists of a stack with 3 layers:
- AWS Infrastructure
- Rancher Server
- RKE Cluster
Each layer has a Terraform code for a specific task and it is built on the top of the previous layer. This layer segmentation will help if you want partially destroy the infrastructure later on.
The following applications should be installed on your computer:
- git
- aws cli
- terraform
- kubectl
- k9s (optionally)
This section will explain how to run the Terraform code and what are the expected results:
- The next step is to clone this git repository:
git clone https://github.com/regismartins/cc-rancher-ec2-tf-stack.gitAfter cloning the repository, your working directory will look like the following:
cc-rancher-ec2-tf-stack
├── README.md
├── aws-infra
│   ├── aws_infra.tf
│   ├── data.tf
│   ├── outputs.tf
│   └── terraform.tf
├── common
│   ├── output.tf
│   └── variables.tf
├── rancher-server
│   ├── bootstrap.tf
│   ├── data.tf
│   ├── helm.tf
│   ├── k3s.tf
│   ├── output.tf
│   └── terraform.tf
└── rke-cluster
    ├── data.tf
    ├── output.tf
    ├── rke.tf
    ├── terraform.tf
└── variables.tf- The variables to be used across all layers are in the the
variables.tfin thecommonfolder. They are loaded as a module. The first step is to customize the variables for your environment. The following table describes the variables:
| Variable | Description | Default Value |
|---|---|---|
| owner | Name to be used in the Owner tag of the AWS resources | Regis Martins |
| prefix | The prefix will precede all the resources to be created for easy identification | regis |
| aws_region | AWS region to be used in the deployment | ca-central-1 |
| aws_az | AWS availability zone to be used in the deployment | b |
| vpc_cidr | VPC CIDR for the EC2 instances | 100.0.0.0/16 |
| instance_type | Instance type used for Rancher server EC2 instance | t3a.medium |
| hosted_zone | The hosted zone domain to be used for the Rancher server | tigera.rocks |
| domain_prefix | Domain prefix of the Rancher server. https://domain_prefix.hosted_zone (ie: https://rancher.tigera.rocks) | rancher |
| rancher_kubernetes_version | Kubernetes version to use for Rancher server cluster | v1.22.9+k3s1 |
| cert_manager_version | Version of cert-manager to install alongside Rancher (format: 0.0.0) | 1.7.1 |
| rancher_version | Rancher server version (format: v0.0.0) | 2.6.5 |
| admin_password | Password to be defined for the admin user by the bootstrap (12 char. minimum) | rancherpassword |
| workload_kubernetes_version | Kubernetes version to use for managed RKE cluster | v1.22.10-rancher1-1 |
| rancher_cluster_name | Prefix for the RKE cluster | rke |
| aws_access_key_id | export TF_VAR_aws_access_key_id = <ACCESS_KEY> for the Rancher server to provision the RKE cluster | "" |
| aws_secret_access_key | export TF_VAR_aws_secret_access_key = <SECRET_KEY> for the Rancher server to provision the RKE cluster | "" |
After reviewing and customizing the variables, let's start applying the Terraform code beggining with the aws-infra, which will build the infrastructure on AWS.
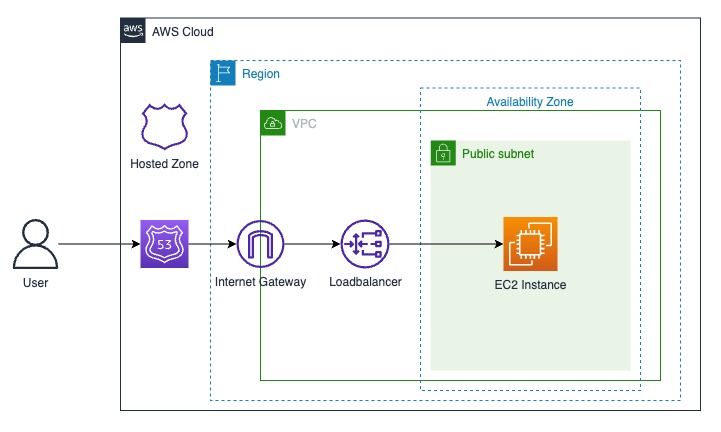
The following elements will be created on AWS for the Rancher server installation:
- VPC
- Subnet
- Internet Gateway
- Default route
- Security Group
- TLS keys
- EC2 Instance
- Load Balancer
- Hosted Zone Record
- Certificate
- IAM role and policy
- Change to the
aws-infrafolder.
cd ./cc-rancher-ec2-tf-stack/aws-infra- Lets now initiate the Terraform in the
aws-infradirectory.
terraform initThe output should be something like the bellow
$ terraform init
Initializing modules...
- common in ../common

Initializing the backend...

Initializing provider plugins...
- Finding hashicorp/aws versions matching "4.18.0"...
- Finding hashicorp/local versions matching "2.2.3"...
- Finding hashicorp/tls versions matching "3.4.0"...
- Installing hashicorp/aws v4.18.0...
- Installed hashicorp/aws v4.18.0 (signed by HashiCorp)
- Installing hashicorp/local v2.2.3...
- Installed hashicorp/local v2.2.3 (signed by HashiCorp)
- Installing hashicorp/tls v3.4.0...
- Installed hashicorp/tls v3.4.0 (signed by HashiCorp)

Terraform has created a lock file .terraform.lock.hcl to record the provider
selections it made above. Include this file in your version control repository
so that Terraform can guarantee to make the same selections by default when
you run "terraform init" in the future.

Terraform has been successfully initialized!

You may now begin working with Terraform. Try running "terraform plan" to see
any changes that are required for your infrastructure. All Terraform commands
should now work.

If you ever set or change modules or backend configuration for Terraform,
rerun this command to reinitialize your working directory. If you forget, other
commands will detect it and remind you to do so if necessary.
$- Once the Terrafor has being successfully initialized in the
aws-infradirectory, you can apply the Terraform code.
terraform apply -auto-approveGreat! Now you just need to wait until Terraform finishes the infrastructure creation process. This process may take about 5 minutes, on average. At the end, the outputs will be like:
You don't need to remember them. They will be referred by the next modules.
Apply complete! Resources: 22 added, 0 changed, 0 destroyed.

Outputs:

aws_iam_profile_name = "regis-rancher-profile"
aws_security_group = "regis-rancher-allow-all"
aws_subnet_id = "subnet-035c3d2350d89c030"
private_key = <sensitive>
rancher_server_private_ip = "100.0.14.233"
rancher_server_public_ip = "35.183.125.29"
rancher_url = "rancher.tigera.rocks"
vpc_id = "vpc-06e23cbacb3622e0d"

$
After all the resources has being successfully created, you can connect to the AWS console and check the resources that were created, if you will. They will have a prefix as you configured in the variables.tf file, in the common folder. Also, the following tags were included in all resources:
Environment = "rancher-workshop"
Owner       = <owner_variable>
Terraform   = "true"
You can change or add more tags by editing the terraform.tf file in the aws-infra folder.
For the next step, let's apply the Terraform code to build a Rancher server using the AWS infrastructure deployed here.
This piece of Terraform code will install a Kubernetes K3s cluster in the EC2 instance previously deployed and use Helm charts to install the Certificate Manager (https://artifacthub.io/packages/helm/cert-manager/cert-manager) and the Rancher server itself. The final step is to bootstrap the Rancher server, changing the admin password to the value of the variable admin_password speficied in the variable.tf file in the common folder.
- Change to the
rancher-serverfolder.
cd ../rancher-server- Lets now initiate the Terraform in the
rancher-serverdirectory.
terraform initThe output should be something like the bellow
$ terraform init
Initializing modules...
- common in ../common

Initializing the backend...

Initializing provider plugins...
- terraform.io/builtin/terraform is built in to Terraform
- Finding hashicorp/helm versions matching "2.5.1"...
- Finding rancher/rancher2 versions matching "1.24.0"...
- Finding hashicorp/local versions matching "2.2.3"...
- Finding loafoe/ssh versions matching "2.0.1"...
- Installing hashicorp/local v2.2.3...
- Installed hashicorp/local v2.2.3 (signed by HashiCorp)
- Installing loafoe/ssh v2.0.1...
- Installed loafoe/ssh v2.0.1 (self-signed, key ID C0E4EB79E9E6A23D)
- Installing hashicorp/helm v2.5.1...
- Installed hashicorp/helm v2.5.1 (signed by HashiCorp)
- Installing rancher/rancher2 v1.24.0...
- Installed rancher/rancher2 v1.24.0 (signed by a HashiCorp partner, key ID 2EEB0F9AD44A135C)

Partner and community providers are signed by their developers.
If you\'d like to know more about provider signing, you can read about it here:
https://www.terraform.io/docs/cli/plugins/signing.html

Terraform has created a lock file .terraform.lock.hcl to record the provider
selections it made above. Include this file in your version control repository
so that Terraform can guarantee to make the same selections by default when
you run "terraform init" in the future.

Terraform has been successfully initialized!

You may now begin working with Terraform. Try running "terraform plan" to see
any changes that are required for your infrastructure. All Terraform commands
should now work.

If you ever set or change modules or backend configuration for Terraform,
rerun this command to reinitialize your working directory. If you forget, other
commands will detect it and remind you to do so if necessary.
$
If you will, you can optionaly set an environment variable to be used as the password by the bootstrap process. If this variable is not set, the variable configured in the common module will be used. This is optional
export TF_VAR_admin_password=<admin_password>- Once the Terrafor has being successfully initialized in the
rancher-serverdirectory, you can apply the Terraform code.
terraform apply -auto-approveThis apply will take tipically from 5 to 7 min to complete. At the end, you should be able to see a message similar to this:
Apply complete! Resources: 7 added, 0 changed, 0 destroyed.
Outputs:
admin_token = <sensitive>
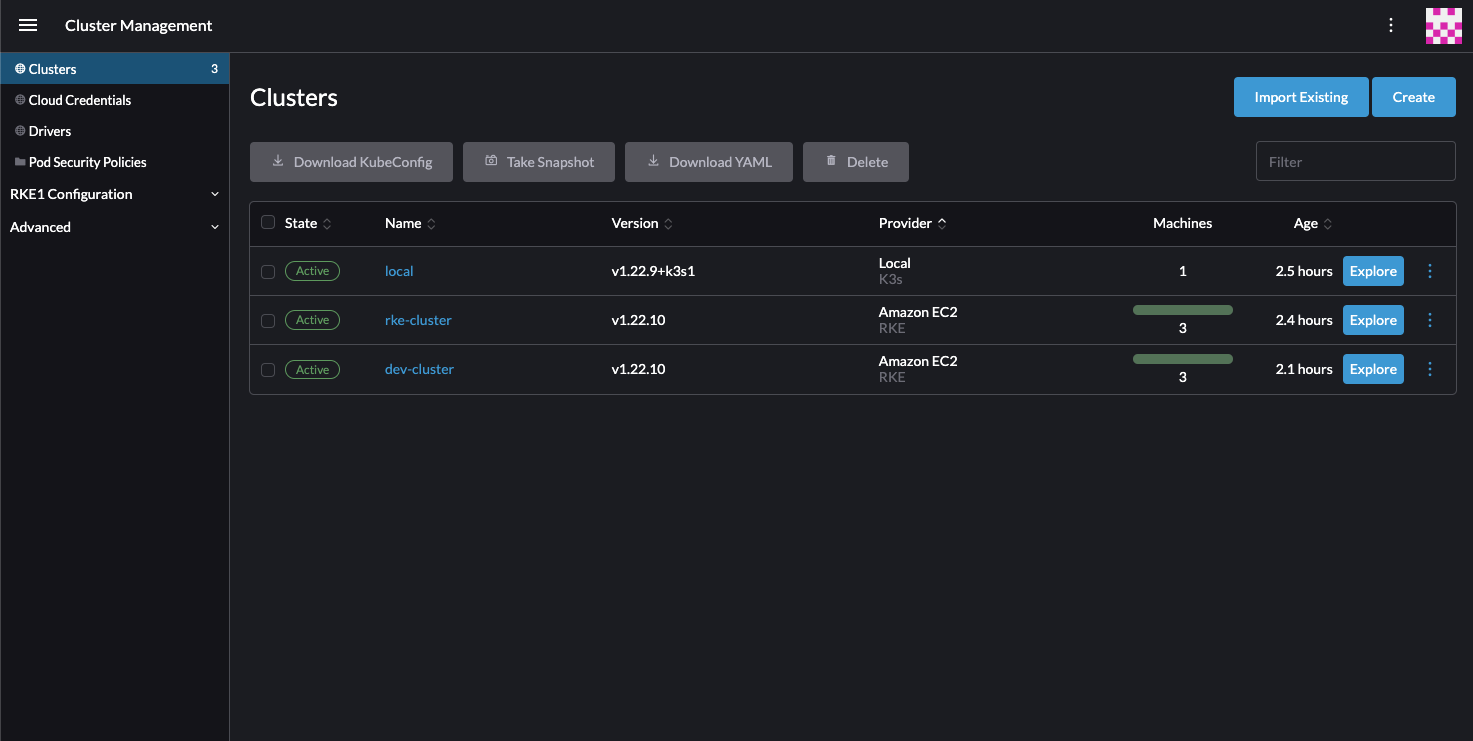
$Perfect! Another layer deployed. Now you have the Rancher Server up and running. Test the access to your Rancher server using the following https address: http://<domain_prefix>.<hosted-zone>. In my case, https://rancher.tigera.rocks.
The username to log in is admin and the password is the one you speficied in the variable admin_password in the variable.tf file at the common folder.
Ok. Now the last layer, RKE cluster creation.
This layer will use Terraform to provision a "Calico Cloud-ready" RKE cluster in Rancher, so Rancher will use AWS APIs to create EC2 instances for the nodes and install RKE on them.
- Change to the
rke-clusterfolder.
cd ../rke-cluster- Lets now initiate the Terraform in the
rke-clusterdirectory.
terraform initThe output should be something like the bellow:
$ terraform init
Initializing modules...
- common in ../common

Initializing the backend...

Initializing provider plugins...
- terraform.io/builtin/terraform is built in to Terraform
- Finding rancher/rancher2 versions matching "1.24.0"...
- Finding hashicorp/null versions matching "3.1.1"...
- Finding hashicorp/aws versions matching "4.18.0"...
- Finding latest version of hashicorp/local...
- Installing rancher/rancher2 v1.24.0...
- Installed rancher/rancher2 v1.24.0 (signed by a HashiCorp partner, key ID 2EEB0F9AD44A135C)
- Installing hashicorp/null v3.1.1...
- Installed hashicorp/null v3.1.1 (signed by HashiCorp)
- Installing hashicorp/aws v4.18.0...
- Installed hashicorp/aws v4.18.0 (signed by HashiCorp)
- Installing hashicorp/local v2.2.3...
- Installed hashicorp/local v2.2.3 (signed by HashiCorp)

Partner and community providers are signed by their developers.
If you\'d like to know more about provider signing, you can read about it here:
https://www.terraform.io/docs/cli/plugins/signing.html

Terraform has created a lock file .terraform.lock.hcl to record the provider
selections it made above. Include this file in your version control repository
so that Terraform can guarantee to make the same selections by default when
you run "terraform init" in the future.

Terraform has been successfully initialized!

You may now begin working with Terraform. Try running "terraform plan" to see
any changes that are required for your infrastructure. All Terraform commands
should now work.

If you ever set or change modules or backend configuration for Terraform,
rerun this command to reinitialize your working directory. If you forget, other
commands will detect it and remind you to do so if necessary.

$- This Terraform code uses the AWS credentials from the environments so, you will need to export the access key and the secret access for your AWS account, as follow:
export TF_VAR_aws_access_key_id=<aws_access_key_id>
export TF_VAR_aws_secret_access_key=<aws_secret_access_key>- Once the Terrafor has being successfully initialized in the
rke-clusterdirectory, and the credentials were loaded, you can apply the Terraform code.
terraform apply -auto-approveThis apply will take less than 10 minutes to complete, in general. At the end, you should be able to see a message similar to this:
Apply complete! Resources: 8 added, 0 changed, 0 destroyed.

$
Now you have the rke cluster installed and ready to connect to Calico Cloud.
The terraform will also load the kubeconfig so you can kubectl to your cluster right away. Try the following:
kubectl get nodesYou should see an output like:
$ kubectl get nodes
NAME                                           STATUS   ROLES                      AGE   VERSION
ip-100-0-5-27.ca-central-1.compute.internal    Ready    worker                     25m   v1.22.10
ip-100-0-5-7.ca-central-1.compute.internal     Ready    worker                     25m   v1.22.10
ip-100-0-7-167.ca-central-1.compute.internal   Ready    controlplane,etcd,worker   28m   v1.22.10
$
The way this layer was built allows you to launch more RKE clusters using the terraform workspace resource. It is possible to change the RKE cluster name using the cluster_name variable in a new workspace.
-
Create a new terraform workspace:
terraform workspace new development
-
Check if you are in the right workspace
terraform workspace list
Ouput:
terraform workspace list default * development -
Run the
terraform applyusing a new value for thecluster_namevariable:terraform apply -var="cluster_name=dev" -auto-approve -
A new RKE cluster will be created.
You can repeat this process as much as you want, creating new workspaces and new values for the cluster_name variable.
The next step would be to install an exemple application, the Online Boutique.
Online Boutique is a cloud-native microservices demo application. Online Boutique consists of an 11-tier microservices application. The application is a web-based e-commerce app where users can browse items, add them to the cart, and purchase them.
- Start by cloning the repository.
cd ..
git clone https://github.com/GoogleCloudPlatform/microservices-demo.git
cd microservices-demo- Deploy the sample app to the RKE cluster.
kubectl apply -f ./release/kubernetes-manifests.yaml- Wait for the Pods to be ready.
kubectl get pods- After a few minutes, you should see:
NAME                                     READY   STATUS    RESTARTS   AGE
adservice-694f4ff98-n6b46                1/1     Running   0          74s
cartservice-85f8bc44fd-gtvjl             1/1     Running   0          75s
checkoutservice-8fc47bbbd-ptjjs          1/1     Running   0          76s
currencyservice-597bdf576b-zvknb         1/1     Running   0          74s
emailservice-d5c6f74dd-kh48c             1/1     Running   0          77s
frontend-7ffbf49884-bq9kl                1/1     Running   0          76s
loadgenerator-65779994db-5xdrm           1/1     Running   0          75s
paymentservice-76b9c8b87d-xq4mq          1/1     Running   0          75s
productcatalogservice-6969d4f5fd-92tk6   1/1     Running   0          75s
recommendationservice-58798d5c8-zkt5t    1/1     Running   0          76s
redis-cart-6f65887b5d-xlrl6              1/1     Running   0          74s
shippingservice-ff5f4d7d-gp6lg 1/1 Running 0 74s- Access the web frontend in a browser using the frontend's EXTERNAL_IP.
kubectl get service frontend-external | awk '{print $4}'Example output - do not copy
EXTERNAL-IP
a2179342230294b15b2ab7a2e15ace8d-1437444666.ca-central-1.elb.amazonaws.com
Note- you may see while Rancher provisions the load balancer on AWS. If this happens, wait a few minutes and re-run the command. Even after the loadbalancer is assigned it may take a few minutes to the traffic starts to be redirected to the frontend service on the RKE.
For connecting your cluster to Calico Cloud, sign up for a trial by accessing https://www.calicocloud.io/home and follow the instructions.
In order to clean up, follow the reverse order.
- Delete the Online Shop
- Destroy the RKE Cluster
- Destroy the Rancher server
- Destroy the AWS infrastructure.
Note- due to some issues with Rancher provisioning API used to create the AWS resources for the RKE cluster, when destroying the AWS infrastructure the VPC destruction may get stuck. If it is too long, use the AWS console to check if the security group created for the frontend loadbalancer still existing. If so, delete it manually and the VPC destruction may resume successfully.