Chainmetric Network being an IoT-enabled permissioned blockchain network based on Hyperledger Fabric stack, is an essential part of Chainmetric supply chain requirements control solution.
It is oriented on storing, managing, and handling the continuous flow of sensor readings data, which is sourced by IoT on-network devices, and validating those readings against organization assigned requirements by Smart Contracts, And as so, providing better control and transparency on the environment-dependent supply chains.
Chainmetric philosophy is based on intentions for it to be completely open-sourced, easily replicable, and available for integration into exciting infrastructures even for small businesses at the lowest cost possible.
And by so, popularizing use of blockchain based solutions in the niche market areas, supporting supply quality transparency, infrastructure security, and convenience in cross-organization interactions.
With such principles in mind, Chainmetric network deployment is aiming at cheap single-board ARM-based computers such as Raspberry Pi, instead of public cloud, convenient but costly infrastructures.
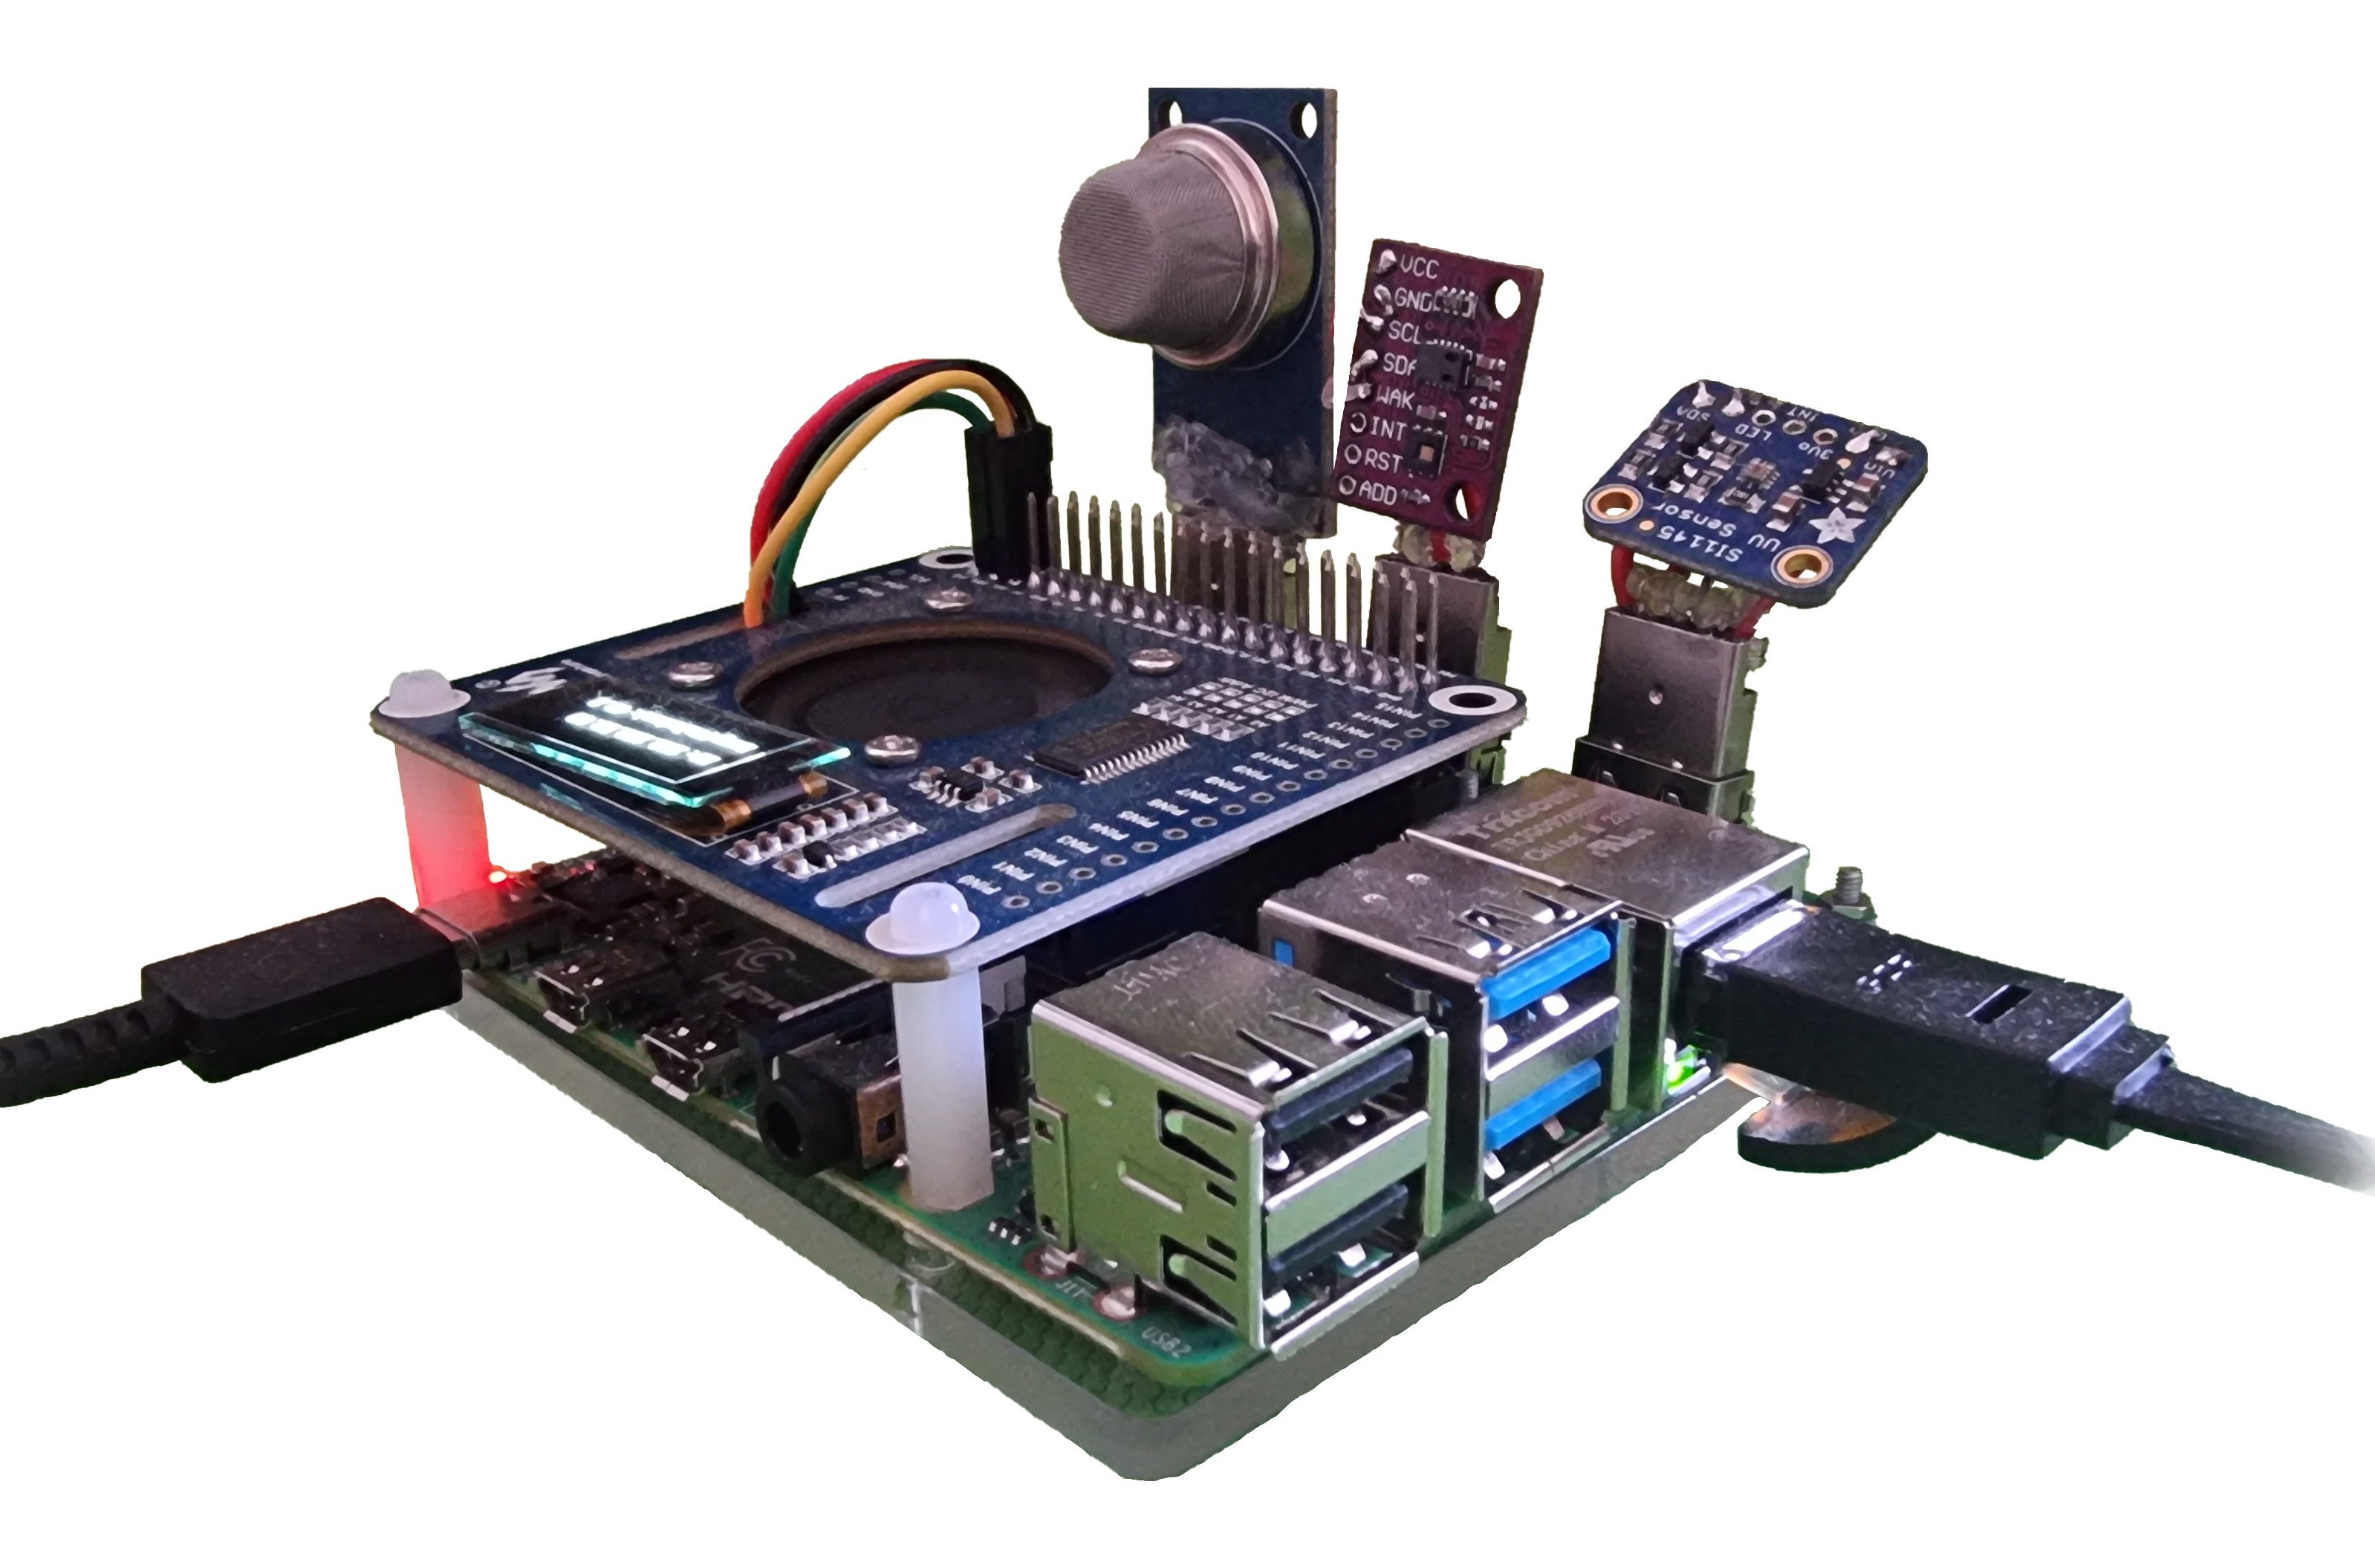 Chainmetric blockchain node device (development stage alpha build)
- Existing Kubernetes environment and
kubectlconnected to it on your local devices - Volume provisioner installed in K8s, this projects intends to use
rancher/local-path-provisioner - Reverse proxy installed in K8s, this projects intends to use Traefik
fabnctlcommand line utility installed on local device
For self-hosting blockchain network you would require:
- Depending on the infrastructure requirements one or multiply single-board computers (Raspberry Pi 4 Model B 4GB+ is recommended, RPi 3 or other similar specs alternatives are also will do)
- Reliable Internet connection through router and ethernet cable
- Assigned static IP address or DHCP Server
- Configured port-forwarding on router, instructions for your exact hardware can be found here
Further instructions for preparing Kubernetes environment on your host devices will be mentioned int the next section.
This step can be skipped if you plan deployment on public cloud with ready to go K8s cluster.
There are a few options for a K8s engine installation, such as kubelet, MicroK8s, or minikube for non-production purposes. However, for the ARM-based hardware the preferred one would be K3s.
Thanks to it tiny size (less than 100 MB), low impact on system resource, and installation simplicity it is a perfect solution for single-board computers like Raspberry Pi.
Assuming SSH connection with Master node-device is already established,
you can now use tool k3sup tool for installing K3s on the target devices.
Define following env variables in .env file or via export command:
CLUSTER_NAME=chainmetric
DOMAIN=chainmetric.network

NODE_IP=192.168.50.88
NODE_USERNAME=ubuntu
Now you can use k3s make rule to perform K3s installation on the master node device:
make k3sTo add slave nodes into the cluster repeat previous step with other devices and use k3sup join to let master aware about them.
For detail instruction on K3s setup refer to rgulden/k3s-raspberry-pi repo.
To expose blockchain network to beyond the local host environment it is required to install some reverse proxy service, which will map Kubernetes services to extensible outside of cluster domain URLs.
This project intends to use Traefik reverse proxy and load balancer for such purposes. Due to its configuration simplicity, native support by K3s, and overall great performance it is a perfect match for our desired infrastructure.
You can install it with the Helm chart or via traefik make rule.
make traefikTo ensure persistence of the on-chain data, configuration, and cryptographic material we would also need Persistent Volumes. Such could be provisioned manually, but more convenient way of achieving this is by installing dynamic volume provisioning service.
There tons of options to chose from, like NFS Server or
Longhorn. But for the sake of simplicity, which is justified by low storage requirements of Hyperledger Fabric,
we rather would utilize rancher/local-path-provisioner.
To install it please use storage make rule.
make storageNow to request volume provisioning local-path Storage Class can be used in Kubernetes deploy configs.
HashiCorp Vault is a centralised secured secret manager service that used for storing x509 identities of Fabric network users, providing convenient SSO authentication, issuing TLS certificates for gRPC APIs, etc.
To install it please use vault make rule.
make vaultHyperledger Fabric is a permissioned blockchain, thus you cannot simply spin up the node and start participating in network activities, like permissionless blockchains (e.g. Bitcoin, Ethereum) allow. Instead, it is universally required a cryptographic proof of membership in a certain organization.
Now that in its own turn would require Fabric network administrators to prepare network configuration, setup secure communication channels, and register user accounts and roles. If it sounds complicated it's because it really is so, but the method and utility developed for this exact use case will reduce required efforts greatly.
From now on we would use
fabnctl, command line utility initially designed specifically for the deployment of the Chainmetric network, but was later open-sourced as a separate repository to separate and streamline it further development as a general convenient way of Hyperledger Fabric deployment routine. If you're having a problem please submit an issue. Alternatively, in case having an ideas for improvements or new features forks and Pull Requests are highly welcomed.
Before going into the deployment process, it is required to prepare desired network configuration.
Configuration is expected to be stored in the network-config.yaml file and have a following example structure:
domain: chainmetric.network

orderer:
  name: Orderer
  type: etcdraft
  mspID: orderer
  hostname: orderer
  port: 7050
  profile: OrdererGenesis
  channelID: system-channel

organizations:
  - name: Chipa-INU
    mspID: chipa-inu
    hostname: chipa-inu.org
    peers:
      - hostname: peer0
        port: 7051
    channelProfile: SupplyChannel
    channelID: supply-channel
  - name: Blueberry-GO
    mspID: blueberry-go
    hostname: blueberry-go.org
    peers:
      - hostname: peer0
        port: 7051
    channelProfile: SupplyChannel
    channelID: supply-channel

channels:
  - name: SupplyChannel
    profile: SupplyChannel
    channelID: supply-channel
    consortium: SupplyConsortium
    organizations:
      - Chipa-INU
      - Blueberry-GO
You can of course use own domain, organization names, channels, etc., but overall structure must remain the same.
With network configuration ready the next step would be feed it in them cmd to get cryptographic materials and channel artifacts. At the same time those would be placed in a shared persistent volume to be accessible from any following blockchain component.
Use gen artifacts command to perform generation based on defined config:
fabnctl gen artifacts --arch=arm64 --domain=chainmetric.network -f=./network-config.yamlThe output materials would be placed into the following directories: .channel-artifacts.$DOMAIN and .crypto-config.$DOMAIN.
Finally, we could proceed to the deployment of the Hyperledger Fabric network itself. Although this step will indeed take some time (5-30 minutes depending on the configuration), the human effort comes down to preparing a command sequence and setting them up to go.
Before the next step it recommended getting familiar with
fabnctldocumentation. Refer to a dedicated repo or view instructions provided infabnctl helpcommand.
Fabric network deployment consists from the following stages:
- Orderer service deployment
- Organization peers deployment
- Communication channels setup
- Smart Contracts (aka chaincodes) deployment
- Anchor peers setup
Each above step is supported by the fabnctl utility, and the besides domains and organization names,
deployment script for the whole network would basically stay the same for most configurations:
hyperledger-deploy:
	fabnctl install orderer -a=arm64 -d=chainmetric.network

	fabnctl install peer -a=arm64 -d=chainmetric.network -o chipa-inu -p peer0
	fabnctl install peer -a=arm64 -d=chainmetric.network -o blueberry-go -p peer0

	fabnctl install channel -a=arm64 -d=chainmetric.network -c=supply-channel \
		-o=chipa-inu -p=peer0 \
		-o=blueberry-go -p=peer0

	fabnctl install cc assets -a=arm64 -d=chainmetric.network -C=supply-channel \
		-o=chipa-inu -p=peer0 \
		-o=blueberry-go -p=peer0 \
		--image=chainmetric/assets-contract \
		--source=./smartcontracts/assets \
		--charts=./deploy/charts
	# ... remaining chaincodes deploy commands

	fabnctl update channel -a=arm64 -d=chainmetric.network --setAnchors -c=supply-channel \
			-o=chipa-inu \
			-o=blueberry-go \
			-o=moon-lan
So you can make required changes in hyperledger-install rule and run it:
make hyperledger-installThat's it! Chainmetric network is up and ready to receive data from IoT devices and dedicated mobile app, and on-chain Smart Contracts would constantly process data to validated it against assigned requirements.
Chainmetric also introduces off-chain per-organisation services with intention to support and extend both functionality and availability of Blockchain network.
For installation of such services please refer to orgservice README
Blockchain network is an essential thought not the only part of the Chainmetric composite solution.
The business logic is mostly concentrated in the Smart Contacts pool. These on-chain services, which are already deployed for each organization, are responsible for deterministic data processing, requirements validation, and events notification.
Yet, the data itself must be submitted to the network by other majorly important components - IoT edge devices and user application.
Edge devices are intended for the deployment in the areas where the assets are, e.g. warehouses, transportation tracks, etc. Their main purpose is to continually sample environments condition with integrated sensors, perform initial processing and sending readings on the distributed ledger for further processing and validation against user defined requirements per each asset. Refer to timoth-y/chainmetric-iot repo for build and deployment instructions.
Controlling edge devices, registering new and existing assets, defining requirements for them, and monitoring environment in real time. All of those and more can be done via Chainmetric mobile application for admins and other users. Please refer to timoth-y/chainmetric-app repo for installation and usage instructions.
For initializing local development environment use bazel run command specified gazelle plugin target.
bazel run //:gazelleInitially it is required to update third-party dependencies for bazel build based on go.mod. Use following command:
gazelle update-repos --from_file=go.mod -index=false -to_macro=go_third_party.bzl%go_dependenciesTo link Protobuf generated files in directories where proto files are defined use following command:
bazel query 'kind("proto_link", //...)' | xargs -L 1 bazel run- CouchDB as the World State database (#2)
-
KafkaRaft for Ordering Service - Raspberry Pi (ARM64) deployment strategy (#4)
- Go written command utility
or Kubernetes operator(#5) - CI/CD integration (probably
GitLab CEor simply GitHub Actions) - Deploy Hyperledger Explorer for managing and monitoring network from the web
Chainmetric network designed to be an enterprise-grade, confidential and scalable distributed ledger, which in combination with dedicated Smart Contracts, embedded sensor-equipped IoT devices, and cross-platform mobile application provides ambitious metric requirements control solutions for general assets supply chains.
Licensed under the Apache 2.0.