This is a study note for SAIT MMDA324 Wordpress theme class.
all the "dashboard" are refering to WordPress backend dashboard.
🆕Comments
The further to the right, the more general The further to the left, the more specific
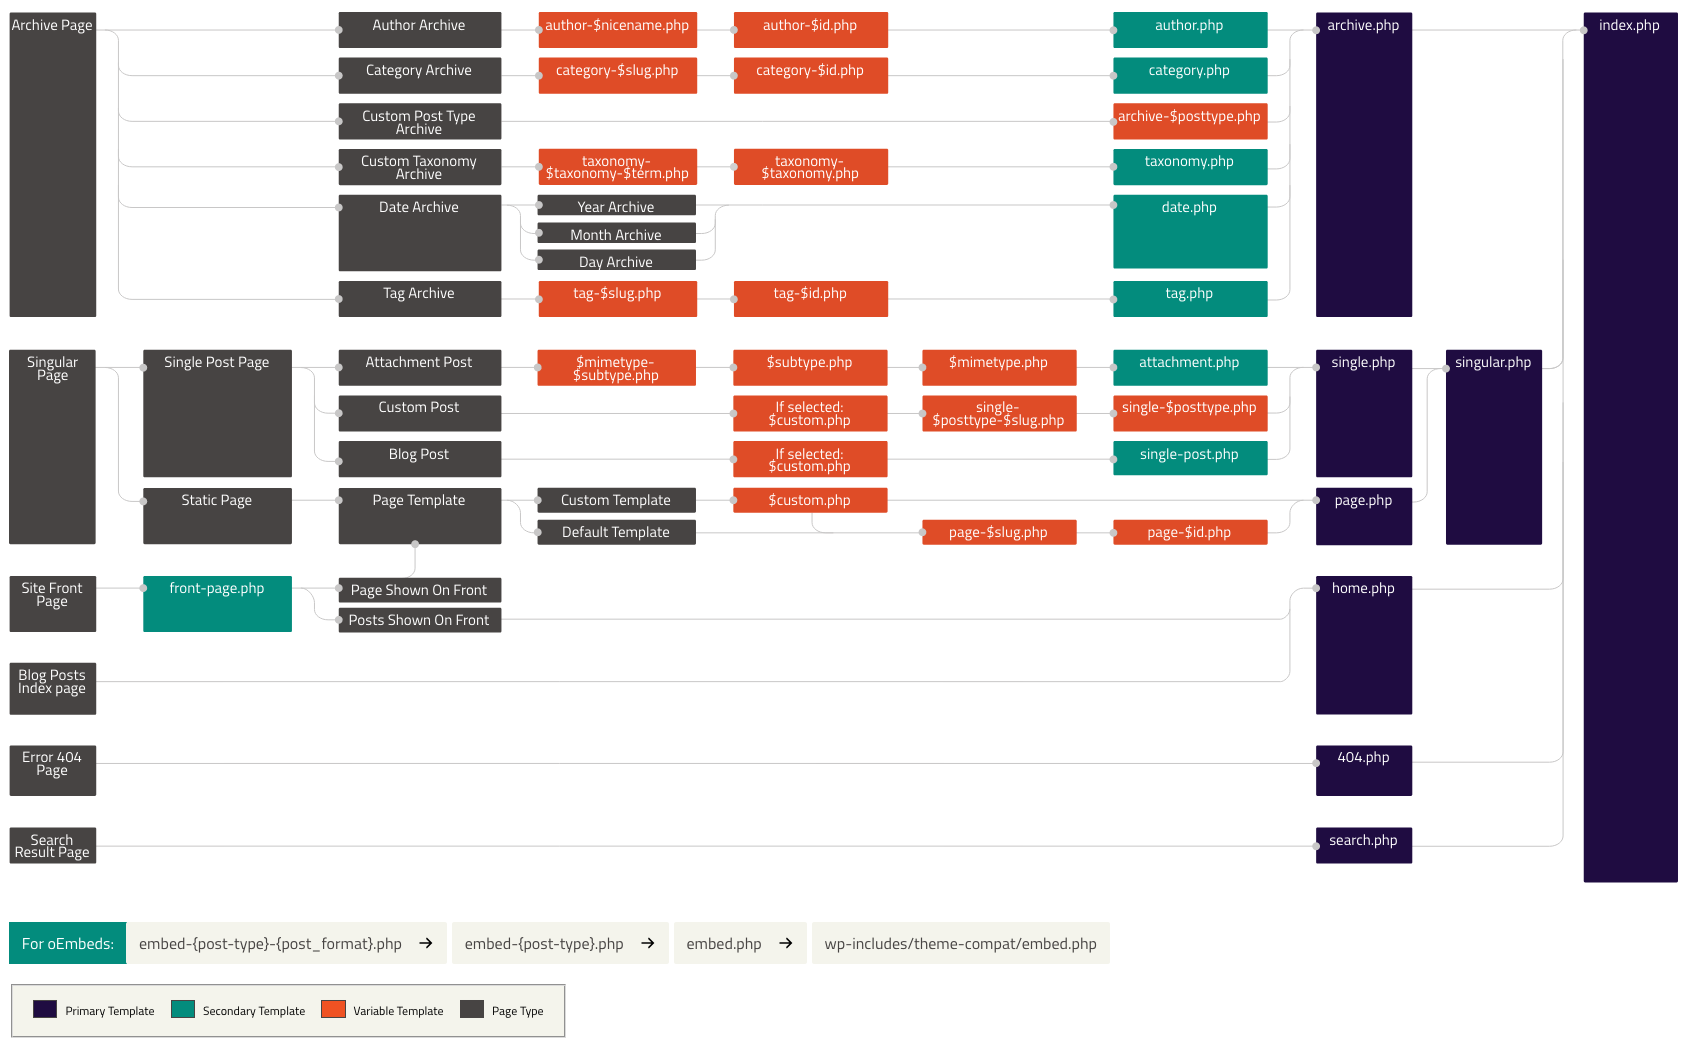
The order below is the recommended file creating order. the name must be named according to the regulations.
** this mark means it is a block element, not a page, you need to use the include or get function to put in a page in order to see them.
- style.css -> The general CSS, the theme information should be written in it, other CSS stylesheets can be created separately according to different templates
- functions.php -> You have to write the funciton so that you can see features in backend(dashboard)
- index.php -> The most general page, it is the last fallback option. (the default place to put blog post is also here)
- header.php / footer.php -> The reusable components**
- page.php -> The pages that is not post
- single.php -> The single post
- sidebar.php -> The place that we activate widgets, all sidebar can share this file**
- archive.php -> Archive pages, the default catagorize them by months
- comments.php -> The comments and comment form components**
- searchform.php -> The search bar**
- search.php -> The search result page
You need to name your theme in order to see them in dashboard
@import url('Remember to import your font at the first line!');
/*
Theme Name: Client Name 2022
Author: Your Name
Version: 0.1.0
Author URI: https://www.sample.com/
Description: The theme we built in MMDA 324 Web Communication 3 (Fall 2022)
*/How to link CSS files to WordPress?
- First add the link function to functions.php (see details at functions.php line 3)
add_theme_support('html5', array('comment-list', 'comment-form', 'search-form', 'gallery', 'caption', 'style', 'script'));
add_theme_support('title-tag');- Add all the CSS you need to the sequence. (The function get_stylesheet_uri() is used to automatically locate the path to the file style.css) (see details at functions.php line 6)
function linked_assets()
{
    wp_enqueue_style('main', get_stylesheet_uri());
    if (is_page()) {
        wp_enqueue_style('page-styles', get_template_directory_uri() . '/page.css');
    } else if (is_single()) {
        wp_enqueue_style('page-styles', get_template_directory_uri() . '/single.css');
    }
}- Activate the function we made (see details at functions.php line 16)
add_action('wp_enqueue_scripts', 'linked_assets');- Finally, add wp_head() to the tag (see details at header.php line 7)
<head>
    <meta charset="utf-8">
    <meta name="viewport" content="width=device-width, initial-scale=1">
    <?php wp_head(); ?>
</head>Use <h1> and <a> to wrap up the logo image, here is an example
(see details at header.php line 12)
<h1>
<a href="<?php echo get_home_url(); ?>">
    <img src="<?php echo get_stylesheet_directory_uri(); ?>/images/web-communicaitons-logo.svg" alt="<?php bloginfo('name'); ?>">
</a>
</h1>It is the meta data (basic info) of WordPress, you can change them in the dashboard setting > general

- bloginfo('name') >> Website Title
- bloginfo('description') >> Tagline
Menu is the stuff that usually appears in the nav, here are the steps
- Create the menus you neeed in functions.php (see details at line 19)
function my_menus()
{
    register_nav_menu('header-menu', 'Main Menu (Header)');
    register_nav_menu('mobile-menu', 'Mobile Menu (Header)');
}
//Syntax register_nav_menu('Give id for html', 'Give a name to see in dashboard');- Activate the function we made (see details at functions.php line 24)
add_action('after_setup_theme', 'my_menus');
// The 'my_menus' here is the function name we just made- Setting corresponding menu in dashboard
Dashboard > Appearance > Menus

- Paste the menu at the place you wish (see details and conditions at header.php line 20)
wp_nav_menu(array(
                'theme_location' => 'header-menu',
                'container' => 'nav',
                'container_id' => 'main-nav'
            ));
// Syntax array('theme_location' => 'The id we register','container' => 'the tag wrap with','container_id' => 'give wrapper a tag')
Sidebar === Widgets We can put stuffs such as social icons, latest post, calendar in sidebar. Here's the step:
- First create new widgets in functions.php (see details at line 27)
function widgets()
{
    register_sidebar(array(
        'name' => 'Blog Post Sidebar', //Give a name to see in dashboard
        'id' => 'blog-sidebar', //Give an id to see in HTML
        'before_widget' => '<div class="widget">', //The tag wrap our widgets
        'after_widget' => '</div>', //The tag wrap our widgets
        'before_title' => '<h3>', //The tag wrap the title in widgets
        'after_title' => '</h3>', //The tag wrap the title in widgets
    ));
}- Activate the function we just made, Now we can see widgets in the dashboard (see details at functions.php line 27)
add_action('widgets_init', 'widgets');
//'widgets' here is the function name we just created- Set up the widgets' content in the dashboard
Dashboard > Appearance > Widgets

- Create sidebar.php, then fill in:
<aside id="sidebar">usually we use aside tag for sidebar</aside>- Activate the widgets/sidebar we made (see details and conditions at sidebar.php line 6)
dynamic_sidebar('blog-sidebar');
//The 'blog-sidebar' here id the id we register in funcitons.php (see details at line 27)- Finally, paste the sidebar in the place we need those widgets, in this case I use it in single post: (see details and conditions at single.php line 25)
if (is_active_sidebar('blog-sidebar')) {
        get_sidebar();
    }
//The 'blog-sidebar' here id the id we register in funcitons.php (see details at line 27)
For more info see Document - Sidebar
Comments only show in single post, the steps to set up comments:
to turn on/off comments and more, go to comments setting: Dashboard > Settings > Discussion Settings
- Create comments.php, fill in:
if (comments_open()){
    // if comment area is open, do...
}
(see details at comments.php line 3)
- Same place, print the comment list and comment form if comment area is open
if (have_comments()) {
// if there is comment, print...
    echo '<h3>';
    // Syntax comments_number("if no comments print this" ,"if only one comment print this", ""if more than one comments print this"")
    comments_number('No comments on this post', 'One comment', '% Comments');
    echo '</h3>';

    echo '<ol id="comment-list">';
    wp_list_comments(array(
        'style' => 'ol',
        'avatar_size' => 64,
        'reverse_top_level' => true //Sort comments new to old
    ));
    echo '</ol>';
};
//Insert a comment form
comment_form();- Lastly, place the comment area in the place you need (see details at single.php line 20)
comments_template();- Codepen - TingHueiChen
- Frontend Mentor - @hejkeikei
- Twitter - @hej_keikei