News
- Some PCBs & parts are available on Tindie.
Arduino-based reflow oven controller with:
- PID loop control
- Wave Packet and Phase Fired control for AC outputs
- graphic TFT LC-Display, drawing the temperature curves
- using an Adafruit 1.8" TFT or derivate display
- solely controlled using a cheap rotary encoder and its single button
- stores up to 30 temperature profiles in EEPROM
- configurable PID-parameters
- simple, small hardware to drive loads up to 600V and up to 8A
- hardware can
- measure two temperatures independently
- drive two AC loads, such as heater and fan
- could also be used for slow coockers
- Please Note: Requires Arduino IDE 1.5.x or newer
(c) 2014 Karl Pitrich karl@pitrich.com in part based on a project (c) 2013 Ed Simmons ed@estechnical.co.uk
Post action shot
 |
 |
|---|
Warning: This project operates with possibly lethal mains voltage. If you are unsure what to do, don't do it and get help from an experienced tinkerer with professional training.
Completed build
 |
 |
|---|
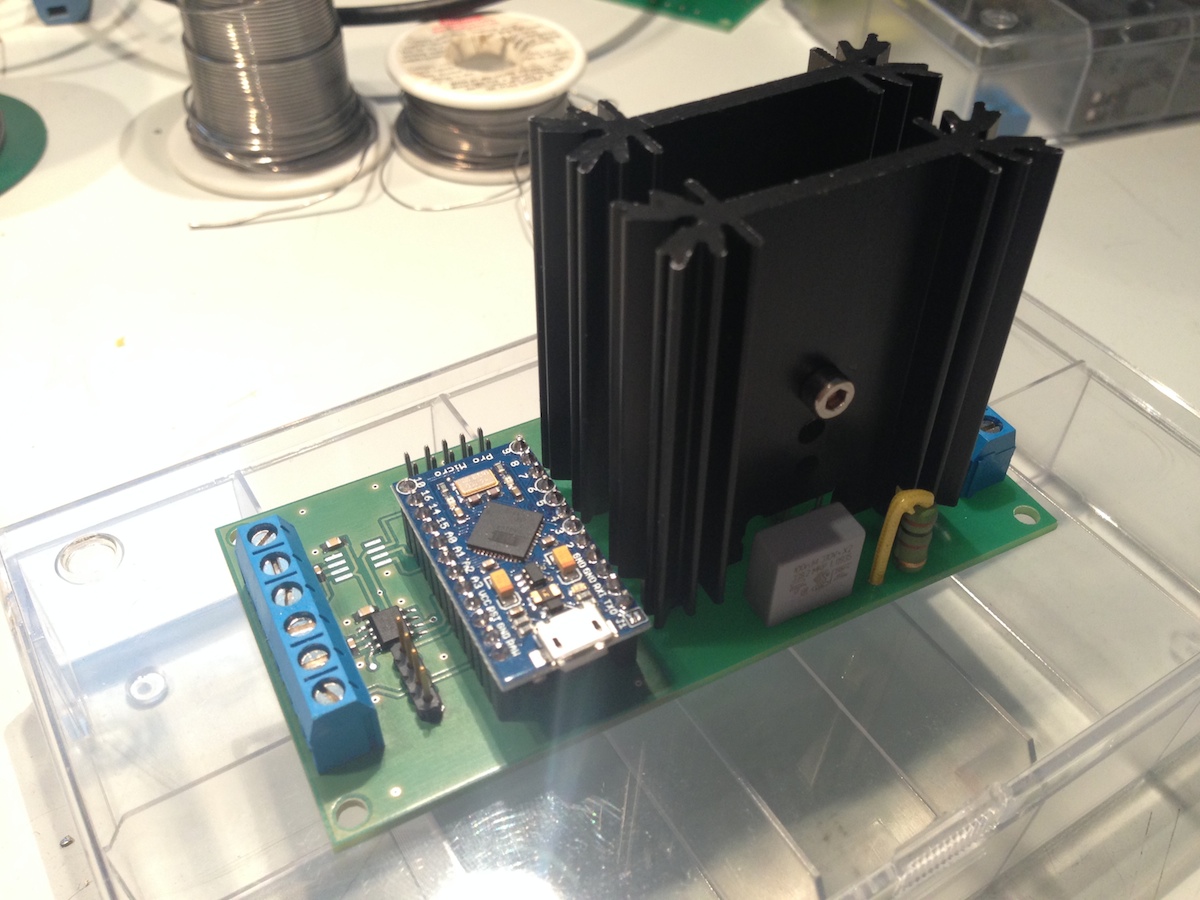
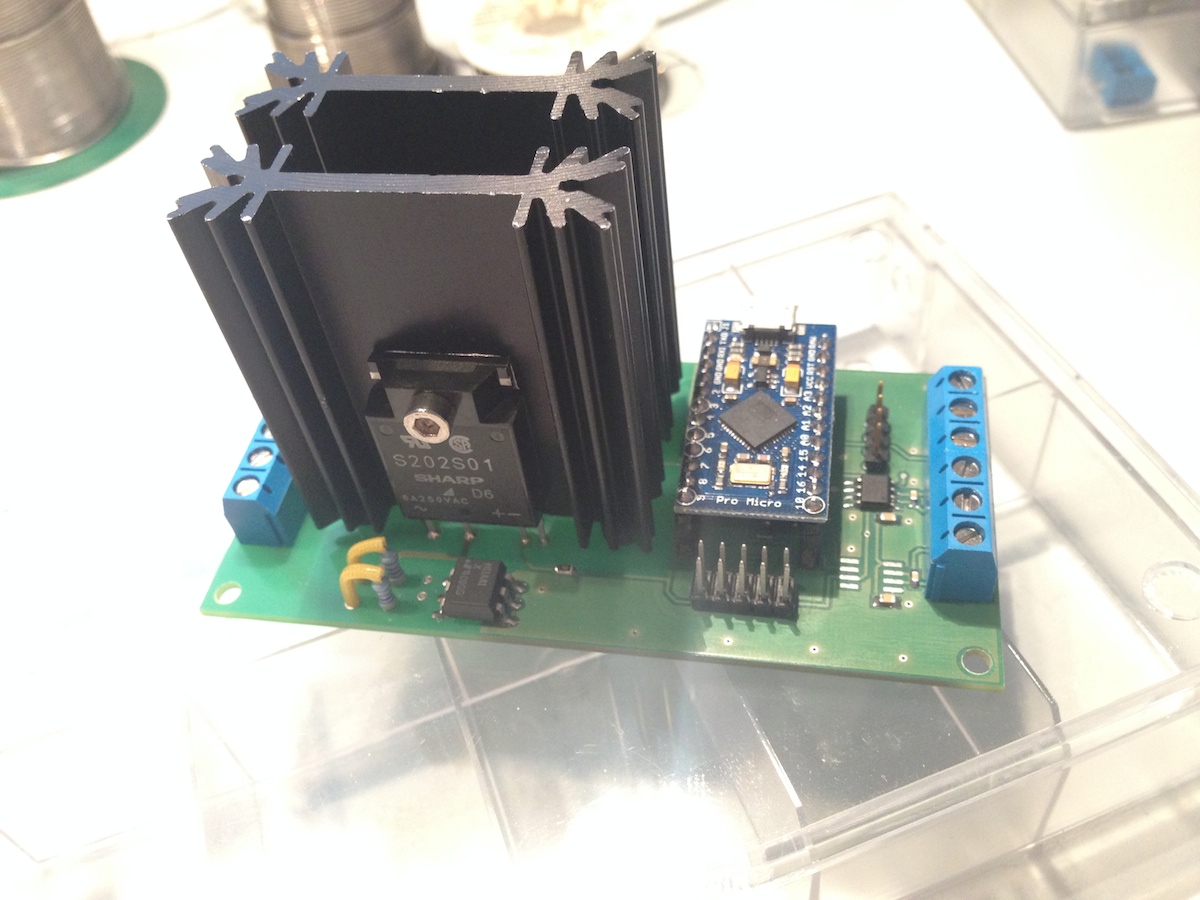
This Reflow Oven Controller relies on an Arduino Pro Micro, which is similar to the Leonardo and easily obtainable on eb*y for less than $10, plus my custom shield, which is actually more like a motherboard.
As I believe it is not wise to have a mess of wiring and tiny breakout-boards for operating mains powered equipment, I've decided to design custom board with easily obtainable components.
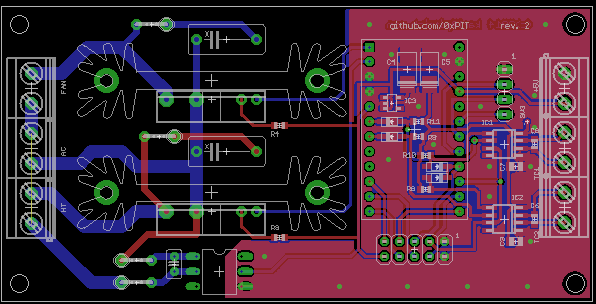
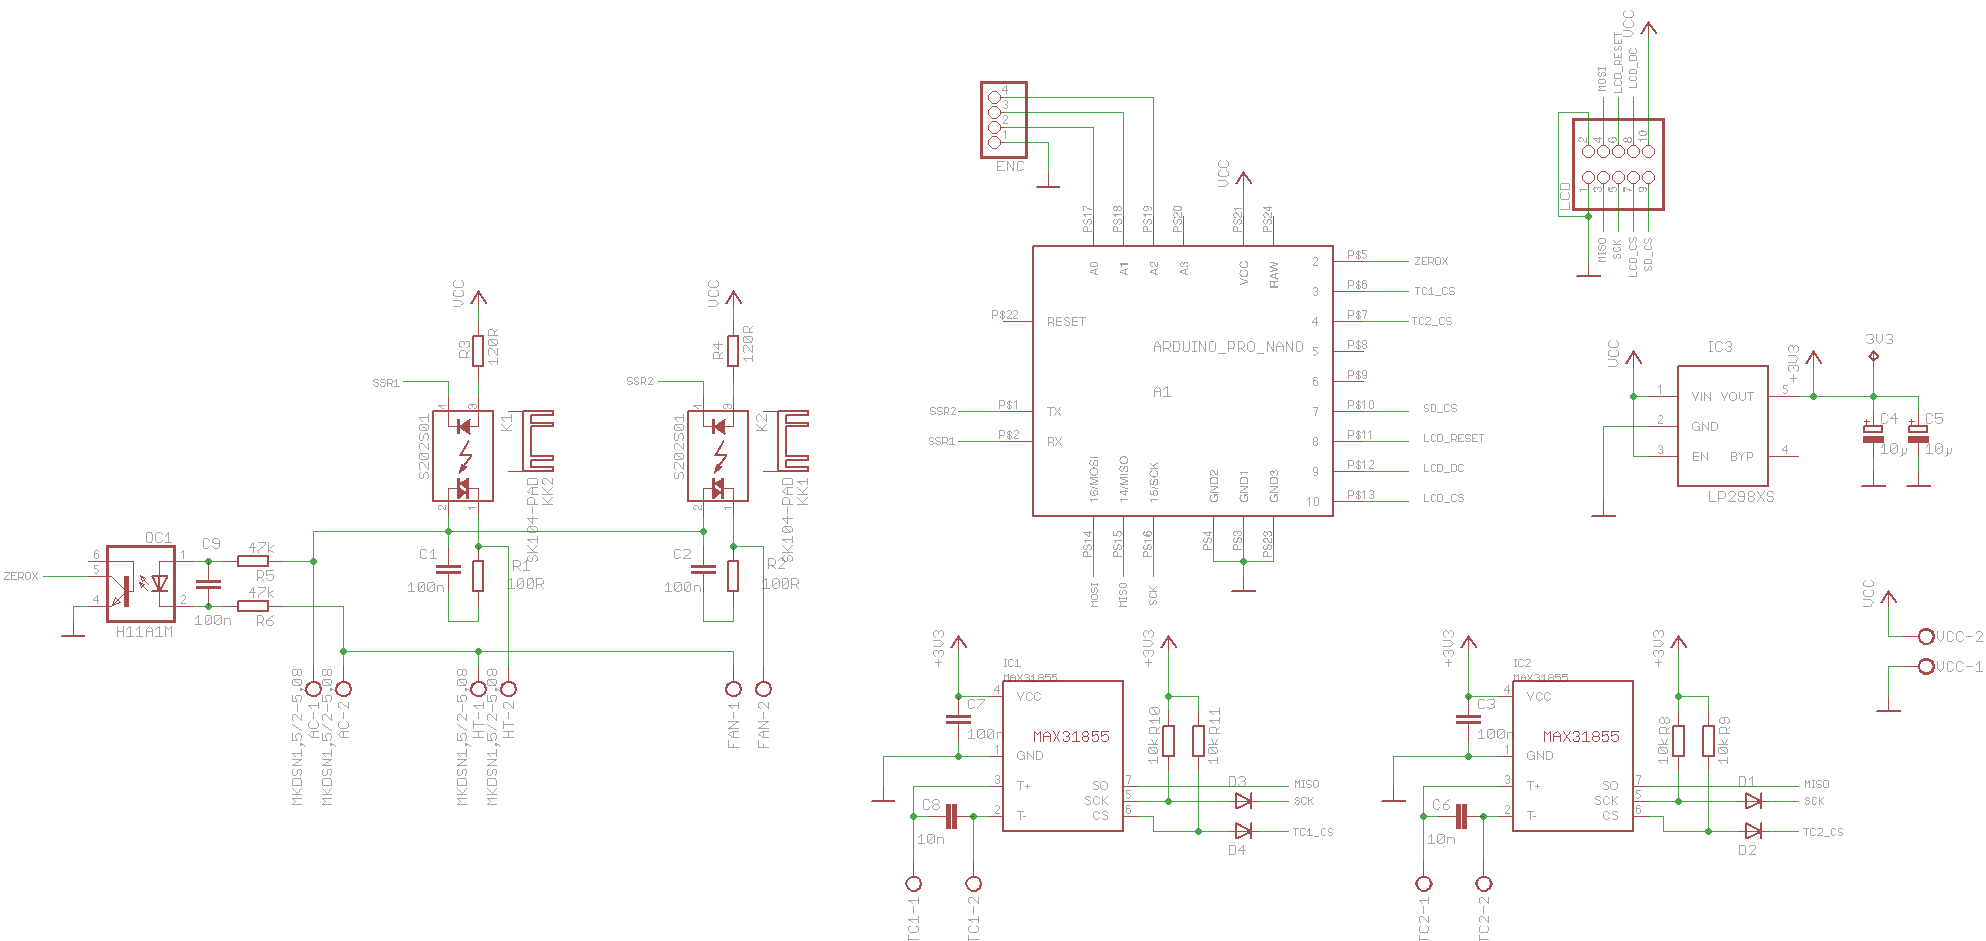
The hardware can be found in the folder hardware, including the Eagle schematics and PCB layout files. It should fit the freemium version of Eagle. Here are preview images:
From my manufacturing run, I have some spare PCBs and parts. They are available at my tindie store.
The board contains the Arduino Pro Micro, very simple Zero crossing detection circuit, used to align control logic to mains frequency, two MAX31855 thermocouple-to-digital converters and two Sharp S202S01 PCB-mount solid state relays, mounted on cheap Fischer SK409 50,8 heat sinks. The current software uses only one of the thermocouples, so you need to populate one IC only. If you're lucky, you can get free samples of the MAX31855 from Maxim.
The software uses PID control of the heater and fan output for improved temperature stability. The heater AC load is controlled using Wave Packet control in order to minimize RF interference and load on the relay. For the fan motor, Phase Fired control has been implemented.
Please note that all important timings are based on the mains frequency, so the circuit will not work properly without mains connection.
But for testing, I've added an additional timer to simulate the zero-crossings, in order to run the software without being connected to mains. The software should work in 50 and 60Hz mains, the 60Hz version is not tested, though.
| Issue | Notes |
|---|---|
| Unfortunately, a trace is missing on the production PCB, you need to solder a bridge. The PCB eagle source has been corrected. | 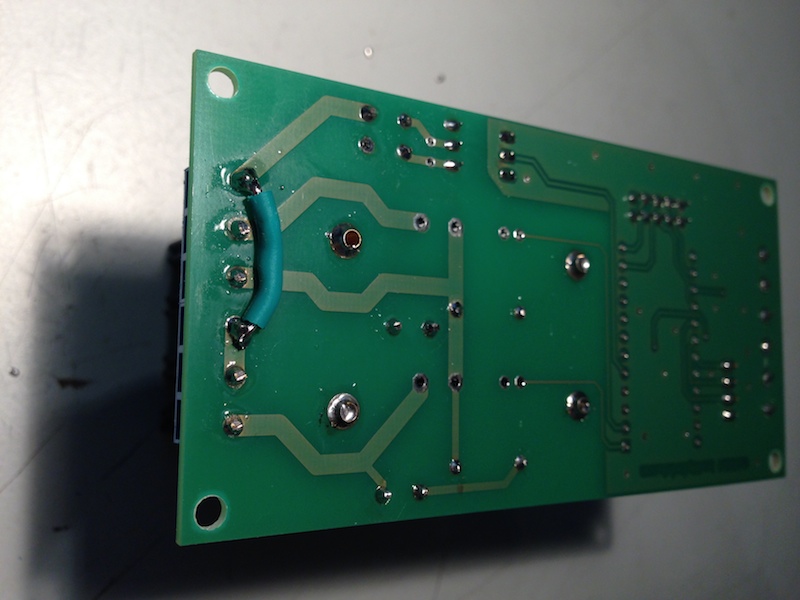 |
| I've used a switch mode power supply which induces a lot of noise on the power supply, causing the MAX31855 to be quite eratic, reporting VCC and GND shots where there are none. Use a linear power supply if you can. | I've added a LC-filter (100µH + 1000µF/100n) + ferrite beads between the PSU and the controller PCB. |
| Image | Information |
|---|---|
|
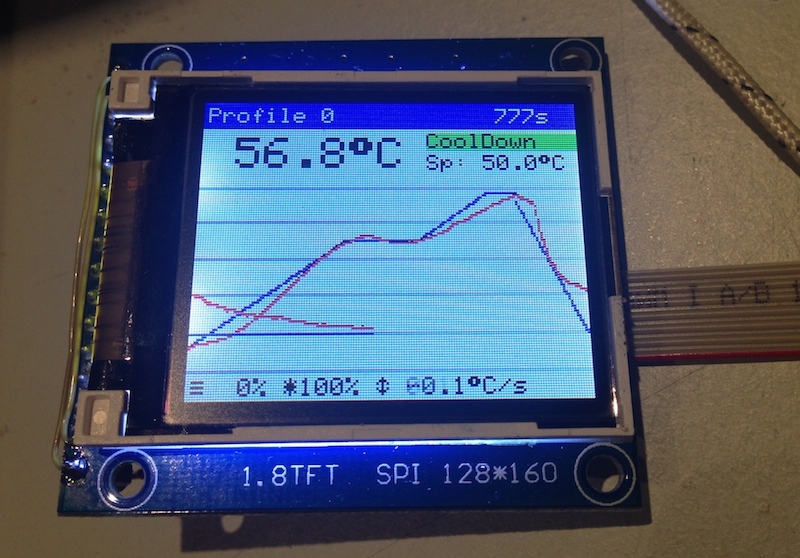
Display after a cylcle has been completed. The blue line is the setpoint, the red line the actual temperature measured by the thermocouple. Note that the graph wraps around automatically. 'Sp' is the current setpoint calculated by the PID loop. In the lower line there are: Current heater and fan outputs, both in percent, and the current temperature rise or drop rate in °C per second. The graph will draw orientation lines every 50°C up to the peak temperature set in the selected profile. |
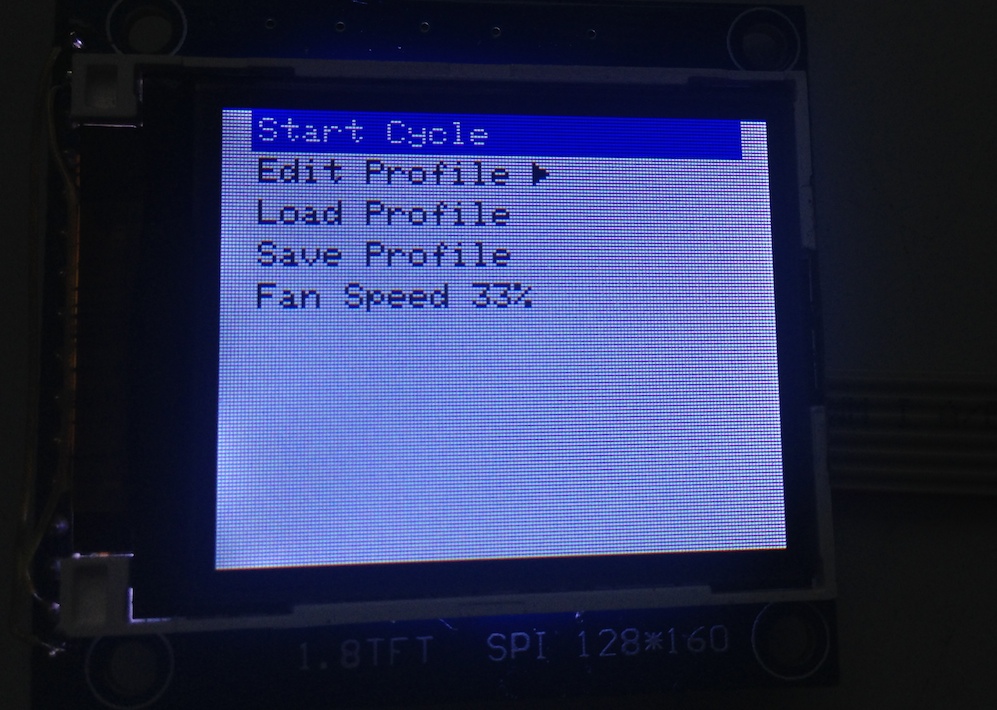 |
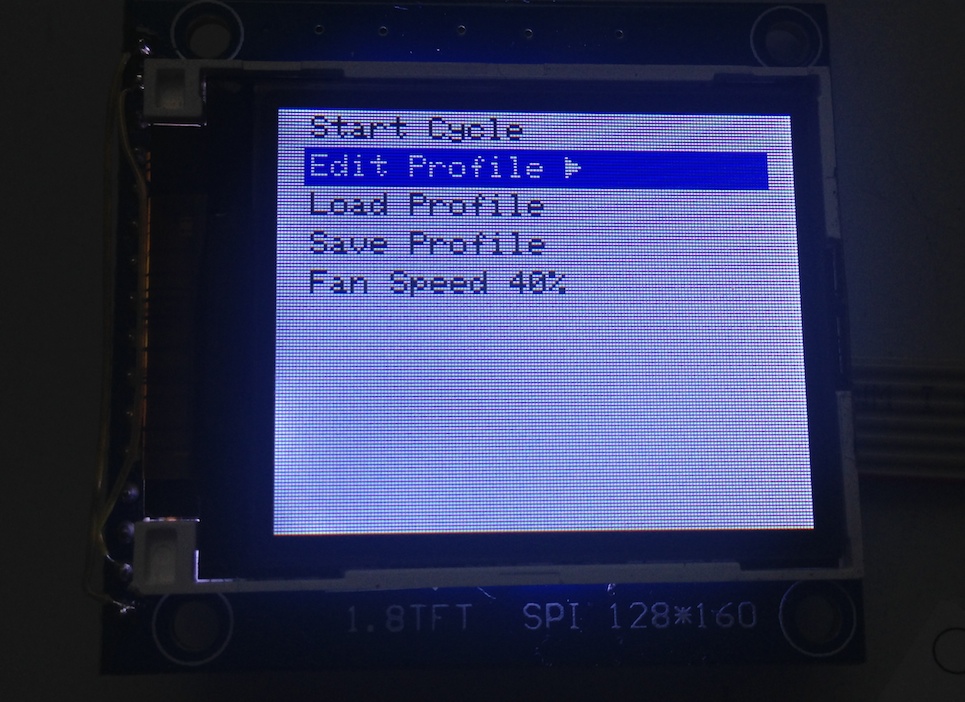
The main menu can be navigated by rotating the encoder (sic!). Clicking enters the menu item, or navigates to the submenu. Doubleclick moves up or back or exits the menu item. |
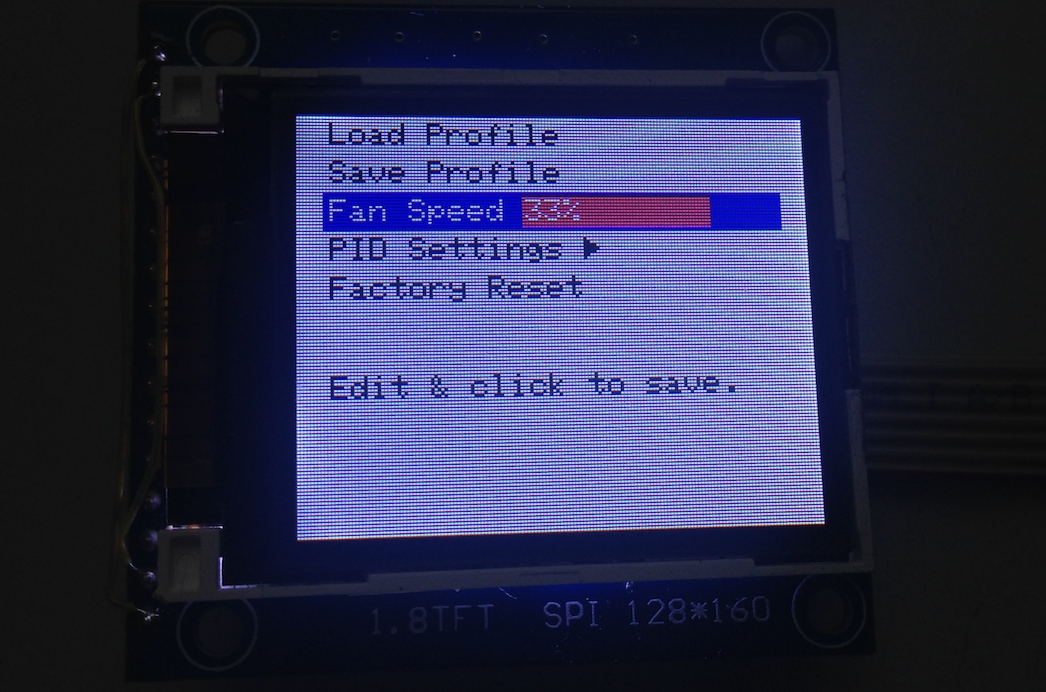 |
To edit a setting, click once to enter edit mode (red cursor), then rotate to change the value, click again to save. Doubleclick will exit without saving. |
 |
- |
 |
Typical solder profile settings... |
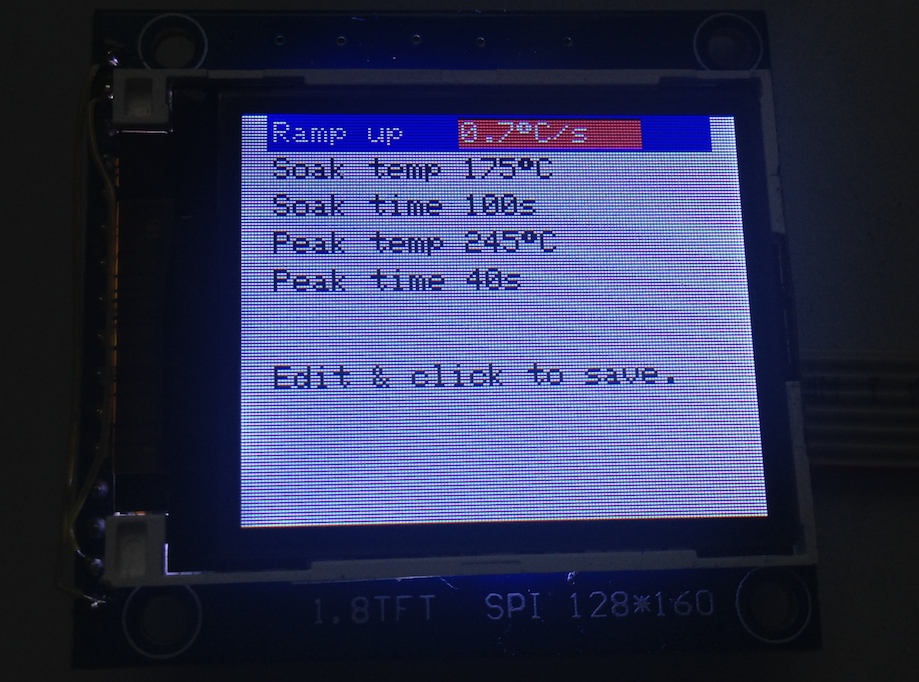 |
These parameters can be easily edited using the encoder as described above. |
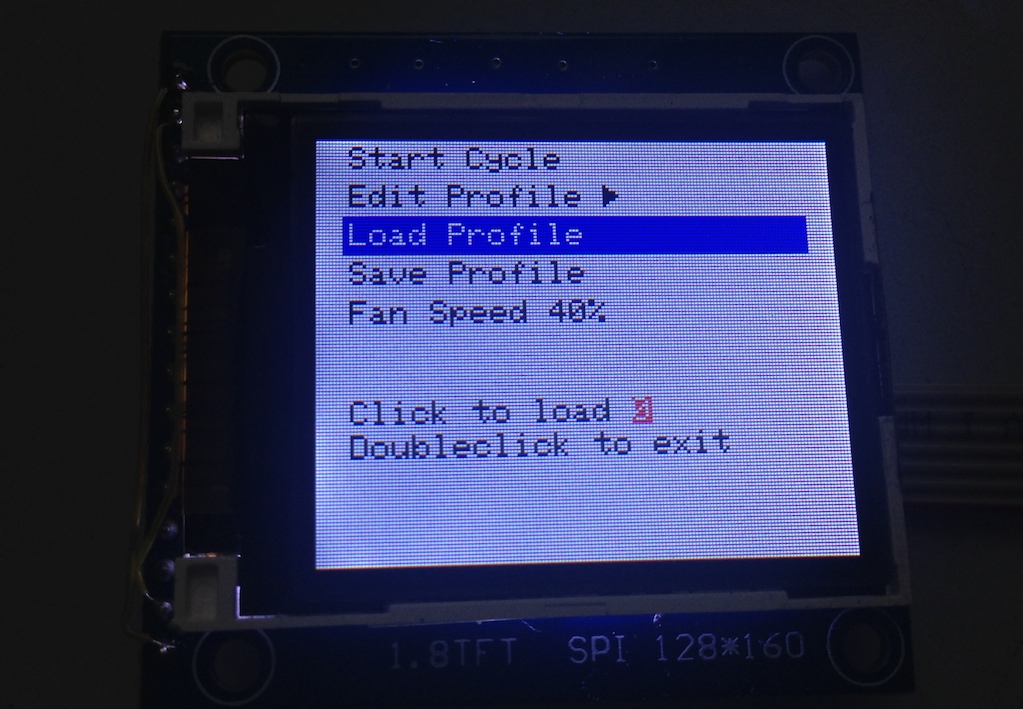 |
Up to 30 Profiles can be loaded and saved. You have to do this manually, so that you can have 'save-as' functionality without overwriting existing profiles. |
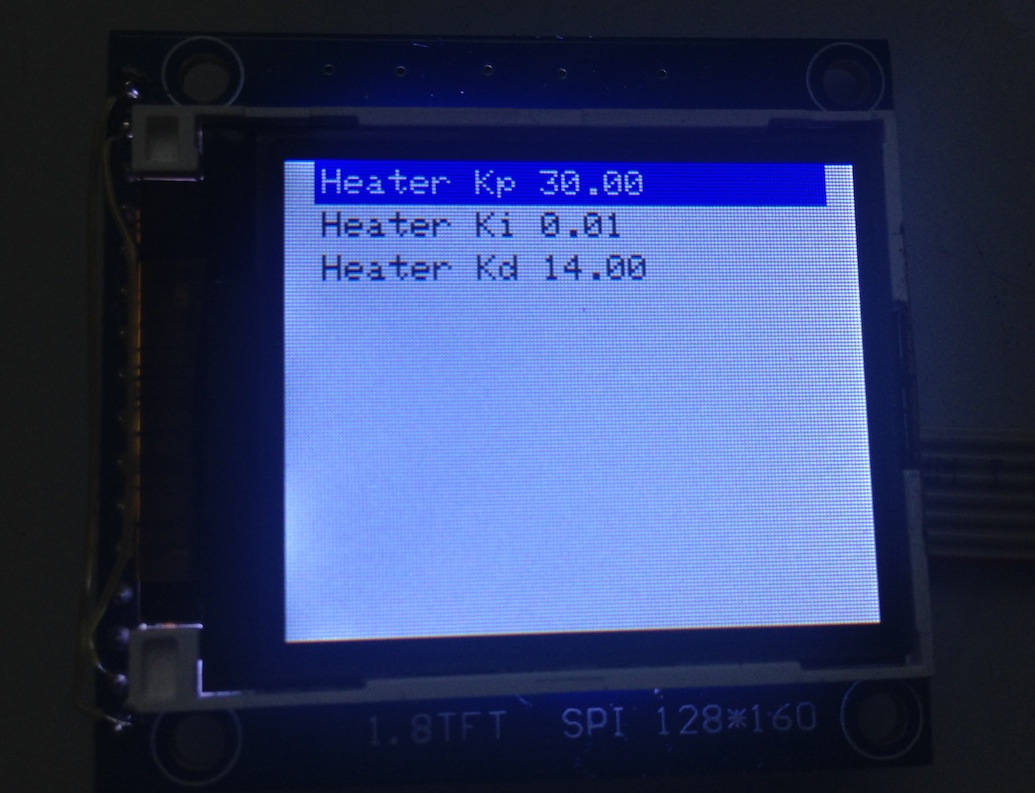 |
Current pid values for my 1300W 20$ toaster oven. |
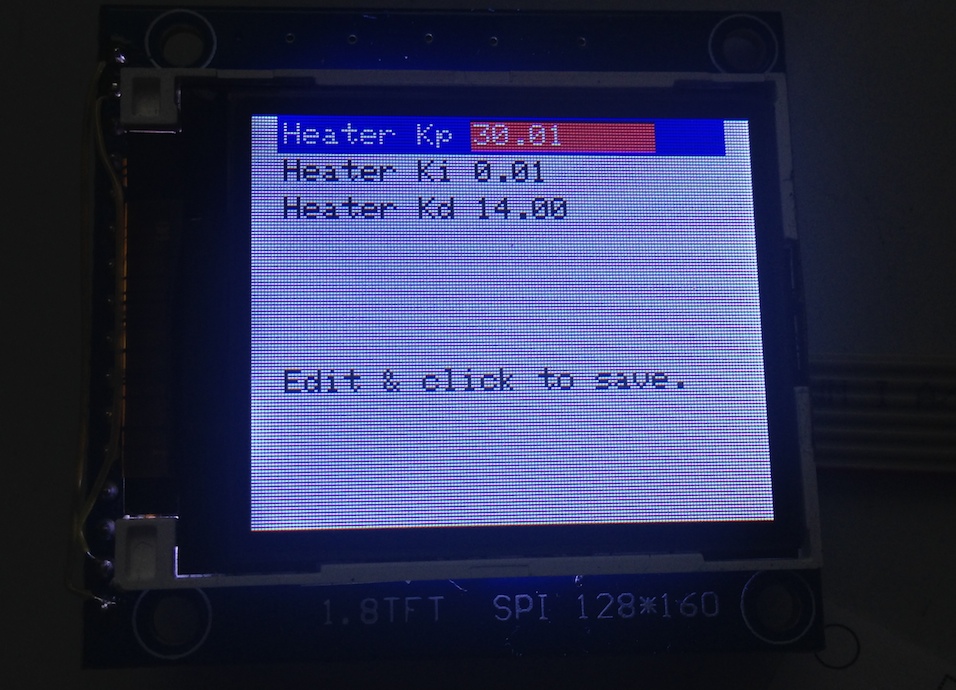 |
Editing is simple, like above. Note that, unlike with the profile settings, the PID values will be automatically stored to EEPROM when you exit the submenu by doubleclicking. |
Get the code using git.
git clone https://github.com/estechnical/reflowOvenController.git
I've added some libraries I've used as submodules to the git repositroy, so it is important that, after cloning this repository, you do
git submodule update --init
to fetch all involved libraries. (See: Submodule Cheat Sheet)
Of course, you need to have the Arduino IDE installed. I've worked with version 1.5.x only and I will not support older versions. Get it from the Arduino Download page or upgrade you current Arduino setup.
There as several dependencies you need to install.
If you are unfamiliar with Arduino Libraries, please read the library guide. Basically, each library needs to be liked or copied into your Arduino library folder.
On a Mac, this is how you link the submodule libraries to your Arduino libraries folder:
cd ~/Documents/Arduino/Libraries
ln -s ~/Development/<reflow source code>/libraries
My code uses TimerOne for basic timing, for the 1.8" TFT I've used Adafruit_ST7735, which requires Adafruit_GFX. I strongly suggest to use my modified version of Adafruit_GFX-pit, as it performs much better, but requires you to use SPI, which my board does anyway.
For the user interface you require my own Menu and ClickEncoder libraries, which are included as submodules.
All other libraries need to be downloaded and installed.
After you've installed all libraries, open the Arduino IDE, open the ReflowController.pde sketch (using File->Open).
Select the right hardware from the Tools->Board menu. (Use Leonardo for the Pro Micro)
Compile the firmware (Sketch->Verify) to test everything is installed correctly. If something's wrong, feel free to post an issue here on github, I will look into it.
Now, choose the correct serial port from Tools->Serial Port and then upload the code. Remember that a standard compile will get stuck at "Calibrating..." without proper mains connection, so that zero crossing interrupts can occur.
I could not fit PID Autotuning into the limited space of the Arduino in addition the normal code. So if you want to try to autotune you PID Loop, install the [PID_AutoTune] Library, #define PIDTUNE 1 in the .ino file, then recompile and download do the Arduino.
As all timing relies on Zero Crossing detection, you need to #define FAKE_HW 1 and install TimerThree when you want to run without actual hardware and/or without mains connection.
- The MAX31855 does not like the thermocouple being grounded; It must be isolated from ground or earth.
- The PID Loop must be tuned individually for each oven. It will not work out of the box.
- PID Autotune is not very useful, as it seems to be able to tune only to keep a specific temperature value, which is not what we do in a reflow oven. Also, at least my oven seems to be very non-linear when heating up.
- When rewiring inside your oven, use only wiring that can withstand high temperatures. I use silicone coated lace.
- Do not solder wiring inside you oven, the temperature might desolder you joints. Crimp everything.
- Use proper earth ground connection for your ovens chassis.
- Optimize code size so that more features can fit
- Clamp values for parameters to reasonalbe ranges
- Add scrollbar (sample implementation in the demo for Menu
- Separate PID configuration for each process step
- try to make the display faster, it is very slow
- Named profiles
- Rewrite Menu so that is uses callback objects instead of spaghetti-callbacks
The MIT License (MIT)

Copyright (c) 2014 karl@pitrich.com
All rights reserved.

Permission is hereby granted, free of charge, to any person obtaining a copy
of this software and associated documentation files (the "Software"), to deal
in the Software without restriction, including without limitation the rights
to use, copy, modify, merge, publish, distribute, sublicense, and/or sell
copies of the Software, and to permit persons to whom the Software is
furnished to do so, subject to the following conditions:

The above copyright notice and this permission notice shall be included in
all copies or substantial portions of the Software.

THE SOFTWARE IS PROVIDED "AS IS", WITHOUT WARRANTY OF ANY KIND, EXPRESS OR
IMPLIED, INCLUDING BUT NOT LIMITED TO THE WARRANTIES OF MERCHANTABILITY,
FITNESS FOR A PARTICULAR PURPOSE AND NONINFRINGEMENT. IN NO EVENT SHALL THE
AUTHORS OR COPYRIGHT HOLDERS BE LIABLE FOR ANY CLAIM, DAMAGES OR OTHER
LIABILITY, WHETHER IN AN ACTION OF CONTRACT, TORT OR OTHERWISE, ARISING FROM,
OUT OF OR IN CONNECTION WITH THE SOFTWARE OR THE USE OR OTHER DEALINGS IN
THE SOFTWARE.