The goal of this tutorial is to be a complete guide for building a secure, database-backed, production-ready application that you could use in professional work.
This tutorial builds up both the frontend & backend of the survey.dev website.
At a high level, this tutorial uses the following tools:
| Frontend | Backend | |
|---|---|---|
| React User interface builder |
Node JavaScript runtime |
|
| React Router Client-side routing |
Express.js Web server framework |
|
| Axios Make API requests |
Postgres Database |
|
| Userfront Authentication & access control |
Sequelize ORM (helps write database queries) |
|
| SurveyJS Submit and display surveys |
Jest Testing |
The tutorial will build a site from scratch in the following order:
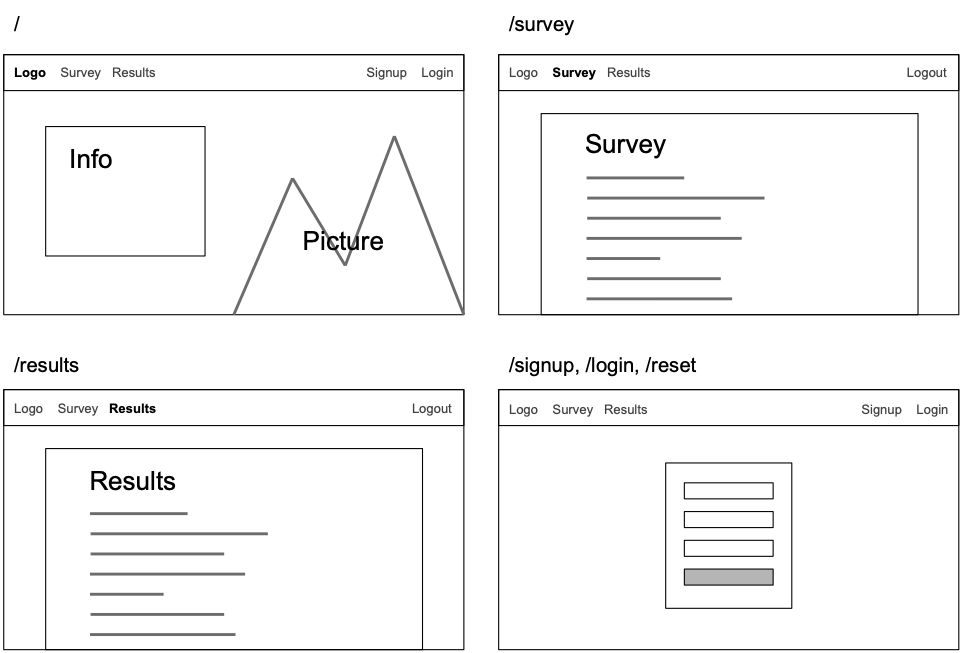
We want to build a site with the following pages:
| Route | Page | Purpose |
|---|---|---|
| / | Landing page | Give some information about the website. |
| /survey | Survey page | Allow a user to submit their survey. |
| /results | Survey page | Allow authorized users to view the survey results. |
| /signup, /login, /reset | Auth pages | Allow users to sign up, log in, and reset their password. |
The pages will roughly look like the following:
We will build the frontend as a single-page app, and we'll build the backend as a standalone API.
The frontend will communicate with the backend by making API requests using JSON Web Tokens (JWTs) for authorization.
For this tutorial, the frontend and backend code will live in the same codebase. However, we could also choose to keep them completely separate from each other if we wanted.
Our frontend will send to the following endpoints to save and display survey data:
| Route | Purpose |
|---|---|
| POST /survey-responses | Receive survey data and save it to the database. |
| GET /survey-responses | Return a user's survey response if they have already answered the survey. |
| GET /results | Return the results of all survey responses. |
| GET /status | Return "ok" if the server is running. |
React is a great frontend tool, but it's a bit of a hassle to set up from scratch. Because of this, we'll use Create React App to get up and running quickly.
Follow the Quick Start instructions for Create React App (https://create-react-app.dev/docs/getting-started/). In your terminal, enter:
npx create-react-app survey-dev
cd survey-dev
npm start
After installing and running, your quickstart site should be viewable at http://localhost:3000
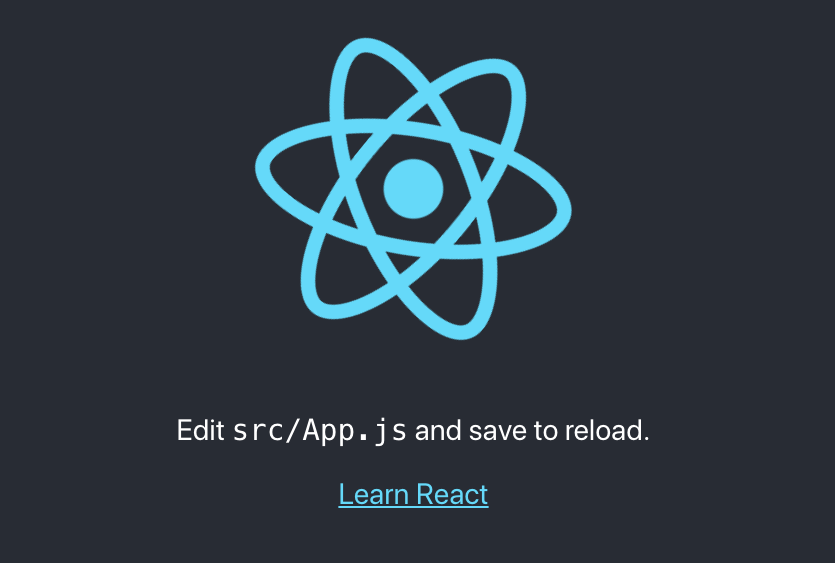
Like the message says, we can now edit our src/App.js file to start working.
We want to render different views for each path (/survey, /results, etc) without reloading the page each time, so we'll use React Router to handle our client-side routing.
Install React Router and save it to our package.json file.
npm install react-router-dom --save-dev
With this installed, we can update src/App.js for a basic application with routing:
// src/App.js

import React from "react";
import {
  BrowserRouter as Router,
  Switch,
  Route,
  NavLink,
} from "react-router-dom";

function App() {
  return (
    <Router>
      <div>
        <nav className="navbar navbar-expand bg-white py-4 shadow">
          <div className="container">
            <NavLink exact to="/" className="btn btn-outline-primary mr-4">
              survey.dev
            </NavLink>

            <ul className="navbar-nav mr-auto">
              <li className="nav-item">
                <NavLink to="/survey" className="nav-link">
                  Survey
                </NavLink>
              </li>
              <li className="nav-item">
                <NavLink to="/results" className="nav-link">
                  Results
                </NavLink>
              </li>
            </ul>
            <AuthButtons />
          </div>
        </nav>

        <div>
          <Switch>
            <Route path="/results">
              <Results />
            </Route>
            <Route path="/survey">
              <Survey />
            </Route>
            <Route path="/login">
              <Login />
            </Route>
            <Route path="/signup">
              <Signup />
            </Route>
            <Route path="/">
              <Landing />
            </Route>
          </Switch>
        </div>
      </div>
    </Router>
  );
}

export default App;

function Landing() {
  return <div className="container">Landing</div>;
}

function Survey() {
  return <div className="container">Survey</div>;
}

function Results() {
  return <div className="container">Results</div>;
}

function Signup() {
  return <div className="container">Signup</div>;
}

function Login() {
  return <div className="container">Login</div>;
}

function AuthButtons() {
  return (
    <ul className="navbar-nav ml-auto">
      <li className="nav-item">
        <NavLink to="/login" className="nav-link">
          Login
        </NavLink>
      </li>
      <li className="nav-item">
        <NavLink to="/signup" className="nav-link">
          Signup
        </NavLink>
      </li>
    </ul>
  );
}
If you're unfamiliar with React or React Router, take a moment to look at the file and get a sense for how it works.
The <Router> tag scopes everything for React Router, while the <Switch> tag contains all the <Route> tags that can be visited.
Whenever a user visits a route that corresponds to one of these tags (e.g. path="/survey"), React Router will render the corresponding component (e.g. <Survey />)
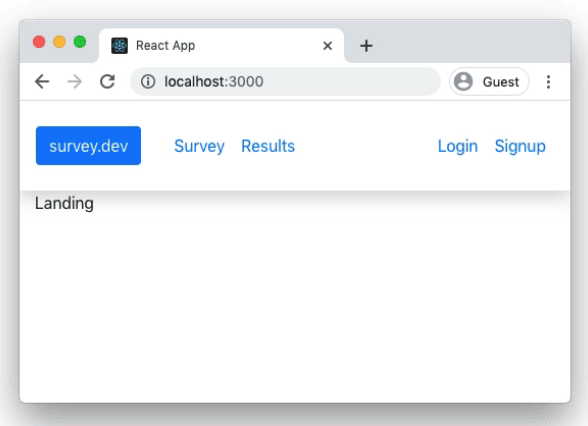
The styling for our App.js file doesn't look very good, so we can use the Bootstrap 4 stylesheet. Add it inside the <head> tag in public/index.html
<!-- Add in the <head> of public/index.html -->
<link
  rel="stylesheet"
  href="https://cdn.jsdelivr.net/npm/bootstrap@4.5.3/dist/css/bootstrap.min.css"
  integrity="sha384-TX8t27EcRE3e/ihU7zmQxVncDAy5uIKz4rEkgIXeMed4M0jlfIDPvg6uqKI2xXr2"
  crossorigin="anonymous"
/>
Now when you run your server with npm start, you should have a basic application at http://localhost:3000:
Let's work on the /survey page first, since that's a main feature of the application. We'll use SurveyJS, which has a library for React: https://surveyjs.io/Documentation/Library.
npm install survey-react --save-dev
SurveyJS renders a nice-looking survey form based on a JSON object with questions in it.
Start by creating a questions.js file inside the src/ directory. You can update these questions to whatever you want, based on the SurveyJS docs.
// src/questions.js

const questions = {
  title: "What technologies do you use?",
  pages: [
    {
      name: "Page 1",
      questions: [
        {
          name: "frameworkUsing",
          title: "Do you use any front-end framework?",
          type: "radiogroup",
          choices: ["Yes", "No"],
          isRequired: true,
        },
        {
          name: "framework",
          title: "What front-end framework do you use?",
          type: "checkbox",
          choices: ["React", "Vue", "Angular", "jQuery"],
          hasOther: true,
          isRequired: true,
          visibleIf: "{frameworkUsing} = 'Yes'",
        },
      ],
    },
    {
      name: "Page 2",
      questions: [
        {
          type: "comment",
          name: "about",
          title: "Please tell us about your experience",
        },
      ],
    },
  ],
};

export default questions;
With the questions in place, we can update src/App.js to show the survey.
Add the required import statements for SurveyJS and the questions, and then update the Survey method near the bottom to include the <SurveyJS.Survey /> element.
// src/App.js

import React from "react";
import {
  BrowserRouter as Router,
  Switch,
  Route,
  NavLink,
} from "react-router-dom";

import * as SurveyJS from "survey-react";
import "survey-react/modern.css";
import questions from "./questions.js";

SurveyJS.StylesManager.applyTheme("modern");
const survey = new SurveyJS.Model(questions);
survey.onComplete.add((result) => {
  console.log(result.data);
});

// ...

function Survey() {
  return (
    <div className="container">
      <SurveyJS.Survey model={survey} />
    </div>
  );
}

// ...
Now when we visit http://localhost:3000/survey, we should see our questions rendered nicely:

Right now, if we complete the survey, it logs the resulting data to the console because of the line:
survey.onComplete.add((result) => {
  console.log(result.data);
});
We'll want to send this data to our backend API instead so that it can be saved.
Let's go ahead and set up the backend.
We could make a separate repo for the backend since it will be completely separate, but instead we will keep it under one repo and put the backend files in their own folder.
Start by installing express into the project:
npm install express --save
If you have trouble installing, check out the Express.js docs.
Remember that we want the following routes:
| Route | Purpose |
|---|---|
| POST /survey-responses | Receive survey data and save it to the database. |
| GET /survey-responses | Return a user's survey response if they have already answered the survey. |
| GET /results | Return the results of all survey responses. |
| GET /status | Return "ok" if the server is running. |
Create a file named server.js at the top level of the project.
// server.js

const express = require("express");
const bodyParser = require("body-parser");
const app = express();
app.use(bodyParser.json());

app.all(["/survey-responses", "/results"], (req, res, next) => {
  res.header("Access-Control-Allow-Origin", "*");
  res.header("Access-Control-Allow-Headers", "Content-Type");
  next();
});

app.post("/survey-responses", async (req, res) => {
  return res.send("Coming soon");
});

app.get("/survey-responses", async (req, res) => {
  return res.send("Coming soon");
});

app.get("/results", async (req, res) => {
  return res.send("Results");
});

app.get("/status", async (req, res) => {
  return res.send("ok");
});

const port = process.env.PORT || 5000;
const server = app.listen(port, () =>
  console.log(`✅  Backend listening on port ${port}`)
);

module.exports = server;
If you haven't ever used Express, take a moment to study the server.js file to see how it works.
The app.all block is added to include headers for CORS, so that the browser does not reject incoming requests.
Each route is then registered with app.post or app.get, and each route sends a response based on what is returned with res.send(). Finally, the server listens on port 5000.
We want our backend server to automatically reload any changes we make, and we can use nodemon to accomplish this during development.
npm install nodemon --save-dev
Now in one terminal tab, you can run npm run serve to start the frontend on localhost:3000.
In another terminal tab you can run nodemon server.js to start the backend on localhost:5000.
| Command | Server | Location |
|---|---|---|
npm run serve |
Frontend (Create React App) | http://localhost:3000 |
nodemon server.js |
Backend (Express.js) | http://localhost:5000 |
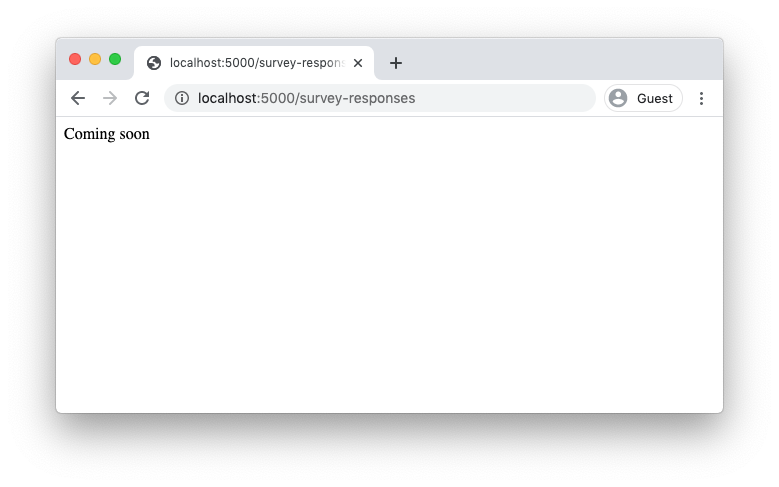
With the backend process running, visiting http://localhost:5000/survey-responses should return "Coming soon".
We will use PostgreSQL ("Postgres") for our database, along with an ORM called Sequelize to help make our queries easier to read and write.
Install Postgres, Sequelize, and the pg-hstore adapter into the project:
npm install sequelize pg pg-hstore --save
If you don't already have Postgres on your computer, download and install it here: https://www.postgresql.org/download/. You will need this to run the database locally.
Once you have Postgres installed, use either the Postgres app or psql to create 2 databases -- one named survey_test for testing and one named survey_dev for development.
If you are using psql in your terminal, these are the commands:
psql
create database survey_test;
create database survey_dev;
\q
We will be using different database details in different environments (testing, development, production).
A standard way to manage different values across environments is by using a .env file. The npm package dotenv will help us implement this.
Install the dotenv package, and also create a new folder called /api for our backend files. Add the .env file to this folder:
npm install dotenv --save
mkdir api
touch api/.env
The api/.env file will be used for the development environment by default, and we will modify the test environment to change the database name.
For now, populate the api/.env file with the following attributes:
# api/.env
DATABASE_NAME=survey_dev
DATABASE_USERNAME=postgres
DATABASE_PASSWORD=null
DATABASE_HOST=localhost
DATABASE_DIALECT=postgres
DATABASE_PORT=5432
When we run dotenv, it will assign each of these to a variable that will be available in our application as process.env.DATABASE_NAME, process.env.DATABASE_USERNAME, and so on.
Note: if you created your database with different name, username, or password, use your values in the api/.env file instead.
Sequelize has 2 main features we want to use:
- Models allow us to create functions that can create, update, and delete data easily.
- Migrations allow us to run simple commands that keep the database schema consistent across different computers and environments.
Create the folders api/models and api/migrations for our models and migrations, respectively. Then add a .sequelizerc file for setting up Sequelize and a api/config/database.js file for defining how it connects to the database:
mkdir api/models
mkdir api/migrations
mkdir api/config

touch .sequelizerc
touch api/config/database.js
Update the .sequelizerc file with the following details, which tell Sequelize where to find the config, models, and migrations:
// .sequelizerc

require("dotenv").config({ path: "./api/.env" });
const path = require("path");

module.exports = {
  config: path.resolve("api", "config/database.js"),
  "models-path": path.resolve("api", "models"),
  "migrations-path": path.resolve("api", "migrations"),
};
Update the config file api/config/database.js to include our environment variables for production and development:
// api/config/database.js

module.exports = {
  production: {
    database: process.env.DATABASE_NAME,
    username: process.env.DATABASE_USERNAME,
    password: process.env.DATABASE_PASSWORD,
    host: process.env.DATABASE_HOST,
    port: process.env.DATABASE_PORT,
    dialect: process.env.DATABASE_DIALECT,
  },
  development: {
    database: process.env.DATABASE_NAME,
    username: process.env.DATABASE_USERNAME,
    password: process.env.DATABASE_PASSWORD,
    host: process.env.DATABASE_HOST,
    port: process.env.DATABASE_PORT,
    dialect: process.env.DATABASE_DIALECT,
  },
};
We are now ready to start using Sequelize.
We can use Sequelize-CLI to create and run our migration files. These will keep our databases consistent across different environments and different machines.
Install Sequelize-CLI into the project:
npm install sequelize-cli --save-dev
Now we can create a migration to generate a database table:
npx sequelize migration:create --name create-survey-response
This command created a file in the folder with a name like api/database/migrations/20210101005858-create-survey-responses.js.
Our SurveyResponses table will have the following columns:
| id | user_id | data | created_at | updated_at |
|---|---|---|---|---|
| integer | integer | JSON | date | date |
Update the migration file so that it will create the SurveyResponses table with these columns when it runs:
// api/database/migrations/20210101005858-create-survey-responses.js

"use strict";

module.exports = {
  up: async (queryInterface, Sequelize) => {
    await queryInterface.createTable("SurveyResponses", {
      id: {
        allowNull: false,
        autoIncrement: true,
        primaryKey: true,
        type: Sequelize.INTEGER,
      },
      user_id: {
        allowNull: false,
        type: Sequelize.INTEGER,
      },
      data: {
        type: Sequelize.JSON,
        defaultValue: {},
      },
      created_at: {
        allowNull: false,
        type: Sequelize.DATE,
      },
      updated_at: {
        allowNull: false,
        type: Sequelize.DATE,
      },
    });
    await queryInterface.addIndex("SurveyResponses", ["user_id"]);
  },

  down: async (queryInterface, Sequelize) => {
    await queryInterface.dropTable("SurveyResponses");
  },
};
Now run the migration with the following command:
npx sequelize db:migrate
This created our SurveyResponses table in the survey_dev database with the columns and index we specified.
You can verify the table was created in psql by using the \d command:
psql survey_dev
\d

# =>
                   List of relations
 Schema |          Name          |   Type   |  Owner
--------+------------------------+----------+----------
 public | SequelizeMeta          | table    | postgres
 public | SurveyResponses        | table    | postgres
 public | SurveyResponses_id_seq | sequence | postgres
You can verify the table schema in psql with \d "SurveyResponses"
\d "SurveyResponses"

# =>
                                     Table "public.SurveyResponses"
   Column   |           Type           |                           Modifiers
------------+--------------------------+----------------------------------------------------------------
 id         | integer                  | not null default nextval('"SurveyResponses_id_seq"'::regclass)
 user_id    | integer                  | not null
 data       | json                     | default '{}'::json
 created_at | timestamp with time zone | not null
 updated_at | timestamp with time zone | not null
Indexes:
    "SurveyResponses_pkey" PRIMARY KEY, btree (id)
    "survey_responses_user_id" btree (user_id)
Note: if we wanted to undo our migration, we could run npx sequelize db:migrate:undo, and this would remove the table. If you undo this migration, be sure to re-run it again before continuing.
We created the SurveyResponses table in our database, and now we want to interact with it.
To do this, we can create a model in Sequelize. Create a file called api/models/survey-response.js
touch api/models/survey-response.js
In this file, we can define a basic Sequelize model. This will let our server know how to interact with the SurveyResponses table. Add the following to the file:
// api/models/survey-response.js

const { DataTypes } = require("sequelize");

module.exports = (sequelize) => {
  return sequelize.define(
    "SurveyResponse",
    {
      userId: {
        allowNull: false,
        type: DataTypes.INTEGER,
        field: "user_id",
      },
      data: {
        type: DataTypes.JSON,
        defaultValue: {},
      },
      createdAt: {
        type: DataTypes.DATE,
        field: "created_at",
      },
      updatedAt: {
        type: DataTypes.DATE,
        field: "updated_at",
      },
    },
    {}
  );
};
This will allow us to use helper methods like:
// Create a survey response
SurveyResponse.create({
  userId: 5,
  data: {
    question1: "answer1",
    question2: "answer2",
  },
});

// Find all survey responses for a user
SurveyResponse.findAll({
  where: {
    userId: 5,
  },
});
For more methods, check out the Sequelize docs.
Now that we have the database set up and a model in place, we can create a Sequelize instance for our server to use when interacting with the database.
Create a file api/config/sequelize.js:
touch api/config/sequelize.js
This file will do the following:
- Initialize a Sequelize instance, connected to the database with credentials from our
api/.envfile - Import and register all of our models
- Export an object that our server can use to reference the Sequelize instance and its models
// api/config/sequelize.js

const fs = require("fs");
const path = require("path");
const modelsDirectory = path.join(__dirname, "../models");
const { Sequelize } = require("sequelize");
const db = {};

// Initialize the Sequelize instance
const sequelize = new Sequelize(
  process.env.DATABASE_NAME,
  process.env.DATABASE_USERNAME,
  process.env.DATABASE_PASSWORD,
  {
    dialect: process.env.DATABASE_DIALECT,
    host: process.env.DATABASE_HOST || "localhost",
    port: process.env.DATABASE_PORT || 5432,
  }
);

db.modelNames = [];

// Import and register all of the models in the /models directory
fs.readdirSync(modelsDirectory)
  .filter((file) => {
    return file.indexOf(".") !== 0 && file.slice(-3) === ".js";
  })
  .forEach((file) => {
    const model = require(path.join(modelsDirectory, file))(
      sequelize,
      Sequelize.DataTypes
    );
    db[model.name] = model;
    db.modelNames.push(model.name);
  });

Object.keys(db).forEach((modelName) => {
  if (db[modelName].associate) {
    db[modelName].associate(db);
  }
});

// Export a reference to the library (Sequelize) and the instance (sequelize)
db.Sequelize = Sequelize;
db.sequelize = sequelize;

module.exports = db;Now we're ready to use our database with our server. We can import the Sequelize instance:
const { sequelize } = require("./api/config/sequelize.js");and then use it in a route:
app.get("/survey-responses", async (req, res) => {
  const surveyResponses = await sequelize.models.SurveyResponse.findAll();
  return res.send({ surveyResponses });
});
The resulting file looks like:
// server.js

require("dotenv").config({ path: "./api/.env" });
const express = require("express");
const bodyParser = require("body-parser");
const app = express();
app.use(bodyParser.json());

// Set up Sequelize
const { sequelize } = require("./api/config/sequelize.js");

app.all(["/survey-responses", "/results"], (req, res, next) => {
  res.header("Access-Control-Allow-Origin", "*");
  res.header("Access-Control-Allow-Headers", "Content-Type");
  next();
});

app.post("/survey-responses", async (req, res) => {
  return res.send("Coming soon");
});

// Return all survey responses
app.get("/survey-responses", async (req, res) => {
  const surveyResponses = await sequelize.models.SurveyResponse.findAll();
  return res.send({ surveyResponses });
});

app.get("/results", async (req, res) => {
  return res.send("Results");
});

app.get("/status", async (req, res) => {
  return res.send("ok");
});

const port = process.env.PORT || 5000;
const server = app.listen(port, () =>
  console.log(`✅  Backend listening on port ${port}`)
);

module.exports = server;
Now when we have the server running with:
nodemon server.js
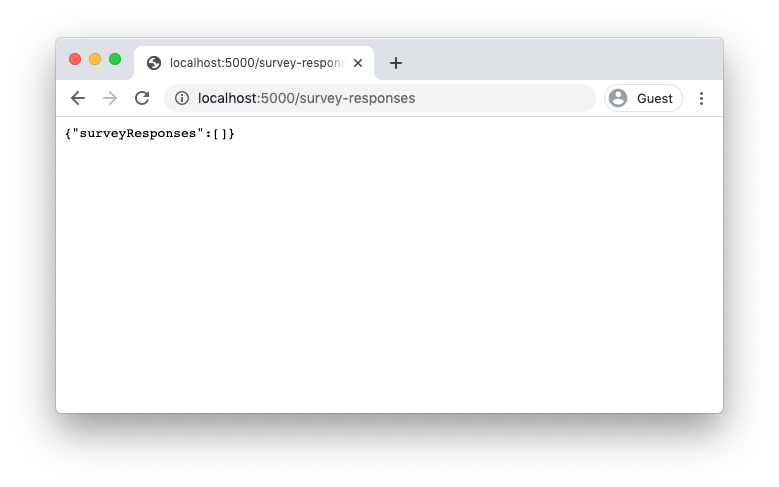
And visit http://localhost:5000/survey-responses
We get the following response:
You can check the logs in the terminal to see that the server did the following lookup:
Executing (default): SELECT "id", "user_id" AS "userId", "data", "created_at" AS "createdAt", "updated_at" AS "updatedAt" FROM "SurveyResponses" AS "SurveyResponse";
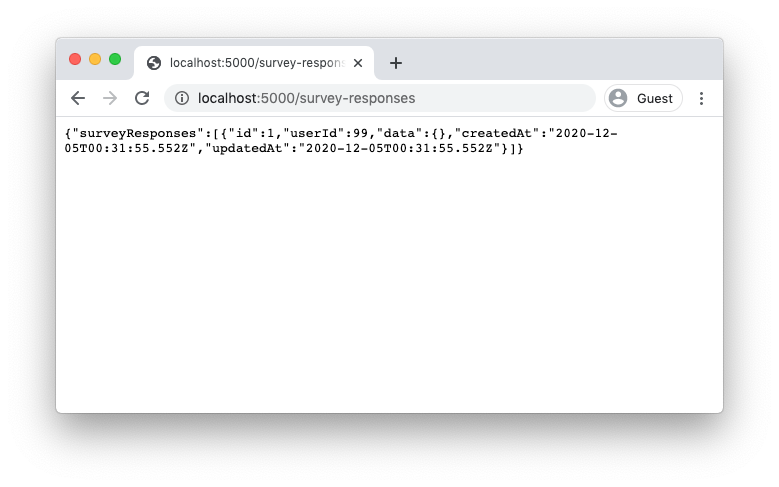
We can manually create a record in psql with the following command:
psql survey_dev
INSERT INTO "SurveyResponses" (user_id, data, created_at, updated_at) VALUES (99, '{}', now(), now());
Now reloading the page will show that survey response:
At this point, it will be easier to develop our backend API using test-driven development, instead of doing guess-and-check in the browser over and over.
In test-driven development (TDD), we write code that checks to see if our server is behaving the way we want it to behave. We intentionally write each test before writing the corresponding server code so that the test will fail initially -- this lets us know the test is "working". With the test in place, we then write the server code so that the test is satisfied. As more tests are written, this lets us continue moving quickly and changing our codebase without fear of accidentally breaking things.
Mocha is a tool for running tests automatically, and Chai is an assertion library that lets us write nice-looking statements like expect(2+2).toEqual(4).
Install mocha and chai as dev dependencies, and then create a /test folder with 3 files: one for configuring Mocha mocha.config.js; one for configuring our test environment (test.config.js); and one for the tests themselves (survey-responses.crud.spec.js). Mocha will automatically run files that end with .spec.js as tests.
npm install mocha chai --save-dev

mkdir api/test
touch api/test/mocha.config.js
touch api/test/test.config.js
touch api/test/survey-responses.crud.spec.js
We can configure npm to run our tests with a custom command. Update the "scripts" section of package.json to add test-backend and test-backend:watch as commands:
// package.json

"scripts": {
  "start": "react-scripts start",
  "build": "react-scripts build",
  "test": "react-scripts test",
  "eject": "react-scripts eject",
  "test-backend": "NODE_ENV=test mocha ./api/test --exit",
  "test-backend:watch": "NODE_ENV=test mocha --watch ./api/test ./api --file ./api/test/mocha.config.js"
},
Now in the terminal we can run the test suite once, or run it each time a file is changed:
| Command | Action |
|---|---|
npm run test-backend |
Run the API test suite one time. |
npm run test-backend:watch |
Run the API test suite whenever a file is changed. |
Mocha will start up the server each time we run the test suite, so we want to make sure to stop the server after the test suite runs. If we don't do this, we'll get an error saying that the server is already running.
Update the Mocha configuration file to stop the server after each run:
// api/test/mocha.config.js

const server = require("../../server.js");

after(async () => {
  return new Promise((resolve, reject) => {
    server.close(() => {
      resolve();
    });
  });
});In addition to restarting the server, it's also nice to reset the test database each time our test suite runs. This will allow for easier debugging, and will also ensure our tests are consistent and that they are testing the things we expect.
In the test.config.js file, we can define helper functions to reset a database table and to reset the whole database (all tables):
// api/test/test.config.js

process.env.DATABASE_NAME = "survey_test";
const { sequelize, modelNames } = require("../config/sequelize.js");

const Test = {};

const resetTable = (modelName) => {
  if (!sequelize.models[modelName]) throw `modelName ${modelName} undefined`;
  return sequelize.models[modelName].sync({ force: true, logging: false });
};

Test.resetAllTables = async () => {
  let deferreds = [];
  modelNames.map((name) => {
    deferreds.push(resetTable(name));
  });
  return Promise.all(deferreds);
};

module.exports = Test;With our test environment set up, let's write a test for one of our endpoints.
The POST /survey-responses endpoint should create a record in the SurveyResponses table. So our test should do the following:
- Set up (reset) the database
- Send a
POSTrequest to/survey-responses - Assert that a
SurveyResponsewas created correctly
We already have all the tools in place for steps 1 & 3. For step 2, our test needs to make a POST request. Axios is a library for making API requests, so let's install that:
npm install axios --save
With axios installed, we can write our test:
// api/test/survey-responses.crud.spec.js

const axios = require("axios");
const chai = require("chai");
const expect = chai.expect;
const Test = require("./test.config.js");
const { sequelize } = require("../config/sequelize.js");

const ax = axios.create({
  baseURL: "http://localhost:5000",
});

describe("SurveyResponses endpoints", () => {
  before(async () => {
    // Reset the database before running these tests
    await Test.resetAllTables();
    return Promise.resolve();
  });

  it("POST /survey-responses should create a survey response", async () => {
    const payload = {
      data: {
        favoriteColor: "green",
        technology: ["Vue", "Node.js"],
      },
    };

    // Perform a POST request to /survey-responses
    const { data, status } = await ax.post("/survey-responses", payload);

    // Check that the server returns a 200 status code
    expect(status).to.equal(200);

    // Check that the surveyResponse is returned
    expect(data.id).to.exist;
    expect(data.userId).to.equal(88);
    expect(data.data).to.deep.equal(payload.data);

    // Check that a surveyResponse was created in the database
    const surveyResponse = await sequelize.models.SurveyResponse.findOne({
      where: { id: data.id },
    });
    expect(surveyResponse).to.exist;
    expect(surveyResponse.userId).to.equal(88);
    expect(surveyResponse.data).to.deep.equal(payload.data);

    return Promise.resolve();
  });
});
We've intentionally written this test to fail, so it should fail when we run it with
npm run test-backend:watch
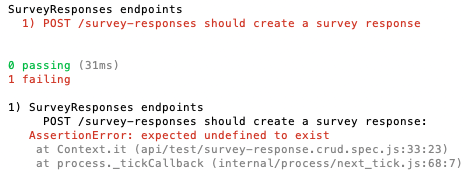
The status is 200, but right now our server does not create a SurveyResponse; it only returns "Coming soon". This means the line that checks the response data:
expect(data.id).to.exist;will fail. This is good because it means our test is working. If we ever break something in the future, this test will catch it.
We can get our test passing by actually creating a SurveyResponse when the route is visited.
In server.js, update the POST /survey-responses route to create a survey response based on the data from the request body:
// server.js

app.post("/survey-responses", async (req, res) => {
  try {
    const surveyResponse = await sequelize.models.SurveyResponse.create({
      userId: 88,
      data: req.body.data,
    });
    return res.send(surveyResponse);
  } catch (err) {
    return res.status(401).send("Unauthorized");
  }
});
With this change, the server will create a survey response whenever the POST route is visited, and for now it will use userId: 88.
Now our test should be passing:
npm run test-backend:watch

Note: visiting http://localhost:5000/survey-responses in the browser while running nodemon server.js will still show no survey responses. This is because the development server connects to the development database, not the test database.
Similar to creating a survey response, we can implement a route to read all survey responses by first writing a failing test, and then writing the code to make it pass.
Here we are creating 2 SurveyResponse records manually in the before block. Then in our test for GET /survey-responses, we check that there are 3 survey responses (2 created in the before block, and 1 created by the POST request from the other test):
// api/test/surveyResponses.crud.spec.js

const axios = require("axios");
const chai = require("chai");
const expect = chai.expect;
const Test = require("./test.config.js");
const { sequelize } = require("../config/sequelize.js");

const ax = axios.create({
  baseURL: "http://localhost:5000",
});

describe("SurveyResponses endpoints", () => {
  before(async () => {
    // Reset the database before running these tests
    await Test.resetAllTables();

    // Create 2 survey responses
    await sequelize.models.SurveyResponse.create({
      userId: 66,
      data: {
        favoriteColor: "red",
        technology: ["Angular", "TypeScript"],
      },
    });
    await sequelize.models.SurveyResponse.create({
      userId: 77,
      data: {
        favoriteColor: "blue",
        technology: ["React"],
      },
    });

    return Promise.resolve();
  });

  it("POST /survey-responses should create a survey response", async () => {
    // ...
  });

  it("GET /survey-responses should return all survey responses", async () => {
    // Perform a GET request to /survey-responses
    const { data, status } = await ax.get("/survey-responses");

    // Check that the server returns a 200 status code
    expect(status).to.equal(200);

    // Check that the surveyResponse array has 3 surveyResponses in it
    expect(data.surveyResponses).to.exist;
    expect(data.surveyResponses.length).to.equal(3);

    // Check that the surveyResponses have the correct structure
    const surveyResponse = data.surveyResponses[0];
    expect(surveyResponse.userId).to.exist;
    expect(surveyResponse.data).to.exist;
    return Promise.resolve();
  });
});
This test actually passes because we already wrote the following in server.js:
// server.js

app.get("/survey-responses", async (req, res) => {
  const surveyResponses = await sequelize.models.SurveyResponse.findAll();
  return res.send({ surveyResponses });
});
In an instance like this, where your test is passing because the application code already exists, it's a good idea to comment out the application code to verify that the test will fail without it. Try changing the GET route so that it will fail:
// server.js

app.get("/survey-responses", async (req, res) => {
  // const surveyResponses = await sequelize.models.SurveyResponse.findAll();
  // return res.send({ surveyResponses });
  return res.send("Coming soon");
});
Once you've verified that the test will fail, you can restore the application code so that the test passes.
Our backend is set up to receive and save a survey response when a POST request is sent to /survey-responses, so we can make our frontend do that when a survey is submitted.
We'll use Axios on the frontend to make API requests too.
Import axios at the beginning of src/App.js, and then update the survey.onComplete method to send a POST request instead of console.log. The beginning of the file should now look like this:
// src/App.js

import axios from "axios";
import React from "react";
import {
  BrowserRouter as Router,
  Switch,
  Route,
  NavLink,
} from "react-router-dom";

import * as SurveyJS from "survey-react";
import "survey-react/modern.css";
import questions from "./questions.js";

SurveyJS.StylesManager.applyTheme("modern");
const survey = new SurveyJS.Model(questions);
// Update survey.onComplete
survey.onComplete.add((result) => {
  axios.post("http://localhost:5000/survey-responses", {
    data: result.data,
  });
});

// ...
Now with the frontend server running in one terminal window:
npm start
And the backend server running in another terminal window:
nodemon server.js
When we visit http://localhost:3000/survey and submit a survey response, it is saved to the database on the backend. Give it a try.
You can view the contents of the database with psql if desired:
psql survey_dev
SELECT * FROM "SurveyResponses";

# =>
 id | user_id |                                data                                |         created_at         |         updated_at
----+---------+--------------------------------------------------------------------+----------------------------+----------------------------
  1 |      88 | {"frameworkUsing":"Yes","framework":["React"],"about":"It works!"} | 2020-12-08 12:59:38.933-08 | 2020-12-08 12:59:38.933-08
(1 row)

\q
Currently, anyone can submit a survey, and anyone can read all the surveys that have been submitted.
We want each user to only submit one survey, and we want to only allow users to see their own survey response. To accomplish both of these goals, we need to authenticate our users.
When a user "logs in" to a website, their browser is issued an access token that it can send to the server in subsequent requests. The server then requires this token to access certain routes. To "log out", the access token is invalidated by the server, and the user's browser deletes the token.
In our application, we'll use a token standard called JSON Web Tokens (JWTs) that allows one server to issue access tokens, and any other server to verify them without contacting the original server. This standard has become a go-to technology for web applications in recent years due to their flexibility and security.
A JWT has a payload that is a JSON object, like:
{
  "userId": 1,
  "exp": 1516239022
}
When encoded, the JWT will look like:
eyJhbGciOiJSUzI1NiIsInR5cCI6IkpXVCJ9.eyJ1c2VySWQiOjEsImV4cCI6MTUxNjIzOTAyMn0.URLqN3WS69wKcappb8obHawjC0eRrQ-a9lftZNoG9khwiUZug9IQ3_1hIW4R9g7jZGiAfY1bKEdSNSp5YZIJ_w
This value is stored in the browser, often as a cookie. It may look like an intimidating value, but in actuality the first 2 terms (as separated by dots ".") are just base64-encoded JSON, which you can check in your browser's debugging console:
atob("eyJhbGciOiJSUzI1NiIsInR5cCI6IkpXVCJ9");
// -> "{"alg":"RS256","typ":"JWT"}"

atob("eyJ1c2VySWQiOjEsImV4cCI6MTUxNjIzOTAyMn0");
// -> "{"userId":1,"exp":1516239022}"
The third part of the JWT is the cryptographic signature, which servers can use to verify that the token is authentic.
It is important to note that JWTs are NOT encrypted -- the payload can be read by anyone. That means they should always be secured over https and should only be sent to the user that you want to log in.
There are many, many pitfalls to configuring and keeping authentication up to date, so we will use a service to handle this in our application.
Userfront is an authentication and access control service that makes it simple to add signup, login, and logout, as well as more advanced auth features. It will issue JWT access tokens when our users sign up or log in, and it will invalidate and remove those tokens when our users log out. It has a generous free tier and will save us from writing and maintaining a lot of complex auth code.
Create an account at https://userfront.com, then install the @userfront/react package with:
npm install @userfront/react --save
Visit the Toolkit section of your Userfront dashboard for installation instructions for the Signup and Login Forms. For React, setting up the Signup Form looks like:
// Sample
import Userfront from "@userfront/react";
Userfront.init("5xbpy4nz");
const SignupForm = Userfront.build({
  toolId: "mnbrak",
});
To incorporate these forms into our application, we need to:
- Add the
@userfront/reactpackage - Initialize the Signup and Login Forms
- Add the
<SignupForm>and<LoginForm>components to the proper views
Update the src/App.js file to add the Signup and Login Forms:
// src/App.js

import axios from "axios";
import React from "react";
import {
  BrowserRouter as Router,
  Switch,
  Route,
  NavLink,
} from "react-router-dom";

import * as SurveyJS from "survey-react";
import "survey-react/modern.css";
import questions from "./questions.js";

// Add the @userfront/react package
import Userfront from "@userfront/react";

// Initialize the forms
Userfront.init("5xbpy4nz");
const SignupForm = Userfront.build({
  toolId: "mnbrak",
});
const LoginForm = Userfront.build({
  toolId: "nadrrd",
});

// ...

// Add the <SignupForm/> and <LoginForm/> components to the view
function Signup() {
  return (
    <div className="container py-5">
      <SignupForm />
    </div>
  );
}
function Login() {
  return (
    <div className="container py-5">
      <LoginForm />
    </div>
  );
}
With our frontend server running, visiting http://localhost:3000/signup will show our signup form:
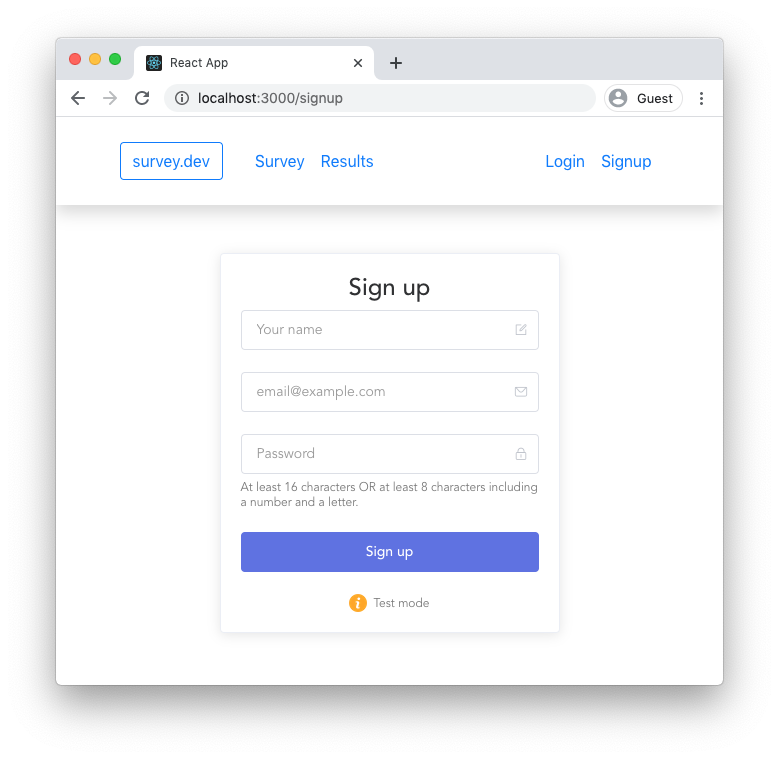
Try signing up a user with your form.
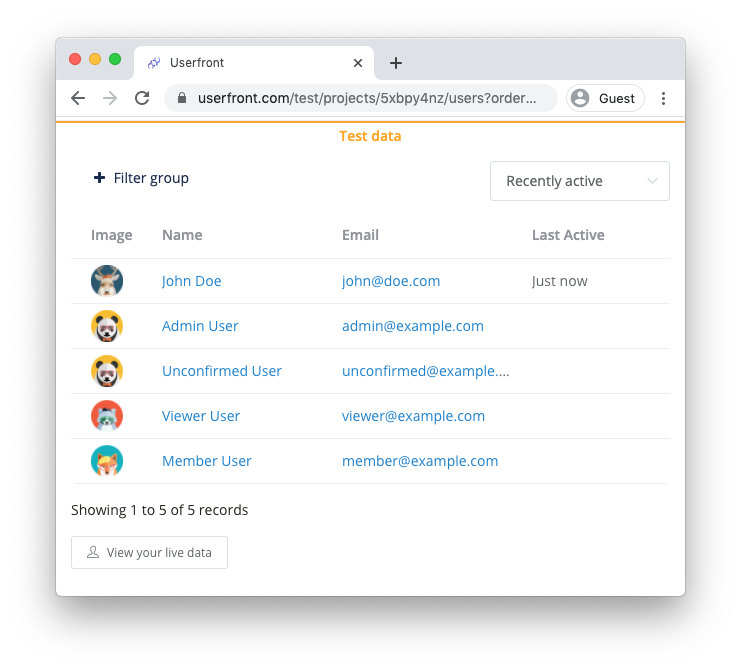
When you sign up, your user record will appear in your Userfront dashboard (under "Users" when in "Test mode"):
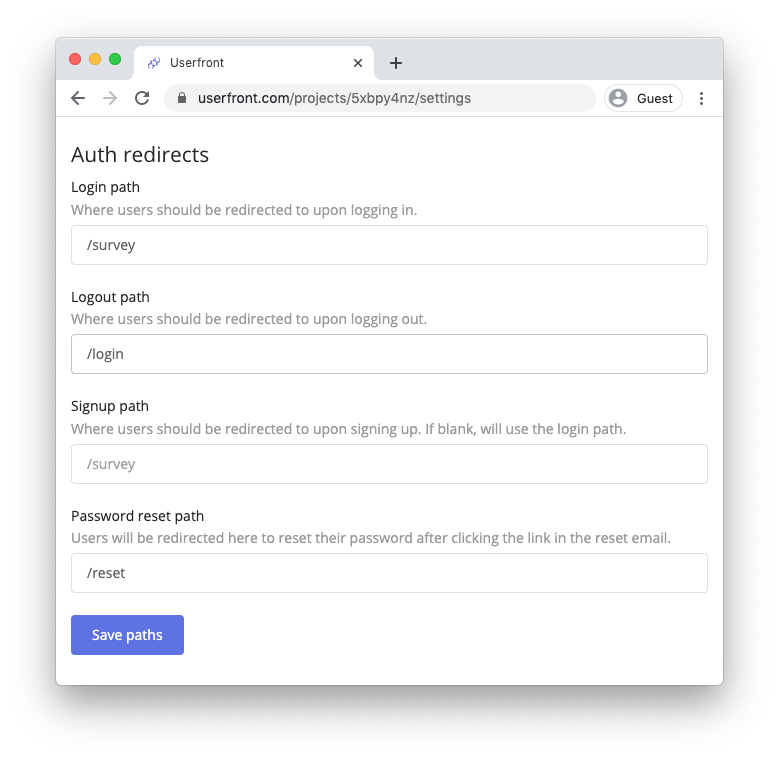
However, the page is redirected to /dashboard, which is not a route we have on our website.
Instead of /dashboard, we want our users to be redirected to /survey when they sign up or log in.
Visit your Userfront dashboard Settings page and set the "Login path" to be /survey. That way when users sign up or log in, they will be redirected to the survey page.
Right now, our page shows the Login and Signup links in the top corner all the time.

We want to show a Logout button if the user is logged in.

To do this, we can use Userfront's built in methods. When the user is logged in, they will have an access token, and calling User.accessToken() will return a value. Thus, we can create an if/else statement to show different buttons if the user is logged in vs logged out.
Update the <LoginLogout/> component with the following code:
// src/App.js

function LoginLogout() {
  // If logged in
  if (Userfront.accessToken()) {
    return (
      <ul className="navbar-nav ml-auto">
        <li className="nav-item">
          <button className="btn btn-link nav-link" onClick={Userfront.logout}>
            Logout
          </button>
        </li>
      </ul>
    );
  } else {
    // If not logged in
    return (
      <ul className="navbar-nav ml-auto">
        <li className="nav-item">
          <NavLink to="/login" className="nav-link">
            Login
          </NavLink>
        </li>
        <li className="nav-item">
          <NavLink to="/signup" className="nav-link">
            Signup
          </NavLink>
        </li>
      </ul>
    );
  }
}
Note that the Logout button has onClick={Userfront.logout}. This will log out the user and then redirect the browser when the button is clicked.
Try logging in and logging out with one of your test users.
Now that the browser recieves a JWT upon login, we can send it to our backend with each request.
We will send the access token when we submit a survey response, which will allow the API to know what user is making the request. We'll use a bearer token in the request header, which will look like:
Authorization: Bearer eyJhbGciOiJ...
Update your survey.onComplete call to include the Authorization header like so:
// src/App.js

survey.onComplete.add((result) => {
  axios.post(
    "http://localhost:5000/survey-responses",
    {
      data: result.data,
    },
    {
      headers: {
        Authorization: `Bearer ${Userfront.accessToken()}`,
      },
    }
  );
});
This will send the access token when the survey is submitted.
Our backend will throw a CORS error if we send a header it doesn't allow. So we need to tell our server to accept the Authorization header.
Update the Access-Control-Allow-Headers setting in server.js to add the Authorization header in addition to the Content-Type header it already allows.
// server.js

res.header("Access-Control-Allow-Headers", "Content-Type, Authorization");
Our JWT is now sent with each form submission, and we can process it on the server.
Now that the browser sends a JWT, we need to verify and decode it on the backend.
We will again use test-driven development to add this feature.
In order to create JWTs for our tests, we need an RSA key pair. RSA is a technology for cryptographically signing keys so that they can be shared. An RSA key pair consists of a private key used to sign and a public key used to verify. In our case, we will be signing and verifying JWTs.
To get a key pair for testing, you can use an RSA key pair generator available online, or you can use the private and public key pair below:
-----BEGIN RSA PRIVATE KEY-----
MIIBOwIBAAJBAJ8PxdNGVwO0Wl4irLuYyrYvNCHMO2ZcTb8cVka/B0xrWTAX/G+7
l1fA7aEWX7/OJsAXkD4aEp3e/d3rNFH/KacCAwEAAQJBAJy/B1zPeVpONauEkiIA
TOtCEyanQ3X4yijlvOPUxlV3+awUq+f8/spS8lCeBtGLYPXdfaib1CvcDpvuZ8nV
mmECIQDWOxh1/d3YkKWUPHML0k88tdSHYKZNrOL2NBL/zWb5FwIhAL4TA+zWYQSv
BfUeyvoXfxIeNtwEZkTnqRdxmdCKK43xAiEAi4fv9aHEpXIItlTs5a0z+KnBY+86
Qesx5AOkwEFLKT8CICbX2fh/gwoi/nOuXEqpnJVGSW3DFGdGdF7PH2Dnq6jxAiBv
x/s4QxfQhYvhPMXisV1PYQ0O2VMMBe4PO7Ioi4xMqQ==
-----END RSA PRIVATE KEY-----
-----BEGIN PUBLIC KEY-----
MFwwDQYJKoZIhvcNAQEBBQADSwAwSAJBAJ8PxdNGVwO0Wl4irLuYyrYvNCHMO2Zc
Tb8cVka/B0xrWTAX/G+7l1fA7aEWX7/OJsAXkD4aEp3e/d3rNFH/KacCAwEAAQ==
-----END PUBLIC KEY-----
Add the public and private keys to your test configuration. We will use process.env.RSA_PUBLIC_KEY for the public key because it will also be used in development and production. The private key will only be used to generate JWTs in our test environment, since Userfront is generating our JWTs in development and production. Thus, we assign it to the test variable Test.rsaPrivateKey.
// api/test/test.config.js

process.env.DATABASE_NAME = "survey_test";
const { sequelize, modelNames } = require("../config/sequelize.js");

const Test = {};

process.env.RSA_PUBLIC_KEY = `-----BEGIN PUBLIC KEY-----
MFwwDQYJKoZIhvcNAQEBBQADSwAwSAJBAJ8PxdNGVwO0Wl4irLuYyrYvNCHMO2Zc
Tb8cVka/B0xrWTAX/G+7l1fA7aEWX7/OJsAXkD4aEp3e/d3rNFH/KacCAwEAAQ==
-----END PUBLIC KEY-----`;

Test.rsaPrivateKey = `-----BEGIN RSA PRIVATE KEY-----
MIIBOwIBAAJBAJ8PxdNGVwO0Wl4irLuYyrYvNCHMO2ZcTb8cVka/B0xrWTAX/G+7
l1fA7aEWX7/OJsAXkD4aEp3e/d3rNFH/KacCAwEAAQJBAJy/B1zPeVpONauEkiIA
TOtCEyanQ3X4yijlvOPUxlV3+awUq+f8/spS8lCeBtGLYPXdfaib1CvcDpvuZ8nV
mmECIQDWOxh1/d3YkKWUPHML0k88tdSHYKZNrOL2NBL/zWb5FwIhAL4TA+zWYQSv
BfUeyvoXfxIeNtwEZkTnqRdxmdCKK43xAiEAi4fv9aHEpXIItlTs5a0z+KnBY+86
Qesx5AOkwEFLKT8CICbX2fh/gwoi/nOuXEqpnJVGSW3DFGdGdF7PH2Dnq6jxAiBv
x/s4QxfQhYvhPMXisV1PYQ0O2VMMBe4PO7Ioi4xMqQ==
-----END RSA PRIVATE KEY-----`;

const resetTable = (modelName) => {
  if (!sequelize.models[modelName]) throw `modelName ${modelName} undefined`;
  return sequelize.models[modelName].sync({ force: true, logging: false });
};

Test.resetAllTables = async () => {
  let deferreds = [];
  modelNames.map((name) => {
    deferreds.push(resetTable(name));
  });
  return Promise.all(deferreds);
};

module.exports = Test;We will update our test to create and send a JWT to the POST /survey-responses endpoint with the header set as authorization: Bearer ${token}.
We will then assert that the userId of the created survey response comes from the token's payload.
In order to create a JWT, install the jsonwebtoken library:
npm install jsonwebtoken --save
// api/test/surveyResponses.crud.spec.js

const jwt = require("jsonwebtoken");

// ...

it("POST /survey-responses should create a survey response", async () => {
  // Create a JWT and sign it with the RSA private key
  const token = jwt.sign(
    {
      userId: 11,
    },
    Test.rsaPrivateKey,
    { algorithm: "RS256" }
  );

  const payload = {
    data: {
      favoriteColor: "green",
      technology: ["Vue", "Node.js"],
    },
  };

  // Perform a POST request to /survey-responses
  const { data, status } = await ax.post("/survey-responses", payload, {
    headers: {
      authorization: `Bearer ${token}`,
    },
  });

  // Check that the server returns a 200 status code
  expect(status).to.equal(200);

  // Check that the surveyResponse is returned
  expect(data.id).to.exist;
  expect(data.userId).to.equal(11);
  expect(data.data).to.deep.equal(payload.data);

  // Check that a surveyResponse was created in the database
  const surveyResponse = await sequelize.models.SurveyResponse.findOne({
    where: { id: data.id },
  });
  expect(surveyResponse).to.exist;
  expect(surveyResponse.userId).to.equal(11);
  expect(surveyResponse.data).to.deep.equal(payload.data);

  return Promise.resolve();
});
This test should be failing now, because the model isn't saving the userId from the token yet:
[TODO update this image [survey-test-3]]
We can get the test passing by updating the route to verify the JWT and include it when saving the survey response.
// server.js

const jwt = require("jsonwebtoken");

//...

app.post("/survey-responses", async (req, res) => {
  // Get the JWT from the header named "authorization"
  const token = req.headers.authorization.replace("Bearer ", "");

  // Verify the token using the RSA public key
  const verified = jwt.verify(token, process.env.RSA_PUBLIC_KEY, {
    algorithm: "RS256",
  });

  // Use the userId from the token when creating the database record
  const surveyResponse = await sequelize.models.SurveyResponse.create({
    userId: verified.userId,
    data: req.body.data,
  });
  return res.send(surveyResponse);
});
And now the test should be passing:
[TODO add image of test passing [survey-test-4]]
In order to build a secure system, we want to make sure that we don't permit access to unauthorized users. We can write tests to assert the following:
- Should return 401 error when authorization header is missing
- Should return 401 error when JWT is expired
- Should return 401 error when JWT is signed with a different key
To test the scenario where the authorization header is not included, we can send a request without an authorization header and then assert that our server returns a 401 status code (Unauthorized):
// api/test/surveyResponses.crud.spec.js

it("POST /survey-responses should return 401 if the authorization header is missing", async () => {
  const payload = {
    data: {
      favoriteColor: "red",
      technology: ["Angular.js"],
    },
  };

  try {
    // Perform a POST request to /survey-responses
    await ax.post("/survey-responses", payload);
  } catch (err) {
    // Check that the server returns a 401 status code
    const { status, data } = err.response;
    expect(status).to.equal(401);
    expect(data).to.equal("Unauthorized");
  }

  return Promise.resolve();
});To test the scenario where an expired JWT is submitted, we can set the expiresIn to a negative number, which will make the JWT be expired. Then we can assert that the request fails with a 401 status code (Unauthorized):
// api/test/surveyResponses.crud.spec.js

it("POST /survey-responses should return 401 if JWT is expired", async () => {
  // Create an expired JWT signed with the RSA private key
  const token = jwt.sign(
    {
      userId: 22,
    },
    Test.rsaPrivateKey,
    {
      algorithm: "RS256",
      expiresIn: -1,
    }
  );

  const payload = {
    data: {
      favoriteColor: "red",
      technology: ["Angular.js"],
    },
  };

  try {
    // Perform a POST request to /survey-responses
    const { data, status } = await ax.post("/survey-responses", payload, {
      headers: {
        authorization: `Bearer ${token}`,
      },
    });
  } catch (err) {
    // Check that the server returns a 401 status code
    const { status, data } = err.response;
    expect(status).to.equal(401);
    expect(data).to.equal("Unauthorized");
  }

  return Promise.resolve();
});To test the scenario where a JWT is invalid because it was signed by a different private key, we can create a JWT with a random private key and then assert that it fails with a 401 status code (Unauthorized):
// api/test/surveyResponses.crud.spec.js

it("POST /survey-responses should return 401 if JWT is signed with wrong key", async () => {
  // Create a JWT signed with a different RSA private key
  const token = jwt.sign(
    {
      userId: 22,
    },
    `-----BEGIN RSA PRIVATE KEY-----
MIIBOwIBAAJBALHlFNfHdfCq4stiIZyTmkawfJXgGSXHHy9L2YmcDYoeoL/ljIXn
PX4/d4AgABq6NTKJEoIm661Ay1VYjErpY4cCAwEAAQJBAJ2XS6yP1So7qCf2KcJ0
e6INrIB1ArIVwMl8Txz5soDcfe8h3X6w7/GshWG//DcnTXsosMnYPbkhGord1nQP
85kCIQDyW5SHAY0mSyYUjZpFrq/dEyDEGiq26DpT8C1w3DlBwwIhALvolEEU+dMt
NMF7Bj8Y/8oi1BP/AlCs62TM9gLt8FbtAiEA5FW2BNBIXMi2cuzKaVZgqGeqGjgR
AEyhD44cMdW6OCMCIF0n3metaHTi0mahAOXDFPw27ADFyXYJY+FjIwssvpu5AiAy
j54LxJp8HjQXvbs/Tr7OSu3CEK7pc9uTZ6RkyD1oGw==
-----END RSA PRIVATE KEY-----`,
    {
      algorithm: "RS256",
    }
  );

  const payload = {
    data: {
      favoriteColor: "red",
      technology: ["Angular.js"],
    },
  };

  try {
    // Perform a POST request to /survey-responses
    const { data, status } = await ax.post("/survey-responses", payload, {
      headers: {
        authorization: `Bearer ${token}`,
      },
    });
  } catch (err) {
    // Check that the server returns a 401 status code
    const { status, data } = err.response;
    expect(status).to.equal(401);
    expect(data).to.equal("Unauthorized");
  }

  return Promise.resolve();
});We can get these tests to pass by returning an Unauthorized error if the process fails:
// server.js

app.post("/survey-responses", async (req, res) => {
  try {
    const token = req.headers.authorization.replace("Bearer ", "");
    const verified = jwt.verify(token, process.env.RSA_PUBLIC_KEY, {
      algorithm: "RS256",
    });
    const surveyResponse = await sequelize.models.SurveyResponse.create({
      userId: verified.userId,
      data: req.body.data,
    });
    return res.send(surveyResponse);
  } catch (err) {
    return res.status(401).send("Unauthorized");
  }
});
Now when we run our test command:
npm run test-backend
All of our tests should be passing:
[TODO add image [survey-test-5]]
Our tests are working, so now we can check to see that the backend works with the frontend.
For our local tests, we're using a dummy RSA public key. That won't work for development or production, so we need to add the key from Userfront to our .env file.
Visit the Userfront dashboard and select your project settings while in test mode. From there, find the RSA public key for your project:
-----BEGIN RSA PUBLIC KEY-----
MIIBigKCAYEAymqnnSQInFgmVhsSLyZWCKCObqCcZQQHrOdE/aqVwvaSyIbbpc01
+/lucPrdsKUAQCo0C93GsoDRXUYOEJ4Gl2z0H3SpOtbmSDTp6mWKU4NZvxKzG/Y2
VXMzgg510GOAvfXQABpKyvbjriXPJ9SOCxeAqlu3nHnKY9lWbmduBAF3AOa1Irhu
i1NigCdkl0anHGYuCpufpkk8PnyrvDWe9GRJLBVd61ImeLl9EFysomF/H0wIgOvX
o+WLQNx/61m4JTODQDbf8R9uWr8eqAFfgt26BU4p1lUQPg6rAc6+9Ry3K0jAJB0b
44pcEd6U5a7rjerzu1IMHIQXJXRDicJE1wYIe8iu7xCAyTvG1DOKFIuT/1Ny8Au/
ggbpBU+tnnH4cF+9DbOT3wi94sj85JsEN8V3VOtFPHeHlZSo3nOi5QqaJiSjHoCI
O35Ql0ouy7Qe8i8YWibbrfm7lrO7TlYF89tiPhQc/TgYsD+iqMwDsgffgHLClZHQ
ln5rVhbqZlcZAgMBAAE=
-----END RSA PUBLIC KEY-----
In order to add a multi-line RSA key to the .env file, we need to put the value in double quotes " " and replace the newlines with /n.
# api/.env

DATABASE_NAME=survey_dev
DATABASE_USERNAME=postgres
DATABASE_PASSWORD=null
DATABASE_HOST=localhost
DATABASE_DIALECT=postgres
DATABASE_PORT=5432
RSA_PUBLIC_KEY="-----BEGIN RSA PUBLIC KEY-----\nMIIBigKCAYEAymqnnSQInFgmVhsSLyZWCKCObqCcZQQHrOdE/aqVwvaSyIbbpc01\n+/lucPrdsKUAQCo0C93GsoDRXUYOEJ4Gl2z0H3SpOtbmSDTp6mWKU4NZvxKzG/Y2\nVXMzgg510GOAvfXQABpKyvbjriXPJ9SOCxeAqlu3nHnKY9lWbmduBAF3AOa1Irhu\ni1NigCdkl0anHGYuCpufpkk8PnyrvDWe9GRJLBVd61ImeLl9EFysomF/H0wIgOvX\no+WLQNx/61m4JTODQDbf8R9uWr8eqAFfgt26BU4p1lUQPg6rAc6+9Ry3K0jAJB0b\n44pcEd6U5a7rjerzu1IMHIQXJXRDicJE1wYIe8iu7xCAyTvG1DOKFIuT/1Ny8Au/\nggbpBU+tnnH4cF+9DbOT3wi94sj85JsEN8V3VOtFPHeHlZSo3nOi5QqaJiSjHoCI\nO35Ql0ouy7Qe8i8YWibbrfm7lrO7TlYF89tiPhQc/TgYsD+iqMwDsgffgHLClZHQ\nln5rVhbqZlcZAgMBAAE=\n-----END RSA PUBLIC KEY-----"
Make sure both of the servers are running (in separate terminal windows).
Frontend
npm start
Backend
nodemon server.js
Now log in and visit the survey page http://localhost:3000/. Submitting the survey will POST the data to the backend, where it will be saved.
We have successfully implemented authentication. Now we can add authorization, where some logged in users are allowed to perform an action while others are not.
-- TODO --