You signed in with another tab or window. Reload to refresh your session.You signed out in another tab or window. Reload to refresh your session.You switched accounts on another tab or window. Reload to refresh your session.Dismiss alert
当执行make操作时,出现如下bug:
libavcodec/x86/h264_qpel_mmx.c: Assembler messages:
libavcodec/x86/h264_qpel_mmx.c:1294: Error: operand type mismatch for cmp' libavcodec/x86/h264_qpel_mmx.c:1294: Error: operand type mismatch for cmp'
libavcodec/x86/h264_qpel_mmx.c:1298: Error: operand type mismatch for cmp' libavcodec/x86/h264_qpel_mmx.c:1298: Error: operand type mismatch for cmp'
libavcodec/x86/h264_qpel_mmx.c:964: Error: operand type mismatch for cmp' libavcodec/x86/h264_qpel_mmx.c:964: Error: operand type mismatch for cmp'
libavcodec/x86/h264_qpel_mmx.c:964: Error: operand type mismatch for `cmp'
make[5]: *** [libavcodec/x86/dsputil_mmx.o] Error 1
Qt5.7.0 + OpenCV2.4.9 + ffmpeg在Ubuntu 14.04LTS下的配置
分类:
tags: Ubuntu Qt OpenCV
©版权声明:本文为博主原创文章,未经博主允许不得转载。
前言:这是我的第一篇MarkDown文档,试手 + 记录用,希望MarkDown能给我带给我很好的记录习惯~
一、Qt 5.7.0的安装
参考链接:http://blog.csdn.net/laizhenghong2012/article/details/51758164
1、安装g++
安装Qt之前安装g++,以便在Qt的安装过程中能够检测到系统已经安装了g++。减少后期配置的困难。
2、安装Qt5.7.0
笔者电脑是64位的,所以应该下载对应的64位版本。安装软件是在学校的IPV6内网中下载的,平常状况下,应该在官网下载。
笔者的qt-opensource-linux-x64-5.7.0.run放在/home/grq/src文件夹下,先对文件实行权限更改:
执行安装文件:
进入安装界面,依次登陆,选择安装位置(注意:最好选择具有读写权限的/home目录下)

直到文件最后安装完成。
3、配置Qt
安装完后,还要配置Qt,否则是不能使用的。
当你在命令行下输入qmake时,会报这样的错误
(32位的ubuntu报的是这样的错 qmake:could not exec '/usr/lib/i386-linux-gnu/qt4/bin/qmake':NO such file or directory)
跟随报错信息,进入下面路径中:
cd /usr/lib/x86_64-linux-gnu/qt-default/qtchooser打开目录下的default.conf文件:
将配置文件中的内容改为实际的Qt安装位置。例如笔者的default.conf文件如下所示:
/home/grq/kit/Qt5.7.0/5.7/gcc_64/bin

/home/grq/kit/Qt5.7.0
4、写Hello World(参考其他链接)
运行得到:
注:运行时报错
can't find lGl,请参考:http://blog.csdn.net/wwkaven/article/details/37755259二、ffmpeg的配置
参考链接:http://blog.csdn.net/micheal_w/article/details/45343873
如果安装OpenCV时没有安装ffmpeg,则在调用OpenCV视频处理函数时,将会导致读取视频失败。
###1、源码下载 ###
终端输入如下指令,获取ffmpeg源码。
注:获取源码后建议备份。
2、文件配置
进入ffmpeg文件夹中,进行文件配置:
cd ./ffmpeg
./configure --enable-shared --enable-gpl --enable-swscale
如果在
configure中遇到提醒,缺少--disable-yasm时,添加该项即可:3、ffmpeg安装
4、关于'cmp'的bug
当执行
make操作时,出现如下bug:libavcodec/x86/h264_qpel_mmx.c: Assembler messages:
libavcodec/x86/h264_qpel_mmx.c:1294: Error: operand type mismatch for
cmp' libavcodec/x86/h264_qpel_mmx.c:1294: Error: operand type mismatch forcmp'libavcodec/x86/h264_qpel_mmx.c:1298: Error: operand type mismatch for
cmp' libavcodec/x86/h264_qpel_mmx.c:1298: Error: operand type mismatch forcmp'libavcodec/x86/h264_qpel_mmx.c:964: Error: operand type mismatch for
cmp' libavcodec/x86/h264_qpel_mmx.c:964: Error: operand type mismatch forcmp'libavcodec/x86/h264_qpel_mmx.c:964: Error: operand type mismatch for `cmp'
make[5]: *** [libavcodec/x86/dsputil_mmx.o] Error 1
解决方案:
将目录下的文件:
./ffmpeg/libavcodec/x86/h264_qpel_mmx.c文件中的"g"替换为"rm"。使用gedit打开文档:
然后可以使用gedit中的替换功能。
三、OpenCV 2.4.9 的安装
参考链接:http://blog.csdn.net/guo8113/article/details/29211041
http://www.samontab.com/web/2014/06/installing-opencv-2-4-9-in-ubuntu-14-04-lts/
1、安装build-essential:
2、安装CMake:
3、安装一些依赖库与组件:
其中,最后四个包是可选的。
4、获取OpenCV源码
可前往官网,寻找下载OpenCV 2.4.9的Linux版源码:http://opencv.org/releases.html
下载得到OpenCV2.4.9.zip,解压到目录中。
5、安装OpenCV
此处使用release版本,所以在OpenCV文件夹下建造目录release。
对OpenCV进行CMake,命令如下:
注:一定要加上后面两个点 "..",两个点..代表上级目录的意思
cmake配置结束后,可以看到一系列编译配置情况。其中一定要注意检查ffmpeg的编译情况:
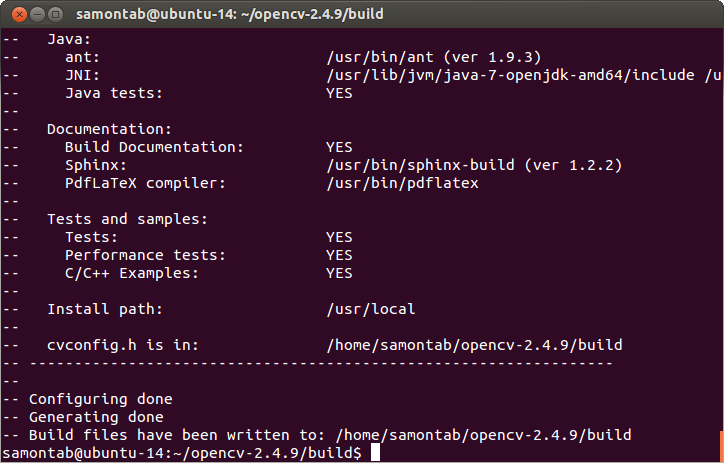
确定编译过程中会对如下模块进行编译:
core flann imgproc highgui features2d calib3d ml video legacy objdetect photo gpu ocl nonfree contrib java python stitching superres ts videostab viz.然后编译、安装OpenCV:
安装过程比较慢,笔者较高的配置下也得编译20分钟。可以稍事休息。
6、更新系统库文件配置
这样可以直接重新加载系统中使用的库,就不用重启电脑就可用OpenCV库了。
四、OpenCV + Qt5.7.0程序测试
创建工程OpenCV_Test,在OpenCV_Test.pro文件中最后加入:
INCLUDEPATH += /usr/local/include

/usr/local/include/opencv

/usr/local/include/opencv2
LIBS += /usr/local/lib/libopencv_highgui.so

/usr/local/lib/libopencv_core.so

/usr/local/lib/libopencv_imgproc.so

/usr/local/lib/libopencv_photo.so

/usr/local/lib/libopencv_calib3d.so
main.cpp如下:
The text was updated successfully, but these errors were encountered: