This will set you up for VersionPress development. 👩💻 👨💻
Our approach is:
- You develop in local tools you're comfortable with – PhpStorm, vim, VSCode, ...
- Runtime is handled by Docker. You don't need MAMP / XAMPP, local installation of Selenium, etc.
- Common tasks are automated via npm scripts, for example,
npm run tests:full.
If you're not familiar with Docker, this is great quick start. We also have some tips for you.
This software is expected on your machine:
- Git 2.10+
- Node.js 8+, npm 6+
- Docker 18.03+
- PHP 7+ and Composer 1.4+
Git Bash (part of Git for Windows) is required on Windows, please use it instead of cmd.exe / PowerShell for both interactive sessions and as your npm script shell:
npm config set script-shell "c:\Program Files\git\bin\bash.exe"
See also Windows tips below.
git clone https://github.com/versionpress/versionpresscd versionpressnpm install
Have a ☕, this will take a while.
Tip: From time to time, it's useful to clean up everything and pull latest Docker images. Run
npm run refresh-dev.
To start a development site:
- Make sure ports 80 and 3306 are free, e.g., no local MAMP / XAMPP is running.
- Run
npm start.
This will start a set of Docker containers in the background. When everything boots up, log into the test site at http://localhost, install WordPress and activate VersionPress on the Plugins page. You're now all set up! 🎉

Let's explore your development environment:
- VersionPress source files are directly mapped to the site's
wp-content/plugins/versionpress. Any changes you make locally are immediately live. - Database can be inspected using Adminer at http://localhost:8099, server name
mysql, loginroot/r00tpwd. You can also use tools like MySQL Workbench ormysqlcommand-line client, e.g.,mysql -u root -p. - WordPress root is mapped to
./dev-env/wp. You can use your local Git client to inspect the site's history there. - To invoke WP-CLI or Git commands in the site, create a terminal session via
docker-compose exec wordpress /bin/bashor invoke the command directly, e.g.,docker-compose exec wordpress git logordocker-compose exec wordpress wp option update blogname "Hello".
Some useful tips for managing your Docker environment:
docker-compose pslists running containers.docker-compose logs -fdisplays live logsdocker-compose logs wordpressdisplays logs of a single service.docker statsshow live CPU / memory usage.- See also Docker tips below.
Run npm stop to stop the development environment. Run npm run stop-and-cleanup to also clean up WordPress files and MySQL database for a fresh start next time.
For PHP development, we recommend PhpStorm and ship project files for it. The steps here have been tested in PhpStorm 2018.1.
Run npm run init-phpstorm. This copies .idea to plugins/versionpress.
Open the plugins/versionpress project in PhpStorm. On the first start, you'll see two prompts:

Enable WordPress support but leave the installation path empty (ignore the warning):

Enable Composer sync.
For Code Sniffer inspections to work, there's a one-time configuration: Go to Settings > Languages & Frameworks > PHP > Code Sniffer, select Local, click the three dots next to it and provide your full system path to ./vendor/bin/phpcs.
Note: Most VersionPress code uses the PSR-2 coding standard with only the parts directly interacting with WordPress using WordPress conventions. For example, global functions are defined as
vp_register_hooks(), notregisterHooks().
It is also useful to install the EditorConfig extension, VersionPress ships with some basic formatting rules.
Please refer to the Contributing code section in CONTRIBUTING.md.
The development containers have Xdebug installed and configured. Here is how to make debugging work in PhpStorm; the Debugging tests section gives an example of how to make debugging work in VSCode.
Start the Docker stack with npm start.
In PhpStorm, go to Settings > Languages & Frameworks > PHP > Servers and check the path mappings of the pre-configured VersionPress-dev server. Specifically, update the WordPress mapping which PhpStorm does not persist automatically:

The two mappings should be:
<your local path>/plugins/versionpress->/var/www/html/wp-content/plugins/versionpress<your local path>/ext-libs/wordpress->/var/www/html
The default zero configuration settings in Settings > Languages & Frameworks > PHP > Debug should be fine:

Enable debugging in the browser, most commonly using a browser extension or a bookmarklet:

Place a breakpoint somewhere, e.g., in the main versionpress.php file, and start listening for debug connections in PhpStorm.
Reload a page in your browser. Debugging should now work:

After you're done with debugging, run npm stop or npm run stop-and-cleanup.
Tests are a significant part of the VersionPress project, we care about writing and maintaining them. They live in plugins/versionpress/tests and there are several types of them, from unit to full end2end tests. They all run in a dockerized test environment.
Note: the
./frontendapp has its own tests, this section is about core VersionPress tests (PHP code) only.
Similarly to the development environment, tests utilize Docker Compose as well. The main benefit is that you don't need to set up things like Selenium or Java locally.
Most tasks are scripted, for example, you just run npm run tests:unit but you can also drop to the raw Docker Compose mode and do things like docker-compose run --rm tests .... In that case, one thing to understand is that there are two services in docker-compose.yml to choose from:
tests– just a test runner.tests-with-wordpress– starts a WordPress stack.
All scripts also come with a ...:debug version, for example, tests:unit:debug. See Starting a debugging session from command line.
- Make sure you have run
npm installas described above and have Docker running. - Run
npm run tests:unitornpm run tests:full.
Unit tests use a simpler tests service and are fast to execute.
The full tests include end2end tests and are relatively slow to run, however, if they pass, there's a good chance that VersionPress works correctly.
tests:custom and tests:custom-with-wordpress scripts allow you to run custom tests easily. Here are some examples:
❕ Notice how PHPUnit arguments come after
--.
# Pick a test suite from the default phpunit.xml
npm run tests:custom -- -c phpunit.xml --testsuite Unit

# Create your own phpunit.*.xml (gitignored)
npm run tests:custom -- -c phpunit.custom.xml

# Run specific test class
npm run tests:custom-with-wordpress -- -c phpunit.xml --filter RevertTest
If you want to go entirely custom, use raw docker-compose:
# PhpStorm-like invocation (copy/pasted from its console):
docker-compose run --rm tests ../vendor/bin/phpunit --bootstrap /opt/versionpress/tests/phpunit-bootstrap.php --no-configuration /opt/versionpress/tests/UnitNpm scripts are configured to log in a TestDox format to container's /var/opt/versionpress/logs which is mapped to your local folder ./dev-env/test-logs.
To log in another supported format, run tests manually like this:
docker-compose run --rm tests ../vendor/bin/phpunit -c phpunit.xml --log-junit /var/opt/versionpress/logs/vp-tests.log
If you've run tests that use the tests-with-wordpress service, the whole Docker stack is kept running so that you can inspect it. For example, you can use your local Git client to explore the site's history in dev-env/wp-for-tests/wptest. The end2end tests section provides more info on this.
When you're done with tests, run npm stop to shut down the Docker stack or npm run stop-and-cleanup to also remove the volumes so that the next start is entirely fresh.
- If you're trying to narrow down a bug, it's useful to run a smaller test suite via one of the options above and add
stopOnFailure="true"to the XML file or--stop-on-failureon the command line. - Unit tests can also easily be run using a local
phpinterpreter, basically just run them in PhpStorm.
PhpStorm makes it easy to select specific tests and to debug them. Also, if you stop debugging, you will see messages gathered so far. There is a one-time setup to go through.
💡 If this doesn't work for you, e.g., due to some Docker Compose bug in PhpStorm, you can start debugging from command line.
First, if you're using Docker for Mac or Docker for Windows, expose a daemon in Docker settings:

In PhpStorm, create a new Docker environment in Settings > Build, Execution, Deployment > Docker:

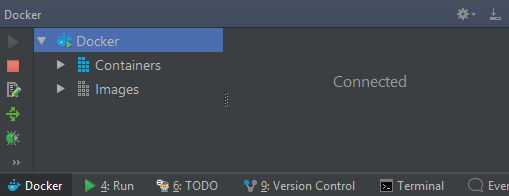
In the Docker panel, you should now be able to connect:
Next, define a remote interpreter. Make sure you have the PHP Docker plugin enabled and go to Settings > Languages & Frameworks > PHP. Add a new interpreter there:

Note that the docker-compose.yml is at the repo root, not inside ./plugins/versionpress:

If this doesn't go smoothly, try unchecking the Include parent environment variables checkbox in the Environment variables field:

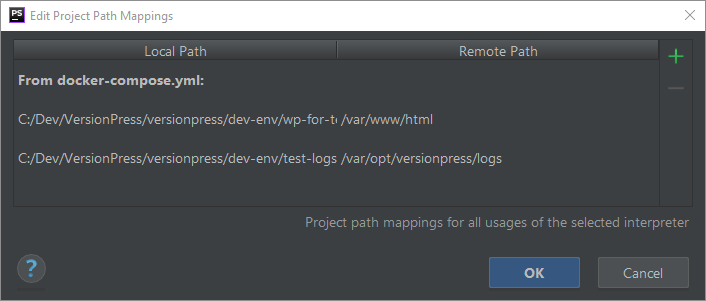
Select this CLI interpreter as the main one for the project and make sure the path mappings are correct:
The final step is to set up a test framework in PHP > Test Frameworks. Add a new PHPUnit by Remote Interpreter:

Don't forget to set the Default bootstrap file to /opt/versionpress/tests/phpunit-bootstrap.php.
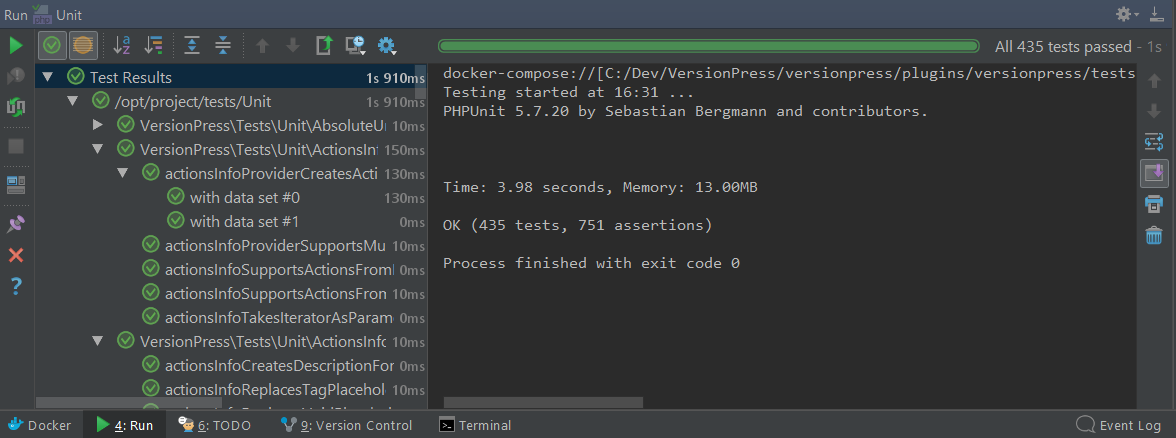
Now you're ready to run the tests. For example, to run all unit tests, right-click the Unit folder and select Run:
Debugging also works, just select Debug instead of Run:

This works equally well other types of tests as well, for example, Selenium tests:

This method is more universal and works for PhpStorm, VSCode and other IDEs. You generally do this:
- Set a breakpoint.
- Start listening in your IDE.
- Launch a debug-enabled script like
npm run tests:unit:debug(see package.json).
First, make sure you have the 'VersionPress-tests' server defined in Settings > Languages & Frameworks > PHP > Servers. If not, run npm run init-phpstorm.
Then, set a breakpoint in some test and start listening for debug connections in the toolbar.
Run npm run tests:unit:debug in the console, skip the first break at the wp binary and see your breakpoint hit:

See this JetBrains help page for more.
In VSCode, install PHP Debug extension and create a launch.json config containing this:
{
  "name": "PHP: Listen for Xdebug",
  "type": "php",
  "request": "launch",
  "port": 9000,
  "pathMappings": {
    "/opt/versionpress": "${workspaceRoot}/plugins/versionpress",
  }
}
Then, start a debugging session in VSCode and set a breakpoint. Run the tests:unit:debug script and see the breakpoint hit:

Unit tests are best suited for small pieces of algorithmic functionality. For example, IniSerializer is covered by unit tests extensively.
You can either run unit tests in a dockerized environment as described above or set up a local CLI interpret which makes the execution faster and more convenient.
End2end tests exercise a WordPress site and check that VersionPress creates the right Git commits, that the database is in correct state, etc. These tests are quite heavy and slow to run but if they pass, there's a good chance that VersionPress works correctly. (Before the project had these, long and painful manual testing period was necessary before each release.)
End2end tests use the concept of workers: each test itself is implemented once but how e.g. a post is created or a user deleted is up to a specific worker. There are currently two types of workers:
- WP-CLI workers – run WP-CLI commands against the test site.
- Selenium workers – simulate real user by clicking in a browser.
In the future, we might add REST API workers; you get the idea.
Currently, the default worker is WP-CLI and the only way to switch workers is to update tests/test-config.yml, the end2end-test-type key. We'll make it more flexible in the future.
After you've run the tests, the Docker stack is left up and running so that you can inspect it:
- The site is running at http://wordpress-for-tests/ – update your hosts file accordingly and log in using the info in
test-config.yml. - The files are mapped to
./dev-env/wp-for-tests, you can use your local Git client to inspect it. - Connect to the database via
mysql -u root -por Adminer which you can access by runningdocker-compose run -d --service-ports adminerand visiting http://localhost:8099. The database name ismysql-for-wordpress.
Stop the Docker stack with npm run stop-and-cleanup (stop-and-cleanup is strongly recommended here; end2end tests are not perfectly isolated yet).
The project has these other types of tests (folders in the ./plugins/versionpress/tests folder and also test suite names in phpunit.xml so that you can run them using --testsuite <SuiteName>):
GitRepositoryTests– test Git repository manipulation inGitRepository.SynchronizerTests– these are quite slow and test that given some INI files on disk, the database is in a correct state after synchronization runs.StorageTests– test that entities are stored correctly as INI files.LoadTests– they are run together with other tests but with very few iterations; manually update their source files and execute them separately to properly exercise them.Selenium– a bit like end2end tests but for rarer cases, like VersionPress not being activated yet.Workflow– exercise cloning and merging between environments.
VersionPress uses a JavaScript frontend implemented as a React app in the ./frontend folder.
- Run
npm run init-phpstormif you haven't done that already. - Open the
frontendproject in PhpStorm. - Answer "No" to Compile TypeScript to JavaScript? prompt.
Linting task is set up for the frontend project. Run npm run lint in the frontend directory.
For pure frontend development, it's more convenient to run it outside of the WordPress administration. Let's assume you run the frontend against the default Docker site.
- Make sure that the site is running and that VersionPress is activated in it. You should be able to visit
http://localhostin the browser and thefrontend/src/config/config.local.tsshould contain this URL as API root. - In your test WordPress site, put this to
wp-config.php(the file should be editable at./dev-env/wp/wp-config.php):define('VERSIONPRESS_REQUIRE_API_AUTH', false); - Run
npm startin thefrontenddirectory.
This launches webpack dev server at http://localhost:8888:

Source code edits will be automatically reflected in the browser.
Run npm run build, it will produce a file like dist/versionpress-3.0.2.zip.
The version number is based on the nearest Git tag and can also be something like 3.0.2-27-g0e1ce7f meaning that the closest tag is 3.0.2, there have been 27 commits since then and the package was built from 0e1ce7f. See git describe --tags for more examples.
Meta! If you're working on updating the dev setup (this document, Docker images, etc.), here are some tips for you.
Simpler tasks are scripted directly in package.json, more complex ones in the ./scripts folder, see for example scripts/build.ts.
To debug the scripts in VSCode, run the script via debug-script, e.g.:
npm run debug-script scripts/init-dev.ts
Then in VSCode, create a "Node attach" configuration and run it.
We're keeping our images close to two official ones, wordpress:php7.2-apache and wordpress:cli.
The only goal of our images is to be close to the official project and have the right environment in it, e.g., the PHP version. We don't care that much about specific WordPress versions (WordPress is often installed dynamically anyway, based on test-config.yml) so we only use "vague" tags like php7.2-apache or cli.
To build and push tags to Docker Hub:
npm run build-imagesdocker loginnpm run push-images
You can get Docker Hub digests by running:
$ npm run get-image-digests

cli sha256:11c49ba4d7198c17660f30e8db4d00ca356b1c4414f338076bf99ab4dd295184
php7.2-apache sha256:39ed34f84a5ccf8ab47eb1db4041c226ffe6f874127ead4c26f0b607457b7377
Legacy approach is documented at the 4.0-alpha1 tag:
Here are some tips for working with Docker / Docker Compose:
- Aliasing
docker-composetodcwill save you some typing. - Values in
docker-compose.ymlcan be customized viadocker-compose.override.yml.
As noted in Getting started, we only support Git Bash on Windows, a shell that comes with Git for Windows. cmd.exe or PowerShell will not work as we use Linux-style syntax (single quotes, setting environment variables, etc.) and tools like curl or rm -rf in scripts.
Git Bash is generally an awesome shell, the only problems you might encounter are related to paths. For example, Docker messes with them and when you try to run docker run --rm -it ubuntu /bin/bash, you'll see an error like C:/Program Files/Git/usr/bin/bash.exe: no such file or directory. Docker prepends C:/Program Files/Git for some reason but you can use this workaround or use double slash like //bin/bash.
If you can, use Docker for Windows, not Docker Toolbox. The experience will be generally smoother.
If you need to use Docker Toolbox:
- Enable port forwarding in VirtualBox (especially for ports 80, 3306, 8080 and 8099), see details.
- Docker Toolbox is slower, but you can try to adjust system performance in VirtualBox settings. However, you can run into timeout issues in Workflow tests sometimes and exceed default value of 5 seconds in
wp_remote_get()in End2End tests. - Run Git Bash and Docker Quickstart Terminal as an Administrator to avoid potential problems (for example permissions and symlinks).
You might want to disable your antivirus software when working with Docker. Recommendations differ between version, please look it up.