
Appium is an open-source mobile application testing framework that allows you to automate testing of native, hybrid, and mobile web applications across various platforms, such as iOS and Android. It provides a cross-platform solution for automating mobile app testing, enabling you to write tests using familiar programming languages like Java, C#, Python, Ruby, and JavaScript.
- It is developed and supported by Sauce Labs and has great community support.
- Appium is cross-platform as it allows the same API which works for different mobile operating systems.
- Appium Testing is flexible, you can use the same code ios that you have written for Android.
- One of the key features of Appium is its ability to automate tests using the WebDriver protocol, which allows you to interact with mobile apps in a similar way to how you would interact with a web page in a browser. This means you can perform actions like tapping buttons, entering text, swiping, and validating UI elements within your tests.
- Multi-language support
- Simplicity and ease of use
- Real device and emulator/simulator support
- Support for gestures and touch events
- Integration with testing frameworks
- It supports both Android and iOS
- Install Python
- To install click on this link Click
- Download the latest version for windows
- Install Pycharm Community Edition
- To install click on this link Click
- Install Node JS
- To install click on this link Click
-
Install Appium Server through Command
pip install Appium-Python-Client -
Install Appium inspector
-
To install click on this link Click
-
Download the latest version for windows
-
First we have to open Appium then click on start server
-
After that click on inspector, it will direct to github page in that page we have to click on "Releases in installation option"
-
In “assets” choose the option which we want
-
It will download .exe file , we need to install it
- Install Android Studio or MEmu Play (for Emulator purpose)
- Create a Virtual Device for Android Studio
- Select pixel device from the phone
- Download the Android version
- Launch the emulator
Appium Desktop : It comes in two packages
1. Appium Desktop (Server)

2. Appium Inspector
-
Start Appium Server
-
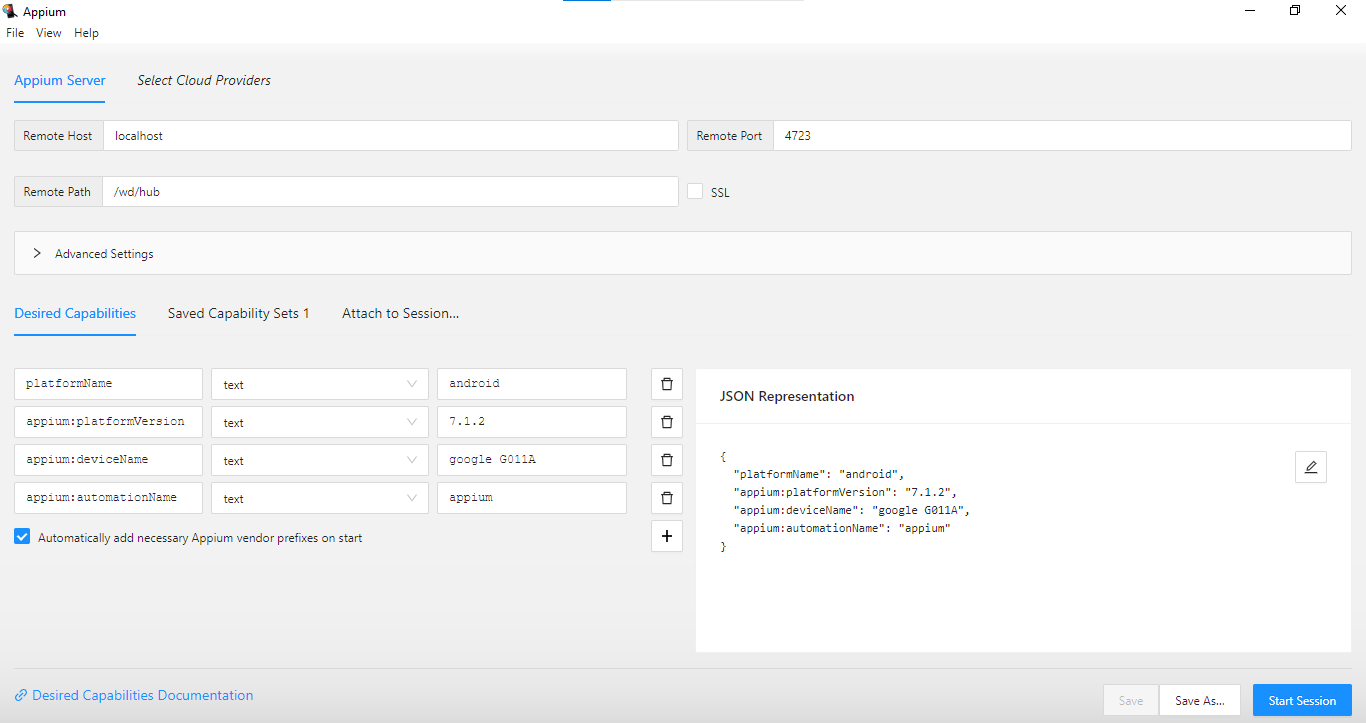
Launch the Appium Desktop then give the Host & Port and then start the server. example:
Host : localhost Port : 4723 -
By default it will run on localhost:4723. This example will consider the default.

-
After download Appium Inspector, Complete the installation process then Open the Appium inspector
-
In Appium Server and Appium Inspector "Host and Remote Host" are needs to be same
-
In Appium Server and Appium Inspector "Port and Remote Port" are needs to be same
Remote path - /wd/hud -
With Appium 2.0, you should also ensure you’re sending W3C standard capabilities within your test code such as the following capabilities:
options = UiAutomator2Options() options.platform_name = 'Android' options.platformVersion = '7.1.2' options.device_name = 'google G011A' options.automation_name = 'Appium' options.app_activity ='MainActivity' -
Create new python project in Pycharm
-
Set the Interpreter and add the Appium dependency for the project
-
Open Settings and Click on Project Interpreter, Click ‘+‘ and then search for Appium in Available Packages dialog box.
-
Select Appium-Python-Client and click Install Package to install Appium Python Client.
- Download APK file
- Now drag and drop the APK file into the Emulator
- Start Appium Server
- Run your filename.py
-
App : Flipkart
-
Description : Hear we are testing the flipkart app via Appium with Python and we are getting the laptop price in the console window
-
First you need to create a .py file in that you have to write your code.
-
  from appium import webdriver
  from appium.options.android import UiAutomator2Options

  options = UiAutomator2Options()
  options.platform_name = 'Android'
  options.platformVersion = '7.1.2'
  options.device_name = 'google G011A'
  options.automation_name = 'Appium'
  options.app_activity = 'MainActivity'
  driver = webdriver.Remote('http://localhost:4723/wd/hub', options=options)

  driver.find_element('xpath','//android.widget.TextView[@index="9"]').click()
  driver.implicitly_wait(50)

  # search lenovo laptops
  driver.find_element('xpath','/hierarchy/android.widget.FrameLayout/android.widget.LinearLayout/android.widget.FrameLayout/android.widget.LinearLayout/android.widget.FrameLayout/androidx.drawerlayout.widget.DrawerLayout/android.view.ViewGroup/android.widget.FrameLayout[1]/android.widget.FrameLayout/android.widget.FrameLayout/android.view.ViewGroup/android.view.ViewGroup[2]/android.view.ViewGroup[2]/android.view.ViewGroup/'
                          'android.view.ViewGroup[2]/android.view.ViewGroup/android.widget.TextView').click()
  driver.find_element('xpath','/hierarchy/android.widget.FrameLayout/android.widget.LinearLayout/android.widget.FrameLayout/android.widget.LinearLayout/android.widget.FrameLayout/androidx.drawerlayout.widget.DrawerLayout/android.view.ViewGroup/android.widget.FrameLayout/android.widget.FrameLayout/android.widget.FrameLayout/android.view.ViewGroup/android.view.ViewGroup[1]/'
                          'android.view.ViewGroup[1]/android.widget.EditText').send_keys('lenovo laptops')
  driver.find_element('xpath','/hierarchy/android.widget.FrameLayout/android.widget.LinearLayout/android.widget.FrameLayout/android.widget.LinearLayout/android.widget.FrameLayout/androidx.drawerlayout.widget.DrawerLayout/android.view.ViewGroup/android.widget.FrameLayout/android.widget.FrameLayout/android.widget.FrameLayout/android.view.ViewGroup/android.view.ViewGroup[2]/android.view.ViewGroup/android.widget.ScrollView/android.view.ViewGroup/android.view.ViewGroup/android.view.ViewGroup[1]/'
                          'android.view.ViewGroup/android.view.ViewGroup[1]').click()

  price = driver.find_element('xpath','/hierarchy/android.widget.FrameLayout/android.widget.LinearLayout/android.widget.FrameLayout/android.widget.LinearLayout/android.widget.FrameLayout/androidx.drawerlayout.widget.DrawerLayout/android.view.ViewGroup/android.widget.FrameLayout/android.widget.FrameLayout/android.widget.FrameLayout/android.view.ViewGroup/android.view.ViewGroup[1]/android.widget.ScrollView/android.view.ViewGroup/android.view.ViewGroup/android.view.ViewGroup[2]/android.view.ViewGroup/android.view.ViewGroup[1]/'
                          'android.view.ViewGroup/android.widget.TextView[4]').get_attribute("text")

  assert price == "₹33,990","Price not same"

  print("Laptop price = " + price)

