Recently, I was asked if the Forge Viewer could view a large bitmap, like a scanned drawing, or a terrain-map. Yes, it can and it's called a Leaflet view.

GitHub repo
Using the Forge Viewer for large-images, let's you take advantage of the built-in markup and measure tools - this is the same features BIM360 uses when viewing PDF's.
Large images are broken up into 'tiles' of bitmaps, at different 'Levels of resolution', forming what is called a 'tile pyramid'.
Here's a 'tile pyramid' diagram...
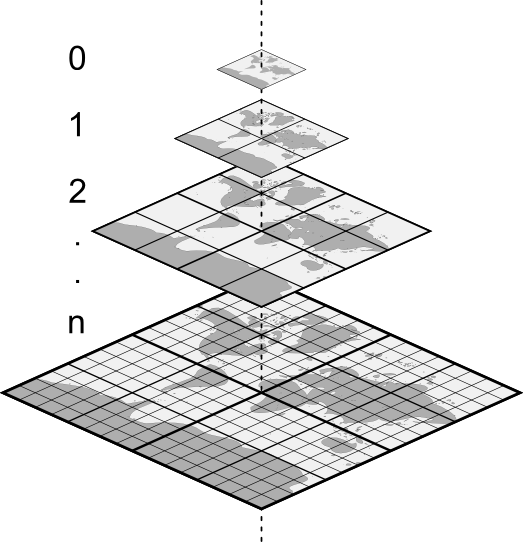
Let's dig in...
At the top of the pyramid, level 0, a single tile, it shows a blurry, low-resolution, version of the map-of-the-world image.
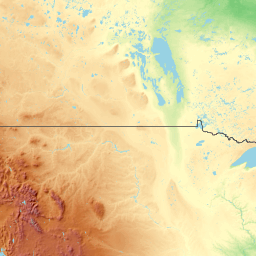
Like the terrain map example (left image):
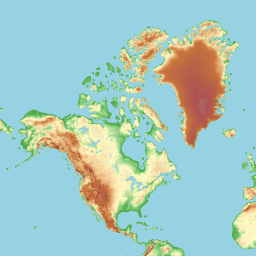
The next level down, level 1 (middle image), the map-of-the-world is split into four tiles and the resolution is higher, less blurry.
Similarly level 2 (right image), we now have 16 tiles. Sharper, more detail.
We keep going, generating many levels, and more image detail.
When a browser wants to view a city, say Paris, from google maps, it doesn't load the entire map of the world and every tile in the 'tile pyramid'. It's too big.
Instead, the browser figures out the right 'level' in the pyramid, and only loads the tiles that are specific to Paris, at a resolution that fits our screen resolution.
For a faster loading experience, the viewer, can load, a low-quality 'preview' of the Paris tiles first, before loading the final tiles. This is easy to do with a tile-pyramid.

Say Paris is at level 14. First, load the single of paris, probably level 12, and stretch it to fill the screen (blurry). Now, switch to level 13, then level 14 to show gradually sharper and sharper detail loading in.
You can see this in the animation above. The Forge Viewer is showing a PDF made of tile images. You can see the tiles streaming in slowly in the debug console, while the display slowly sharpens. It starts with lower resolution tiles (stretched to fit), and gradually loads in the higher resolution tiles (not stretched).
To provide some sample content for my demo, I'm going to pull a tile-pyramid from OpenTopoMap, specifically, a terrain map, so I can demostrate the measure tool.
Here is the bash script I used...
gettiles () {
mkdir $1; cd $1;
 for (( y=0; y<=$2; y++ )) do
  for (( x=0; x<=$2; x++ )) do
  	curl https://a.tile.opentopomap.org/$(($1-6))/$(($y+$4))/$(($x+$3)).png -o $x-$y.png &
  done;
 done;
cd ..;
}

mkdir 9; cd 9;
curl https://a.tile.opentopomap.org/1/0/0.png -o 0-0.png &
cd ..;

gettiles 10 1 5 3
gettiles 11 3 10 6
gettiles 12 6 20 12
gettiles 13 12 40 24
gettiles 14 30 80 48
The script only downloads a section of the topoMap tiles into a local folder. Each tile is 256x256, for example, this is one tile at level 13 and level 12...
With the full width and height of the terrain image coming to 6k x 6k pixels, for this sample.
Now I modify the bubble.json file to point to the new folder containing all those image tiles. And I upated the pixel resolution too.
When I open the index.html file, and point the documentId to the topo/bubble.json file (Note: I setup this based on window.location.hash) where the #topo denotes the folder).
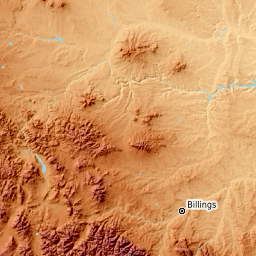
I now see my terrain map !
I can zoom in and out to get more terrain details. I can also add markup and measurements.
Here's a live demo: TERRAIN DEMO
Say you have 'OCR / scanned' an image and got a really large .TIFF file, that you want to view in a browser. It's too big and clunky by itself and... you want to add markup and measurements.
So, as with the PDF example and Terrain examples above, we first need to convert the scanned TIFF image to a jpeg tile-pyramid. I'll use imagemagick to do this.
From the commandline, type in...
convert image.tif -resize 1.5625% -crop 256x256 +repage +adjoin out/1/tile_1_%d.jpg
convert image.tif -resize 3.125% -crop 256x256 +repage +adjoin out/2/tile_2_%d.jpg
convert image.tif -resize 6.25% -crop 256x256 +repage +adjoin out/3/tile_3_%d.jpg
convert image.tif -resize 12.5% -crop 256x256 +repage +adjoin out/4/tile_4_%d.jpg
convert image.tif -resize 25% -crop 256x256 +repage +adjoin out/5/tile_5_%d.jpg
convert image.tif -resize 50% -crop 256x256 +repage +adjoin out/6/tile_6_%d.jpg
convert image.tif -crop 256x256 +repage +adjoin out/7/tile_7_%d.jpg
Then copy and update the bubble.json file, so that it points to the out/z/y/x.jpg path and set the pixel resolution as done in the terrain demo.
Now open the index.html#out file and you should see your OCR image, load quickly and with markup and measure features available.
Included in this offline sample are the files needed for offline markup and measure. See the files listed in the GitHub repo.
Click on the measure tool and calibrate to get started.
Similarly, modify the CSS to create a custom markup UI.
That's a wrap !
More 2D features, like document comparing coming. Stay tuned !