To use the below commands, you need to npm install first.
In case you get npm WARN Invalid version: on that, you can try temporarily editing the version in package.json into a semver version, do npm install and revert the version back when installed.
For styles: gulp styles
For scripts: grunt js
To use the below commands, you need to npm install first.
- Update changelog with latest changes
- Update version number in
snapshot.phpheader - Update version number in
SNAPSHOT_VERSIONvariable insnapshot.php - Update version number in
package.json-- important - Run
gulp styles - Run
grunt release - There will be a new archive named
builds/snapshot-<RELEASE_NUMBER>.zipin yourbuilds/directory.
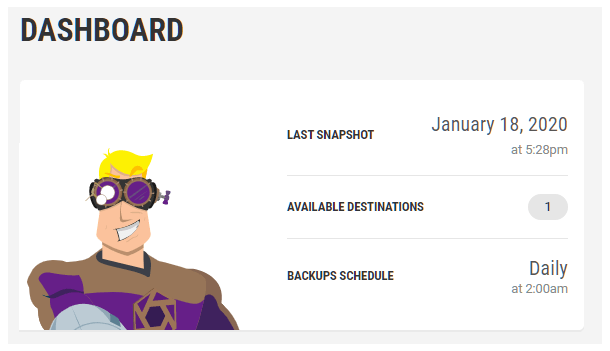
The Snapshot Pro Dashboard provides an overview of your scheduled backups, what third-party destinations you’re linked to, and when your last backup was taken.
Last Snapshot – Lists the date and time of your most recent successful backup Available Destinations – Is the number of locations your backups can be saved to. A full explanation of what destinations are and how to configure them can be found under the Destinations section of this guide. Backups Schedule – Shows what time your backups are scheduled to take place each day.
Snapshots is where backups are configured and executed, on demand or at scheduled intervals, to include all or a custom selection of files and database tables.
Click the Create Snapshot button to open the Snapshot Wizard.

Snapshots cannot be created for a site that has not passed the Requirements Check, which verifies that the required apps and settings are present and up-to-date, and which provides recommended actions if the minimum requirements are not met:
PHP Version – Snapshot Pro requires PHP version 5.5 or later. If your host is using an older version of PHP Snapshot Pro will display a low PHP version or PHP version is out of date warning. You’ll need to update your PHP version to proceed. Max Execution Time – A minimum execution time of 150 seconds is recommended to give the backup process the best chance of succeeding. If you use a managed host, contact them directly to have it updated. MySQLi – Snapshot needs the MySQLi module to be installed and enabled on the target server. If you use a managed host, contact them directly to have this module installed and enabled. PHP Zip – To unpack the zip file created by Snapshot, the PHP Zip module will need to be installed and enabled. If you use a managed host, contact them directly to have it added or updated. If your site fails the check, correct the deficiencies, then click Re-check. Once the Requirements Check is passed, proceed with configuring a Snapshot.

A destination is a location where Snapshot backups are stored, and come in two forms: local and remote (third-party). Snapshot creates a default local destination when the plugin is activated, but remote destinations must be connected to Snapshot before backups can be stored there.
Connected destinations appear as options within the snapshot configuration screen. Multiple destinations can be connected, but only one destination can be used for any given snapshot.
The default local destination created by Snapshot is a directory on the same server that houses your site. See our guidance in the Destinations section below for details on using and modifying this default local destination.
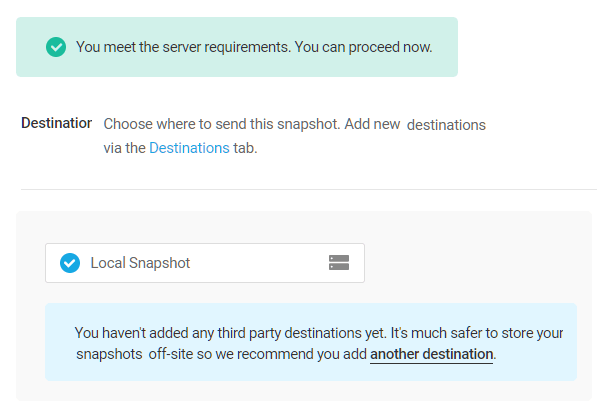
We do not recommend using your local server as your sole backup location, for security reasons discussed in the Destination section of this guide. Instead, we recommend connecting at least one remote destination and using it as your primary backup destination.
See this guide’s Destinations section below if you wish to change where your local backups are stored or need to connect a remote destination before proceeding.
This field is optional and can be used to change the folder in which your backup will be stored or to add dynamic values for customizing the bucket/directory, site domain, or ID.
The default local directory is set to public_html/wp-content/uploads/snapshots/, but this can be modified during configuration to store a backup elsewhere on your local server by selecting Use Custom Directory and entering the preferred directory in the field provided.
This module allows you to choose what files Snapshot Pro includes in your backup. These options apply to files only, and not the database. Similar options for database tables are located in the Database section.
Don’t include any files – This option will only backup the database and will exclude all theme, plugin, and media files. Include common files – Includes all themes, plugins, media files in the wp-content and uploads folders. Only included selected files – Select this option to reveal a list from which you can choose what files should be included in your backup.
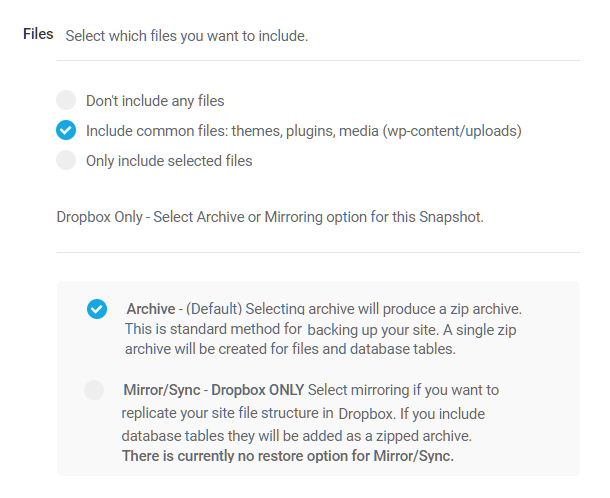
By default, all Snapshots are created using the traditional Archive option, which creates a single zip version of your website including all the files and database tables. However, if Dropbox is the destination, the Mirror/Sync option will replicate the site’s file structure so it can be viewed in Dropbox. Only the database will be zipped. It is important to know that Mirror/Sync backups cannot be restored using Snapshot’s one-click restore feature, but must be restored manually.
Every file in the WordPress directory has a unique URL. You can exclude any individual file from your backup by adding the URL to the field provided. URLs must be added one per line.

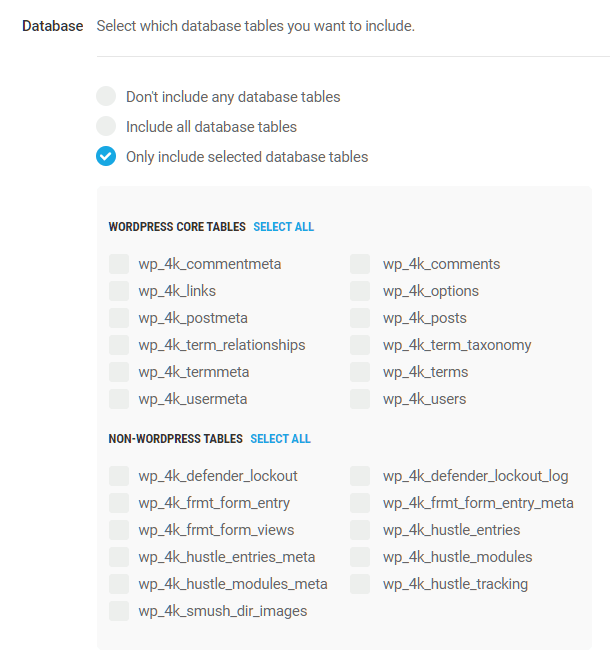
This module lets you select which database tables to include in your backup. The Include all and Don’t include any options are self-explanatory.
To select a custom array of tables to backup, select Only include selected database tables, then select the tables you want backed up from the menu that appears.
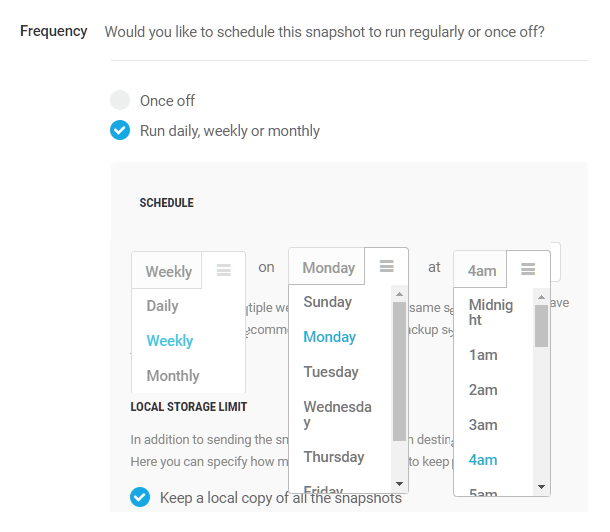
By default, Snapshot is set to Once-off, which simply is a one-time, on demand backup. Select Run daily, weekly or monthly if you want to schedule automatic backups that occur on a regular basis.
Use the drop-down menus to choose the frequency (daily, weekly, monthly), the day of the week, and the time of day you want the backup to occur.
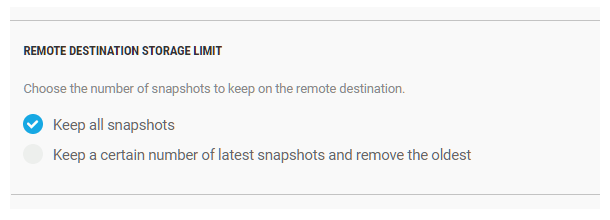
Remote Storage Limit
When scheduling recurring backups destined for remote destinations you have the option to keep all the backups Snapshot creates or limit them to a specific number. Once the limit is met, Snapshot will begin overwriting the oldest stored copy with the new backup.
Select Keep all snapshots to retain every backup Snapshot creates. Select Keep a certain number of snapshots and remove the oldest and then set the desired number of backups in the field provided.
Local Storage Limit
You have the option to keep all the backups Snapshot stores in the cloud or limit them to a specific number. Once the limit is met, Snapshot will replace the oldest stored copy with the new copy.
Keep in mind that 10gb of cloud storage is allocated for Snapshot backups for every member account. Limiting the number of backups stored in the cloud will help minimize the rate at which those 10gb are used.
Select Keep all snapshots to retain every local backup Snapshot creates, or select Keep a certain number of snapshots and remove the oldest and then set the desired number of backups in the field provided.
Enable Also run a backup now to execute an immediate backup or disable the feature to delay the backup until it’s scheduled time.

Enter a name for the current Snapshot into the field provided, keeping in mind that Snapshot automatically adds a date and ID to that name. If you are satisfied with the current configuration, click Save & Run Backup to execute the Snapshot.
The time it takes to complete the backup ranges from a few minutes to a few hours depending on the size of the site.

When the backup is complete, a zip file will be uploaded to the chosen destination.
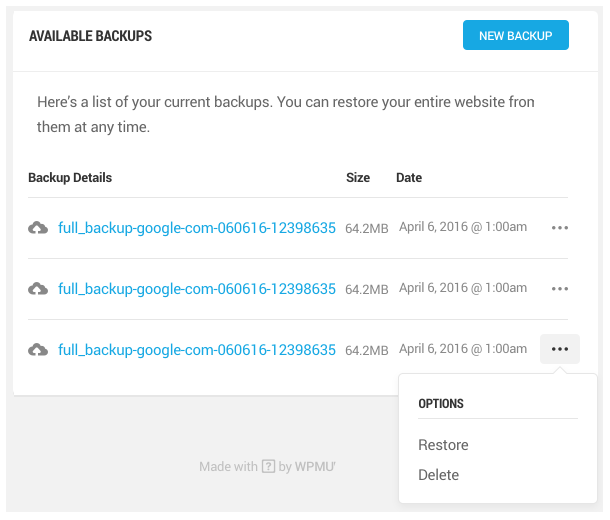
After you’ve created your first Snapshot, a new module — Available Snapshots — will appear in the Snapshots tab and display a list of snapshots created for the configured site, along with other key data.
Use the filter located at the top of the panel to sort snapshots by destination.

The three dots to the right of a backup opens the Options Menu. The options menu includes:
Edit – Click to access and modify a snapshot’s configuration. Regenerate – Click to overwrite the last backup created with a fresh copy. Restore – Click to open the Restore Wizard and begin restoring a site from backup, as discussed in the Restoring a Backup section below. Delete – Click to delete a backup.
Use bulk actions to delete multiple Snapshots at the same time.
A destination is a location where Snapshot backups are stored, and come in two forms: local and remote (third-party).
The default destination is Local. Local backups are stored on the same server as your live site, and are great for quickly rolling back changes, which is useful during development. Local backups are not recommended for recovering after being hacked. Because the server that houses your site has been compromised, every backup on that server could be infected.
Local backups are stored on your server here: public_html/wp-content/uploads/snapshots/.

You can change the directory where your snapshot backups are stored by clicking Configure in the local module.

The name of the local directory, Local Snapshot, cannot be modified, but the directory path can be changed to any folder on your server by entering the path into the field provided and clicking Save Destination.

Snapshot Pro supports four remote storage destinations which can be connected using the instructions in this section: Dropbox, Google Drive, AmazonS3, and FTP/SFTP.

A few steps should be accomplished before attempting to connect a remote destination. These include:
Account – Users must create an account with their preferred remote storage service before it can be connected to Snapshot. Each of the four supported services offer free accounts that are more than adequate for storing backups. Authorization – In almost every case, an authorization step of some kind must be completed before a third-party app will communicate with Snapshot Pro. Sometimes that authorization can be obtained with a simple click of an “Accept” or “Authorize” button when connecting the app to Snapshot Pro. Other times the authorization comes in a form – such an API key – that can only be obtained by logging into the app’s website and following the guidance provided there. Directory for accepting backups – Supported apps store your backups in directories. Sometimes these objects can only be created by logging into your account on the app’s website and following the usage guide provided there, before integrating with Snapshot.
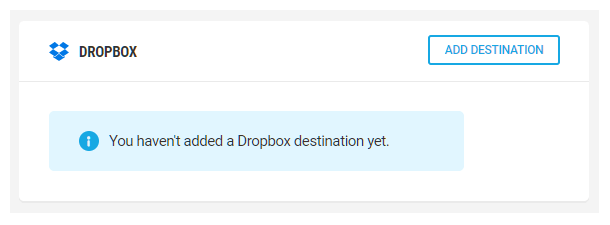
These instructions cover configuring a Dropbox remote destination and require an existing Dropbox account. If you do not have a Dropbox account you can set up a free account here.
In the Dropbox panel, click Add Destination.
Give your destination a unique name. This is important if you plan to link multiple Dropbox locations.
Click Get Authorization Code and follow the prompts to obtain a code that you will paste in the field provided.
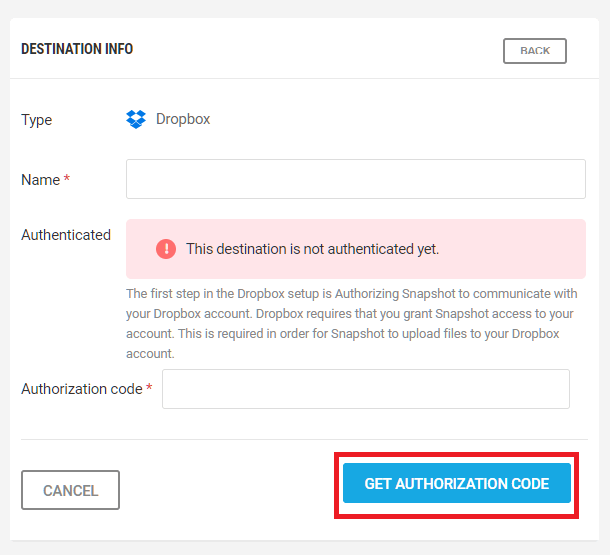
Click Allow and Dropbox will provide an authorization code.
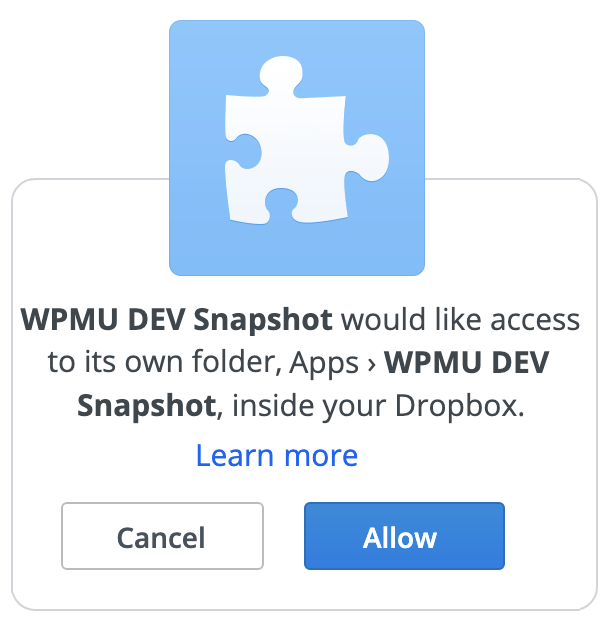
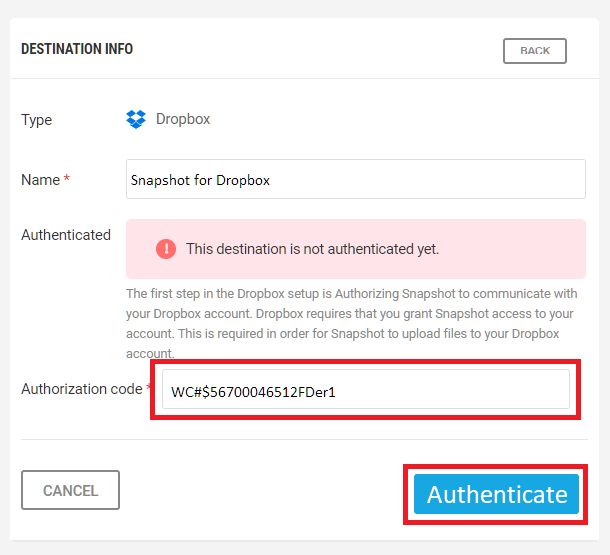
Copy the authorization code and paste into Snapshot. The Get Authorization Code button will change to Authenticate. Click Authenticate .
Once connected, add the Dropbox URL to the folder you would like your Snapshot backups to be stored.
If you ever want to move to a new directory or reauthorize your account, click the box next to Force Re-Authorize with Dropbox to input a new authorization code.
If your Dropbox account is authorized, account information and storage usage information will be listed.
To add another Dropbox account, return to the Destinations module and, click Add Destinations.
To edit or delete a connected Dropbox account, click the Configure button. Here you can make changes and save or click the Delete button to disconnect the destination.
These instructions cover configuring a Google Drive remote destination and require an existing Google Drive or G Suite account. If you do not have an account you can set up a free account here
To get started, click Add Destination in the Google Drive module.
Give your destination a unique name. This is important if you plan to link multiple Google Drive locations.
Paste your Directory ID and click Save Destination.
To find your Directory ID:
Open your Drive account. Create a new folder for your backups. A Google Drive folder will have it’s own path that works exactly like a directory.
The URL for the folder/directory will be similar to https://drive.google.com/#folders/0B6GD66ctHXXCOWZKNDRIRGJJXS3, with the Directory ID being the final alpha-numeric series: 0B6GD66ctHXXCOWZKNDRIRGJJXS3.
You may specify multiple Directory IDs separated by a comma if you want to store multiple copies of your backup on Google Drive.
Paste your Client ID and Client Secret in the fields provided. The Client ID and Client Secret can be retrieved by following these steps:
Go to the Google API Console. Select an existing project or create a new one. If creating a new project, you will need to enter a name, but the ID is not important and can be ignored.
Once you’ve selected a project, go to the API Manager (API Library), select and then enable the Drive API.
Next, access the Credentials section. Click Create Credentials, and then OAuth 2.0 client ID. In the popup that appears select Web application as the Application Type. In the field Authorized redirect URL, copy the value from the Redirect URL field provided by Snapshot, which we’ve outlined in the image below. Then click Create Client ID.

After the popup closes copy the Client ID and Client Secret from the Google page and paste into the form fields. Click Save Destination.
Repeat this procedure to add another Google Drive destination.
These instructions cover configuring a Amazon S3 remote destination which requires an existing S3 account. If you do not have an account you can set up a free account here.
To get started, click the Add Destination button in the Amazon S3 module.
Give your destination a unique name. This is important if you plan to link multiple Amazon S3 locations.
Create an AWS Access Key ID and AWS Secret Access Key in the AWS Console and paste them into Snapshot.
If your site does not have an SSL connection, toggle the Use SSL Connection button off or create an SSL certificate for your site before continuing.
Select your AWS Region associated with your account.
Storage Type Amazon S3 provides two storage methods:
- Standard
- Reduced Redundancy
Reduced Redundancy Storage (RRS) is an Amazon S3 storage option that stores noncritical, reproducible data at lower levels of redundancy than Amazon S3’s standard storage. Learn more about RRS.
Select Bucket
Amazon S3 stores data in buckets to improve and simplify data management. The Select Bucket button lets you choose a bucket location from a list of all the availible buckets you’ve created on your account.
File Permissions Configure if your backups are:
- Private – Owner gets full control. No one else has access
- Public Read – Allows public read access of backups and its metadata
- Public Read/Write – Allows read and write permissions to your backups
- Authenticated Read – All requests must be signed (authenticated)
Directory
If the directory field is left blank the Snapshot backup file will be stored at the bucket root. If the directory is provided it will be created inside the bucket.
To add another Amazon S3 location, from the Destinations module, click the Add Destinations button.
To edit or delete a connected Amazon S3 account, click the Configure button. Here you can make changes and save or click the Delete button to disconnect the destination.
The FTP/SFTP mode includes three options for connecting to your third-party server
- FTP (File Transfer Protocol) – Not recommended
- SFTP (Secure File Transfer Protocol)
- FTP with TSL/SSL (Transport Layer Security and Secure Sockets Layer)
The FTP option will use the standard PHP library functions. Choosing FTPS will use the PHP Secure Communications Library. This option may not work depending on how your PHP binaries are compiled. FTPS with TSL/SSL attempts a secure connection, however, it will only work if PHP and OpenSSL are properly configured on your host and destination host. This option will not work with Windows using the default PHP binaries. Check the PHP docs for ftp_ssl_connection. For SFTP, a PHP version equal to, or greater than, 5.3.8 is required.
You will need the information below to connect to your server. If your site is hosted by WPMU DEV, this information will be located in SFTP/SSH tab of your Hosting manager for the site you are configuring.
- Host
- Port Number
- Username
- Password
Where you get this information will vary depending on the server. If you are having trouble locating or setting credentials for your server, contact your service provider.
The Directory field is used to specify a directory where your backups will be stored. If the remote path is left blank, the home directory will be used as the destination for your Snapshot files.
Passive Mode Activate the Use Passive Mode option if a firewall is causing problems with your connection. In passive mode, data connections are initiated by the client, rather than by the server.
Server Timeout The number in this field is in seconds. The default timeout for PHP FTP connection is 90 seconds. Increase the Server Timeout for slower connections to busy servers.
Test Connection When your connection credentials have been added, use the test connection button to verify Snapshot is communicating with your cloud server.
To add another FTP/SFTP account, from the Destinations module, click the Add Destinations button.
To edit or delete a connected FTP/SFTP account, click the Configure button. Here you can make changes and save or click the Delete button to disconnect the destination.
Backups must be activated before you can configure and execute backups. Click Activate Backups and proceed.
Once activated, the Backups Overview and Available Backups panels will appear.
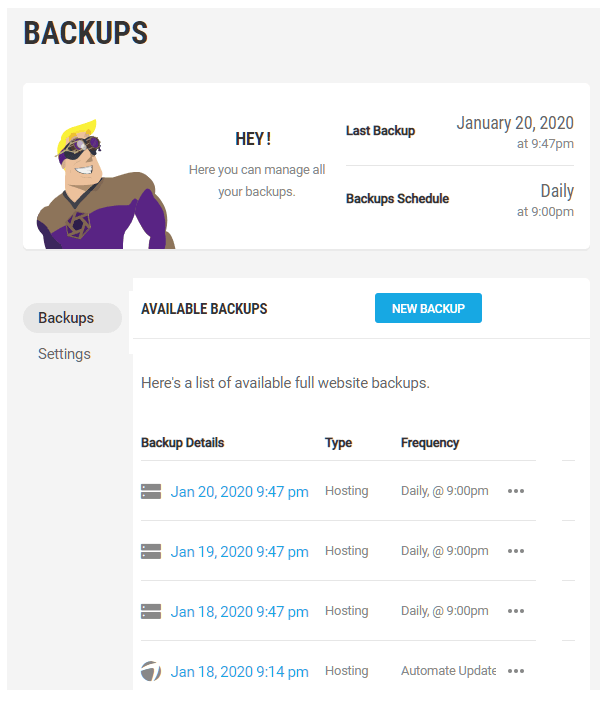
In the header, you will get an overview of when your last backup was taken and when the next scheduled backup will occur.
The Available Backups Module lists only your managed backups created and managed in the Hosting area of your WPMU DEV account.
Under Backup Details you will see the date and time the backup was created, where it came from and the schedule it runs on.
The three dots to the right of a backup open the Options menu.
- Info – The info tab will open the backups manager in your WPMU DEV hosting account.
- Restore – The Restore option will automatically restore your site to the corresponding version.
The setting tab displays details about your backups and the schedule. Changes to your hosted backups can only be made from your WPMU DEV hosting account.
Managed Backups are available to WPMU DEV members whose sites are not hosted by WPMU DEV but which are, and must be, connected to the Hub.
Managed Backups must be activated before you can configure and execute backups.

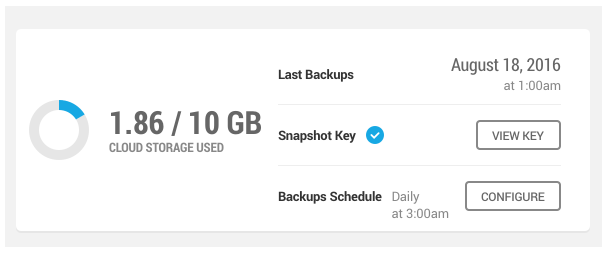
After creating your first backup, an overview panel will appear in Managed Backups that displays your cloud storage usage, the data and time of your last backup, your Snapshot key and your next scheduled backup.
New Backup
Click New Backup to initiate a backup. This will open the configuration panel, which automatically initiates the Requirements Check.
Requirements Check
Backups cannot be created for a site that has not passed the Requirements Check, which verifies that the required apps and settings are present and up-to-date and which provides recommended actions if the minimum requirements are not met.
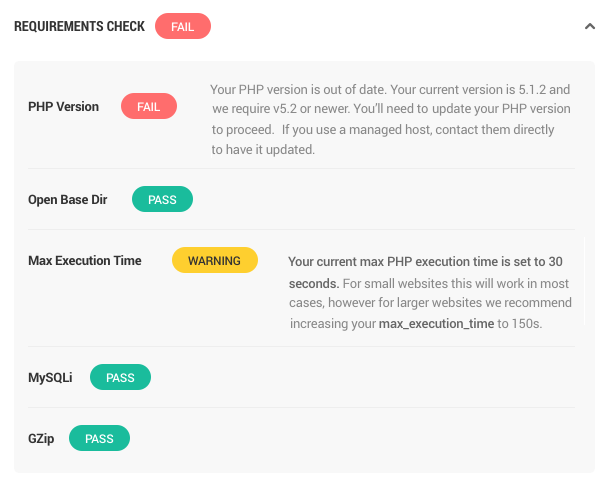
- PHP Version – Snapshot Pro requires PHP version 5.5 or later. If your host is using an older version of PHP Snapshot Pro will display a low PHP version or PHP version is out of date warning. You’ll need to update your PHP version to proceed.
- Max Execution Time – A minimum execution time of 150 seconds is recommended to give the backup process the best chance of succeeding. If you use a managed host, contact them directly to have it updated.
- MySQLi – Snapshot needs the MySQLi module to be installed and enabled on the target server. If you use a managed host, contact them directly to have this module installed and enabled.
- GZip – To unpack the zip file created by Snapshot, the GZip module will need to be installed and enabled. If you use a managed host, contact them directly to have it added or updated.
If your site fails the check, correct the deficiencies, then click Re-check. Once the Requirements Check is passed, proceed with configuring a backup.
Managed Backups can only be stored on WMPU DEV’s cloud servers, for which every user is allocated 10gb to start.
Additional Snapshot storage can be purchased from your account, here: WPMU DEV Accounts > Add-ons.
Your Snapshot storage plan can be upgraded or downgraded at any time.
Use the Frequency panel to schedule backups to occur at regular intervals, automatically.
Use the drop-down menus to choose the frequency (daily, weekly, monthly), the day of the week, and the time of day you want the backup to occur.

You can keep all the backups Snapshot creates or limit them to a specific number. If you set a limit and that limit is reached, Snapshot will begin replacing the oldest stored copy with the new backup.
It is typically not necessary to keep every scheduled backup, and it will require more storage to do so. Limiting the number of copies to just the most recent will reduce the rate at which you use cloud storage. However, if you wish to keep every backup, set the limit to zero.
Enable Also run a backup now to execute an immediate backup when you save the configuration or disable the feature to delay the backup until it’s scheduled time.
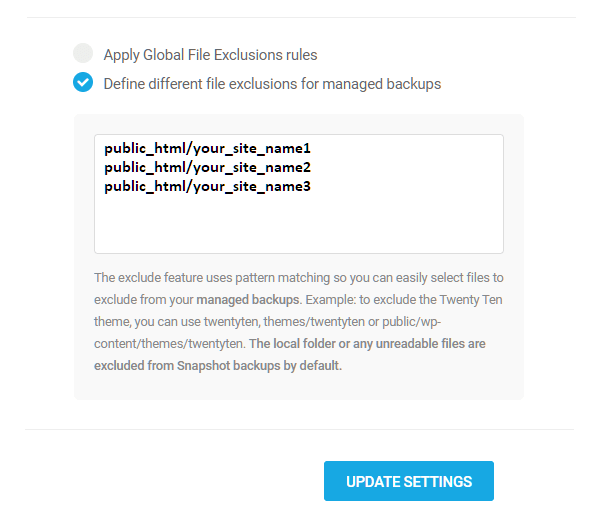
You can exclude files and tables from the backup process in the Managed Backups Settings. Any excluded files will be listed here.
To exclude a file, enter the path to that file into the field provided. One file should be added per line. There is no limit to the number of files that can be excluded.
Useful exclusions
The following are some situations where exclusions are recommended:
Multiple sites in public_html
When multiple sites are shared on one member account, especially cPanel accounts, all those sites may be located within the public_html folder. This can cause issues when creating a backup.
Therefore, members should use exclusions to limit Snapshots to the site on which the plugin is active. Snapshot can be active on all sites, and each site should exclude all the other sites within public_html.
Enter the following text into the file exclusion field for each site to be excluded, replacing site with the file names for the site(s) being excluded.
public_html/site
Run Backup
When you’re satisfied with your configuration, click Run Backup to execute and save the backup configuration.
The time it takes to complete the backup ranges from a few minutes to a few hours depending on the size of the site.

The Available Backups Module lists only your managed backups created and managed in the Hosting area of your WPMU DEV account.
Backup Details
Under Backup Details you will see the date and time the backup was created, where it came from and the schedule it runs on.
The three dots to the right of a backup open the Options menu.
- Info – The info tab will open the backups manager in your WPMU DEV hosting account.
- Restore – The Restore option will automatically restore your site to the corresponding version.
From the Available Backups panel, click the Options menu (three dots) to the right of the backup you wish to restore, and select Restore to open the Restore wizard.

A requirements check will automatically occur. If your site fails the requirement check, see the Requirement Check section of this guide for assistance.
Location
Enter the directory path to the folder in which you want the backup to restore. Typically, this is the root directory for your site. Contact your host if you are unsure what folder to enter into the field provided.
When ready, click Restore Now to initiate the restore.
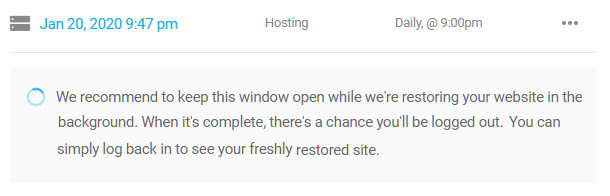
The time it takes to complete restore a site ranges from a few minutes to a few hours depending on the size of the site.
The setting tab displays details about your backups and the schedule. Changes to your hosted backups can only be made from your WPMU DEV hosting account.
You can import Snapshots from created on another site or from a previous Snapshot installation with the Import tool. The tool only works with backups created by Snapshot. Managed backups and other forms of backups cannot be imported.
The import process can import an archive from a remote system server via FTP, Amazon S3 or Dropbox. The remote archive must be publicly accessible as this import process does not yet support authentication. See notes below on specific services.
- Remote FTP: When downloading from a remote FTP server you must ensure the file is moved to a location where it will be accessible via a simple http:// or https:// URL.
- Dropbox: If you are attempting to download a Dropbox Snapshot archive written to the App/WPMU DEV Snapshot you first need to copy the file to a public folder within your Dropbox account before grabbing the public link.
- Amazon S3: When downloading a file from S3 you need to ensure the file is public.
For archives already in your server but not showing in the ALL Snapshots listing you can simply submit this form without entering a value below. This will scan the snapshot archives directory /media/storage/www/wp/snapshotold/wp-content/uploads/snapshots for any missing archives and add them to the listing.
If the missing archive is on the server but saved to a different path. Maybe you setup the archive to save to an alternate directory. Then you can enter the full server path to the directory where the archive resides.
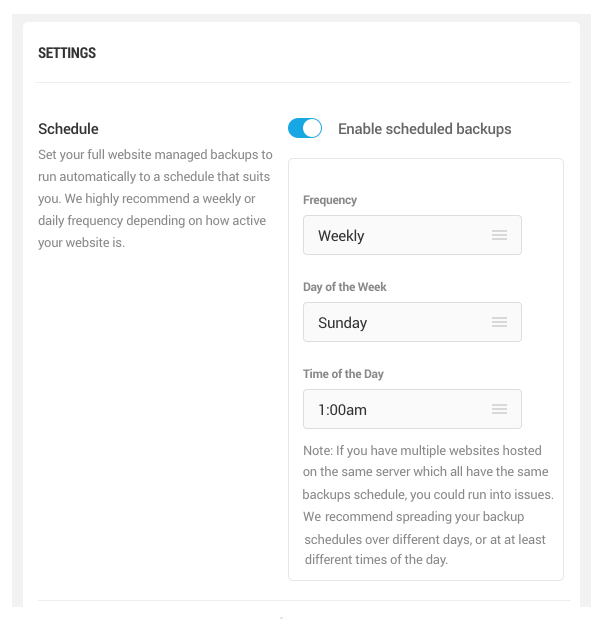
The Managed Backups Settings panel is where you configure scheduled backups, establish storage limits, file exclusions, and where you can deactivate Managed Backups.
Use the Frequency panel to schedule backups to occur at regular intervals, automatically.
Use the drop-down menus to choose the frequency (daily, weekly, monthly), the day of the week, and the time of day you want the backup to occur.
he File Storage and File Exclusion restrictions set here will apply to all managed backups, whether they are scheduled or Once-off.
You can keep all the backups Snapshot creates or limit them to a specific number. If you set a limit and that limit is reached, Snapshot will begin replacing the oldest stored copy with the new backup.
It is typically not necessary to keep every scheduled backup, and it will require more storage to do so. Limiting the number of copies to just the most recent will reduce the rate at which you use cloud storage. However, if you wish to keep every backup, set the limit to zero.

Snapshot Defines let you customize the way managed backups and snapshots are executed. We recommend applying defines in the wp-config.php file, located in the root of your WordPress file directory.
It is also possible to place these defines in a dedicated mu-plugin, which adds some flexibility. Don’t let the idea of creating an mu-plugin intimidate you. An mu-plugin is simply a .php file in your wp-content/mu-plugins directory that is automatically loaded when WordPress loads. Our blog has several posts on plugin development that can help.
To add a define from the list below to your wp-config.php file, you will need to access your site’s root files with the FTP client of your choice. The wp-config.php file is located with the public_html folder, as shown below using Filezilla.

Right-click the filename and click View/Edit to open the file in a text editor. Within the open file, locate Locate this statement: /* That's all, stop editing! Happy blogging. */ and insert the preferred define statement from the list below into the line above that statement. Save and upload the new wp-config.php file and your new define will be in effect.
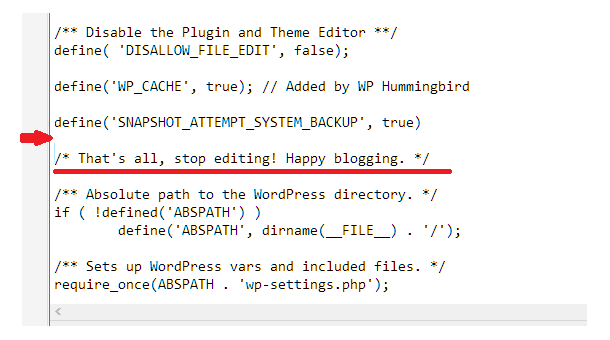
define('SNAPSHOT_ATTEMPT_SYSTEM_BACKUP', true);
Default: true
Backups: Managed backups only
Expects true or false. If set to true, managed backups will try to use system binaries to do the backup. This will accelerate backups, generally, and managed backups in particular. It requires:
- a. server support for executing binaries from PHP (PHP functions escapeshellarg, escapeshellcmd and exec are present and available), and
- b. presence of expected binaries needed to do the backup (zip, ln, rm, mysqdump and, optionally, find).
If these prerequisites are not met, the backup will proceed per the default PHP and the following log entry recorded: “Unable to perform requested system backup, proceeding with built in.”
define('SNAPSHOT_MB_BREADTH_FIRST', true);
Default: false
Backups: Managed backups only
Expects true or false. If set to true, managed backups will try to use our new engine to process files (just files – databases are not affected by this).
It this is active the engine will also process this with the the value set at SNAPSHOT_FILESET_CHUNK_SIZE so if there are still issues with the files you can use something like:
define('SNAPSHOT_FILESET_CHUNK_SIZE', 100); define('SNAPSHOT_MB_BREADTH_FIRST', true); define('SNAPSHOT_TABLESET_CHUNK_SIZE', 100);
Default: 1000
Backup: Managed backups only
This is the number of table rows that will be processed for each step of the backup creation. Size can be defined as the number of rows to backup per table per request. This controls the backup processing when you create a new snapshot.
During the backup process, Snapshot will make a request to the server to backup each table. You can see this in the progress meters when you create a new snapshot.
In most situations this backup process will attempt to backup the table in one step. But on some server configurations the timeout is set very low or the table size is very large and prevents the backup process from finishing.
To control this, the Snapshot backup process will breakup the requests into smaller ‘chunks of work’ requested to the server.
For example, let’s say you have a table with 80,000 records. This would take more than the normal 3 minutes or less most servers allow for processing a single request. By setting the segment size to 1000, the Snapshot process will break up the table into 80 small parts. These 1000 records per request should complete within the allowed server timeout period.
Note: this setting has no effect if the backup is being done via system binaries (i.e. when SNAPSHOT_ATTEMPT_SYSTEM_BACKUP is in effect).
define('SNAPSHOT_FILESET_CHUNK_SIZE', 100);
Default: 250
Backup: Managed backups only
This is the number of files that will be processed for each step of the backup creation. Note: this setting has no effect if the backup is being done via system binaries (i.e. when SNAPSHOT_ATTEMPT_SYSTEM_BACKUP is in effect, v3.1.5 and up).
define('SNAPSHOT_FILESET_LARGE_FILE_SIZE', 104857600);
Default: 1073741824 (1Gb)
Backup: Managed backups only
When processing the files for backup creation, each file will be queried for size. If a processed file size is larger than this threshold value, we will log a warning with this content: “Processing a large file: {$file} ({$size})”. By default, changing this value only changes the size that is used to log this warning.
It is also possible to auto-reject oversized files with code snippet like this:
add_filter('snapshot_queue_fileset_reject_oversized', '__return_false');
define('SNAPSHOT_FILESET_USE_PRECACHE', true);
Default: false
Backup: Managed backups only
By default, the list of files is scanned on beginning of each files-processing backup step. When this setting is enabled, this is done only once and the list is cached. Each subsequent steps will work off this cache.
define('WP_MEMORY_LIMIT', '512M');
Default: See below
Backup: Snapshots and Managed backups
WP_MEMORY_LIMIT option allows you to specify the maximum amount of memory that can be consumed by PHP. This setting may be necessary in the event you receive a message such as “Allowed memory size of xxxxxx bytes exhausted”.
This setting increases PHP Memory only for WordPress, not other applications. By default, WordPress will attempt to increase memory allocated to PHP to 40MB (code is at the beginning of /wp-includes/default-constants.php) for single site and 64MB for multisite, so the setting in wp-config.php should reflect something higher than 40MB or 64MB depending on your setup.
WordPress will automatically check if PHP has been allocated less memory than the entered value before utilizing this function. For example, if PHP has been allocated 64MB, there is no need to set this value to 64M as WordPress will automatically use all 64MB if need be.
Please note, this setting may not work if your host does not allow for increasing the PHP memory limit–in that event, contact your host to increase the PHP memory limit. Also, note that many hosts set the PHP limit at 8MB. More info: https://codex.wordpress.org/Editing_wp-config.php#Increasing_memory_allocated_to_PHP
define('SNAPSHOT_BACKTRACE_ALL', true);
Default: false
Backup: Managed backups only
Expects true or false. If set to true, this define forces logging of all managed backups log calls, regardless of their level (very verbose log file).
define('SNAPSHOT_SESSION_PROTECT_DATA', true);
Default: false
*Backup: Managed backups only
Expects true or false. If set to true, this define forces the session data to be encrypted. This behavior might be useful in combination with SNAPSHOT_FILESET_USE_PRECACHE option. It will also add some processing overhead to each and every backup step. Limited usability.
define('SNAPSHOT_FORCE_ZIP_LIBRARY', 'pclzip');
Default: archive
Backup: Snapshots and Managed backups
Expects 'archive' or 'pclzip'. This option will force selection of the internal ZIP library used to produce backups.
define('SNAPSHOT_NO_SYSTEM_BACKUP', true);
Default: false
Backup: Managed backups only
Expects true or false. If set to true, this define will force Snapshot plugin to not try and use system binaries for managed backups. In effect, reverses SNAPSHOT_ATTEMPT_SYSTEM_BACKUP define. Limited usability.
define('SNAPSHOT_SYSTEM_ZIP_ONLY', true);
Default: false
Backup: Managed backups only
Expects true or false. When processing files with SNAPSHOT_ATTEMPT_SYSTEM_BACKUP enabled, we will default to using the “find” binary for finding all files first (if find binary is available) and piping the output to zip. This can be prevented by setting this define to true, in which case the find binary won’t be used at all. In this scenario, we will use zip binary alone and -x flags to process exclusions. The same will happen if there is no find binary available. When using find, we will also automatically exclude large files from the archive by default – unless the oversized files size getter returns 0 (can be tweaked via filter), in which case we will be including them.
define('SNAPSHOT_SYSTEM_DEBUG_OUTPUT', true);
Default: false
Backup: Managed backups only
Expects true or false. Only effective when SNAPSHOT_ATTEMPT_SYSTEM_BACKUP is enabled. When set to true, this option will log each actual command passed onto system binaries for execution. This option can be useful for debugging system binaries based managed backups – this is also somewhat of a security risk, because it will expose things such as database passwords in plain text in the log files. Be cautious.
define('SNAPSHOT_IGNORE_SYMLINKS', false);
Default: true
Backup: Managed backups only
A symlink – or symbolic link – is a special file that is actually a reference to another file or folder. With symlinks you can keep your plugins and themes in a separate folder and – using symlinks – you can point it into each installation you have. Each installation uses the same files which makes modifications and maintenance a breeze.
Expects true or false. When set, this option will force managed backups to not follow symlinks. The symlinked files will not be included in final backup.
define('WPMUDEV_SNAPSHOT_DESTINATIONS_EXCLUDE', see below);
Default: empty string
Backup: Snapshot backups only
Expects comma-separated string of destinations to exclude. Possible destinations are: “SnapshotDestinationFTP”, “SnapshotDestinationGoogleDrive”, “Snapshot_Model_Destination_AWS”, SnapshotDestinationDropbox”. When set to a non-empty string, the support for matching destination will not even be loaded.
PHP
Minimum required PHP version is 5.2.6 for the most part. Google Drive and Amazon AWS destinations require PHP v5.3 and better. Dropbox destination requires minimum PHP v5.5. The value can be obtained via phpversion() call from PHP, or phpinfo() output. Changing this is up to the host.
Max_execution_time
We will try to automatically increase this value ourselves if it’s less than 90. If this is not possible, changing this value is up to the host.
MYSQL
MySQL version 5.0 or greater. Changing this is up to the host – but WP won’t even run on anything older than that, so this is a moot point.
GZip
Requirement is that ZipArchive is present. If it’s not, see SNAPSHOT_FORCE_ZIP_LIBRARY define.
What if I am getting, for example “405 Not Allowed”?
Since there’s no unified server response mapping back to server error, there’s no meaningful quick searchable way of checking this. The rule of thumb is to always check the snapshot logs, as well as debug.log file (with WP_DEBUG_LOG set to true) when something goes wrong.
All logs are in plain text files, in the /_logs directory. The logs for managed backups are on by default – but only for warnings and errors. To include additional debug info in managed backups logs, see SNAPSHOT_BACKTRACE_ALL and SNAPSHOT_SYSTEM_DEBUG_OUTPUT defines.
In general, these are the options to try for managed backups:
- Try increasing memory and/or exec time
- If the above fails and we have Snapshot v3.1.5 or better, try the SNAPSHOT_ATTEMPT_SYSTEM_BACKUP define
- If this fails or we can’t do system backup because it’s not supported, remove this define and try setting SNAPSHOT_FORCE_ZIP_LIBRARY to either 'archive' or 'pclzip'
- If this fails, try setting the SNAPSHOT_FILESET_USE_PRECACHE define
- If this fails, try reducing SNAPSHOT_(FILESET|TABLESET)_CHUNK_SIZE to, say, 100
- If this fails, set SNAPSHOT_FILESET_LARGE_FILE_SIZE to smaller value (say 100 or even 50mb in bytes), then inspect snapshot log for any large file warnings.
- If this yields no results, try excluding paths that have “.git” in them
- If this fails as well, try to zero down on problematic path by adding more exclusions, then keep the most specific path in the exclusion list.
The following are log messages and their triggers.
“There was an error in initial backup saving” Something went wrong initializing the backup
“We have an offending error: ” There was an error during the process of managed backup creation that caused us to stop processing
“There was an error processing the files” We encountered a potentially recoverable error backing up the files
“There was an error continuing backup finalization” We encountered a potentially recoverable error uploading the backup to the Hub
“There was an error post processing the backup” We encountered a potentially recoverable error moving the backup to the final destination locally
“Invalid timestamp, giving up” We weren’t able to update the service about our last backup attempt
“We encountered an issue communicating last backup info to service” As it says :)
“Unable to get exchange token” Reported when we have an issue during attempted secret key exchange
“Unable to exchange key” Reported when we have an issue during attempted secret key exchange
“Error processing manual backup: {$key}” Reported when we have an issue during the attempted manual managed backup creation
“Error finalizing manual backup: {$key}” Reported when we have an issue during the attempted manual managed backup creation
“Could not communicate with remote service” Reported when we have an issue during manual managed backup finalization
“Error processing automatic backup: {$key}” Reported when we have an issue during the attempted scheduled managed backup creation
“Error finalizing automatic backup: {$key}” Reported when we have an issue during scheduled managed backup finalization
“Immediate hook misfired, kickstart backup processing” Reported occasionally when automatic backup processing stalls. Backup is attempting to recover. Not necessarily an issue.
“Error re-connecting to refresh API cache”, “Issue encountered with cache cleanup/refresh” Reported when we have an issue with the Hub attempts automatic cache clear action
“Error exchanging token”, “Key already set”, “Invalid token”, “Problem setting key”, “Problem setting key from token” Reported when we have an issue during attempted secret key exchange
“Invalid parameter: frequency”, “Invalid parameter: time”, “Invalid parameter: limit”, “Invalid reschedule parameters passed from service”, “Unable to create response array”, “Could not resolve domain”, “Invalid schedule parameters”, “Error constructing response” Reported when we have an issue during attempted Hub config update
“Error starting remote backup: not ready”, “Managed backups not ready”, “Scheduled backup already running”, “Backup already running”, “Backup not running”, “Error starting remote backup: no key”, “Error starting backup” Reported when we have an issue during attempted Automate backup start
In WordPress theme and development, Hooks are functions that can be applied to an Action or a Filter in WordPress. Actions and Filters in WordPress are functions that can be modified by theme and plugin developers to change the default WordPress functionality.
Functions used to modify Actions/Filters in WordPress can be hooked into WordPress. However, it is important to note that actions and filters are not the same thing. Actions are functions performed when a certain event occurs in WordPress. Filters allow you to modify certain functions.
Filters are functions that WordPress uses to pass data through. Passing data through filters allows developers to modify the default behavior of a specific function. Functions used to filter data are called hooks. Filters and Actions together allow developers great flexibility to modify default WordPress filters and actions and even create their own custom filters and actions so that other developers can extend their plugins or themes.
Filters are different than Actions. WordPress actions are executed at events like when a theme or plugin is activated, or when a post is published. Filters are used to filter output when it is sent to either database or to user browser.
The hooks processing code is probably best placed in a mu-plugin. A mu-plugin is simply a .php file in your wp-content/mu-plugins directory (you can just create it if it doesn’t already exist). These .php files will be automatically loaded with your WordPress, so this makes them a good place for such customizations. Please, note that these files need to be valid PHP files – so, remember to add the opening title pairs.
snapshot_home_path
WordPress root installation as absolute path.
Default value https://codex.wordpress.org/Function_Reference/get_home_path
snapshot_current_path
Current site path.
Default PATH_CURRENT_SITE
snapshot_queue_tableset_full
Whether to include other, randomly prefixed DB tables in managed backups list
snapshot_queue_fileset_preprocess
List of queued managed backup files for pre-processing before they’re backed up
snapshot-queue-fileset-reject_oversized
Whether to reject the oversized files (i.e. not include them in the managed backup).
Default: false (i.e. don’t reject them – do include them).
Full file path to each individual file passed as 2nd argument to the filter.
snapshot_queue_fileset_filesize_threshold
Large file threshold value. Overrides the SNAPSHOT_FILESET_LARGE_FILE_SIZE define value.
snapshot_mocks_api_response_code
Reponse code returned by remote request.
snapshot_mocks_api_response_body
Response body returned by remote request.
snapshot_full_backups_log_enabled
Whether managed backups logging has been enabled
snapshot_full_backups_log_enabled_explicit
Whether managed backups logging has been explicitly enabled by the user
snapshot_full_backups_log_enabled_implicit
Whether managed backups logging has been implicitly enabled (no user action, by default)
snapshot_limit_of_files_per_session
Max number of files added to ZIP archive in one go. Applies to regular snapshots only, not managed backups.
Default: 200
Snapshot_Model_Full_Remote_Storage::get_filter( 'api_space_used' )
Managed backups used remote space
Snapshot_Model_Full_Remote_Storage::get_filter( 'api_space_free' )
Managed backups total remote available space
Snapshot_Model_Full_Remote_Storage::get_filter( 'api_space_free' )
Managed backups total remote free space left
Snapshot_Model_Full_Remote_Storage::get_filter( "backups_get" )
Raw list of remote backups
Snapshot_Model_Full_Remote_Storage::get_filter( "backups_refresh" )
Raw list of remote backups during refresh
Default API-obtained backups list
Snapshot_Model_Full_Remote_Storage::get_filter( "cache_expiration" )
Cached values expiry time
Default DAY_IN_SECONDS
Snapshot_Model_Full_Backup::get_filter( "get_backups" )
A list of full backup items
Snapshot_Model_Full_Backup::get_filter( "has_dashboard" )
Whether we have WPMU DEV Dashboard installed
Snapshot_Model_Full_Backup::get_filter( "is_dashboard_active" )
Whether the WPMU DEV Dashboard is activated
Snapshot_Model_Full_Backup::get_filter( "has_dashboard_key" )
Whether the used logged into their WPMU DEV Dashboard
Snapshot_Model_Full_Backup::get_filter( "is_active" )
Whether managed backups have been activated
Default: true if they did, AND we have dashboard available
Snapshot_Model_Full_Backup::get_filter( "schedule_frequencies" )
List of schedule frequencies (daily, weekly, monthly) as value => title pairs.
Snapshot_Model_Full_Backup::get_filter( "schedule_frequency" )
User-selected current frequency, or 'weekly' as fallback.
Snapshot_Model_Full_Backup::get_filter( "schedule_times" )
List of schedule times, as offset in seconds => title pairs.
Snapshot_Model_Full_Backup::get_filter( "schedule_time" )
User-selected schedule time, or 3600 as fallback.
Snapshot_Model_Full_Backup::get_filter( "has_backups" )
Whether we have any managed backups (true|false)
Snapshot_Model_Full_Remote_Api::get_filter('domain')
Current site domain
Snapshot_Model_Full_Remote_Api::get_filter('api_key')
WPMU DEV Dashboard API key
Snapshot_Model_Full_Remote_Help::get_filter('help_url')
Individual help item URL
Snapshot_Model_Time::get_filter('local_timestamp')
Local time as UNIX timestamp
Snapshot_Model_Time::get_filter('utc_timestamp')
UTC time as UNIX timestamp
Snapshot_Controller_Full_Cron::get_filter('kickstart_delay')
Gets kickstart action delay in seconds.
Default: 5min
Snapshot_Controller_Full_Cron::get_filter('next_backup_start')
Next backup start schedule time
Snapshot_Controller_Full_Cron::get_filter('backup_kickstart')
Next kickstart action schedule time
snapshot_full_backups_restore_tables
Fired just before tables restoration
snapshot_destinations_render_list_before
Fired just before destinations are rendered in admin area
snapshot_destinations_loaded
Fired right after the destination classes have been loaded
snapshot_register_destination
Fired right after a destination class have been loaded and registered. Fires once for each destination class.
snapshot_config_loaded
Fires when config data has been loaded, at the beginning of the plugin exec cycle.
snapshot_class_loader_pre_processing
Fires on missing plugin class loading
Snapshot_Controller_Full_Ajax::get_filter('ajax_error_stop')
AJAX managed backups processing encountered too many errors.
Snapshot_Controller_Full_Cron::get_filter('cron_error_stop')
Scheduled managed backups processing encountered too many errors