[dev] Setting up VS Code for Wrye Bash
I (lojack) use VS Code for my python programming. Most of these steps are for general python projects, but I have a few steps in here for setting up specifics for Wrye Bash. I also code on Windows, some of these steps might be different if using VS Code on Linux or macOS.
Python 3.8+ is installed. I'm working on windows, so I'll also assume you installed the Python Launcher for Windows (default in the Python installer). I'm also using Python 3.10, so there are a few extra steps for wxPython later on.
Clone with git:
> git clone https://github.com/wrye-bash/wrye-bash.git
Cloning into 'wrye-bash'...
remote: Enumerating objects: 57581, done.
remote: Counting objects: 100% (653/653), done.
remote: Compressing objects: 100% (273/273), done.
remote: Total 57581 (delta 506), reused 468 (delta 379), pack-reused 56928
Receiving objects: 100% (57581/57581), 123.27 MiB | 3.44 MiB/s, done.
Resolving deltas: 100% (45156/45156), done.
Get VS Code from one of the following:
-
From Microsoft. Note Microsoft adds telemetry to their installer, so if you don't want all that, use one of the other options.
-
Use VSCodium. This is basically option 2, but with all the details taken care of for you. It's updated fairly regularly, so you can mostly not worry about falling behind on features.
I'll be using the Microsoft supplied build, but the steps should work fine with any version you choose.
-
Open the Wrye Bash project directory in VS Code (if you chose to at installation, you should have an "Open in VS Code..." context menu entry.
- On the first launch of a new directory, VS Code will ask if you trust the code. Select Yes.
- In the explorer view, navigate to
Mopy\Wrye Bash Launcher.pyw.
-
You should now have a view like this, a few things to point out:
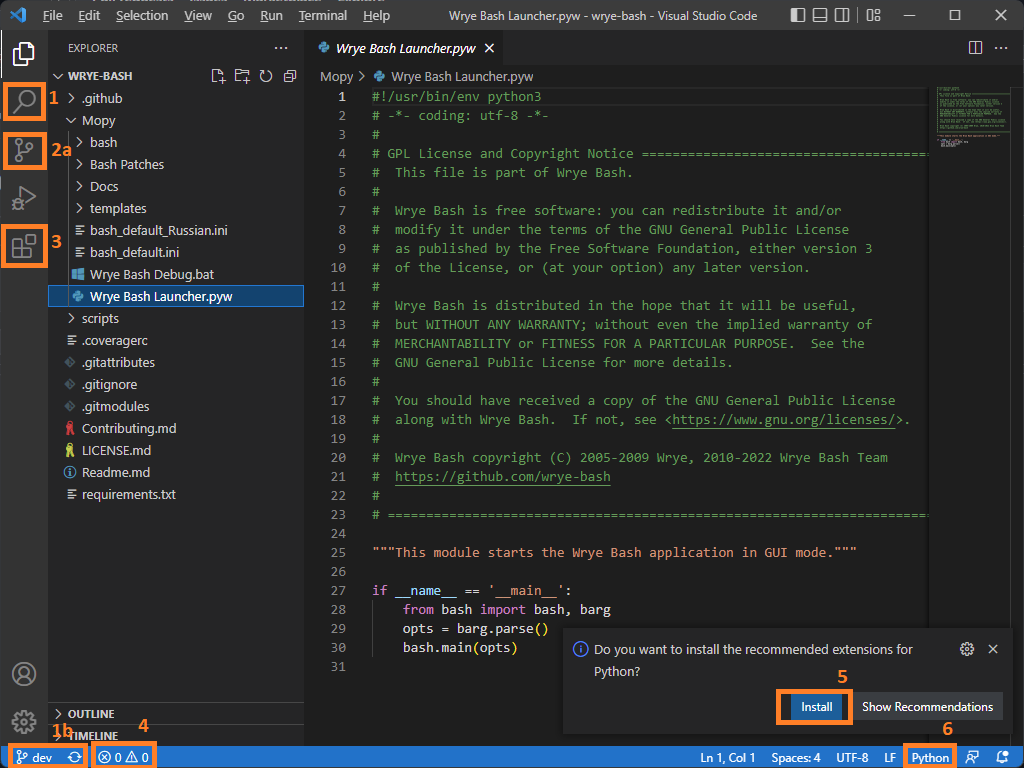
- 1) This is a quick shortcut for searching in files.
-
2) Since this is a repository, VS Code detects that and provides some git functionality. I don't personally use them.
- (a) You can view un-committed changes here.
- (b) You can switch/create branches, and sync from here.
- 3) This is where you can manage VS Code extensions.
- 4) This will show if there are any errors or warnings for you code (as detected by linters and type-checkers).
- 5) VS Code detected that we're viewing a python file, but we have no python extensions installed yet. The install button only installs the baseline python extension, so it's safe to go ahead and click that now.
- 6 Here is where you can select which python environment to run code in. You can quickly switch from different versions (3.9, 3.10) and virtual environments. Right now the python extension is not installed so it just indicates that the source file is a python file.
You can do this all in your favorite command line interface, but I'll be doing it in VS Code.
I'll use Python 3's built in venv for this, but VS Code supports others as well. For this we'll need a terminal.
-
Open a terminal, with
Terminal -> New Terminal(hotkey `Ctrl+Shift+``). -
Create a new virtual environment. When you run this command, VS Code will detect the new virtual environment and ask to set it as default (this is why I do most command line stuff through VS Code). Select Yes, or switch through the option in the lower right.
> py -m venv <environment_directory> [--prompt=<environment_prompt> [--upgrade-deps]So for example:
> py -m venv .venv --prompt=Wrye-Bash --upgrade-deps -
Activate the virtual environment. This will ensure when we install dependencies they will be installed to the virtual environment. You can do this either by running
Wrye Bash Launcher.pyw("play" button in the upper right) you'll get some errors because we haven't installed dependencies yet. Or run the activate script in the virtual environment directory:> .\.venv\Scripts\Activate.ps1NOTE: Powershell (the default terminal in VS Code) doesn't allow running scripts by default. The run button also always runs in powershell, so unless you want to manually activate the environment every time, you can allow scripts to run by running this command:
> Set-ExecutionPolicy RemoteSigned -Scope CurrentUser
Run
> py -m pip install -r requirements.txt
Or if you want to skip out on some of the packages that are only needed for building releases, you can open the requirements file and install each one manually.
Now that the python extension is installed, you should have a new icon on the left for accessing tests:

- Click on the flask.
- Click on
Configure Tests. - Select
pytest. This will install pytest if you didn't while installing dependencies. - Select
. Root folder.
You can now run the tests, however some will be failing. To fix this, download the git sub-module for the testing resources:
> git submodule sync
> git submodule update --init
However, test_archives will still be failing. This is due to the tests not running from the working directory usually assumed by Wrye Bash. I haven't nailed down the best solution for this yet.
If you want to work on writing tests, coverage reports will help you determine where tests either aren't hitting all the code branches, or find code that isn't tested at all (most of it).
-
Install
pytest-cov> py -m pip install pytest-cov -
Install the
Coverage Guttersextension for VS Code. This will give us nice indicators on the left side of the code for what is covered (green), partially covered (yellow) or not covered (red). To have it automatically pull in results as you run tests, click the new "O Watch" text in the bottom of VS Code. -
Create a
pyproject.tomlfile in the repository root. This is the easiest way to configure various python tools (likepytestandpytest-cov) Here are it's contents:[tool.coverage.run] branch = true [tool.coverage.report] show_missing = true skip_covered = true [tool.pytest.ini_options] addopts = "--cov --cov-report term --cov-report=html --cov-report=xml"
NOTE: Debugging tests does not work when running with coverage. There are some workaround in vs-code-python#693 that may work for debugging.
Here are just a few more plugins I've found useful, both in Wrye Bash and other projects. Install them through VS Code or via the links.
-
autoDocstring - Generates docstrings for you automatically. You can configure it for different docstring styles (I prefer
sphinx). Right now Wrye Bash doesn't have any generated docs, so we don't have a standard specified. - gitignore - Can use to quickly generate/pull .gitignores for many project types. A good starting place for a new project to edit down further.