DEPRECATION NOTICE: this tool has been deprecated and it is not maintained anymore.
Test framework for running AutoYaST integration tests by using Veewee and Vagrant.
- Building Vagrant images by using AutoYaST profiles.
- Checking these images with RSpec tests.
- Generating own installation ISO images with local built RPMs or the newest one from OBS.
- QEMU/KVM (through libvirt) and VirtualBox are supported.
These integration tests need to start virtual machines for their operation. If you want to use QEMU/KVM, support for hardware virtualization is vitally important. Check it on your host system:
$ grep --only-matching '\(svm\|vmx\)' /proc/cpuinfo
Alternatively, you can just use VirtualBox (no hardware virtualization support is needed).
If you prefer, you can install the framework in a QEMU/KVM machine. For that scenario to work you must enable nested virtualization and also expose virtualization extensions.
You can check if the parameter for nested virtualization is enabled with:
$ cat /sys/module/kvm_intel/parameters/nested #(Intel based machines)
$ cat /sys/module/kvm_amd/parameters/nested #(AMD based machines)
To enable, just add this options to the modules and then reload them or restart your machine:
$ sudo sh -c "echo 'options kvm-intel nested=1' >> /etc/modprobe/kvm-intel.conf"
$ sudo sh -c "echo 'options kvm-amd nested=1' >> /etc/modprobe/kvm-amd.conf"
And if you're using libvirt, you can expose 'virtualization extensions' setting cpu mode
to host-model or host-passthrough. You can find more information in the official
documentation.
-
Unless you run tests as 'root', configure
sudoin order to run themksusecd,systemctl start libvirtdandzypper incommands as root.This will grant access to execute every command for user as root without asking for password (unsecure):
echo '<username> ALL=NOPASSWD: ALL' >> /etc/sudoers -
Add YaST:Head and devel:languages:ruby:extensions repositories. For example, if you're running openSUSE Leap 42.2:
$ sudo zypper ar -f -r http://download.opensuse.org/repositories/YaST:/Head/openSUSE_Leap_42.2/YaST:Head.repo $ sudo zypper ar -f -r http://download.opensuse.org/repositories/devel:/languages:/ruby:/extensions/openSUSE_Leap_42.2/devel:languages:ruby:extensions.repo -
Install package ruby2.1-rubygem-aytests (or ruby2.2-rubygem-aytests) and clone tests repository (tests are also available in the package aytests-tests):
$ sudo zypper in ruby2.1-rubygem-aytests git $ git clone https://github.com/yast/aytests-tests -
The task
setupwill do a lot of work for you. After that, you should logout and login again (as the user will be added to some groups):$ aytests setup -
If the host is running a firewall, you must permit connections from libvirt default network to host’s port 8888. For example, if you’re running SuSEfirewall2 and your libvirt default network is 192.168.122.0 (you can check it on
/etc/libvirt/qemu/networks/default.xml), you could add a custom rule to /etc/sysconfig/SuSEfirewall2 allowing incoming connections from 192.168.122.0/24 to TCP port 8888, e.g.:FW_SERVICES_ACCEPT_EXT="192.168.122.0/24,tcp,8888"After that, you must reboot your system to be sure everything works properly (libvirt iptables rules, ip forwarding, etc.).
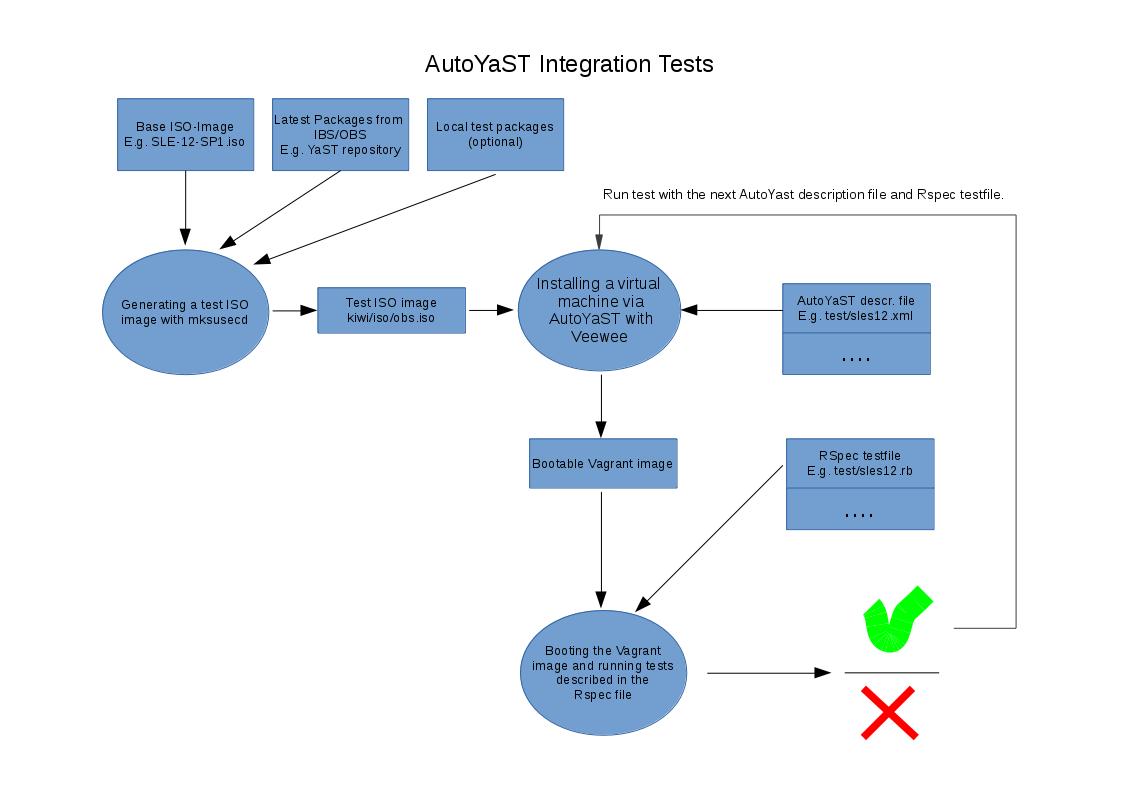
This is the workflow used to run integration tests:
- Create an ISO image to test. This ISO will contain the latest YaST packages, although it's also possible to use any other image.
- Install the system using the generated ISO and run the tests on the resulting system. You can run the tests as many times as you want using the same installed system.
Actually, the second step can be seen as two different steps (building the system and running the tests). But for now, we'll keep them tied.
Since December 2015 AYTests uses a special directory to perform all the
actions: downloading the ISO, building the virtual machine, etc.
$HOME/aytests-workspace is used by default. You can change it via the
--work-dir option.
$ aytests build_iso sles12-sp1 --work-dir $HOME/another-directory
After this brief introduction, let's go deeper into each step.
Generating a new ISO to use in tests is as easy as typing:
$ aytests build_iso sles12-sp1
where sles12-sp1 could be any of the values defined in
config/definitions.yml.
At this time SLE 12 (sles12) and SLE 12 SP1 (sles12-sp1) are supported.
These are the steps that will be performed by this task:
- If the original ISO is not found in the
isodirectory, it will be downloaded. Optionally you can just copy the ISO (retaining its original name) into theisodirectory. You can find out the original name in config/definitions.yml. - Latest YaST packages will also be downloaded from build system (IBS/OBS). If you
want to include your own packages, just drop them into
rpms/<definition>under work directory (e.g.$HOME/aytests-workspace/rpms/sles12-sp1). - Those packages will be included in a Driver Update (DUD).
- Finally, the DUD will be added to the ISO. The new ISO will be copied to
$HOME/aytests-workspace/iso/obs.iso.
If you want to use another ISO, just copy it to iso/obs.iso under the work
directory and it will be used.
Once the ISO is available, the tests are ready to run. All tests are defined in the
test directory. For example, to run aytests/tftp.rb test, just type:
$ aytests test aytests/tftp.rb
If you want to run all the tests in test directory, just type:
$ aytests test aytests/*.rb
By default, tests will run using QEMU/KVM as backend. But it's possible to
select a different provider via the --provider option or setting the
AYTESTS_PROVIDER environment variable. At this time, libvirt and
virtualbox are supported:
$ aytests test aytests/tftp.rb --provider virtualbox
$ AYTESTS_PROVIDER="virtualbox" aytests test aytests/tftp.rb
Now, the nitty-gritty details. For every test file, these steps will be performed:
- A new Vagrant box will be created using the ISO and the profile named after
the test (e.g.
aytests/tftp.xml). Veewee will take care of this part. - Using the generated Vagrant box, a new virtual machine will be created and the tests will run on that machine.
- If any test failed, the YaST2 logs will be copied to
logdirectory under work directory. - Finally, the virtual machine will be destroyed.
Sometimes is useful to run a given test but skipping the installation process, which is quite time consuming. To execute a test but skipping the installation:
$ aytests test <path/to/test.rb> --skip-build
For example:
$ bundle exec rspec aytests/tftp.rb --skip-build
To help with debugging, AYTests will store a screenshot and, if possible, YaST2
logs from installation/upgrade under the workspace. Assuming that the default
settings are used, they'll be saved under $HOME/aytests-workspace/results.
Each run will have its data saved in a directory named after the current
date/time in the form YYYYMMDDhhmm.
The screenshot will be refreshed every 30 seconds so, if a timeout occurs, it will easy to find out where the process got stuck.
About logs, they're retrieved through SSH so, if installation/upgrade crashed, there's a big risk that they're not saved.
VirtualBox can run in headless mode if needed. To do that, just use the
--headless option or set the AYTESTS_HEADLESS environment variable to
true.
$ aytests test astests/tftp.rb --headless
$ AYTESTS_HEADLESS="true" aytests test
This setting is not relevant to QEMU/KVM which will run in headless mode anyway.
Two tasks for cleaning-up stuff are available. To remove cache
(<work_dir>/cache) and Kiwi
state (<work_dir>/veewee/import_state.yaml) use:
$ aytests clean
If you also want to remove ISO images (downloaded and generated ones), logs and
the Vagrant box file (kiwi/autoyast.box), is safe to remove just the work
directory.
- The framework can be a little bit fragile. Polishing is needed.
- Usability also needs some love.
If you are experiencing There was a problem opening a connection to libvirt: libvirt is not a recognized compute provider error, you might need to downgrade gems 'fog' and 'fog' core to version 1.30 to 1.29
$ gem list fog
$ gem install fog --version 1.29
$ gem uninstall fog --version 1.30
$ gem install fog-core --version 1.29
$ gem uninstall fog-core --version 1.30
If you're running AutoYaST integration tests in a virtual machine (as mentioned
in the Supported Scenarios section) you should make sure that you're using different
IP ranges. For example, if you are using 192.168.122.0/24 in the host machine, you should
use another one (e.g. 192.168.123.0/24) in the guest. The following commands will be
helpful:
$ sudo virsh net-dumpxml default
$ sudo virsh net-edit default
Finally, don't use 192.168.121.0/24 as it will be used by libvirt Vagrant plugin.
You must take into account that KVM and VirtualBox can't be running at the same
time. If for example you want to switch to VirtualBox, unload kvm (and
related) kernel module and load vboxdrv and friends.
# rmmod kvm
# rcvboxdrv start
Libvirt (1.2.* on Leap 42.1) has problems while deleting volumes from the default pool:
# sudo virsh vol-delete autoyast_vagrant_box_image_0.img default
# error: Failed to delete vol autoyast_vagrant_box_image_0.img
# error: cannot unlink file '/var/lib/libvirt/images/autoyast_vagrant_box_image_0.img': Success
libvirt-1.3.5-15.9.x86_64 solves this problem.
After installation of the RPM please run:
# systemctl start virtlogd.socket
in order to initialize the socket communication.