Author: LantaoJin
GitHub: https://github.com/LantaoJin/DistributedSystemUsingJavaNIO
要写好一个分布式系统往往是一件比较复杂的事情,特别是使用
Java、C++这类不具有并发原语的非函数式编程语言,不仅需要考虑各个线程之间的同步和并发,还要考虑进程以及节点之间的通信和协作。单就通信框架这一层(如RPC调用)就有许多坑等着猿猿们来跳,如果再考虑系统在高并发情况下的响应时间和性能等,又会使系统设计变得复杂。好在我们无需从零开始,业界存在着许多开源的优秀的分布式系统组件(如RPC框架、序列化框架等等),这类组件封装了网络通信协议、序列化等底层处理,但要写出一个高性能的分布式系统仍然不容易。本教程将手把手的教你如何写一个高性能的Java NIO框架,使得其具有很好的扩展性,也便于理解Java NIO。
JavaNIO网上已有许多不错的文章和教程供开发者学习,如Java NIO Tutorial,Getting started with new I/O等等,详细内容本文不再累述,这里只简要总结一下。
普通IO,也叫BIO、Blocking IO,数据在客户和服务器之间交换是阻塞式的,数据通过TCP协议从一端发送到另一端,无论是发送的一端还是接受的一端,在没有数据准备好的时候是处于一种等待状态的,该状态会block住该线程直到有数据后继续传输。
NIO,也叫New IO、Non-Blocking IO,顾名思义是非阻塞式的,它不再将实际收发数据的客户端和服务端线程一对一绑定在一起,而是增加了一个事件管理线程,通过该事件管理线程来监听网络上数据是否已经准备好,然后告知相应的客户端或服务端的收发线程,可以来读写数据了。更进一步的,该事件管理线程及为我们常说的reactor。
NIO的写法相对固定,服务端和客户端代码看起来类似,我们很容易写出一个简单的CS模型,具体写法会在后面章节详细介绍。要弄懂NIO首先要先理解Selector,Channel,SelectedKey和Buffer之间的关系:
- Selector和Channel的关系
通过Selector,我们可以用一个线程来操作多个Channel。
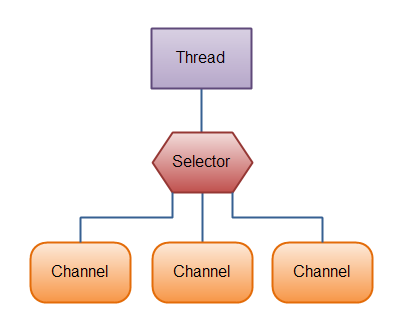
这里的操作指的是监听Channel是否可读或可写。
- SelectedKey和Channel的关系
当我们使用Selector来操作Channel时,我们首先需要将这个Channel注册在一个Selector上。
SelectionKey key = channel.register(selector, SelectionKey.OP_READ);
register方法的第二个参数SelectionKey.OP_READ代表的是通过Selector来监听我们感兴趣的事件,这类事件有:
Connect
Accept
Read
Write
当某个Channel上“发生”以上事件时,通常表示Channel be ready for那个事件。 一旦我们为Selector注册了一个或多个Channel,接下来就可以调用Selector的select方法。
int readyChannels = selector.select();
该方法是个阻塞方法,只有当至少有一个事件在某个Channel上ready时才返回。返回值代表着有多少Channel存在ready的事件。 当select方法返回非0(有事件在某些Channel上ready),我们就可以通过selectedKeys方法来访问这些Channel了。
Set<SelectionKey> selectedKeys = selector.selectedKeys();
我们可以通过iterator来遍历selectedKey,并通过SelectionKey.channel()拿到对应的Channel( ServerSocketChannel或SocketChannel)。
Set<SelectionKey> selectedKeys = selector.selectedKeys();

Iterator<SelectionKey> keyIterator = selectedKeys.iterator();

while(keyIterator.hasNext()) {
    SelectionKey key = keyIterator.next();
    if(key.isAcceptable()) {
        // a connection was accepted by a ServerSocketChannel.
    } else if (key.isConnectable()) {
        // a connection was established with a remote server.
    } else if (key.isReadable()) {
        // a channel is ready for reading
    } else if (key.isWritable()) {
        // a channel is ready for writing
    }
    keyIterator.remove();
}
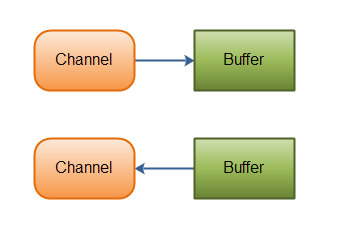
- Channel和Buffer的关系
NIO的数据必须用Buffer对象“包裹”起来,数据从Channel里读出来首先会写入Buffer,要写入Channel的数据也必须先从Buffer中读出:
使用Buffer来读写数据的步骤可以简单分为4步:
- 读Channel将数据写入Buffer
- 调用buffer.flip() (Buffer进入读模式)
- 从Buffer中读数据写入Channel
- 调用buffer.clear()或buffer.compact() (Buffer进入写模式)
Buffer操作指针如下:

一个简单的例子:
ByteBuffer buf = ByteBuffer.allocate(48);

int bytesRead = inChannel.read(buf); //read into buffer.
while (bytesRead != -1) {
  buf.flip();  //make buffer ready for read
  while(buf.hasRemaining()){
      System.out.print((char) buf.get()); // read 1 byte at a time
  }
  buf.clear(); //make buffer ready for writing
  bytesRead = inChannel.read(buf);
}

所有代码均为代码片段,可能无法运行。有兴趣可以参考一个实际的项目Blackhole的network模块。这是一个类似Kafka的消息系统,纯Java编写。
public class GenServer {
    public static final Log LOG = LogFactory.getLog(GenServer.class);

    private Selector selector;
    private ServerSocketChannel serverSocketChannel;
    volatile private boolean running = true;

    public void init(String name, int servicePort) throws IOException {
        serverSocketChannel = ServerSocketChannel.open();
        serverSocketChannel.configureBlocking(false);
        ServerSocket ss = serverSocketChannel.socket();
        ss.bind(new InetSocketAddress(servicePort));
        selector = Selector.open();
        serverSocketChannel.register(selector, SelectionKey.OP_ACCEPT);
        LOG.info("GenServer " + name + " started at port:" + servicePort);

        loop();
    }

    protected void loop() {
        SelectionKey key = null;
        while (running) {
            try {
                selector.select();
            } catch (IOException e) {
                LOG.error("IOException in select()", e);
                running = false;
                continue;
            }
            try {
                Iterator<SelectionKey> iter = selector.selectedKeys().iterator();
                while (iter.hasNext()) {
                    key = iter.next();
                    iter.remove();
                    try {
                        if (key.isValid()) {
                            if (key.isAcceptable()) {
                                doAccept(key);
                            } else if (key.isWritable()) {
                                doWrite(key);
                            } else if (key.isReadable()) {
                                doRead(key);
                            }
                        }
                    } catch (IOException e) {
                        LOG.warn("IOE catched: " + e.getMessage());
                        closeConnection((Connection) key.attachment());
                    }
                }
            } catch (Exception e) {
                LOG.error("Oops, got an Exception", e);
            }
        }
        releaseResources();
    }
}
启动Server也很简单。只需要几行代码:
server = new GenServer();
server.init("ServerVersionOne", 18080);
我们暂时不看doXX(key)方法的具体实现,先看看如何创建一个最简单的Client。
public class GenClient() {
    public static final Log LOG = LogFactory.getLog(GenClient.class);

    private Selector selector;
    private SocketChannel socketChannel;
    volatile private boolean running = true;

    public void init(String clientName, String serverHost, int serverPort) throws IOException, ClosedChannelException {
        this.clientName = clientName;
        host = serverHost;
        port = serverPort;

        socketChannel = SocketChannel.open();
        selector = Selector.open();

        loop();
    }

    protected void loop() {
        while (running) {
            try {
                connect();
                loopInternal();
            } catch (ClosedChannelException e) {
                LOG.error("Channel cloesd", e);
            } catch (Exception e) {
                LOG.error("Oops, got an Exception", e);
            } finally {
                try {
                    if (running) {
                      Thread.sleep(3000);
                      LOG.info("reconnect in 3 second...");
                    }
                } catch (InterruptedException e) {
                }
            }
        }
        releaseResources();
    }

    protected void loopInternal() {
        SelectionKey key = null;
        while (running && socketChannel.isOpen()) {
            try {
                selector.select();
            } catch (IOException e) {
                LOG.error("IOException in select()", e);
                return;
            }
            Iterator<SelectionKey> iter = selector.selectedKeys().iterator();
            while (iter.hasNext()) {
                key = iter.next();
                iter.remove();
                try {
                    if (key.isValid()) {
                        if (key.isConnectable()) {
                            doConnect(key);
                        } else if (key.isWritable()) {
                            doWrite(key);
                        } else if (key.isReadable()) {
                            doRead(key);
                        }
                    }
                } catch (IOException e) {
                    LOG.warn("catch IOE: ", e);
                    closeConnection((Connection) key.attachment());
                }
            }
        }
    }

    private void connect() throws IOException, ClosedChannelException {
        if (socketChannel == null || !socketChannel.isOpen()) {
            socketChannel = SocketChannel.open();
        }
        socketChannel.configureBlocking(false);
        SocketAddress server = new InetSocketAddress(host, port);
        socketChannel.connect(server);
        LOG.info("GenClient "+ clientName + " connecting to " + host + ":" + port);
        socketChannel.register(selector, SelectionKey.OP_CONNECT);
    }
}
启动Client也是两行代码
client = new GenClient();
client.init("broker", serverHost, 18080);
至此,我们的基于NIO的基础框架就搭建好了。当Server启动后,端口就会被监听。当Client启动后去连接Server(调用socketChannel.connect(server)),但在Non-Blocking模式下,该方法可能在连接建立之前就返回。所有需要在socketChannel上注册一个OP_CONNECT事件。当连接建立以后,key.isConnectable()返回true。然后需要调用channel.finishConnect() 来完成连接的建立。Server的selector会根据收到的事件类型,做相应的事情。如果是OP_CONNECT事件,Server就开始建立链接。 加粗的地方是跟传统Java IO不同的地方。
    public final boolean isConnectable() {
        return (readyOps() & OP_CONNECT) != 0;
    }

    private void doConnect(SelectionKey key) throws IOException {
        SocketChannel channel = (SocketChannel) key.channel();
        try {
            key.interestOps(SelectionKey.OP_READ);
        } catch (CancelledKeyException e) {
            LOG.warn("Exception while client connecting." + e);
        }
        channel.finishConnect();
        LOG.info("GenClient "+ clientName + " connectted to " + host + ":" + port);

        connected.getAndSet(true);
        Connection connection = factory.makeConnection(channel, selector, wrappedFactory);
        key.attach(connection);
    }
我们先看一下NIO连接如何建立。先看Server段的doAccept(key)逻辑:
    private void doAccept(SelectionKey key) throws IOException {
        ServerSocketChannel server = (ServerSocketChannel) key.channel();
        SocketChannel channel;
        while ((channel = server.accept()) != null) {
            channel.configureBlocking(false);
            channel.socket().setTcpNoDelay(true);
            channel.socket().setKeepAlive(true);

            Connection connection = factory.makeConnection(channel, selector, wrappedFactory);
            channel.register(selector, SelectionKey.OP_READ, connection);
        }
    }
当Server接受到来自Client的
public abstract SelectionKey register(Selector sel, int ops, Object att) throws ClosedChannelException
channel.register()方法的第三个参数接受Object 类型,表示一个附件:The attachment for the resulting key; may be null 之所以使用attchment是为了将异步IO的读写操作进行封装。后面会详细介绍异步IO读写数据的细节。
Connection connection = factory.makeConnection(channel, selector, wrappedFactory);
从上面的代码我们把channel和selector这两个重要的对象都塞进了一个封装类Connection。所以对IO的读写,实际上都是在Connection对象上完成的。我们看一下这个封装类。
public interface NonblockingConnection {
    public boolean isActive();
    public SocketChannel getChannel();
    public SelectionKey keyFor(Selector selector);
    public int read() throws IOException;
    public boolean readComplete();
    public void readyforRead();
    public int write() throws IOException;
    public boolean writeComplete();
    public void close();
    void sendMsg(ByteBuffer msg);
    public ByteBuffer getMsg();
}
我们来看它的实现类ByteBufferNonblockingConnection以及它最重要的读写操作:
public class ByteBufferNonblockingConnection implements NonblockingConnection {
   public ByteBufferNonblockingConnection(SocketChannel channel, Selector selector) {
        this.channel = channel;
        this.selector = selector;
        writeQueue = new ConcurrentLinkedQueue<ByteBuffer>();
        active = new AtomicBoolean(true);
        length = ByteBuffer.allocate(4);

        InetSocketAddress remoteAddr = Util.getRemoteAddr(channel.socket());
        host = remoteAddr.getHostName();
        port = remoteAddr.getPort();
    }

    @Override
    public void readyforRead() {
        length.clear();
        readBuffer.clear();
        readComplete = false;
    }

    @Override
    public int read() throws IOException {
        int read = 0;
        if (length.hasRemaining()) {
           int num = channel.read(length);
           if (num < 0) {
               throw new IOException("end-of-stream reached");
           }
           read += num;
           if (length.hasRemaining()) {
               return read;
           } else {
               length.flip();
               int len = length.getInt();
               readBuffer = ByteBuffer.allocate(len);
           }
        }

        int num = channel.read(readBuffer);
        read += num;
        if (num < 0) {
            throw new IOException("end-of-stream reached");
        }
        if (!readBuffer.hasRemaining()) {
            readBuffer.flip();
            readComplete = true;
        }

        return read;
    }

    @Override
    public int write() throws IOException {
        int written = 0;
        writeComplete = false;
        while (true) {
            if (writeBuffer == null) {
                ByteBuffer buffer = writeQueue.peek();
                // end of queue
                if (buffer == null) {
                    writeComplete = true;
                    break;
                }
                writeBuffer = ByteBuffer.allocate(4 + buffer.capacity());
                writeBuffer.putInt(buffer.capacity());
                writeBuffer.put(buffer);
                writeBuffer.flip();
            }

            // finish one buffer
            if (writeBuffer.remaining() == 0) {
                writeQueue.poll();
                writeBuffer = null;
                continue;
            }
            // start to write one buffer until socket writebuffer full
            for (int i = 0; i < 16; i++) {
                int num = channel.write(writeBuffer);
                written += num;
                if (num != 0) {
                    break;
                }
            }
            if (writeBuffer.hasRemaining()) {
                break;
            }
        }
        return written;
    }
无论是GenServer还是GenClient,在处理读写时都是在loop循环里调用doRead和doWrite方法。现在我们知道所有的数据读写都是在Connection这个封装类上进行的,那么我们如何将数据写入Client,数据又是如何从Server读出来的呢?
首先我们看如何将消息发送,使用一个工具类静态方法,调用connection.sendMsg接口:
Util.java
    public static void sendMsg(ByteBufferNonblockingConnection connection, Message message) {
        if (connection != null) {
            connection.sendMsg(PBwrap.PB2Buf(message));
        } else {
            LOG.info("peer is not connected, message sending abort " + message);
        }
    }
ByteBufferNonblockingConnection.java
    @Override
    public void sendMsg(ByteBuffer msg) {
        if (!isActive()) {
            LOG.error("connection closed, message sending abort: " + this.toString());
            return;
        }
        offer(msg.duplicate());
        SelectionKey key = keyFor(selector);
        try {
            key.interestOps(key.interestOps() | SelectionKey.OP_WRITE);
        } catch (CancelledKeyException e) {
            LOG.warn("Exception while sending message." + e);
        }
        selector.wakeup();
    }

    @Override
    public SelectionKey keyFor(Selector selector) {
        return channel.keyFor(selector);
    }

    private void offer(ByteBuffer buffer) {
        writeQueue.offer(buffer);
    }
这样消息就进入了writeQueue。再在主线程的doWrite方法(即connection的write方法)中,从writeQueue取出ByteBuffer对象进行操作(写入channel)了。
消息的接收实际上就是doRead方法,将消息完成读取出来。所以无论是在GenClinet还是GenServer,都是在doRead方法里进行。例如在GenClient.java中
    private void doRead(SelectionKey key) throws IOException {
        Connection connection = (Connection) key.attachment();
        connection.read();

        if (connection.readComplete()) {
            ByteBuffer msg = connection.getMsg();
            //msgQueue.addMsg(new MessageEvent(MessageEvent.RECEIVED, msg, connection));
            connection.readyforRead();
        }
    }
当消息的读完成后,connection.readComplete()返回true,就可以从connection封装类中把发送的消息取出来处理了。注释的代码是为了将业务处理和NIO读写框架分离。再比如GenServer.java,也是类似的结构,不同的是Server端处理的消息量大,我们构建了一个Hander线程池来处理收到的消息。
    private void doRead(SelectionKey key) throws IOException {
        Connection connection = (Connection) key.attachment();
        connection.read();

        if (connection.readComplete()) {
            ByteBuffer msg = connection.getMsg();
            //Handler handler = getHandler(connection);
            //handler.addMsg(new MessageEvent(MessageEvent.RECEIVED, msg, connection));
            connection.readyforRead();
        }
    }
无论是GenServer还是GenClient,我们的主线程,即loop循环里调用来调用doXX方法。OP_ACCEPT, OP_CONNECT, OP_READ, OP_WRITE事件都在loop线程里完成。数据写入Channel和从Channel里读取也都是在同一个线程里进行的。由于NIO的Channel为非阻塞式,所以单个线程进行读写操作性能并不算太差。特别是写操作,区别于传统的BIO,NIO的写频繁(由于只是写一点数据而不是像BIO持续写),线程间的上下文切换开销大。写操作建议不要分离线程。
回到本节,虽然NIO的读写可以在同一个线程里进行,但是业务逻辑的处理还是有较大的开销,不能将其和框架的线程放在一起。现在我们来把业务代码流程从目前的线程中剥离出来。
无论是在Client还是Server,当我们读到完整的一条message后,即上一节所说connection.readComplete(),从connection里取出message,首先封装成一个MessageEvent封装类,再将该对象丢到一个BlockingQueue里。如GenClient.java:
    private void doRead(SelectionKey key) throws IOException {
        Connection connection = (Connection) key.attachment();
        connection.read();

        if (connection.readComplete()) {
            ByteBuffer msg = connection.getMsg();
            msgQueue.add(new MessageEvent(MessageEvent.RECEIVED, msg, connection));
            connection.readyforRead();
        }
    }
Server端因为处理消息个数明显大于Client,除了封装成MessageEvent以外,我们用Handler线程池来处理。见GenServer.java
    private void doRead(SelectionKey key) throws IOException {
        Connection connection = (Connection) key.attachment();
        connection.read();

        if (connection.readComplete()) {
            ByteBuffer msg = connection.getMsg();
            Handler handler = getHandler(connection);
            handler.addMsg(new MessageEvent(MessageEvent.RECEIVED, msg, connection));
            connection.readyforRead();
        }
    }

    public void init(String name, int servicePort, int numHandler) throws IOException {
        handlerCount = numHandler;
        // start message handler thread
        handlers = new ArrayList<Handler>(handlerCount);
        for (int i=0; i < handlerCount; i++) {
            Handler handler = new Handler(i);
            handlers.add(handler);
            handler.start();
        }
此外,GenServer的doAccept方法也类似:
    private void doAccept(SelectionKey key) throws IOException {
        ServerSocketChannel server = (ServerSocketChannel) key.channel();
        SocketChannel channel;
        while ((channel = server.accept()) != null) {
            channel.configureBlocking(false);
            channel.socket().setTcpNoDelay(true);
            channel.socket().setKeepAlive(true);

            Connection connection = factory.makeConnection(channel, selector, wrappedFactory);
            channel.register(selector, SelectionKey.OP_READ, connection);
            Handler handler = getHandler(connection);
            handler.addMsg(new MessageEvent(MessageEvent.CONNECTED, null, connection));
        }
    }
MessageEvent和Handler都很简单,前者是一个封装类,后者是一个不断从Queue取出message并根据消息类型进行处理的线程类。
    private class MessageEvent {
        static final int CONNECTED = 1;
        static final int DISCONNECTED = 2;
        static final int RECEIVED = 3;
        int type;
        ByteBuffer msg;
        Connection c;
        public MessageEvent(int type, ByteBuffer msg, Connection c) {
            this.type = type;
            this.msg = msg;
            this.c = c;
        }
    }
    private class Handler extends Thread {
        private BlockingQueue<MessageEvent> messageQueue;

        public Handler(int instanceNumber) {
            entityQueue = new LinkedBlockingQueue<MessageEvent>();
            this.setDaemon(true);
            this.setName("process handler thread-"+instanceNumber);
        }

        public void addMsg(MessageEvent msg) {
            messageQueue.add(msg);
        }

        @Override
        public void run() {
            while (running) {
                MessageEvent e;
                try {
                    m = MessageQueue.take();
                    switch (m.type) {
                    case MessageEvent.CONNECTED:
                        processor.OnConnected(m.c);
                        break;
                    case MessageEvent.DISCONNECTED:
                        processor.OnDisconnected(m.c);
                        break;
                    case MessageEvent.RECEIVED:
                        processor.process(m.entity, m.c);
                        break;
                    default:
                        LOG.error("unknow message" + m);
                    }

                } catch (InterruptedException ie) {
                    LOG.info("handler thread interrupted");
                    running = false;
                } catch (Throwable t) {
                    LOG.error("exception catched when processing message", t);
                }
            }
        }
    }
这里的processor是一个接口,不同的角色可以根据业务逻辑的不同,进行不同的实现。
public interface Processor<ByteBuffer, Connection extends NonblockingConnection> {
    public void OnConnected(Connection connection);
    public void OnDisconnected(Connection connection);
    public void process(ByteBuffer reply, Connection from);
}
略
NIO中读到0 Byte或写入0 Byte并不代表流写完或读完,也不代表流关闭。通常是继续注册OP_READ/OP_WRITE等待下次处理。
为了避免线程切换的系统调用开销,一般在写操作时增加一个循环体,再读到0 Byte时,多循环几次。
            // start to write one buffer until socket writebuffer full
            for (int i = 0; i < 16; i++) {
                int num = channel.write(writeBuffer);
                written += num;
                if (num != 0) {
                    break;
                }
            }
前面提到过使用当前线程往channel写数据,可以减少线程切换和系统调用,一定程度上提高发送效率。
OP_READ,OP_WRITE,OP_ACCEPT事件可以放在同一个线程,也可以分别放倒不同的线程。 拆分方式: 线程boss处理OP_ACCEPT,OP_CONNECT事件,处理连接建立 线程worker处理OP_READ,OP_WRITE事件,处理IO读写
见第五节
优先发送Accept > Write > Read 优先读取Accept > Read > Write (Netty)
SO_TCPNODELAY(默认false) Nagel算法通过将缓冲区内的小封包自动相连,组成较大的封包,阻止大量小封包的发送阻塞网络, 从而提高网络应用效率。 对于实时性要求较高的应用(telnet、网游),可能需要关闭此算法。 Socket.setTcpNoDelay(true);
SO_LINGER Socket.setSoLinger(boolean linger, int timeout):控制socket关闭后的行为
- linger=false,timeout=-1(默认行为)
当socket主动close,调用的线程会马上返回,不会阻塞,然后进入CLOSING状态, 残留在缓冲区中的数据将继续发送给对端,并且与对端进行FIN-ACK协议交换,最后进入TIME_WAIT状态。
- linger=true,timeout>0
调用close的线程将阻塞,发生两种可能的情况:一是剩余的数据继续发送,进行关闭协议交换;二就是超时过期,剩余的数据将被删除,进行FIN-ACK交换。
- Linger=true,timeout=0
进行所谓“hard-close”,任何剩余的数据都将被丢弃,并且FIN-ACK交换也不会发生,替代产生RST,让对端抛出"connection reset"的SocketException 慎重使用该选项,TIME_WAIT状态的价值:可靠实现TCP连接终止
SO_REUSEADDR (默认false) Socket.setReuseAddress(boolean):重用端口 使用场景:
- 当有一个有相同本地地址和端口的socket1处于TIME_WAIT状态时,而你启动的程序的socket2要占用该地址和端口,你的程序就要用到该选项。
- SO_REUSEADDR允许同一port上启动同一服务器的多个实例(多个进程)。但每个实例绑定的IP地址是不能相同的。在有多块网卡或用IP Alias技术的机器可以测试这种情况。
- SO_REUSEADDR允许完全相同的地址和端口的重复绑定。但这只用于UDP的多播,不用于TCP
SO_KEEPALIVE(默认false) Socket.setKeepAlive(boolean) 默认间隔2个小时,建议应用层做心跳。
在SelectionKey的循环处理时,必须每次都从迭代器中移除已处理的Key。不移除会造成重复处理,cpu100%
Iterator<SelectionKey> iter = selector.selectedKeys().iterator();
            while (iter.hasNext()) {
                key = iter.next();
                iter.remove();
Selector返回的key集合非线程安全,对selected keys的处理必须单线程处理或者适当同步
OP_WRITE造成CPU100%是一个场景问题。首先要理解OP_WRITE的触发条件
前提:interest了OP_WRITE
触发条件:
- socket发送缓冲区可写
- 远端关闭
- 有错误发生
正确的处理方式:
- 触发之后立即取消注册,否则会继续触发导致循环
    private void doWrite(SelectionKey key) throws IOException {
        try {
            key.interestOps(key.interestOps() & ~SelectionKey.OP_WRITE);
        } catch (CancelledKeyException e) {
            LOG.warn("Exception while server writing." + e);
        }
        Connection connection = (Connection) key.attachment();

        connection.write();
        if (!connection.writeComplete()) {
            // socket buffer is full, register OP_WRITE, wait for next write
            try {
                key.interestOps(key.interestOps() | SelectionKey.OP_WRITE);
            } catch (CancelledKeyException e) {
                LOG.warn("Exception while server writing." + e);
            }
        }
    }
处理完成后视情况决定是否继续注册
- 没有完全写入,继续注册
- 全部写入,无需注册
SocketChannel.connect方法在非阻塞模式下可能返回false,切记判断返回值 在OP_CONNECT触发后,调用SocketChannel.finishConnect成功后, 连接才真正建立 在OP_CONNECT触发后,没有移除OP_CONNECT,导致 SelectionKey一直处于就绪状态,空耗CPU
尽量不要自己实现nio框架,除非有经验丰富的工程师,推荐Netty