Option Settings
简体中文 | English
The "Option Settings" dialog will be shown when "Options" command in the context menu is selected.
There are three tabs in the Option Settings dialog.
Contents

-
Font
You can set the font family and font size of the main window text here.
The "Font" dialog will be bring up by clicking "Choose font" button. You can also set the font styles here, including bold, italic, strikeout and underline.
You can't set the font color by "Font" dialog.
-
Text color
Click the rectangle on the right side of "Text color" will bring up the a dialog to change the text color on the main window.
If you have checked "Specify colors for each item", click the rectangle will bring up the "Main Window Color Settings" dialog. You can set the text color for each item. As shown bellow.
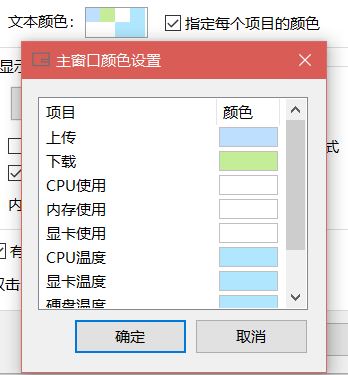
In this dialog, the text color of each item will be shown in the column "Color". You can change the text color for corresponding item by double clicking the color rectangle in the column "Color".
The effect after the text color is changed is as follow:

Note: the font and text color of the main window may be changed by the skin you are using. If you don't want these settings to be changed by the skin, you can set it in "Option Settings" - "General Settings" - "Skins".
-
Display Text settings
Clicking "Display Text settings" button will bring up the "Display Text Settings" dialog. You can set the text in front of each item in the main window here. As shown in the picture bellow:
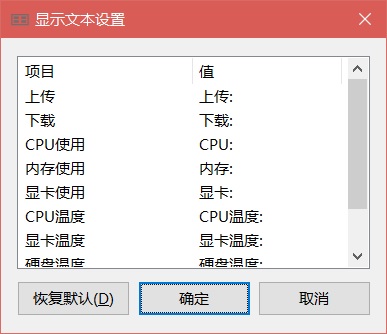
The displayed text of the corresponding item can be edited by double clicking the "Value" column in the list.
The default value to the displayed text can be restored by clicking the "Restore Default" button,
Note that because some skins do not display the text before each item, the "Display Text settings" button may not be available when using these skins.
-
Swap the position of upload and download
When this option is checked, the position of upload and download can be swapped.
Note that this option is also not available for skins that do not display the text for each item.
-
Short mode for net speed display
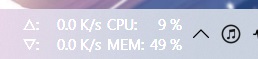
This option allows the display of the net speed to avoid to occupy more position of characters. When this option is checked, the number of decimal places of the network speed will be reduced by 1, and B will not be displayed when the network speed unit is set to B (byte). As shown the picture below.

-
Separate value and unit with space
When this option is checked, the value and unit will be separated by a space.
-
Show mouse tooltip
When this option is checked, a tooltip will be displayed when the mouse point to the main window.
-
Memory display mode
You can set the memory usage display mode here.
-
Used Percentage
Display the current memory usage as a percentage.
-
Memory used
Display the value of used memory directly.
-
Memory available
Display the value of available memory directly.
-
-
Net speed unit
You can select the displayed net speed unit. There are two options: B (byte) and b (bit).
The value of the net speed in b (bits) will be 8 times larger than that in B (bytes).
-
Unit selection
There three options: "Auto", "Fixed as KB/s" and "Fixed as MB/s".
When selecting "Auto", the net speed unit will be selected based on the current net speed automatically. If the value is less than 1024K, the unit will be K, and if the value is larger than 1024K, the unit will be M.
-
Don't show speed unit
If the "Unit selection" above is selected as "Auto", this option will be not available.
When this option is checked, the net speed unit will be hidden.
-
Don't show percent
When this option is checked, the percent sign of CPU and memory usage will be hidden.
-
Always on top
When this item is checked, the main window will always be placed above the other windows.
But the main window of TrafficMonitor may not necessarily be placed above other windows if they also have the top property.
To prevent the top property from failing, if "Always on top" is set, the program will automatically perform the top property every once in a while.
-
Mouse Penetrate
When this item is checked, the main window will not respond any mouse messages, and the context menu will not be popup by right click.
This option can make the main window does not affect operations in other programs.
If you want to cancel mouse penetrate, you can right click the notify icon, uncheck mouse penetrate in the context menu.
-
Lock Window Position
When this item is checked, the main window cannot be dragged to move.
-
Allow out of Screen Boundaries
By default, the main window is not allow to be moved out of the screen, after this item is check, this restriction is removed.
-
Hide main window when program is running full screen
When this option is checked, the main window will be hidden automatically if other window occupy the entire screen.
-
Double click action
You can set the operation to be executed when the main window is double clicked.
If you selected "Open specified application", the "Specified application" controls will be displayed bellow, you can specified the application to be open when double clicked.


-
Font
You can set the font family and font size of the taskbar window text here.
The "Font" dialog will be bring up by clicking "Choose font" button. You can also set the font styles here, including bold, italic, strikeout and underline.
You can't set the font color by "Font" dialog.
-
Text color
This option is the same as which in the "Main Window Settings". If "Specify colors for each item" is checked, the "Taskbar window color settings" dialog box will be bring up by clicked. As shown in the picture bellow.

It is allowed to set different colors for the label and value of each items in the taskbar window.
The text color of the label or value can be changed by double clicking the color rectangle in "Label color" or "Value color" column.
-
Background color
You can changed the background color of the taskbar window here.
-
Background transparent
Check this item will make the background transparent.
The effect of this option will be a little different in Windows 10 dark mode and light mode.
-
-
In Windows 10 dark mode
If your current Windows color mode is dark, you should set the background color as pure black (RGB:0,0,0), and check "Background transparent", this will obtain the best display effect. As shown in the picture bellow:

When "Background transparent" is checked, if the background color is set as the color other then pure black, the taskbar window will keep the acrylic translucent effect as the taskbar. As shown in the picture bellow:
The reason seems to be that in dark Windows mode, the brightness values of the colors in the sub windows of the taskbar are mapped to opacity, so that the black background or text will be treated as fully transparent.
When "Background transparent" is unchecked, the background of the taskbar window will become completely opaque.
-
In Windows 10 light mode
In light Windows mode, using the settings in dark mode, that is, setting the background color to pure black and the text to white, will cause the taskbar window color to be blurred:
Because the black background color is mapped to be completely transparent, and the text is white, it is not legible. But you can't set the text color as black, because the black text will still be mapped to completely transparent.
In light Windows mode, you should set the background color to the color other then pure black, and it is recommend to set to the color similar as the taskbar.
You can click the rectangle beside "Background color", click "Select" button int the "Color" dialog box, and select a color on taskbar as the background color. As shown in the picture bellow:
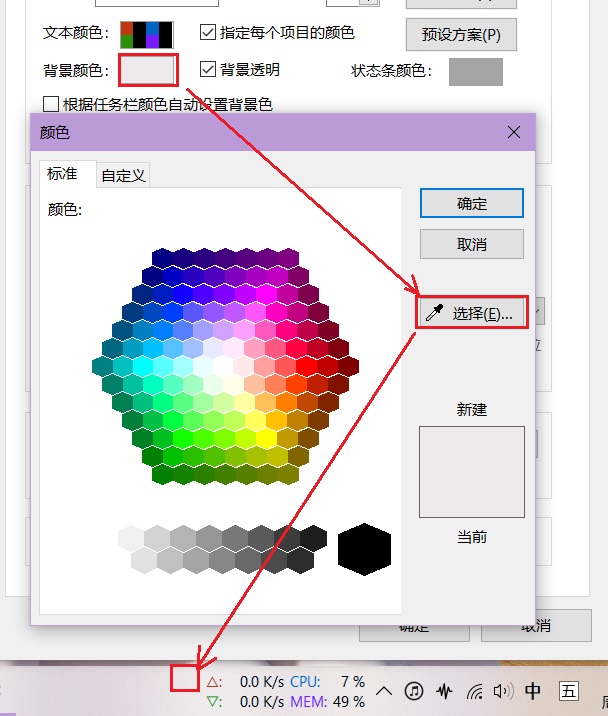
If "Background transparent" is not checked, the background of the taskbar window will be displayed as opaque effect.

-
-
Preset
A menu will be displayed when click this button, as shown in the picture bellow:

By default, "Preset1", "Preset2" and "Preset3" all have a color scheme of white text on a black background and are suitable for dark Windows mode. "Preset4" is a color scheme for black text on a light background, suitable for light Windows mode. You can save your own color scheme to these four presets.
When you have set a color scheme of text color, background color and other settings, select the item in the submenu of "Modify preset", you can save the current color settings to the selected preset, and a message will pop up, as shown in the picture bellow:
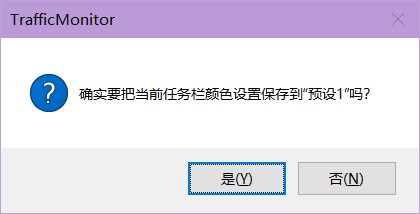
The current color settings will be saved to the selected preset after the "Yes" button is clicked.
Selected the preset in the "Preset" menu will apply the selected preset.
-
Automatically set the background color according to the taskbar color
This feature is mainly provided for light Windows mode. When this option is checked, the program will select a color from the taskbar as the background color. That means it automatically completes the manual selection of the taskbar color mentioned above.
This feature does not work when the background color is set to pure black.
-
Auto adapt to Windows 10 dark/light themes
This feature will apply the preset scheme when the Windows10 dark/light mode changes automatically.
You can configure which preset to use in Windows10 dark or light mode by clicking "Auto Adapt settings" button.

To use this feature, you can configure two preset for the dark and light Windows modes, and then set the corresponding preset for the dark and light Windows modes here.
-
Display Text settings
You can set the text in front of each item in the taskbar window by clicking "Display Text settings" button.
Click "Restore default" button will restore the default value.
-
Display settings
You can set which items to displayed in the taskbar window by clicking "Display settings" button. You can also sort these items. As shown in the picture bellow.

-
Short mode for net speed display
This option allows the display of the net speed to avoid to occupy more position of characters. When this option is checked, the number of decimal places of the network speed will be reduced by 1, and B will not be displayed when the network speed unit is set to B (byte). As shown the picture below.

-
Show mouse tooltip
When this option is checked, a tooltip will be displayed when the mouse point to the taskbar window.
-
Align values to the right
When this option is checked, the values on the taskbar window will be displayed as right aligned.
-
Horizontal arrange
When this option is checked, the value on the taskbar window will be arranged in horizontal, as shown in the picture bellow.

If your taskbar uses "small taskbar buttons", using a horizontal layout will make the taskbar window not too crowded in the vertical direction.
This option is not available when the taskbar is placed on the left or right side of the desktop.
-
Separate value and unit with space
When this option is checked, the value and the unit will be separated with a space.
-
Net speed data width
Here you can set the number of characters used by the width of the network speed data. If the net speed cannot be displayed completely, you can increase the number of this option.
-
Memory display mode
You can set the memory usage display mode here.
-
Used Percentage
Display the current memory usage as a percentage.
-
Memory used
Display the value of used memory directly.
-
Memory available
Display the value of available memory directly.
-
-
Item spacing
You can set the horizontal spacing of each item in the taskbar window.
If the taskbar is on the left or right side of the desktop, this value is the vertical spacing of the items.
The unit settings of the taskbar windows is the same as which of main window. Please refer to the "Unit Settings" of "Main Window Settings" section above.
-
Taskbar window appears to the left of the taskbar
When this option is checked, the taskbar window will be displayed on the left side of the taskbar. As shown in the picture bellow.

Note: In Windows11, this option only works if the taskbar alignment is Center.
In Windows 11, when this option is checked, the taskbar window will keep a distance from the left side of the taskbar in order to avoid overlapping with the Windows 11 widgets. As shown in the picture bellow:

If you want to adjust this distance manually, you can modify the settings in the configuration file
config.ini:[task_bar] taskbar_left_space_win11 = 160
-
Taskbar window closed to the icon instead of the side of the taskbar
This option only works in Windows 11. The effect is shown in the picture below:

-
Double click action
You can set the operation to be executed when the taskbar window is double clicked.
If you selected "Open specified application", the "Specified application" controls will be displayed bellow, you can specified the application to be open when double clicked.
-
Show resource usage graph
When this option is checked, a graph showing the resource usage of the corresponding items will be displayed in the background of items such as CPU and memory usage on the taskbar window. As shown in the picture bellow:

-
Show dashed box
When this option is checked, a dashed box will be displayed on the items such as CPU and memory usage in the taskbar window.
-
Show net speed graph
When this option is checked, a graph showing the corresponding net speed will be displayed in the background of upload and download items on the taskbar window.
-
The max value of the net speed graph
Here you set the maximum network speed that the network speed graph can represent.
-
Usage graph color
Here you can set the color of the resource usage graph.
-
Graph display mode
Here you can select the type of the displayed resource graph. Default is "Bar mode". If it is set to "Plot mode", the CPU/memory changes over time will be displayed. As shown in the picture below:


-
Check for update at startup
When this option is checked, the program will check for update in the background during startup. If there is an update, a message box will pop up.
An update check will be performed immediately when clicking "Check now" button.
-
Update source
You can set the update source as GitHub or Gitee. Due to the slow access to GitHub in mainland China, check for update will be failed. It is recommend to set the update source to Gitee if you live in mainland China.
If you the language setting of TrafficMonitor is set as Simplified Chinese, the default update source is Gitee.
-
Auto run when Windows starts
When this option is checked, the program will be started automatically after Windows is started.
-
For the versions before 1.80 and Lite version, the program achieve auto run function by adding a start up item in registry
\HKEY_CURRENT_USER\SOFTWARE\Microsoft\Windows\CurrentVersion\Run. If you encountered the problem that the auto run function dose not work, you can check if there is a start up item in the registry path mentioned above. -
For the standard version 1.80 and later, the program achieve auto run function by Task Schedule. As shown in the picture bellow:
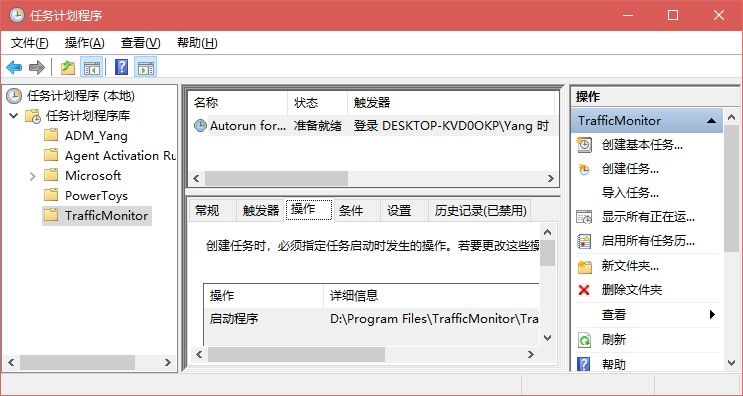
If you encountered the problem that the auto run function dose not work, please check if the start up item of TrafficMonitor in the Task Schedule is created, and the path of the exe file is correct.
-
-
Reset autorun
When clicking this button, the auto run function will be reset once for current TrafficMonitor process. You can try to click this button if the auto run function dose not work.
If the option "Auto run when Windows starts" is not checked, it will be checked automatically when this button is clicked.
-
Language
You can change the displayed language of TrafficMonitor here. It is need to restart the program to take effect.
Here you can set the save location of the configuration file and historical traffic data file of the program. The default location is the program directory.
You can click the "Open configuration file directory" button to view the configuration files in the File Explorer.
Please refer to 配置和数据文件 for details on configuration and data files.
-
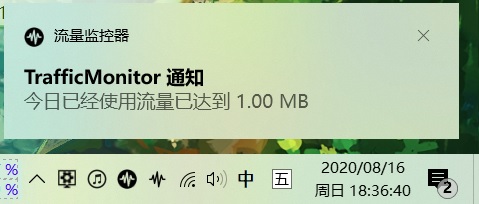
Notify when today traffic has been reached
When this option is checked, TrafficMonitor will show a message when the traffic used today exceeds the set value.
-
Notify when memory usage has been reached
When this option is checked, TrafficMonitor will show a message when the memory usage exceeds the set value.
-
Notify when xxx temperature has been reached
When these options are checked, TrafficMonitor will show a message when the temperature of the corresponding hardware exceeds the set value.
If you have not turn on the corresponding monitor item in "Hardware monitoring", or you are using the Lite version of TrafficMonitor, the options here will not be available.
You can enable or disable the hardware monitoring function here. Hardware monitoring is disabled by default. If you want to use TrafficMonitor to display temperature, GPU usage and other hardware information, you can enable the hardware monitoring option here.
Note: If you are using the Lite version, the options here will bot be available.
-
CPU
Check this option will enable the CPU temperature and CPU frequency monitoring function.
-
GPU
Check this option will enable the GPU temperature and GPU usage monitoring function.
-
Hard disk
Check this option will enable the hard disk temperature and hard disk usage monitoring function.
-
Main board
Check this option will enable the main board temperature monitoring function.
Note: When a monitoring function is disabled, the corresponding item will not he displayed in the "Display Settings" of the taskbar context menu. As shown in the picture bellow.
In the picture above, due to the "CPU" and "Main board" in the Hardware monitoring is disabled, the "CPU temperature" and "Main board temperature" will not be displayed in "Display Setting" of the taskbar context menu.
-
Select the hard disk to be monitored
If there are more one hard disk in your computer, you can choose which one's temperature and usage to display.
-
Select the CPU temperature to be monitored
Here you can select which CPU core temperature you want to monitor.
If "Average Temperature" is selected, the CPU temperature displayed is the average of all temperatures.
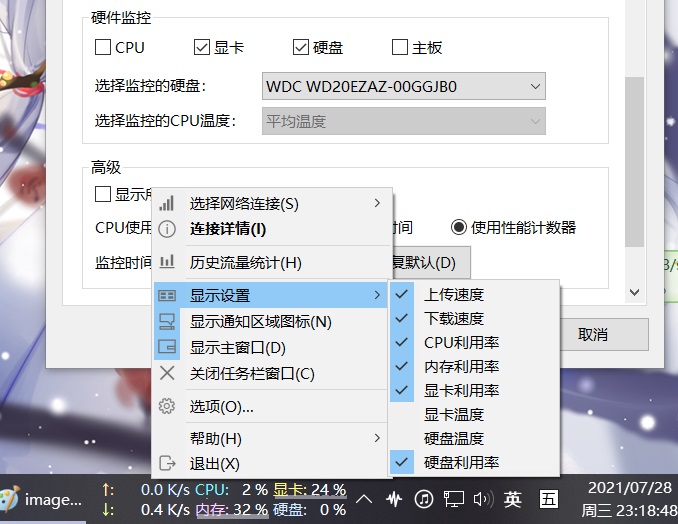
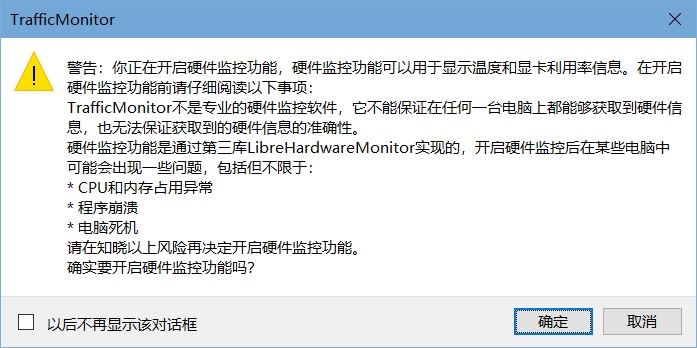
The temperature monitoring function of TrafficMonitor relies on a third-party open source library LibreHardwareMonitor. According to the feedback from some users, turning on the temperature function will cause problems such as CPU usage abnormal, program crashes and system crashes. If you do not need to monitor hardware, do not enable this function. When any of the hardware monitoring function is enabled, a warning message will be show. As shown in the picture bellow:
-
Show all network connections
When this option is checked, all the connections acquired will be shown in the submenu of the "Select Network Connections" in the context menu. Do not enable this option unless you have special needs.
When this option is enabled, the "Select All" in the "Select Network Connections" submenu will not be available because there will be duplicate network connections.
-
Select the connection to monitor
The "Select the connection to monitor" dialog box will be shown after this button is clicked.
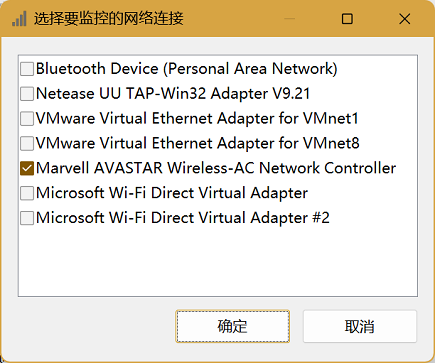
All of the items in this dialog is checked by default.
If you uncheck some items here, these network connections will not be displayed in the "Select Network Connections" submenu.
If you always encountered the problem with the abnormal net speed display, you can try to uncheck the network connections you are not interested in here.
-
CPU usage acquisition method
-
Based on CPU time
This option is selected by default. The CPU usage is calculated by
GetSystemTimesfunction. -
Use the performance counter
When this option is selected, the CPU usage is acquired by the performance counter.
In the operating system of Windows 10 or later, if you select "Based on CPU time", the displayed CPU usage will be inconsistent with the Windows task manager. If you want the it to be the same as in the task manager, please select "Use the performance counter" option.
In the operating system before Windows 10, there is no difference in CPU usage between these tow options.
-
-
Monitoring intervals
You can set the refresh interval of the monitoring information of TrafficMonitor. The default value is 1000 milliseconds.
-
Plugin-in manage
The "Plugin-in Manage" dialog box will be shown after this button is clicked.
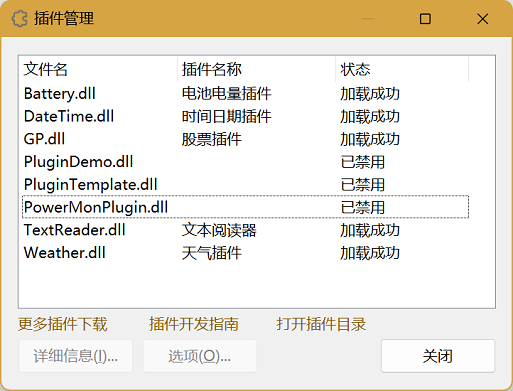
You can view and manage all of the plugins here.
Please refer to the 插件功能 section for details on plugin function.
-
Show Notify Icon
The notify icon will be shown when this option is checked.
Please refer to the 通知区图标 section for details on notify icon.
You can set whether to allow skins to changed certain settings of the main window here.