MultiMC guide
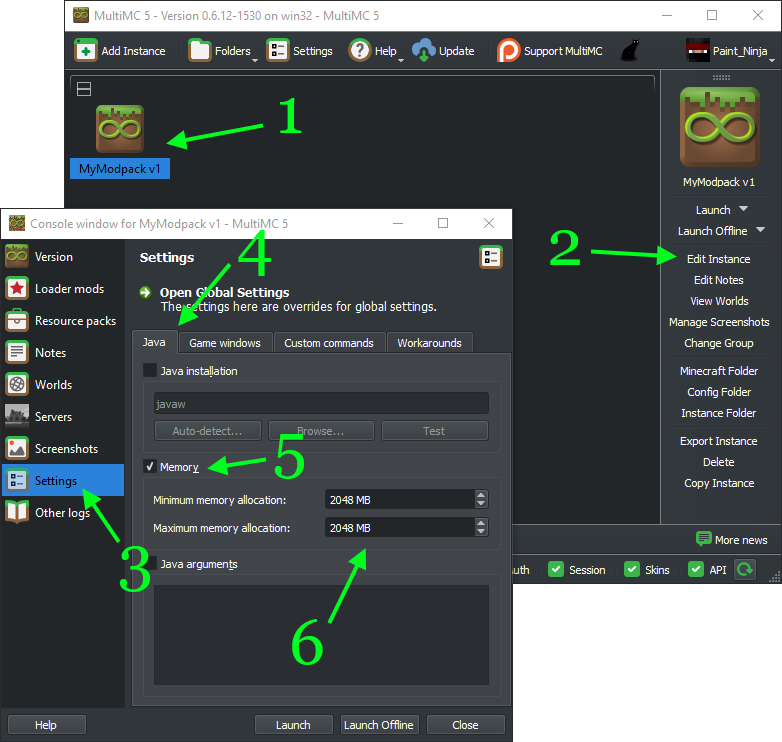
Step 1) Select the modpack you want to edit
Step 2) Click "Edit Instance" on the right
Step 3) Click "Settings" on the left of the window that pops up
Step 4) Click on the "Java" tab if not already selected
Step 5) Make sure that the "Memory" checkbox is checked
Follow steps 1 through 5 here
Step 6) Change both the "Minimum memory allocation" and "Maximum memory allocation" to a higher number. The minimum and maximum should be the same number for best performance.
Tip: 1GB = 1024MB. For example, for 2GB it's 2 * 1024 = 2048MB.
If you can't go higher than 1GB, you need 64bit Java.
Follow steps 1 through 5 here
Step 6) Change both the "Minimum memory allocation" and "Maximum memory allocation" to a lower number. The minimum and maximum should be the same number for best performance.
Tip: 1GB = 1024MB. For example, for 2GB it's 2 * 1024 = 2048MB.
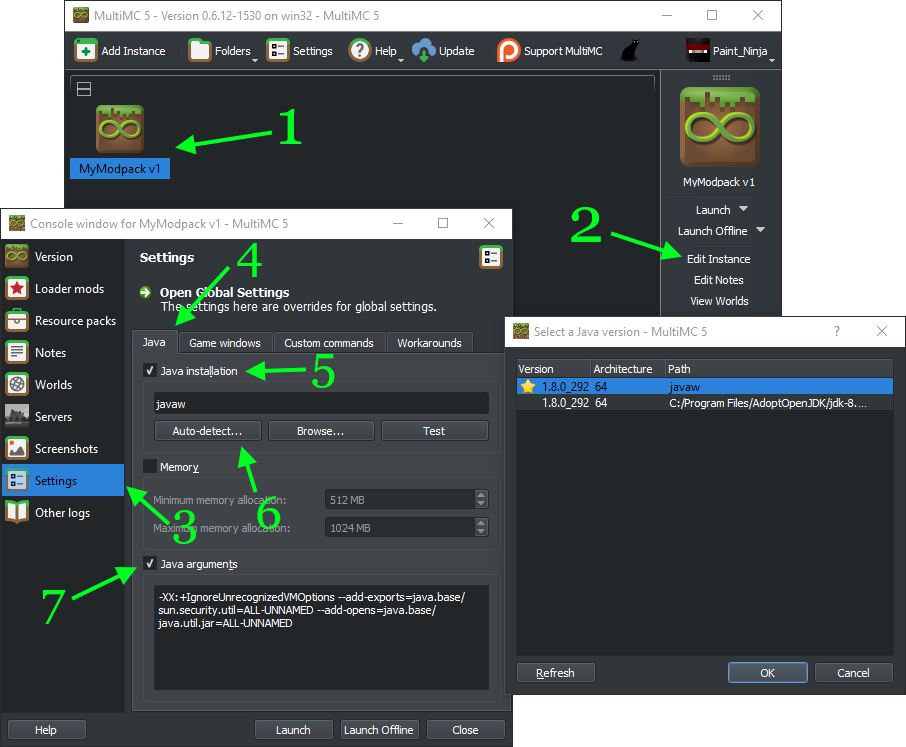
Step 1) Select the modpack you want to edit
Step 2) Click "Edit Instance" on the right
Step 3) Click "Settings" on the left of the window that pops up
Step 4) Click on the "Java" tab if not already selected
Step 5) Make sure that the "Java installation" checkbox is checked
Step 6a) Click "Auto-detect..."
Step 7) Only if using Minecraft 1.16.5 and Java 16+: Check the "Java arguments" checkbox and then copy and paste this into the textfield below it: -XX:+IgnoreUnrecognizedVMOptions --add-exports=java.base/sun.security.util=ALL-UNNAMED --add-opens=java.base/java.util.jar=ALL-UNNAMED
Follow steps 1 through 6a here.
Step 6b) Select a version that has the architecture column listed as "64"
If you can't see one with "64", go to the troubleshooting section.
Follow steps 1 through 6a here.
Step 6b) Select a version that is version x or older
Example: if it says it wants "Java 14 or older" then pick one from the list that is version 14 or lower. If it says "Java 8 or older", pick one that is version 1.8 or lower.
If you can't see the version you need, go to the troubleshooting section.
Follow steps 1 through 3a here.
Step 6b) Select a version that is version x or newer
Example: if it says it wants "Java 11+" then pick one from the list that is version 11 or higher. If it says "Java 8 or newer", pick one that is version 1.8 or 9/10/11/12/etc...
If you can't see the version you need, go to the troubleshooting section.
First, make sure you've downloaded and installed the version you need in the "How to get Java" section
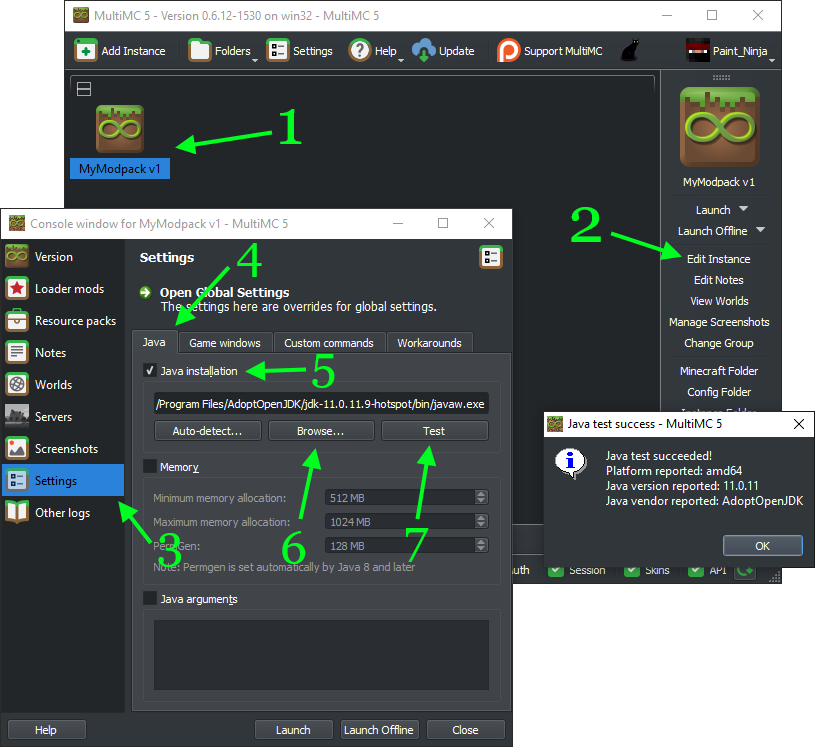
Step 1) Select the modpack you want to edit
Step 2) Click "Edit Instance" on the right
Step 3) Click "Settings" on the left of the window that pops up
Step 4) Click on the "Java" tab if not already selected
Step 5) Make sure that the "Java installation" checkbox is checked
Step 6a) Click on the "Browse..." button
Step 6b) Click on "This PC" -> "Local Disk (C:)" (or where you installed Java) -> "Program Files" -> "Zulu" or "AdoptOpenJDK" -> (the version you want to add) -> "bin" -> "javaw.exe" and click on "Open"
Step 7) Click the "Test" button. If successful, check that the "Java version reported" is the version you expect and that the "Platform reported" contains the number 64.
The textbox under the "Java installation" checkbox should now be filled with the version you selected.
The error/warning message should tell you, for example:

If it just says "64bit Java" but doesn't say the version, assume the same version as you're currently using.
If the game won't start at all, check that you started it with a supported version:
| Minecraft version | Minimum supported Java version | Maximum supported Java version |
|---|---|---|
| 1.18-1.19 | 17 | ? |
| 1.17 | 16 | ? |
| 1.16.5 | 8 | 18* |
| 1.16.4 | 8 | 15 |
| 1.15-1.16.3 | 8 | 14 |
| 1.13-1.14 | 8 | 10 |
| 1.12 | 8 | 8 |
| 1.2.5-1.11 | 6 | 8 |
*Needs custom Java args to run on Java 16+ - see step 7 of the Java section. Works out of the box with Java 15.
Step 1) Open Windows Terminal (you can get it here if you don't already have it)
Step 2) Type WinGet install --exact Azul.Zulu.17 and hit enter, replacing the 17 at the end with the version of Java you want.
For example, to install Java 11, run WinGet install --exact Azul.Zulu.11
Note: For Java 14, you'll need to replace Azul.Zulu. with AdoptOpenJDK.OpenJDK
Click here to go to the Java download page for macOS
Step 1) Choose the version of Java you need
Step 2) For the architecture dropdown, select "x86 64-bit" for Intel Macs and "ARM 64-bit" for Apple Silicon Macs (such as the Apple M1)
Tip: If you're using an Apple Silicon Mac and can't find or select an "ARM 64-bit" architecture for your chosen Java version, use the "x86 64-bit" instead and rely on Rosetta 2
Step 3) Download the first .dmg at the top of the list and install it
Use your preferred package manager to install the version of Java you need for your distro. Comprehensive details are omitted due to the large variety of Linux distros that each have their own separate ways of doing things, but here's some instructions for a couple of popular ones:
Debian (also: Ubuntu, Linux Mint, Pop!_ OS)
Step 1) Open a new Terminal or Shell
Step 2) Add the Zulu repo keys by running the following command in the terminal:
sudo apt-key adv --keyserver hkp://keyserver.ubuntu.com:80 --recv-keys 0xB1998361219BD9C9
Step 3) Add the Zulu repository so that we can find and install packages from them:
sudo apt-add-repository 'deb http://repos.azulsystems.com/ubuntu stable main'
Step 4) Fetch the latest package lists from the installed Aptitude repositories, including the one we just added:
sudo apt update
Without this, Aptitude will be unaware of the Zulu repo we just added.
Step 5) Run sudo apt install zulu-(version), replacing (version) with the Java version you want (e.g. zulu-17 for Java 17, zulu-8 for Java 8, etc...)
OpenBSD
Method 1: Pre-compiled JDK packages
Step 1) Use pkg_info -Q jdk to get a list of pre-compiled JDK packages. The output should look something like this:
debug-jdk-1.8.0.302.b08.1p0v0
debug-jdk-11.0.12.7.1v0
debug-jdk-16.0.2.7.1v0
jdk-1.8.0.302.b08.1p0v0
jdk-11.0.12.7.1v0
jdk-16.0.2.7.1v0
If the Java version you want isn't listed, you'll need to use Method 2 instead.
Step 2) Install with pkg_add (pkg name), using one of the package names listed earlier. For example, pkg_add jdk-1.8.0.302.b08.1p0v0
Method 2: Compiling a port
This is a long process, but these resources might help: https://www.openbsd.org/faq/ports/ports.html and https://en.m.wikibooks.org/wiki/Guide_to_Unix/BSD/OpenBSD/As_a_Desktop#Using_ports
FreeBSD
Step 1) Use pkg search jdk to get a list of pre-compiled JDK packages. It should look something like this:
bootstrap-openjdk11-11.0.5.10.1
bootstrap-openjdk8-r450802_2
openjdk11-11.0.13+8.1
openjdk11-jre-11.0.13+8.1
openjdk17-17.0.1+12.1
openjdk8-8.312.07.1
openjdk8-jre-8.312.07.1
Step 2) Install with pkg install (pkg name), using one of the package names listed earlier. For example, pkg install openjdk17-17.0.1+12.1
Step 3) Mount the filesystems OpenJDK needs for full functionality:
mount -t fdescfs fdesc /dev/fd
mount -t procfs proc /proc
Step 4) Make the mount changes permanent so they're not lost on reboot by editing the text file /etc/fstab and inserting the following:
fdesc   /dev/fd     fdescfs     rw  0   0
proc    /proc       procfs      rw  0   0
Step 5) Run rehash