MoveIt Tutorial
![]()
Please visit the MoveIt! homepage for more information
This tutorial describes how to use the Baxter Research Robot with MoveIt! the standard ROS motion planning framework.
- Installation/Prerequisites
- Overview
- Tutorial
- IKFast
- Interfaces
- Related Examples/Tutorials
- Troubleshooting
This tutorial requires a ROS distribution >= Groovy
Check out the Baxter MoveIt configuration package into your ROS workspace (follow Catkin or rosbuild tab instructions accordingly)]
    $ cd ~/ros_ws/src
    $ git clone https://github.com/ros-planning/moveit_robots.git
The follow debian packages are required for using MoveIt! with Baxter
    # Make sure to update your sources
    $ sudo apt-get update
    # Install MoveIt!
    $ sudo apt-get install ros-groovy-moveit-full
Run catkin_make to make the new additions to your ROS workspace
    $ cd ~/ros_ws/
    $ ./baxter.sh
$ catkin_makeMoveIt! motion planning framework provides capabilities including Kinematics (IK, FK, Jacobian), Motion Planning (OMPL, SBPL, CHOMP) integrated as MoveIt! plugins, Environment Representation (robot representation, environment representation, collision checking, contraint evaluation), execution using move_groups, benchmarking, warehouse database for storage (scenes, robot states, motion plans), a C++/Python API and more!
Baxter now supports using MoveIt! through the addition of the configurable joint trajectory action server, and hosting of the necessary MoveIt! configuration files on ros_planning/moveit_robots.
This tutorial will focus on the MoveIt! Rviz plugin as an introduction to some of the capabilities of MoveIt!
####Baxter Planning Groups Describes the joints considered during motion planning. These are specified in the SRDF for Baxter. Baxter's SRDF includes planning groups, additional collision checking information, and default configurations.
Planning Groups
-
both_arms
- left_arm
- right_arm
-
left_arm
- left_s0
- left_s1
- left_e0
- left_e1
- left_w0
- left_w1
- left_w2
- left_hand
- left_endpoint
-
right_arm
- right_s0
- right_s1
- right_e0
- right_e1
- right_w0
- right_w1
- right_w2
- right_hand
- right_endpoint
-
left_hand
- left_gripper
-
right_hand
- right_gripper
You can view the SRDF at any time:
$ rosed baxter_moveit_config baxter.srdfVerify that the robot is enabled from an RSDK terminal session, ex:
$ rosrun baxter_tools enable_robot.py -eStart the joint trajectory controller, ex:
$ rosrun baxter_interface joint_trajectory_action_server.pyIn another RSDK terminal session, Launch the rviz MoveIt! plugin, ex:
$ roslaunch baxter_moveit_config demo_baxter.launchNote: Do not launch baxter_moveit_config demo_sim.launch with the ROS_MASTER_URI set to the robot (ie. using the robot's ros master) as this starts a new joint_state_publisher/robot_state_publisher causing the robot's internal joint_state_publisher/robot_state_publisher be preempted, essentially ceasing Baxter's ability to move the arms until reboot. Please use baxter_moveit_config demo_baxter.launch to run this demonstration on Baxter.
The Rviz gui will then open showing Baxter with interactive markers:
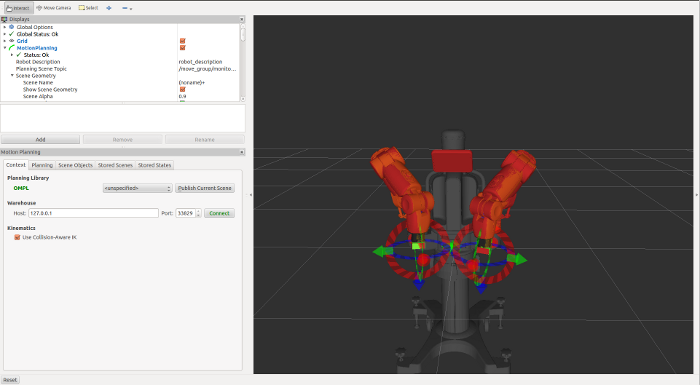
You will see the goal state for the motion planning, shown for each plan group in Orange.
You can then move Baxter's arms to a planning goal by clicking and dragging the arrows (Cartesian) and rings (orientation) of the interactive markers. Kinematic/collision checking is happening simultaneously and will not allow self collisions (links will turn red), or goal states out of the reachable workspace (inability to drag and endpoint/gripper will turn red).
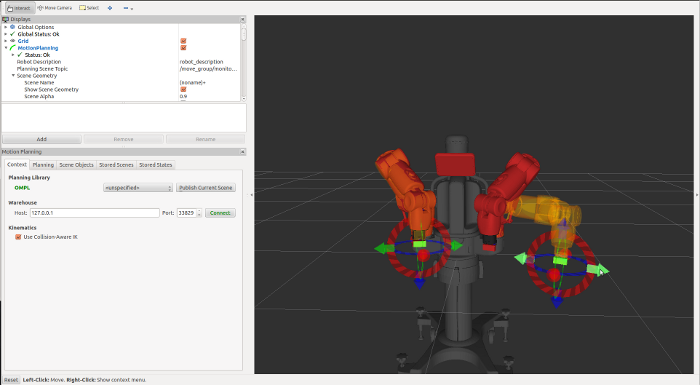
With a valid goal state, and assuming that the robot is in a valid start state, you are now ready to plan and execute a trajectory from your start state to the goal state.
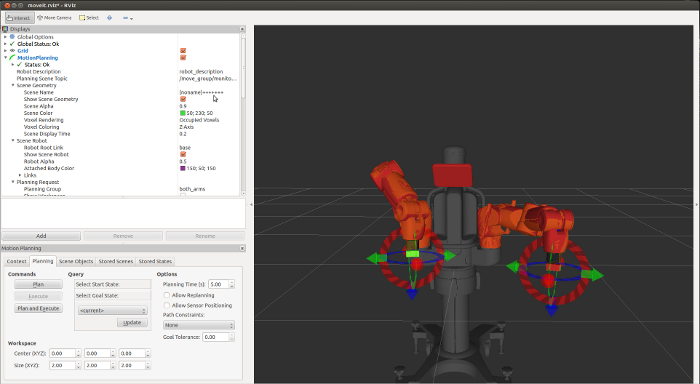
In the bottom left you will the motion planning frame with a tabbed interface to access different tools of the MoveIt! Rviz visualizer.
Please select the Planning tab in this frame.

Click the Plan tab under the Commands field to plan a trajectory from your start state to the goal. You will see this solution executed in Rviz. When you are happy with the planned trajectory, click Execute to run this trajectory on the robot.
Alternatively, if you would like to immediately execute the first plan from your current position to the goal position use the Plan and Execute button.
Another useful field in the Planning tab is Query. You can specify here Select Start State choosing <current>, <random>, and <same as goal>, choosing these options with the Update button. Also, You may Select Goal State by clicking that button. Here again you can choose <current>, <random>, and <same as goal> for the Goal State.
Note: It is dangerous to plan from a start state other than your current joint positions. Please update the Select Start State option under the Query field to reflect your current position before planning. This can be done by clicking the Select Start State: text, from the drop down menu select <current>, click Update to complete this step. You will now be planning from your current position as the start state.
After trajectory execution you will see Baxter has achieved your specified Goal.
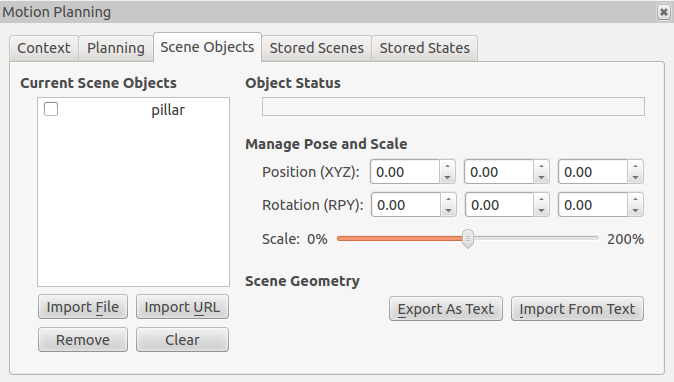
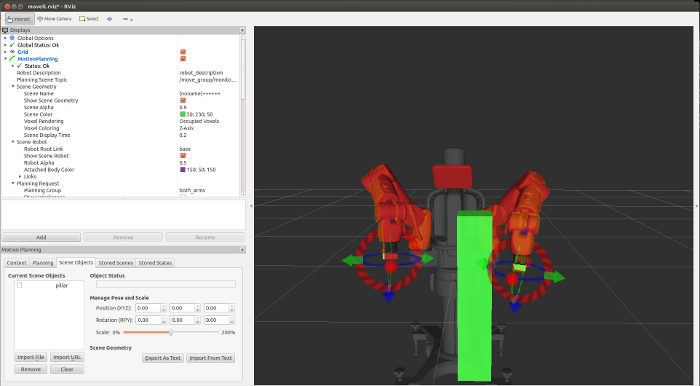
Select the Scene Object tab from the Motion Planning frame.
We will now create a scene object in a text file to be imported into our environment.
 $ roscd baxter_moveit_config
 $ mkdir baxter_scenes
 $ gedit baxter_scenes/baxter_pillar.scene
Copy in the following scene describing a pillar
 pillar
 * pillar
 1
 box
 0.2 0.2 1
 0.6 0.15 0
 0 0 0 1
 0 0 0 0
 .
Save and exit.
You can now import this scene from the Scene Geometry field selecting Import From Text
Navigating to select baxter_moveit_config/baxter_scenes/baxter_pillar.scene
After opening this scene you will now see the pillar inserted into your environment.
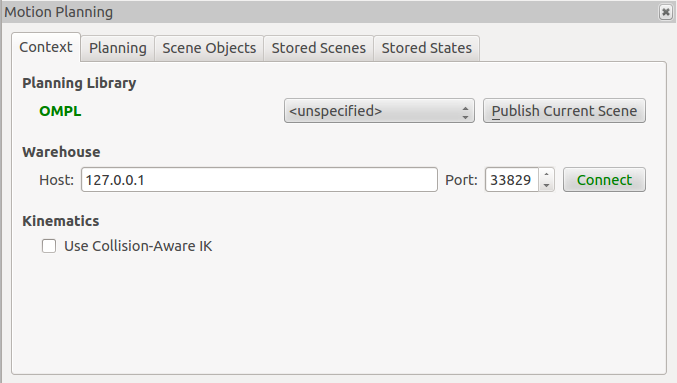
Important: You must publish your current scene so that MoveIt! knows that it will need to plan around your modified environment. Do so by selecting the Context tab from the Motion Planning frame. Under this tab you must click the Publish Current Scene Button under the Planning Library field.
Similar to our previous planning we can now drag our interactive markers moving the goal state to a location on the opposite side of the pillar.
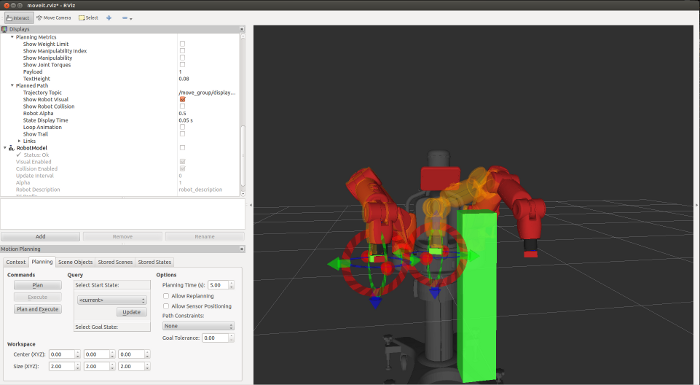
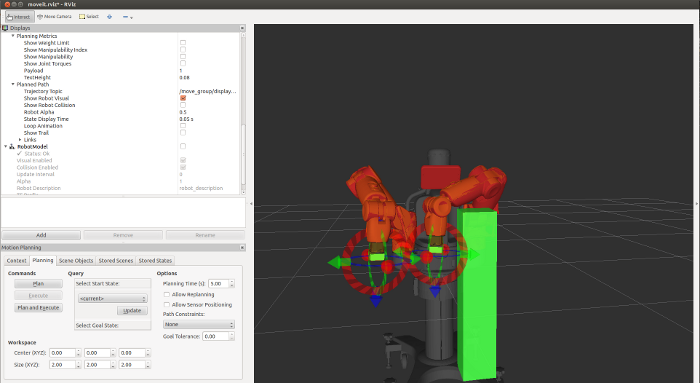
Selecting the Planning tab in the motion planning frame you can now plan a new trajectory that will avoid collision with your environment object (the pillar). The shell in which you launched demo_baxter.launch will provide information regarding which planner will be used, how long it took to find a solution, path simplification/smoothing time, and more. This will also display if your planner was unsuccessful in finding an allowable solution. This is often caused by collision with the environment during testing of the execution or invalid start/goal states. In very constrained or difficult motions, you may have to plan several times to find an acceptable solution for execution.
Upon execution the robot will avoid this 'virtual' object tracking the commanded trajectory.
That's it, you have successfully commanded Baxter using MoveIt!
There is much more information, tutorials, API documentation and more on moveit.ros.org.
MoveIt! Python - MoveIt Commander
IKFast provides analytical closed-form solutions for manipulator inverse kinematics. Part of the OpenRAVE robot architecture/software framework, IKFast has been used to provide closed-form solutions for Baxter's inverse kinematics.
Advantages include order of magnitude faster IK solutions and the ability explore the manipulator's null space!
In the baxter_moveit_config package - modify the kinematics.yaml file to specify the use of the IKFast plugins.
rosed baxter_moveit_config kinematics.yamlYou can now uncomment the use of the IKFastKinematicsPlugin, commenting out the default KDL solver.
The result should look like so:
 left_arm:
# kinematics_solver: kdl_kinematics_plugin/KDLKinematicsPlugin
# uncomment to use ikfast kinematics plugin
  kinematics_solver: baxter_left_arm_kinematics/IKFastKinematicsPlugin
  kinematics_solver_attempts: 3
  kinematics_solver_search_resolution: 0.005
  kinematics_solver_timeout: 0.005
right_arm:
# kinematics_solver: kdl_kinematics_plugin/KDLKinematicsPlugin
# uncomment to use ikfast kinematics plugin
  kinematics_solver: baxter_right_arm_kinematics/IKFastKinematicsPlugin
  kinematics_solver_attempts: 3
  kinematics_solver_search_resolution: 0.005
  kinematics_solver_timeout: 0.005
You will now need to recompile and install the IKFast plugins.
   catkin_make
   catkin_make install --pkg baxter_ikfast_right_arm_plugin
   catkin_make install --pkg baxter_ikfast_left_arm_plugin
Note: It is known that with 0.6 software the SDK will prevent users from executing: catkin_make install across the entire workspace. This will be addressed with the upcoming release.
That's it! MoveIt! will now be using IKFast as it's kinematics solver!
Please try it out following the above tutorial.
See the API Reference page for details.
- Joint Trajectory Action Server - /robot/limb/right/follow_joint_trajectory [control_msgs/FollowJointTrajectoryAction]
- Joint Trajectory Action Server - /robot/limb/left/follow_joint_trajectory [control_msgs/FollowJointTrajectoryAction]
- JointTrajectoryActionServer class:
joint_trajectory_action_server.py
Verify that the robot is enabled:
rosrun tools enable_robot.py -e
Verify that the trajectory controller has been started:
rosrun baxter_interface trajectory_controller.py
Problem Description:
Pressed plan, solution was found and a trajectory execution service request was recieved after which I got the error: Unable to identify any set of controllers that can actuate the specified joints: [left_e0 left_e1 left_s0 left_s1 left_w0 left_w1 left_w2 right_e0 right_e1 right_s0 right_s1 right_w0 right_w1 right_w2 ] After which nothing occurred.
If you see the following warning error in the terminal output when roslaunch-ing demo_baxter.launch:
[FATAL] [1372432489.342541284]: Parameter '~moveit_controller_manager' not specified. This is needed to identify the plugin to use for interacting with controllers. No paths can be executed.
This indicates you need to make sure you have the appropriate controller manager plugins installed. Make sure to follow the Baxter MoveIt! Installation instructions and install the required debian packages for both moveit-full and any required plugins. (For the current version, yes - you do need to install ros-groovy-pr2-moveit-plugins, even though it is not a pr2 - these plugins include default versions which enable the interface to the controllers.)
© 2008-2013 Rethink Robotics. All rights reserved. ![]()