Installing Blendyn
Blendyn has been ported to Blender >=2.80.
Blendyn is currently still compatible with Blender
versions from 2.50 to 2.79, through the code in the branch blendyn27.
Be careful though, that only occasional bugfixes will be applied in that branch,
as the main development will be carried out in the devel and master branches.
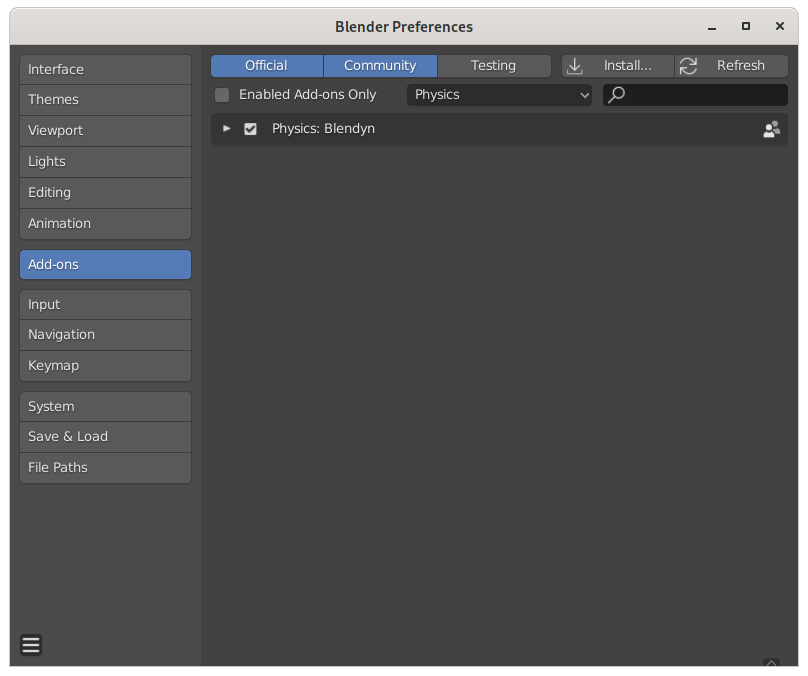
The basic installation of the add-on is very simple. Download the repository as a
.zip file using the Download ZIP button at the top right of the repository
main page, under the Code menu.
NOTE: please check that the current active branch is "master": that is the one you want to download, unless you are an MBDyn developer or, in general, have access to the bleeding edge MBDyn's source code.
In Blender, go to
Edit -> Preferences -> Add-ons -> Install
and locate the .zip file that you have downloaded. The add-on will be shown
under the Physics category. You will have to activate it in the usual way,
by clicking on the checkbox on the right.
If, upon the activation of the add-on, complaints that the
numpypackage is not installed, please follow the instructions below to installpip, if it is not already present in your system, and then installnumpywith
# pip install numpyor
# pip3 install numpy
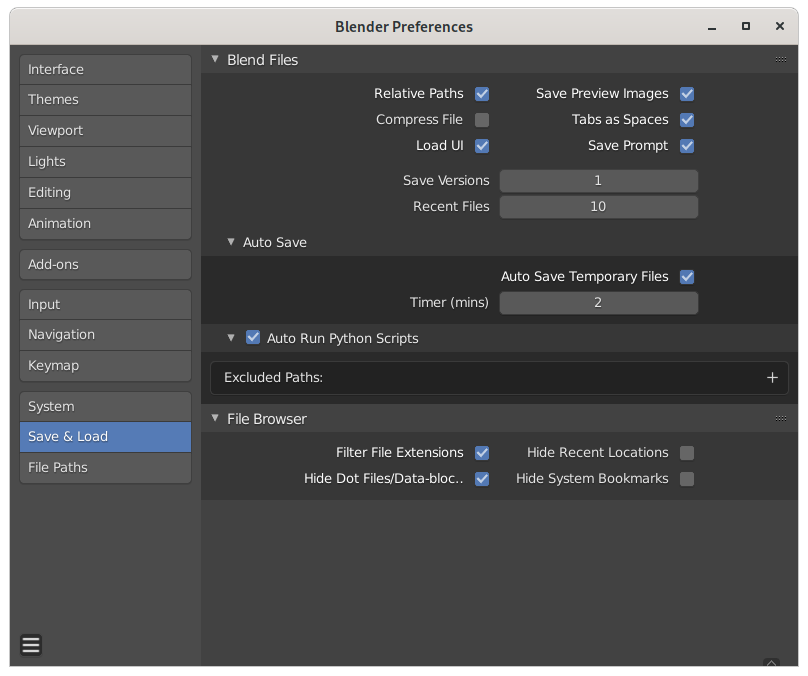
Additionally, for some elements (like beams, for example) to be
visualized correctly, you need to activate the Auto Run Python Scripts
option in the Save & Load tab of the Blender User Preferences,
as shown in the picture below.
A few optional Python packages are needed to enable some additional features in Blendyn:
- the
netcdf4package is needed to import MBDyn results in NetCDF format - the
pygalandcairosvgpackages are needed to enable the plotting of MBDyn output from the Blender UI - the
psutilpackage is needed to enable running MBDyn from the Blender UI
Blendyn depends also on numpy, which should be bundled in recent
Blender versions, but may be missing on some platforms.
In the current version, Blendyn is equipped with an automatic system to check for the
presence of the packages required by the additional features, and install them. The panel
is accessed through the Blendyn addon section in the Edit -> Preferences -> Add-ons
Blender menu.
Below the Blendyn info, a Preferences section, dedicated to optional features, is
displayed:
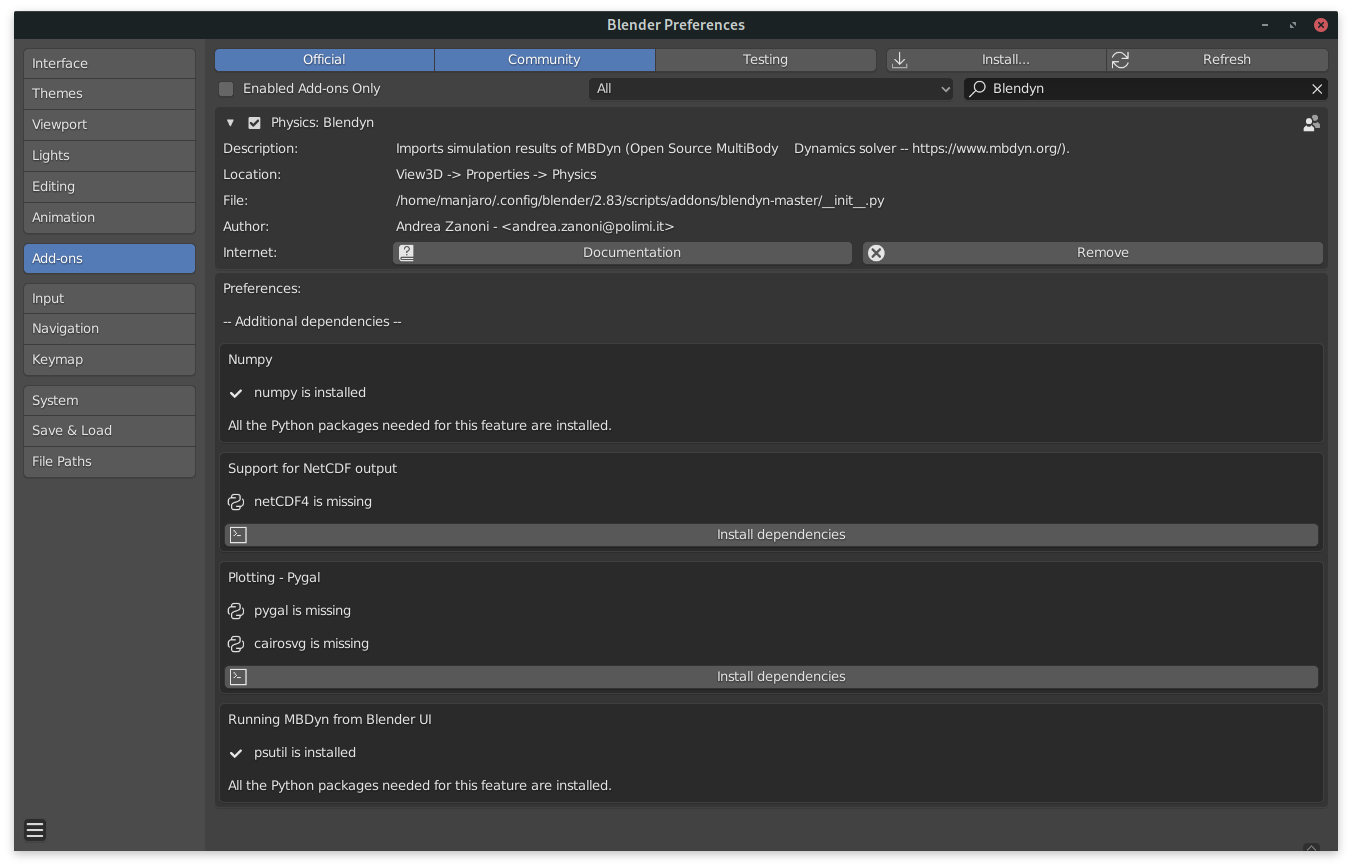
if the packages required by an additional feature are missing, an Install dependencies
button is displayed at the end of the related block. Clicking on it will result in Blendyn
checking for and, if needed, installing pip
and using it to install the required packages. The latter will be installed in the
modules folder aside of Blender user addons folder (e.g., for GNU/Linux systems,
/home/user/.config/blender/v.vv/scripts/addons/modules, where v.vv is the installed
Blender version).
If the packages are found, the Install dependencies button is hidden and a checkmark
appears next to the Python packages names.
NOTE 1: Using MBDyn NetCDF output with Blendyn is highly recommended.
The following guide2 will provide help in the installation of both MBDyn and Blendyn in Windows 10/11 operating system, using the Windows Subsystem for Linux feature. It assumes that WSL is installed, so please refer to the linked page on the Microsoft documentation to get started from scratch. This guide also assumes that the distribution installed in the WSL is Ubuntu.
The part related to the MBDyn installation can be used also as a reference for a Blendyn-friendly MBDyn installation in Ubuntu (and most of Debian and Ubuntu based distributions).
Also, please note that in the following guide, as was the case in the other sections above, commands preceded by
#should be issued with superuser privileges. This, generally, in the GNU/Linux environment, means that they should be preceded by a "sudo" statement. Commands preceded by a$can instead be issued by a normal user.
Open WSL and install the required (first apt install line) and additional
(second apt install line) packages for MBDyn:
# apt update
# apt install autoconf libtool make gcc g++ gfortran
# apt install liblapack-dev libnetcdf-dev [ libnetcdf-cxx-legacy-dev | libnetcdf-c++4-dev ]
meaning that you can either install libnetcdf-cxx-legacy-dev or libnetcdf-c++4-dev, as
MBDyn supports both. The latter is actually to be preferred.
Download MBDyn, cloning it from the Gitlab repository (install git if needed before cloning)
$ git clone https://public.gitlab.polimi.it/DAER/mbdyn.git
$ cd mbdyn/
$ git checkout develop
Generate the configure scripts:
$ sh bootstrap.sh
You are now ready to configure, build, and install the MBDyn package:
$ ./configure --enable-netcdf --with-lapack --prefix=/usr/local
$ make -j4
# make install
the choice of changing the prefix to /usr/local is arbitrary: one can choose
to keep the default prefix /usr/local/mbdyn and add the /usr/local/mbdyn/bin
directory to the systems' PATH environment variable (look
here, for example,
for more information).
Head over to the Blender website and download the most recent release.
Download the .zip from this repo and install the addon following the
instructions at the top of this page.
1: Thanks to Stefano Francesco Pitton for the tip.
2: The original version of this guide was kindly sponsored by Jacopo Surra.