scans
Only a minimal amount of information is required to start a new scan, just the target URL is sufficient as the defaults settings are the most sensible and recommended.

The default way a scan is performed goes something like this:
- The Web UI spawns an RPC Instance on the machine on which it runs.
- It configures that Instance according to the data you've provided via the New scan form and starts the scan.
- It checks up on all running scans at regular intervals.
However, this is not the only way to perform a scan. Arachni has a very distributed nature and that allows you a few more interesting deployment options.


This option allows you to specify how many Instances (scanner processes) should share the workload for the Scan you're about to perform. Using multiple Instances can lead to better utilization of your machine's resources (like CPU cores and network bandwidth) and thus result in much faster scans.
However, high-performance distribution is still an experimental feature and can lead to stability issues and/or decreased scan coverage.
Scan Types control how the Scan workload is to be distributed, with the default being the Direct one.

The Direct scan type tells the WebUI to spawn a scanner Instance on the machine on which it runs and use it to perform the scan. This is the default and simplest type as it doesn't need any assisting services to be available in order to perform a scan.
For this, you will need a Dispatcher to be available.

When specifying a Dispatcher, the scanner Instance will be provided by it and the scan will run/originate from the machine on which the Dispatcher is running. This allows you to deploy Dispatchers on several machines and distribute the workload of many scans across them.

This option will assign the Scan to the least burdened available Dispatcher automatically.
For this, you will need a grid of Dispatchers to be available.

As the highlighted text says:
The Instance will be automatically provided by the least burdened member of the Grid of the Dispatcher you select.
If the scan is configured to use more than 1 Instance, all Instances will be load-balanced across the Grid as well.
This results in automatic load-balancing of scans and their workload amongst a network of Dispatchers.
The scheduling options allow you to configure a scan to be performed at a later time/date and its frequency.

This option determines the start datetime of the scan and expects the value to be in the form of:
hour:minute day/month/year
Please pay special attention to the timezone of the system.
The Recurring options allow you to configure the frequency of the scan.
Allows for a simple way of setting the intervals between scans.
Determines whether or not the specified interval should be applied to the finish-time of the previous scan or its start-time.
For example, if you wish for a scan to be performed every Monday at 6pm (and the next Monday is on 11/11/2013) you should configure the scheduling options thusly:
- Start at: 18:00 11/11/2013
- Every: 7 days
- After: Start time
Please note, if a running scan's operation overlaps with its next scheduled occurrence, that occurrence will be skipped.
Allows you to use sitemaps of previous scan revisions to avoid a fresh crawl or use them as seeds to jump start the next one.

The index page of the scans section displays scans and groups which are available to you.
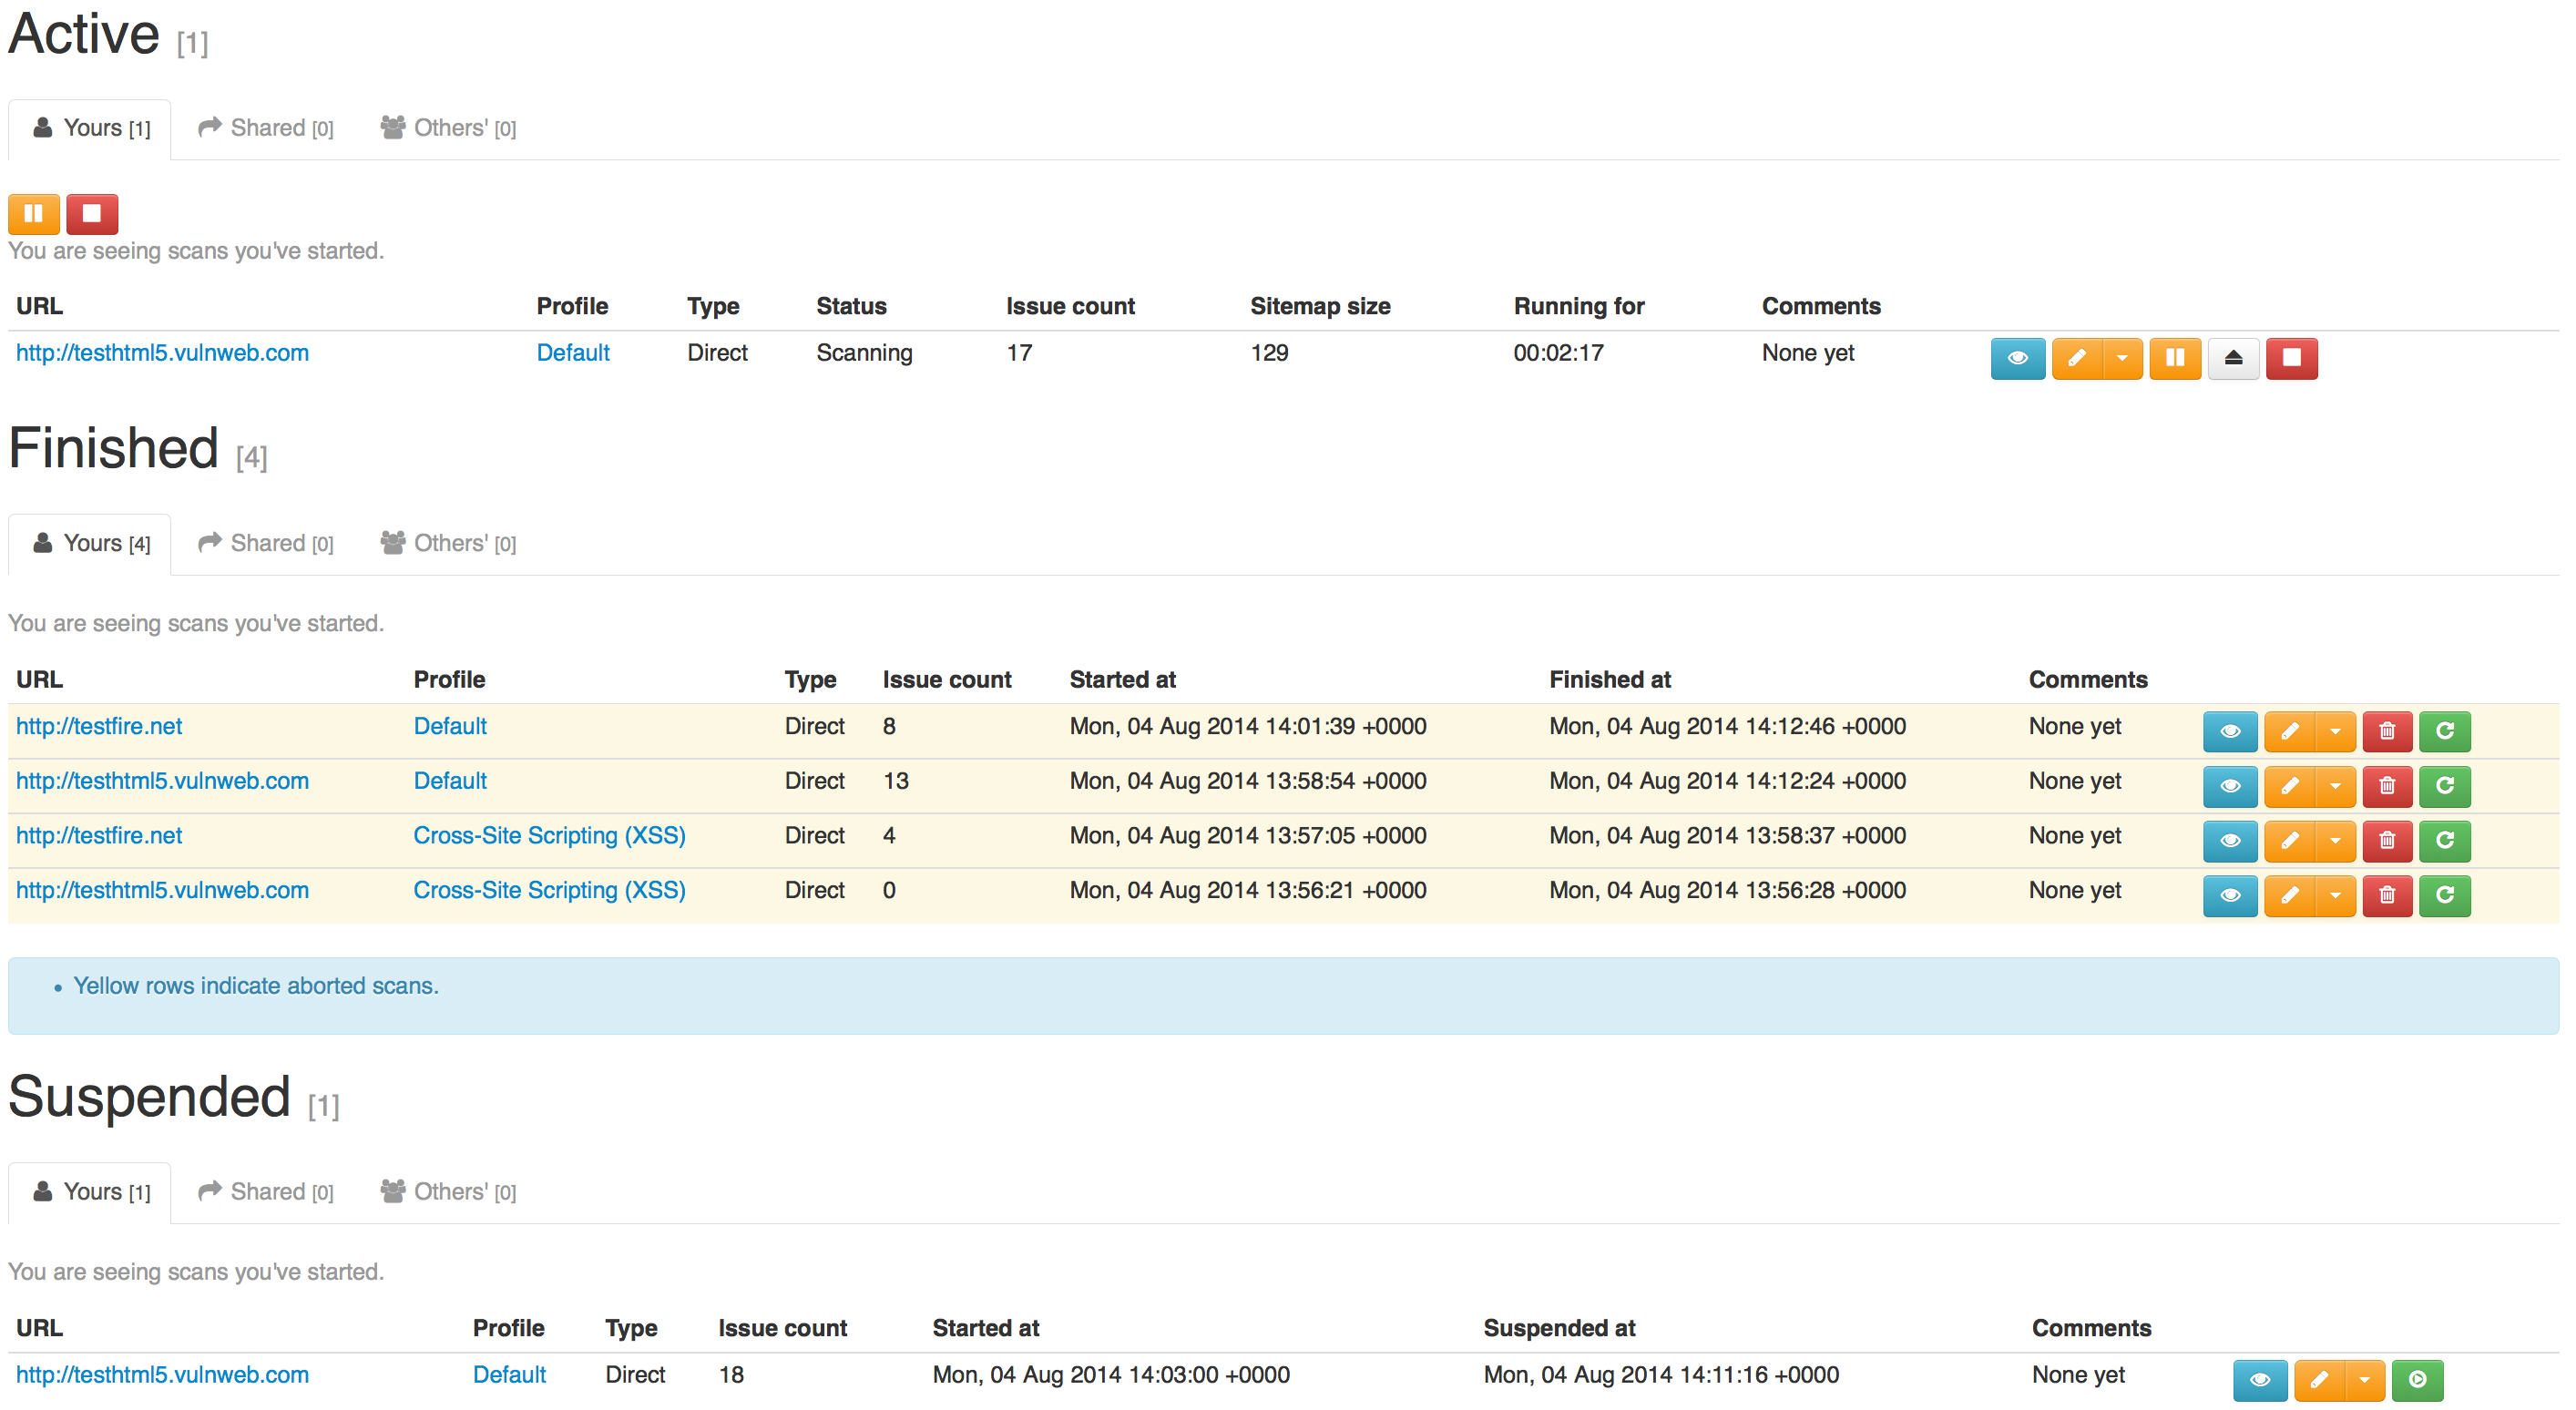
The scan tables are categorized in tabs:
-
Yours: These are scans which you own (i.e. you have have started) and you can:
- View details (
 )
) - Repeat the scan, creating a new revision
(
 ).
). - Pause/Resume (
 /
/ )
) - Stop (
 )
) - Suspend (
 )
) - Delete (
 )
)
- View details (
-
Shared: These are scans which are owned by someone else and their owner
decided to shared them with you.
- View details ()
- View details (
- Other's: This is a privileged tab and is only visible to administrators. It lists every scan running on the system which is not a member of the first 2 categories.

Groups serve as scan containers which can be shared with other users thus allowing you to organize and collaborate on scans with ease. Scans and Users can belong to multiple groups.
You can treat them as projects (for keeping all scans for a specific website together), assignments (assigning users to monitor/review scans for a certain client) or just keeping things tidy and making filtering/management easier.
Like Scans, Groups are divided in 3 categories:
- Yours
- Shared
- Other's

Selecting a group filters which scans appear on the tables.
The schedule screen allows you to see the scans which have been scheduled for later and lets youedit their configuration.
The schedule table lists scheduled scans and gives you information about when each scan will start and how frquently it will be performed, if it's a recurring one.

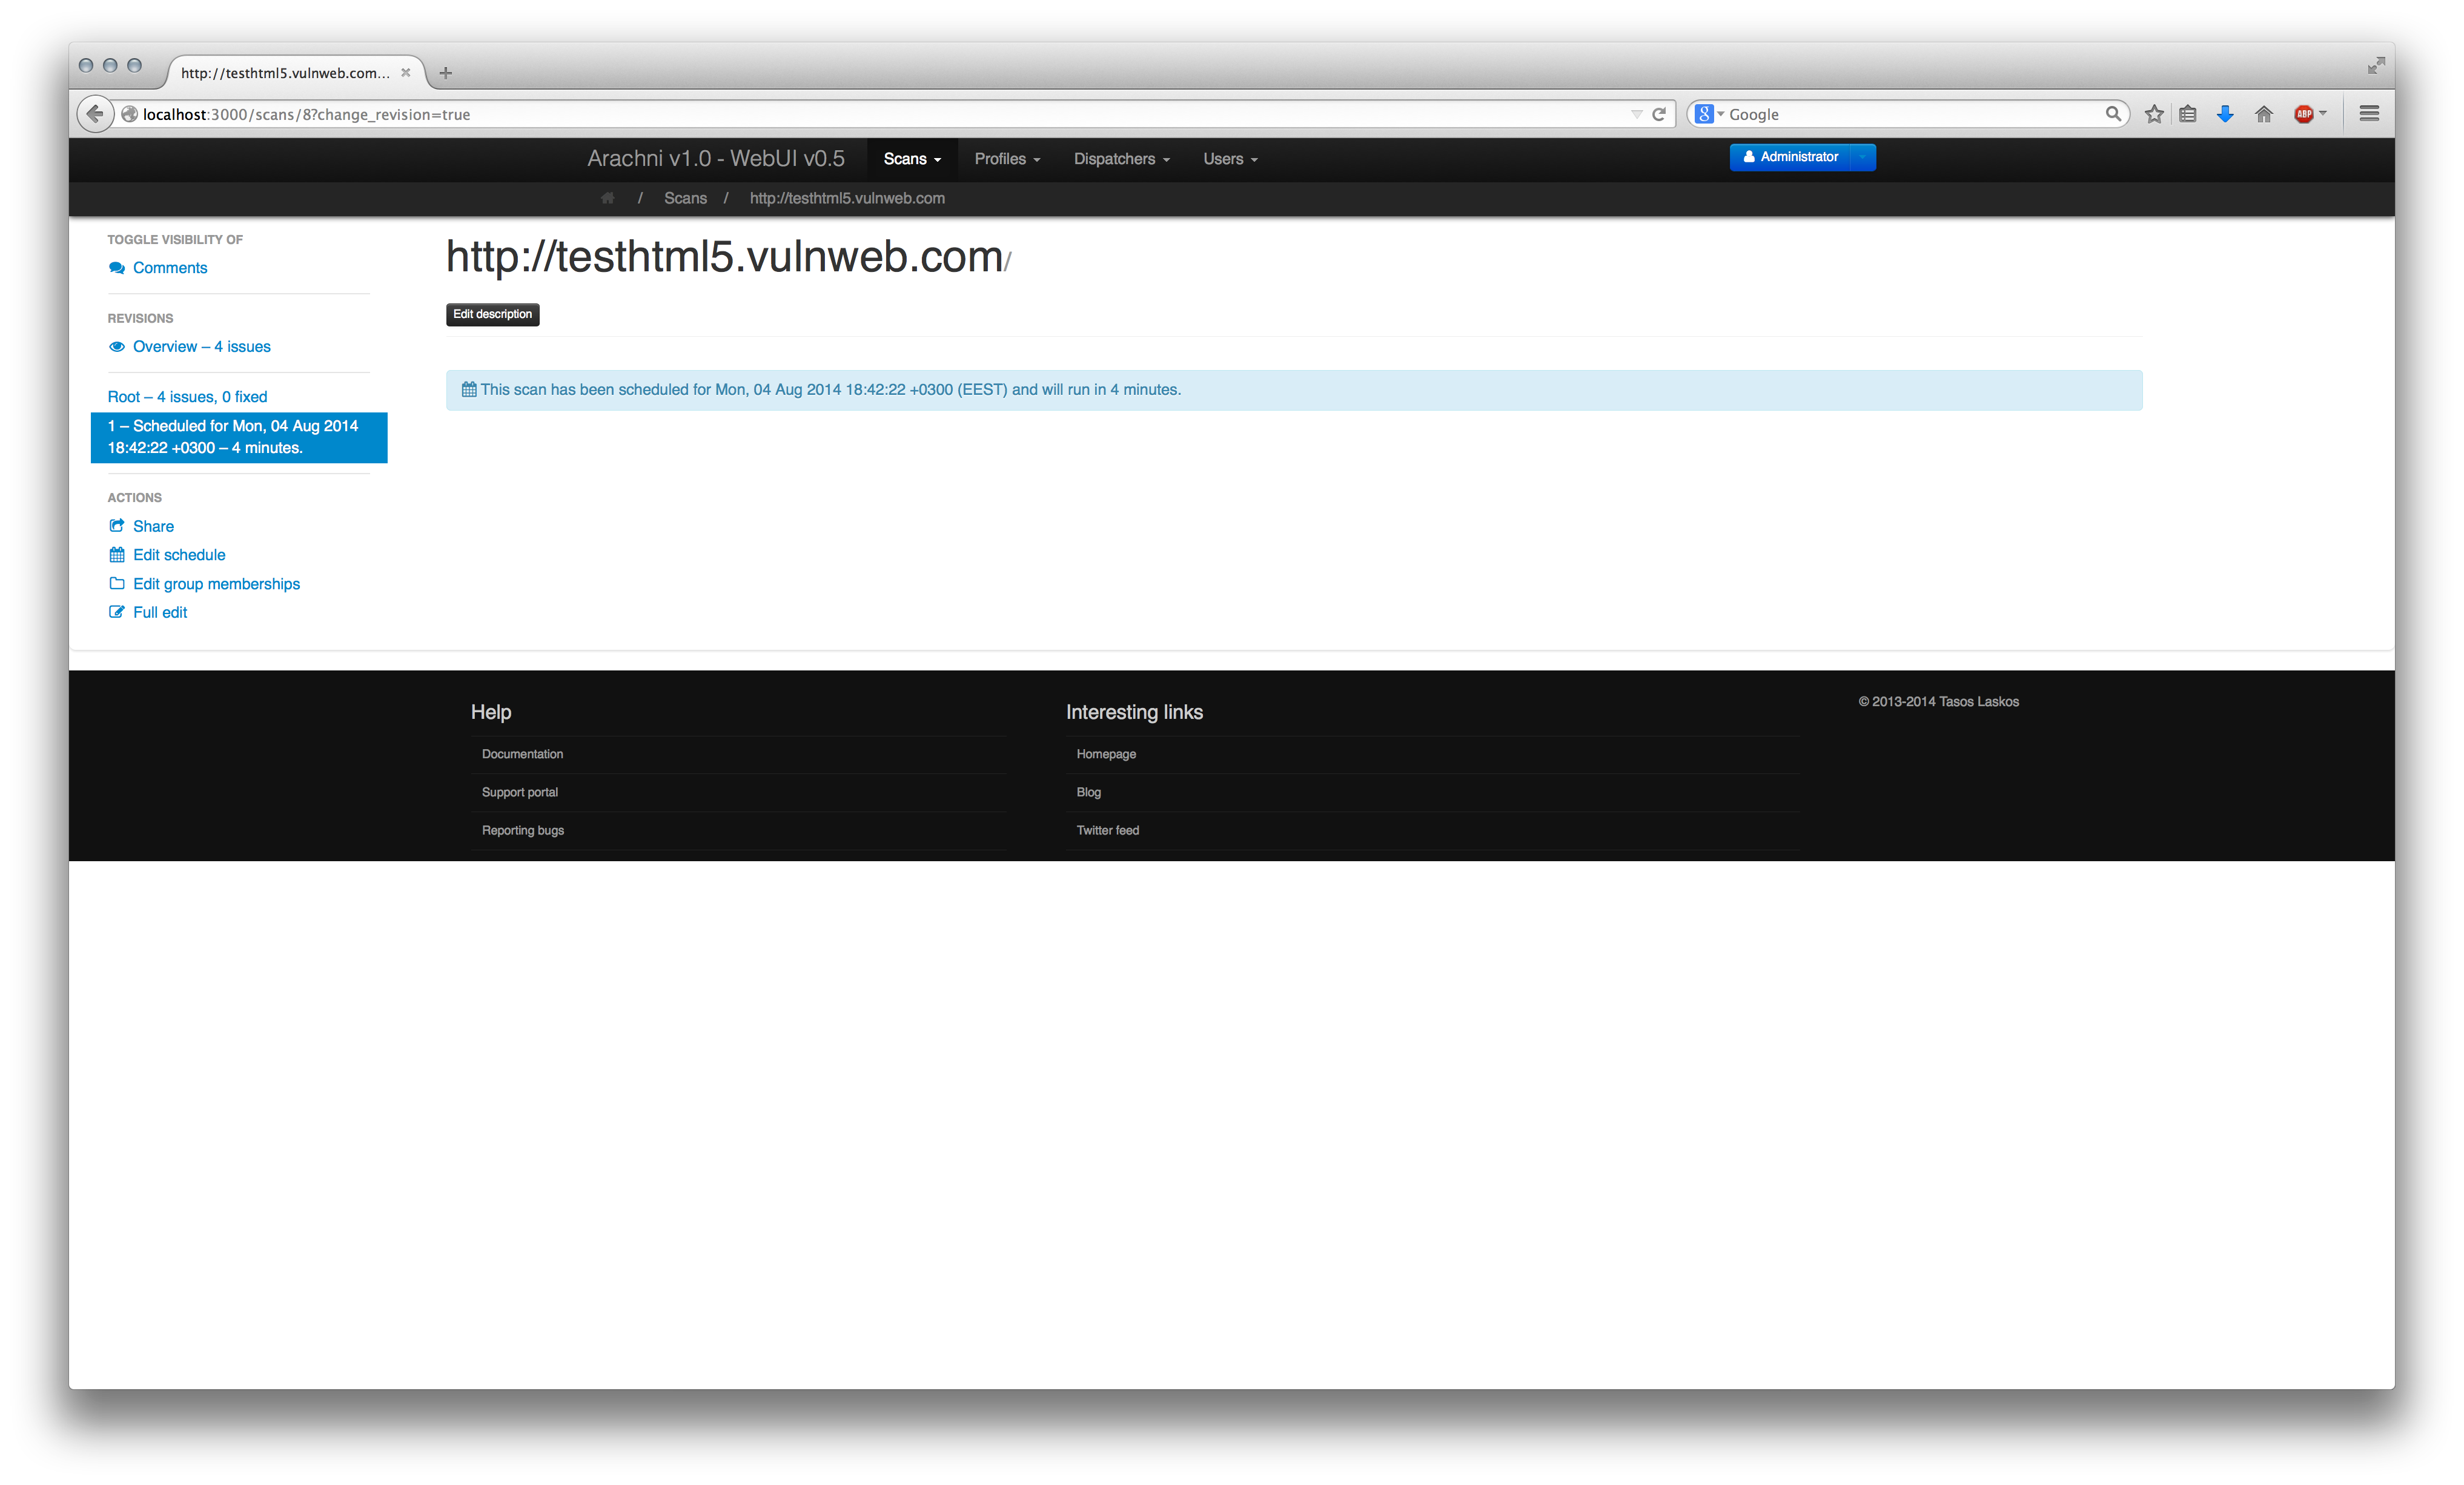
The scan screen will show you the time the scan is scheduled to start instead of the familiar progress information.

Since this scan was configured to be recurring, once the current scan has finished the next one is scheduled based on the configured interval (5 minutes in this case):

The view of the scan details/monitoring page can be adjusted (to a small extent) to show you the info you feel more comfortable with.

The default view consists of scan controls, statistics and the issues table.

Users can comment on scans which are accessible to them.
However, comments are hidden by default and to change their visibility status you will need to use the relevant controls on the sidebar on the left.
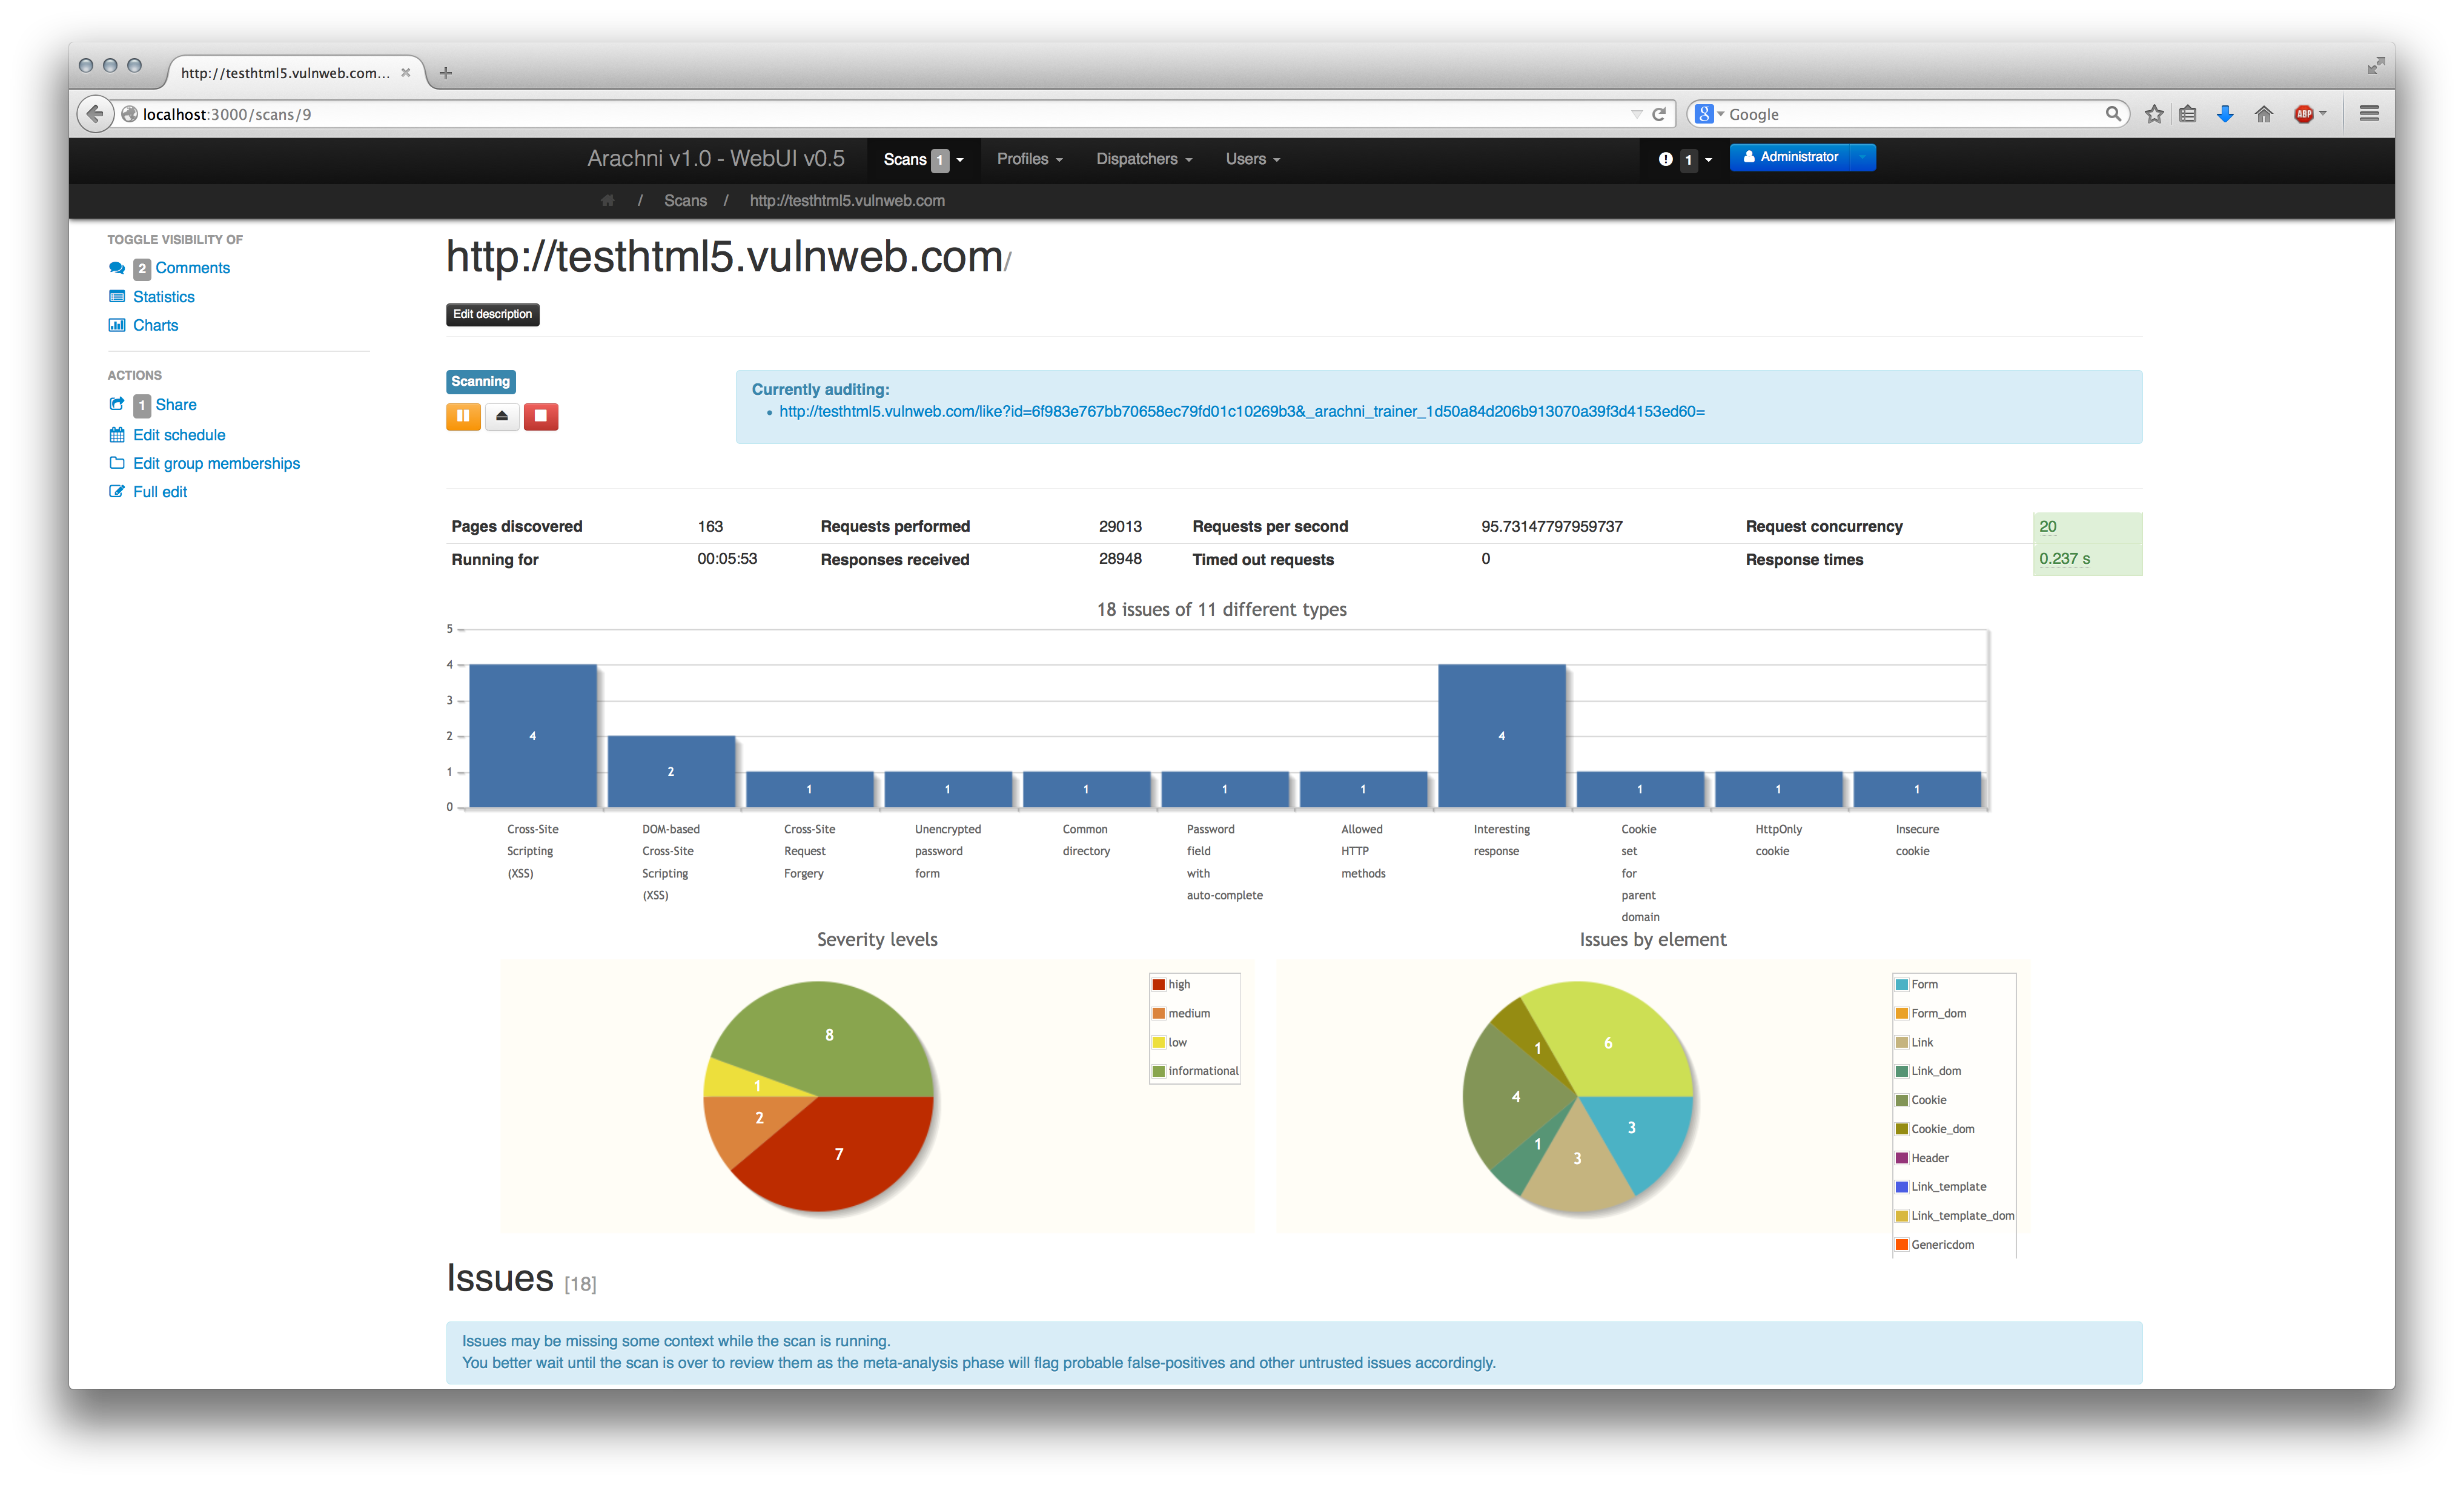
Everybody likes charts but they take too much space away from data which are much more useful, thus, if you want to see some relatively pretty charts you will have to alter their visibility status (as with the comments above) using the controls on the left.

The issues table shows you what issues the scan has found thus far, along with some basic information about them.
To make it easier to shift through the data, issues are color-coded and sorted by severity and grouped by type. In addition, High and Medium severity issue types are expanded by default while Low and Information severity ones will initialy be displayed as collapsed.
To change group visibility and quickly navigate to each issue type you can use the controls to the left of the table.
For detailed information about each issue you'll have to click on the blue button on the left of the displayed URL.
To make issue reviews easier, the issues table is separated into categories based on the review status of the issues it lists. As usual, the categories are presented as tabs:
- All -- All issues.
- Fixed -- Issues which have been marked as fixed (by either a user or a scan revision, more on scan revisions later).
- Verified -- Issues which have been explicitly marked as legit by a user.
- Pending verification -- Issues which have been marked as requiring manual verification (either by a user or the scanner)..
- False positives -- Issues which have been marked as false positives by a user.
- Awaiting review -- Issues which don't belong to any of the above categories (except for All).
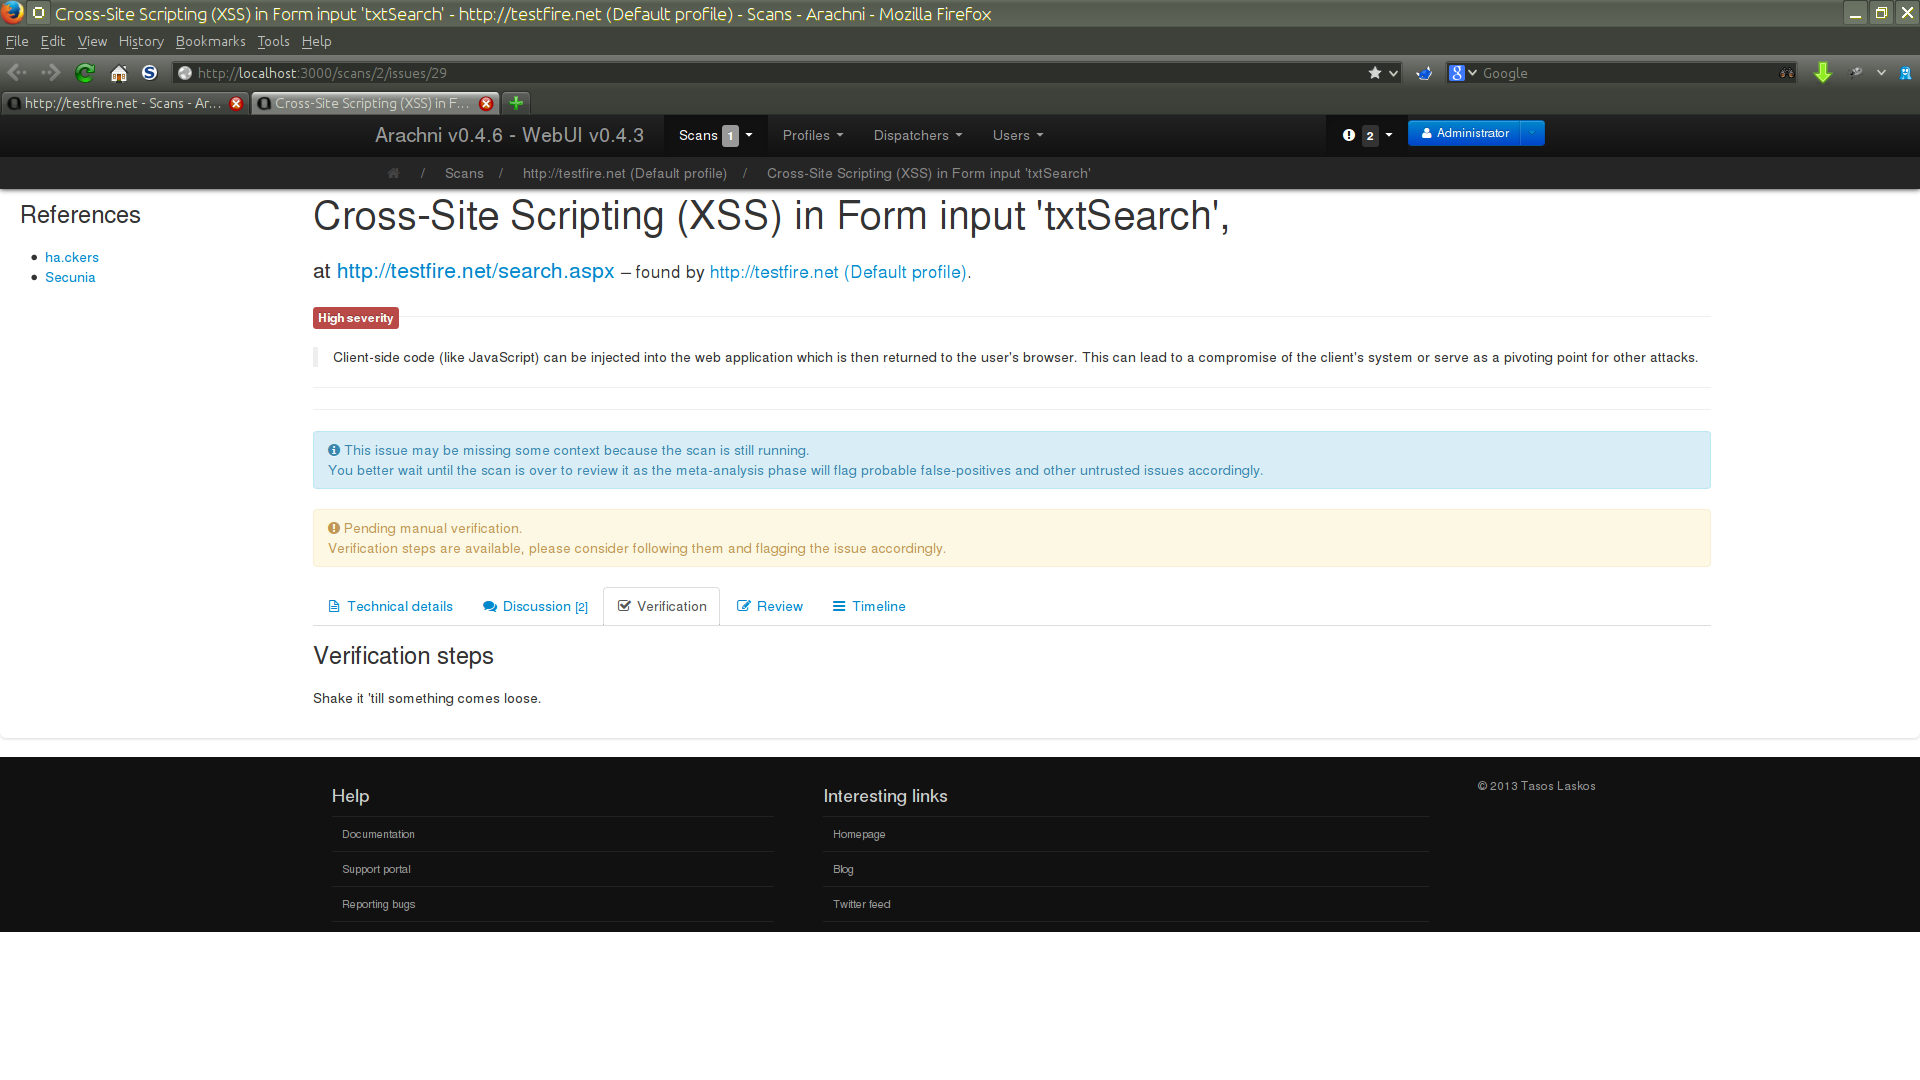
Issues can be overviewed, discussed, reviewed and have their history inspected; because of that, the issue display page is split into sections:
This section shows exactly what its title suggests.


Like Scans, Issues can be discussed by allowing users to comment on them.

This section shows the manual verification steps one followed to prove that the issue indeed exists.
Only appears when the issue has been reviewed accordingly.
This section shows the steps one should follow to fix the issue.
Only appears when the issue has been reviewed accordingly.

Allows for some basic review options like marking an issue as fixed, false positive, verified etc.
This review status will be reflected in the Scan's issues table.

When Arachni has reason to believe that an issue cannot be trusted, it will review it automatically as requiring manual verification and, if possible, will add a remark informing you as to why.
Trust (or lack thereof) evaluation is usually performed by plugins which run a certain type of analysis, called meta-analysis, on the results of the scan.
This means that once the scan finishes, the system will perform a high-level analysis on the issues it logged and cross-reference them with the web application's/server's behavior during the scan (the target's behavior is being constantly profiled on multiple data points). If something doesn't add up, the issues that are suspicious are flagged as untrusted to signify the need for human verification and closer examination.
While the scan is still running untrusted issues will appear to be legitimate:

This is because the system cannot have the full-picture until the scan finishes.
However, once the scan completes the meta-analysis takes place and flags untrusted issues appropriately:


The untrusted issue is shown to be pending verification because, as its remark says:
This issue was discovered using a timing-attack but the audited page was exhibiting unusually high response times to begin with. This could be an indication that the logged issue is a false positive.
Lists changes to the Issue's review status.

Scan revisions are repeats of finished scans but they provide only new information, information which has not already been acquired by previous revisions (the first scan is considered the root revision).
First of all, we need to have a finished scan (a root revision) available which we're going to repeat, so let's for example say that we start a scan against a given version of the company's new killer webapp and place it under the group Revision demo:

(It's good practice to make a copy of the Profile you plan to use, for that specific webapp, if you plan on repeating a scan. That way you'll be able to update things like session cookies without interfering with other users/scans who are about to use that same Profile.)
This being the first time the webapp was tested, the scan found a lot of vulnerabilities:

When we showed those issues to the devs they insisted that the webapp was secure and that we scan it again to make sure.
Since the Web interface makes this process easy enough, we didn't put up a fight
and instead just went with it.
So we went to the Scans index and hit the repeat () button.

Thankfully, since we're no longer working fresh, earlier revisions can provide us with info that we can use to make the job of future revisions easier.
For example, new revisions can use the combination of sitemaps of previous revisions to either extend the scope of the crawl or skip it altogether.
And since we're scanning the same version of the webapp, we know that the sitemap won't have changed and we can just use the sitemap of the previous scan and avoid a useless crawl.


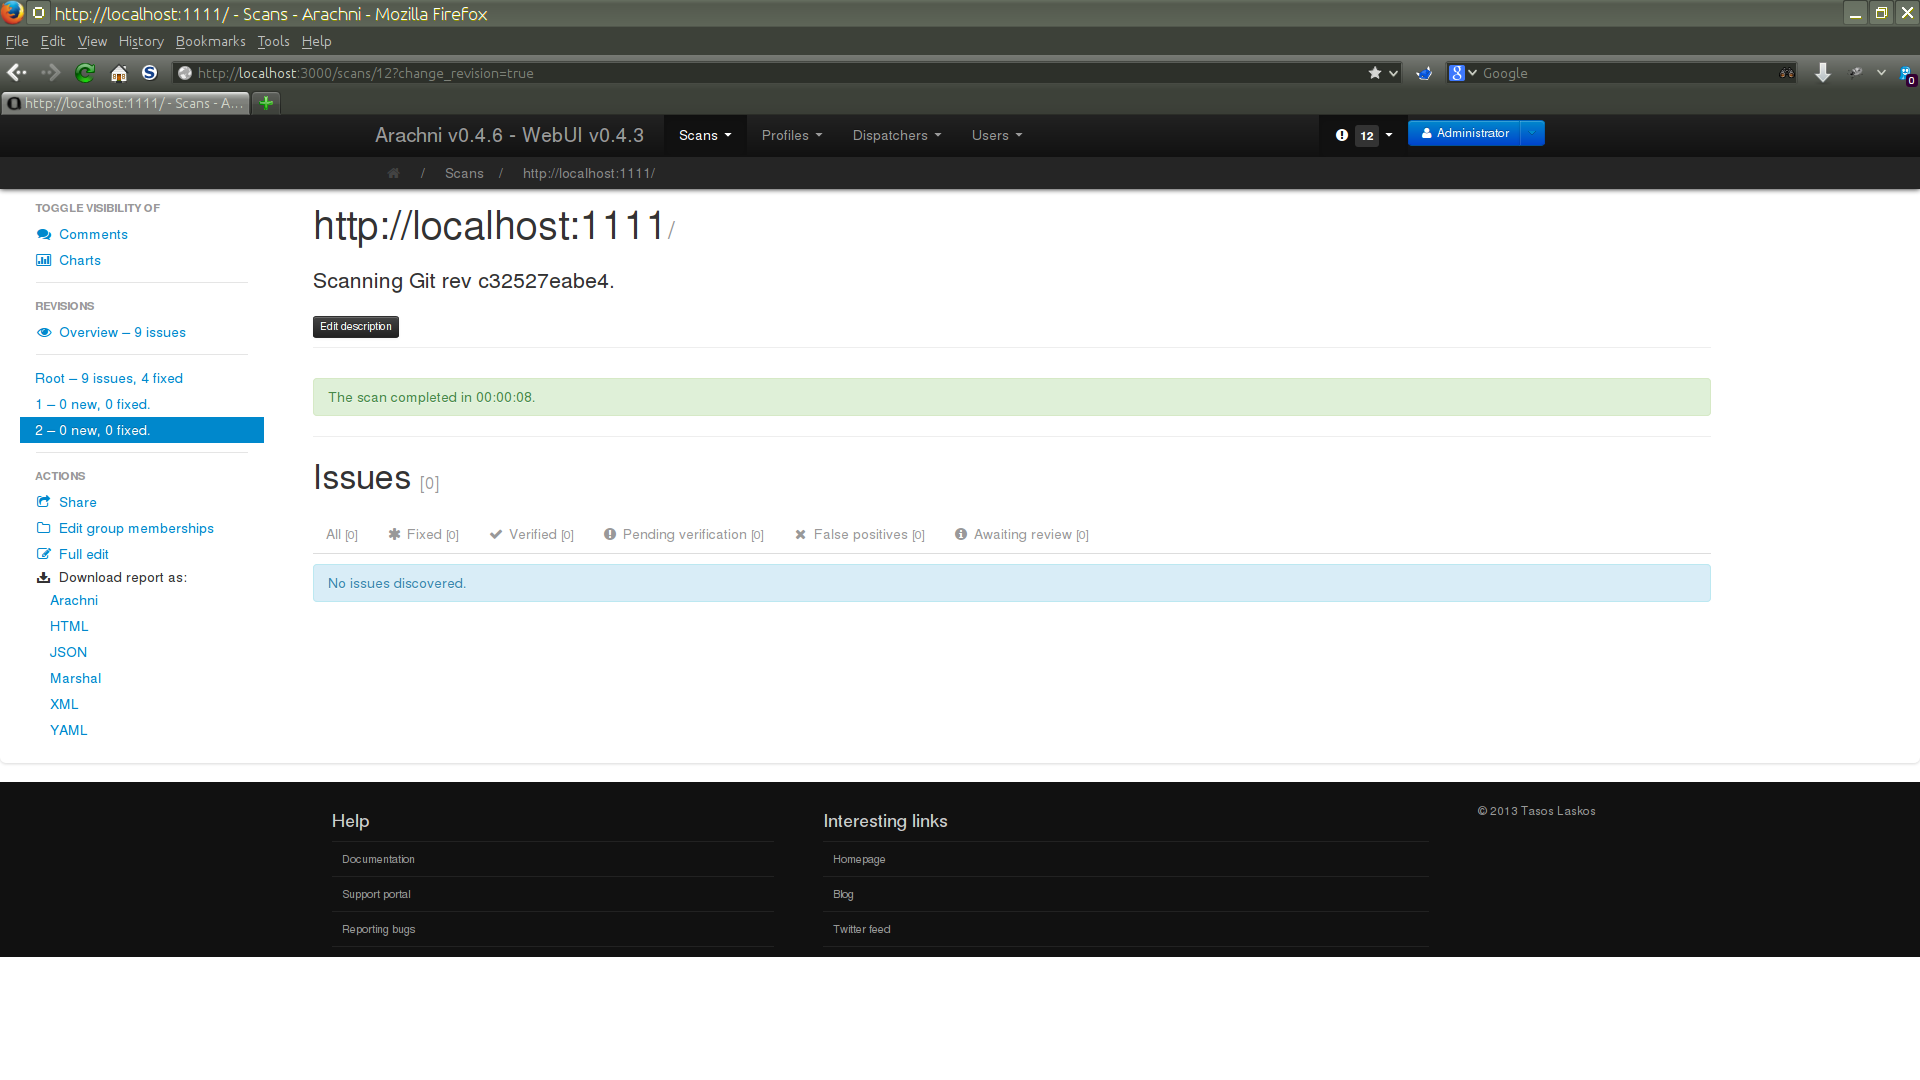
The screen is quite familiar, the only difference is the REVISIONS menu on the left, allowing you to see:
- An Overview of all revisions -- Issues from all revisions combined for easy review.
- Issues of individual revisions.
As you can see from the above screenshot, this revision logged no issues; however, this does not mean that the webapp has no issues. As mentioned earlier, revisions only add new information and in this case no new issues were found, but no old ones were fixed either. So nothing has changed.
New revisions only log issues which have not already appeared in previous revisions, in order to make reviews easier and avoid storing and burdening you with duplicate information.
However, if an issue that appeared in a previous revision does not appear in a future one, that issue will be automatically marked as fixed and you will receive a relevant notification about it (and you'll also be able to see that in an Issue's timeline).
As mentioned above, issues which don't appear on subsequent revisions will be automatically reviewed as fixed.
Let's continue with our killer webapp. After we proved to the devs that the previous results weren't flukes and that the webapp is indeed vulnerable, they decided to fix them.
So, we rescan the webapp just like before to make sure that the issues have been fixed.
Now, again, no new issues have been logged but some of the previous issues have indeed been fixed!


As you can see, the revisions are grouped together and are headed by the overview container.