2.3. Battery meter calibration and Speed Alt unit configuration (offset.lua)
The most successful means of establishing accurate LiPo consumption readings in Ardupilot telemetry is to make sure that the LiPo sensors being used are accurately calibrated. In the case of the APM battery sensor (as used in most Pixhawk configurations) this means spending time and effort to get an accurate calibration of both Voltage and Current readings. These sensors however are not always 100% accurate, and some sensor types (other than the standard APM battery monitor sensors) do not even provide means for calibration so in these cases we should take some extra steps to ensure that our battery consumption readings are as accurate as we can get them. Fortunately, this project provides a way to configure additional calibration info by the way of the 'offset' mixer script. The following paragraphs describe techniques for getting accurate calibrations configured.
Most chargers inform us about the amount of energy in Wh and mAh which flows during charging in the battery. If we now compare the values of the charger (reference) with the values of the telemetry screen it should be possible to make a fairly accurate comparison. In our case, we use the model script called 'offset' to help.
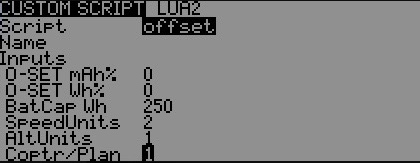
We can set from the linear function (Wh = P x t and Ah = V x I xt) dependent Percentage offset for mAh and Wh here. "BatCap Wh" is needed by Wh consumption Gauge. This simply hold the Real Battery capacity in Wh. This is needed to display the Wh Gauge consumption correctly.
Measurements
-
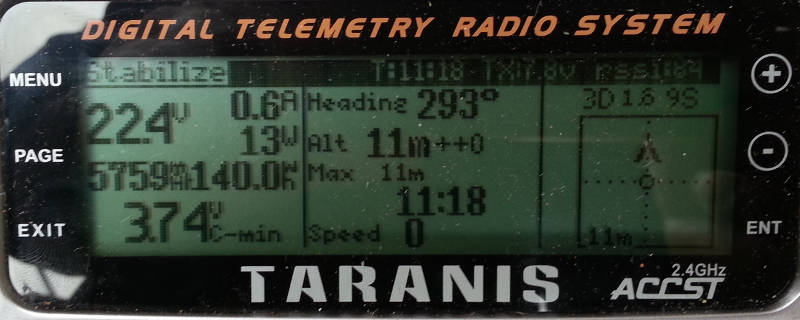
First, we charge up a few empty batteries to full capacity, and then go fly with these batteries, keeping a record of the displayed telemetry values for mAh and Wh at the end of each flight. Of course, we make special effort to take note of the batteries and values so we do not get confused later. (E.g. Battery #1 = 5055mAh and 120.3Wh, Battery #2 = ... ..., battery #3 = ... ... etc.)
-
secondly, we charge (on the same charger as before) each of the the empty batteries, and keep a record of the relevant energy quantity that the charger had to provide to fully charge each battery back to full again. Again make special effort to ensure you note these values against the correct battery alongside the original flight consumption readings taken earlier. Note - modern chargers do not generally provide Wh values, so these need may need to be estimated - a good starting point is to take the mAh value * 1000 (to get Ah) and multiply this by the nominal voltage of the LiPo - so for a 3s this is 11.1v, for 4s this is 14.8 (3.7v per cell). This method is not perfectly accurate but as best we can manage in this situation.
-
Thirdly, we make our Percentage offset calculation. A very simple calculation.
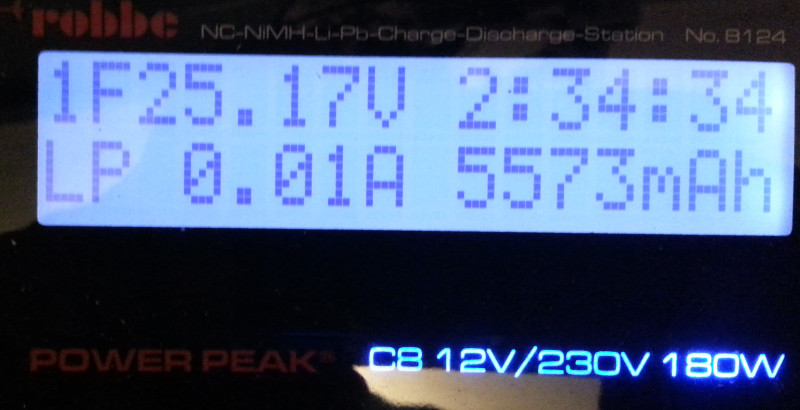
Example of battery 1:
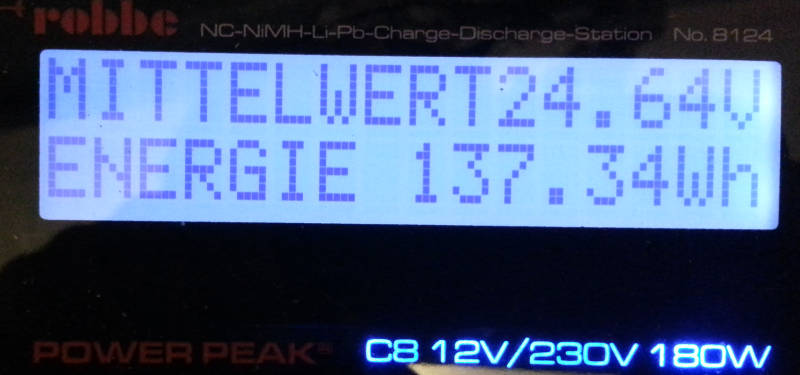
We had on our charger display 5573mAh and 137.34Wh. The telemetry screen previously displayed 5055mAh and 120.3Wh
So we calculate:
-
Charger ÷ telemetry screen
-
5573mAh ÷ 5055mAh = 1.10247
The decimal places of the result give the Percentage offset.
This means for mAh our offset is rounded to +10% - in other words, our model is under-reading the consumed mAh value by 10% (compared to the actual consumption it used told to us by our charger), so we therefore need to configure our O-Set mAh% value to 10 so that this will increase the values being displayed for mAh on the telemetry screen by 10%, bringing it closer in line with our charger reading.
the same calculation for Wh
137,34Wh ÷ 120,3Wh = 1,14164
This means for Wh our offset is rounded to +14% so we therefore need to configure our O-Set Wh% value to 14.
When we perform these calculations for all batteries, we can use later an average for our configuration.
At the very end we make it up a flight test and compare the new values of the telemetry again with the values of the charger to recharge the batteries. Now should the values of the telemetry show a little higher than the be the charger. 1-5%. Higher values on the telemetry display of course prevent a negative charging of the batteries.
after calibration:
The offset.lua script now also provides the means to select required units of measurement for the main telemetry screen, which can be selected as follows:
-
SpeedUnits (values 1-3) - these effect the display of both Ground Speed and Airspeed:
1 - m/s - metres per second
2 - kph - kilometers per hour
3 - mph - miles per hour
-
AltUnits (values 1-2) - these effect the display of: Altitude, max altitude, climb rate, distance from home:
1 - m - metres (or m/s for climb rate)
2 - f - feet (or f/s for climb rate)
-
Coptr/Plan (values 1-2) - this selects whether the script will be used for a model with Copter or Plane firmware:
1 - Copter
2 - Plane
This effects flight modes which are different for copter/plane.