Create custom models
This topic discusses how to create a custom model using the tools in the OpenStreetMap Toolbox. There are many scenarios where you'd want to create a custom model. For example, if you have a workflow that involves many steps, and you would like these steps to execute as soon as their predecessor completes, it is useful to have a model. Also, if you want to run a workflow repeatedly, again it is useful to use a model rather than executing tools step by step.
Another reason to use models is because ArcGIS provides robust model building tools that make it easy to compose dynamic, powerful, specific analysis with your downloaded OSM data and with other data.
In this topic, we'll walk through creating a model in the ArcGIS Desktop environment. The model will enable you to Load an OSM File into ArcMap and then run the 'OSM Attribute Selector' to extract specific tags from the .osm data when its added to the user interface. This is a simple workflow, designed to get you familiar with how to use model builder with the OSM Toolbox. For more information on model builder, see a quick tour of Model Builder.
Note: The sample below will require an .osm file saved locally, to test the model. You can download an .osm file from several locations - see Country and Area extracts of planet files - or you can create your own using the Download OSM Data (XAPI) tool.
- Launch ArcMap. In the ArcCatalog window, navigate to the OpenStreetMap Toolbox.
- Right click on the toolbox, and select "New...". Then select "Model". A new model window opens.

- Drag the 'Load OSM File' tool from the OpenStreetMap Toolbox over to the Model window. The tool expands in the window.
- Drag the 'OSM Attribute Selector' tool from the OpenStreetMap Toolbox over to the Model window, to the right of the Load OSM File components. Repeat this step two more times, as we will want this model to run the OSM Attribute Selector on each of the three feature classes in our OpenStreetMap feature dataset.
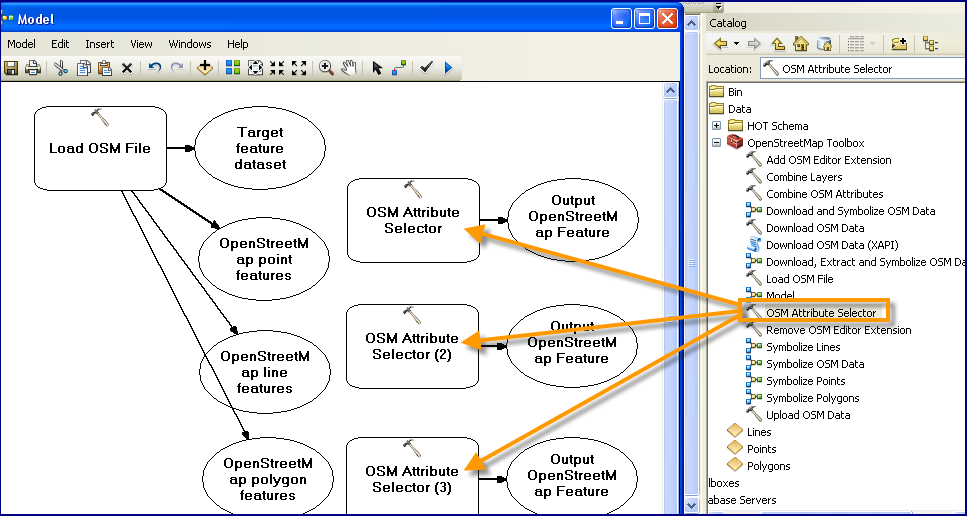
- Now we will connect the tools together in the model. On the Model Builder toolbar, select the connect button. Then click the first circle 'OpenStreetMap Point Features', and drag a connecting line to the first 'OSM Attribute Selector' box. When you release the mouse, a menu appears. Select 'Input OpenStreetMap Feature Class' from the menu.

- Repeat the previous step to also connect the 'OpenStreetMap Line Features' and 'OpenStreetMap Polygon Features' each to 'OSM Attribute Selector' box.
- Recall that if you use the 'Load OSM File' tool, you are asked to select an .osm file to load. Now you will create a variable in your model to represent that file. Right click the 'Load OSM File' box, select 'Make Variable', then 'From Parameter', and finally 'OSM File' from the resulting menu.

- Now, right click on the 'OSM File' box, and select the 'Model Parameter' option. Repeat for the 'Target Feature Dataset' box. This sets the input OSM File and the output feature dataset as parameters a user can set.

- Now you will set the tags which you'd like the OSM Attribute Selector tools to extract for each feature class. Start by double clicking the topmost 'OSM Attribute Selector' box. In the 'Input OpenStreetMap Feature Class' field, select the feature class to which you want the extract to apply - in this case, we'll select the 'OpenStreetMap point features' option. In the 'Select OSM Tag Keys' field, enter the attributes that you want extracted. In this example, lets select the 'name' attribute. We enter 'name' in this field and click the plus sign to the right. You can enter in as many tags as you'd like, or select the keyword ALL for all tags - Note, for documentation on available tags, see Map Features. After selecting the tags you want to extract, click OK to save the changes and close the dialog. Repeat this for the other two 'OSM Attribute Selector' tools, except select 'OpenStreetMap line features' and 'OpenStreetMap polygon features' for the requisite 'Input OpenStreetMap Feature Class' fields. You can choose to extract different tags for each feature class if desired. in our example, we will choose 'name' for these as well.
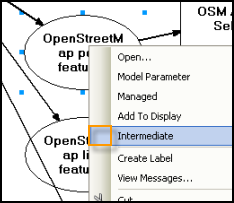
- Now, right click on each of the three 'OSM Attribute Selector' tools, and verify that the "Intermediate" option is unchecked. If left checked, the feature classes will only be used during the process of the model and will not be kept as outputs of it.
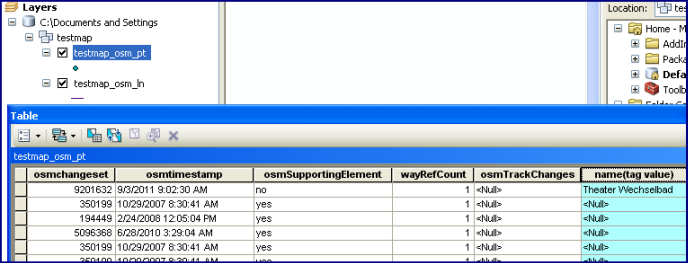
- Save the model, and validate it if desired. Now you are ready to test with real data. Double click this new model in your Toolbox, and browse to an .osm file you've saved locally. After the model executes, you can browse to the location where you designated the feature classes be created, and drag them to your ArcMap table of contents. If you right click on each of the feature classes to view their attribute tables, the extra tags you designated should appear in the right-most column of the table.
Back to: Documentation