Lab 07
For this week's Lab 7 we'll be making our own Video Doorbells, like a DIY Ring.
Bring your whole kit, Pi and Arduino, to lab this Thursday.
In preparation for this week's lab, you'll build a small circuit with your Arduino and test it with some code. You don't need the Pi for this preLab.
On your breadboard, make this basic button circuit connected to pin 2 of the Arduino. (The LED is built in on the board and connected to pin 13.)
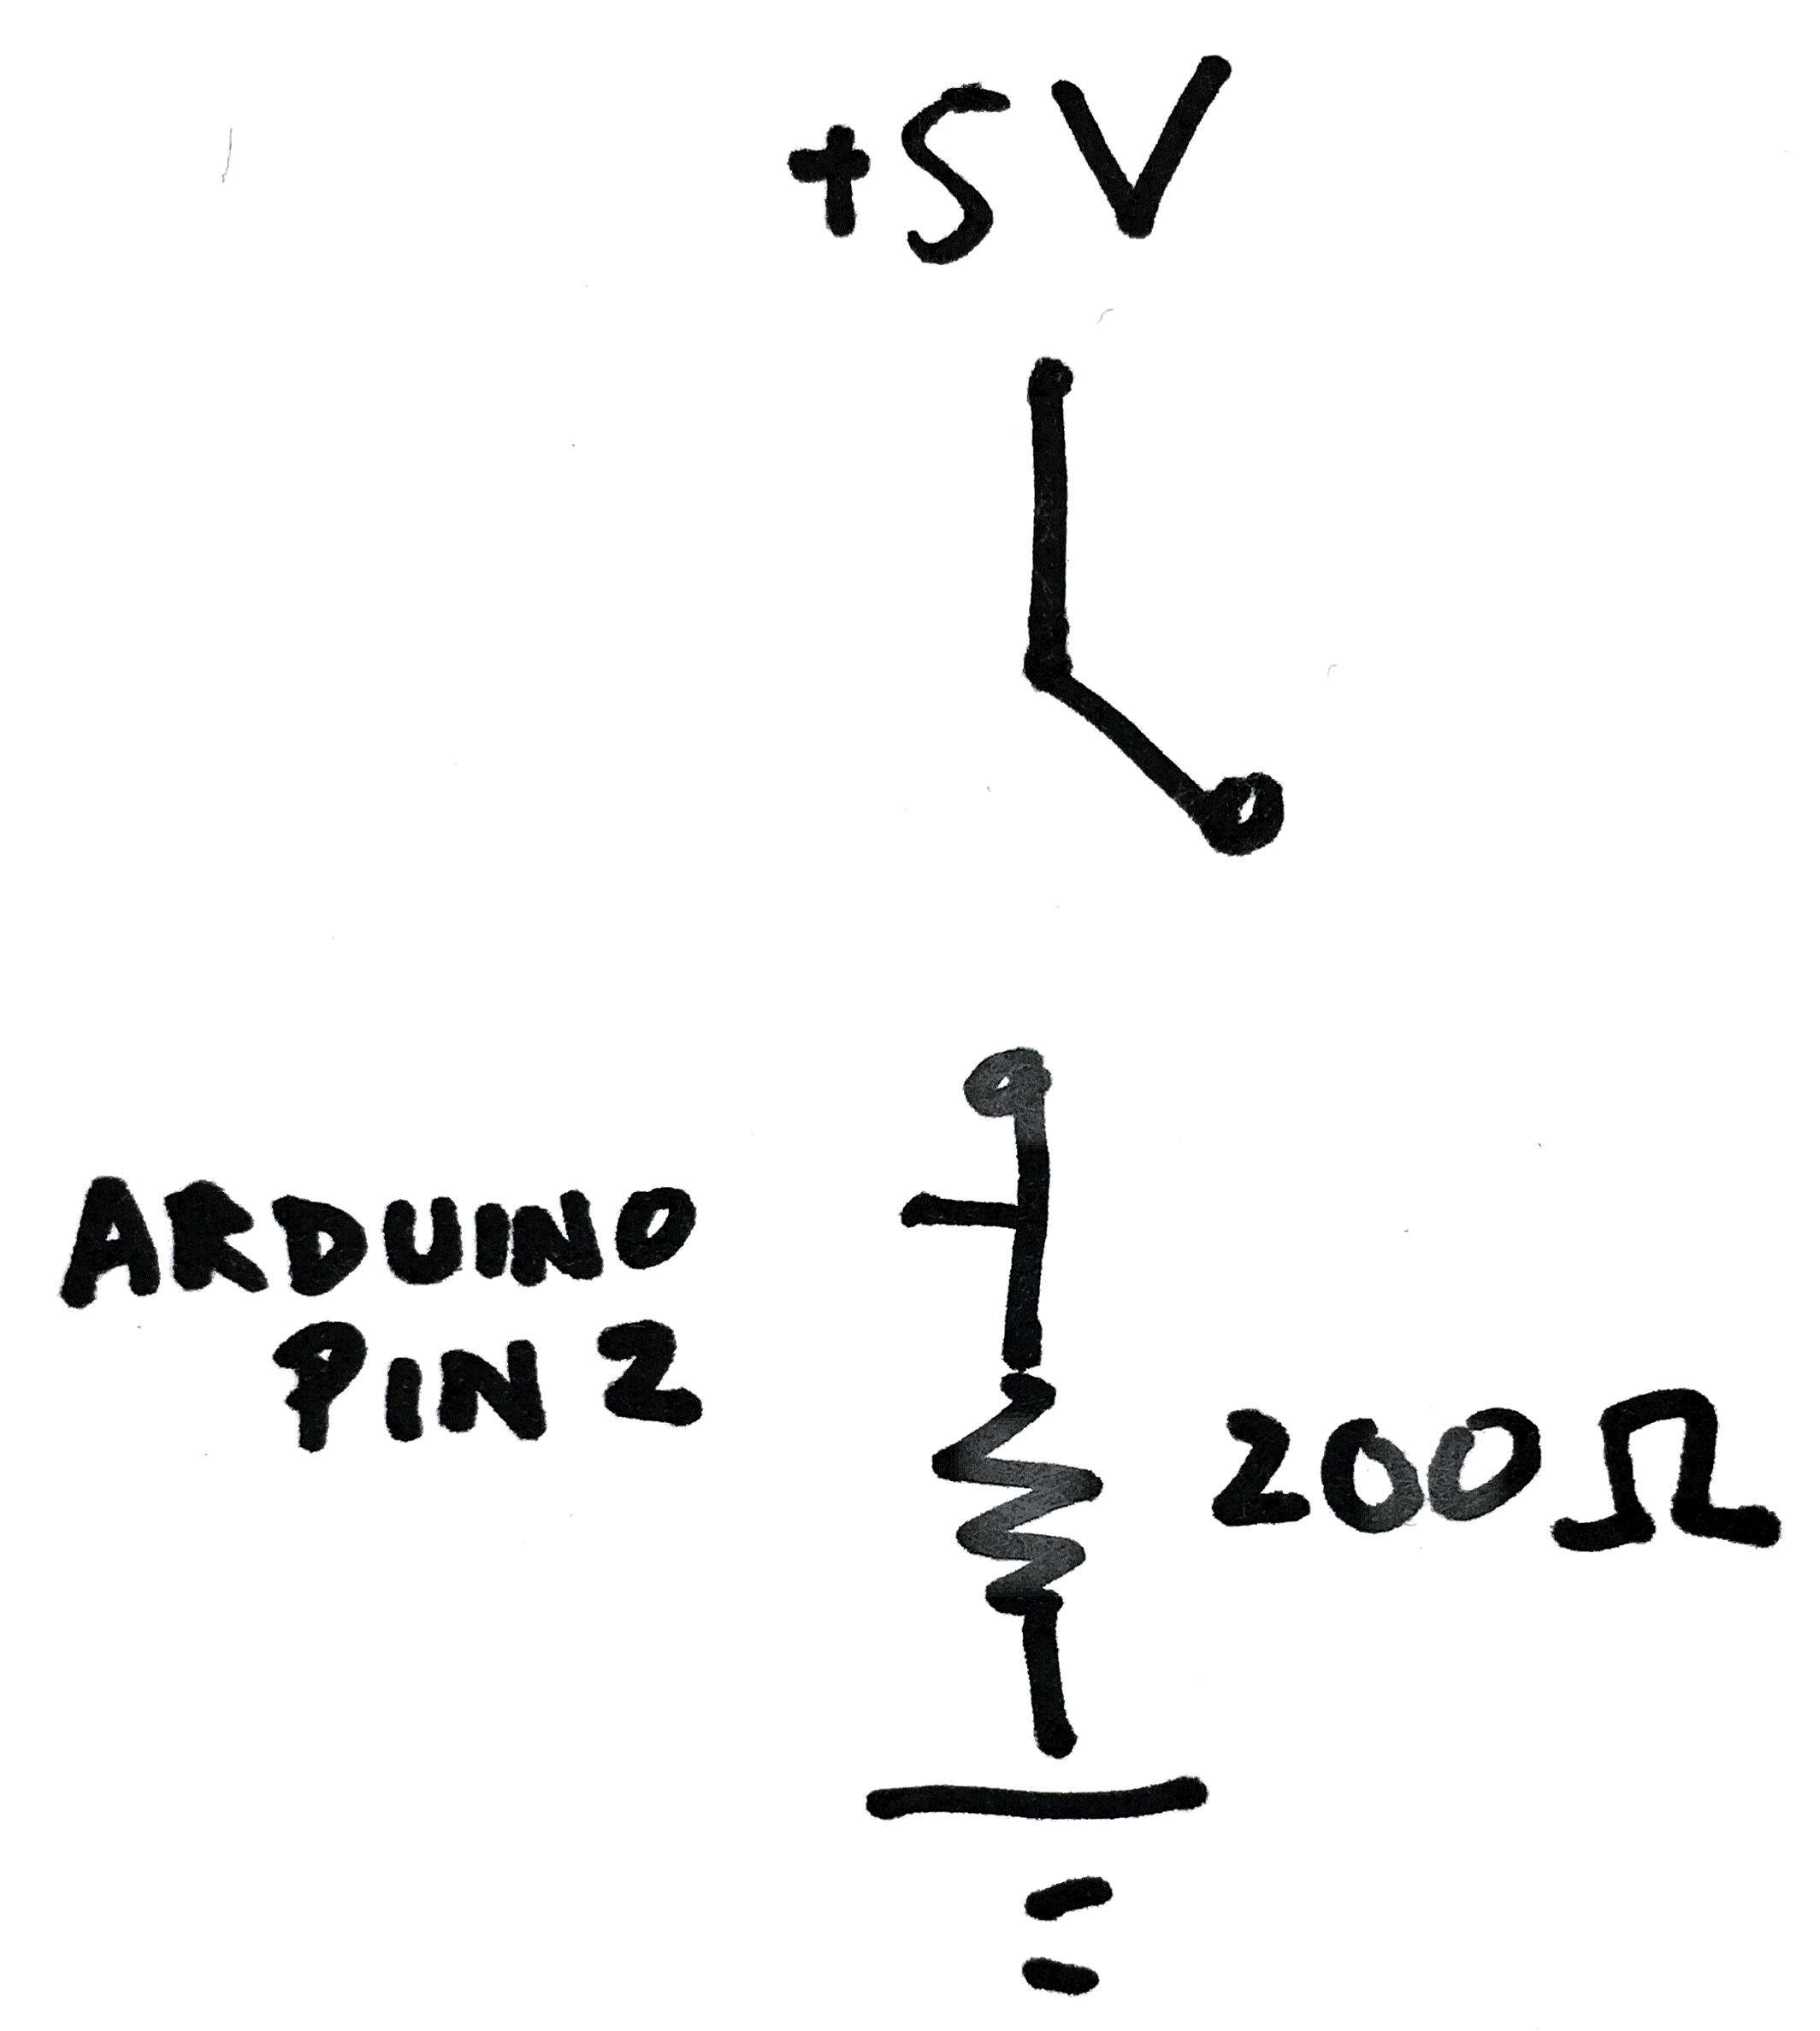
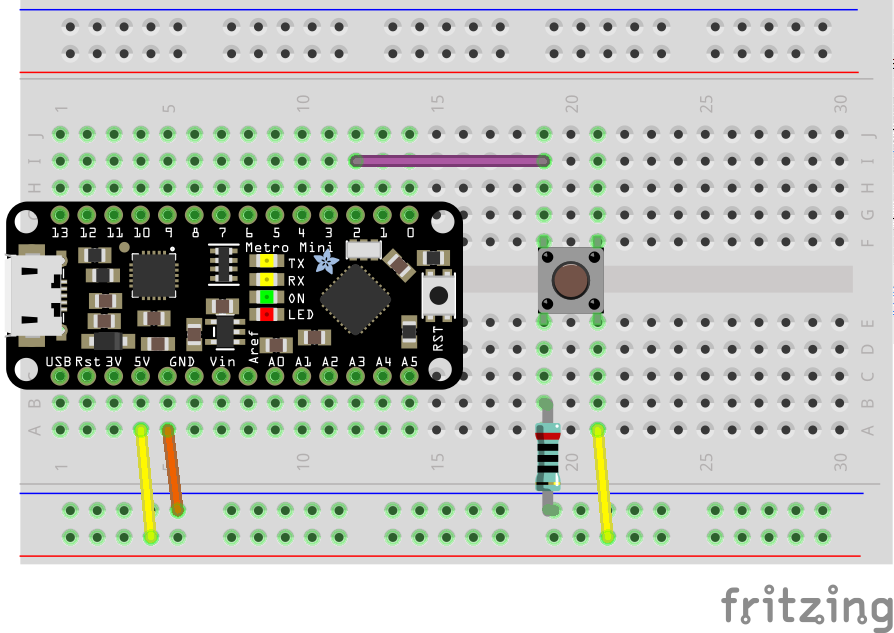
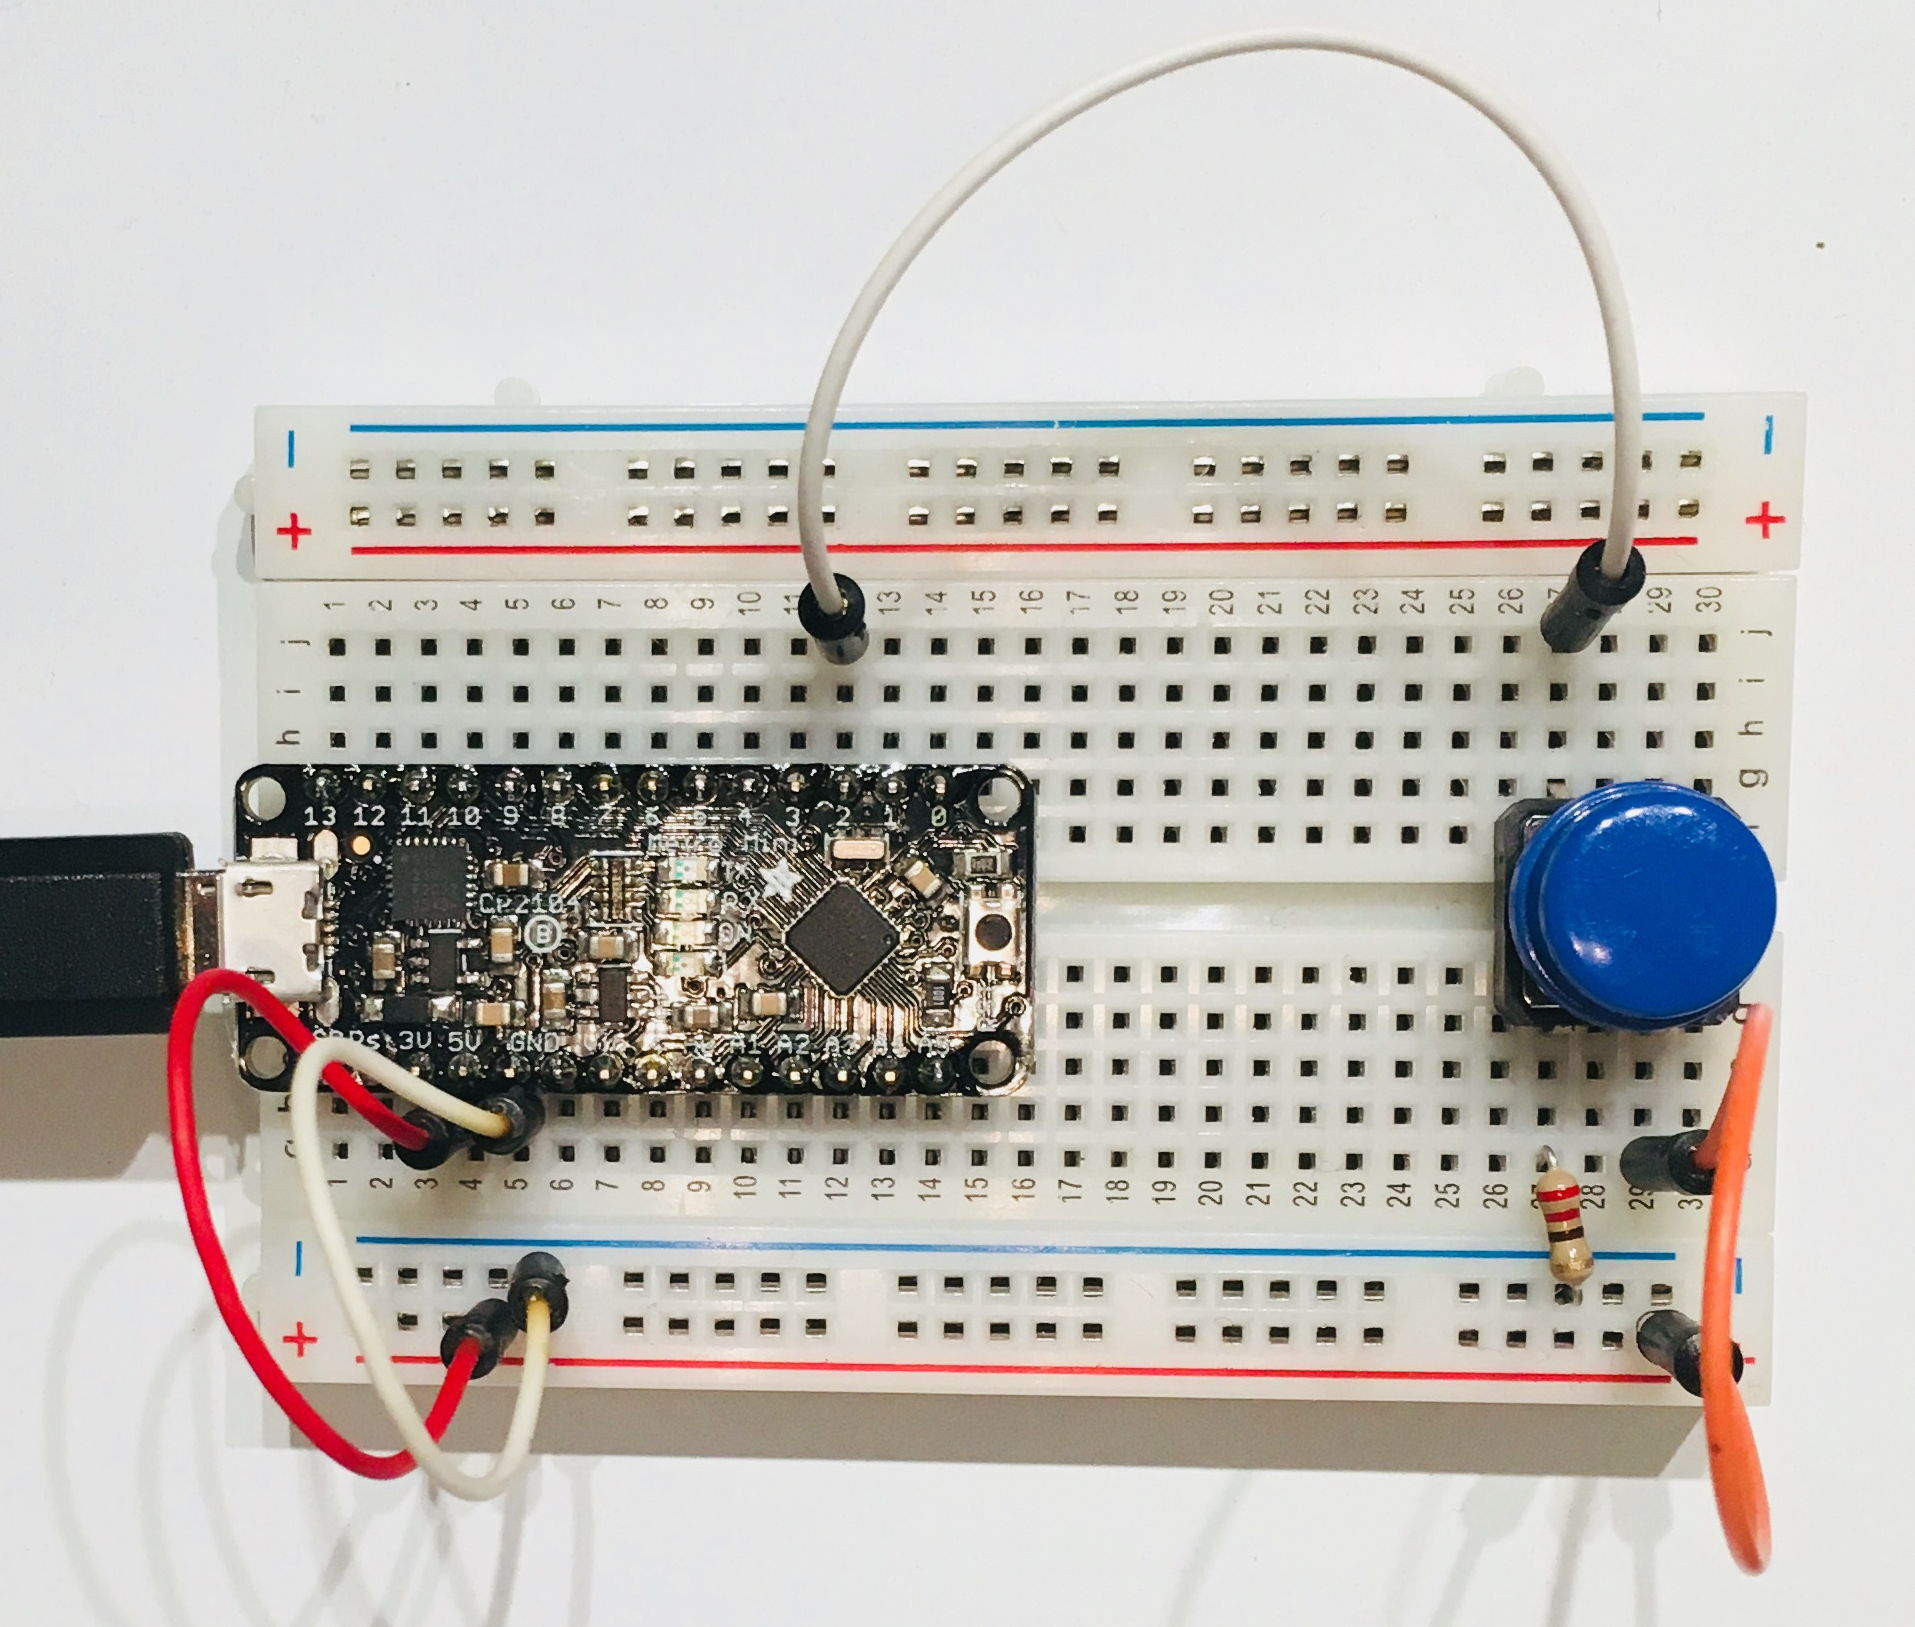
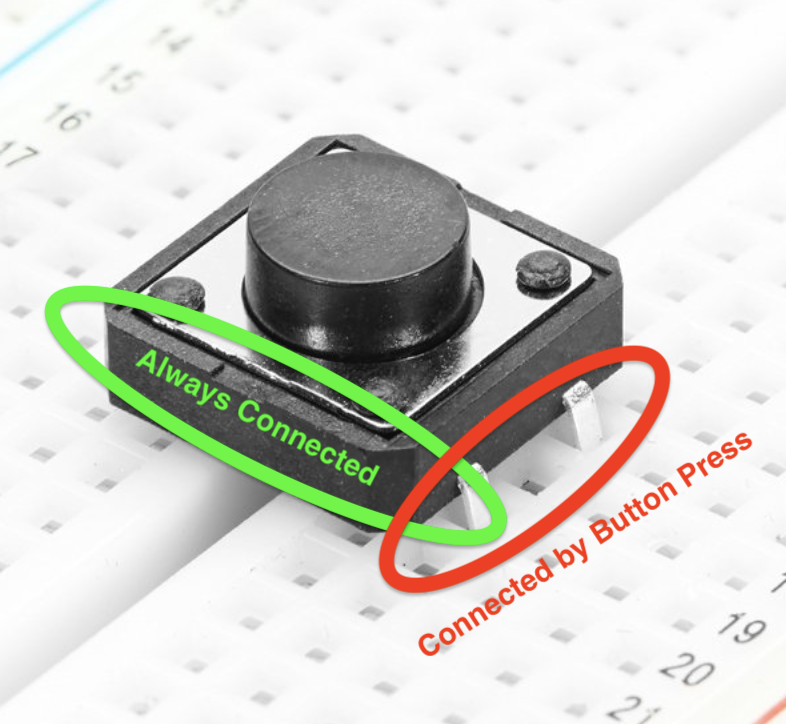
Remember that the orientation of the button matters. Of the four pins, the pairs of pins closest to each other are the two that get connected when you push the button. And in fact, each pin of the close pair is always connected to the corresponding pin of the other close pair. This diagram my help:
HelloYou is Arduino code that communicates over Serial to a Raspberry Pi (or any computer with a serial interface), sending any button events out to the computer, and turning on or off the built-in LED in response to message events coming in.
Copy this HelloYou.ino sketch into a new Arduino window and upload it to your board. (The built-in LED marked L should be off.)
Open the Serial Monitor in Arduino and observe what happens when you press the button in your circuit -- you should see a change!
To fetch information that is on the internet, we have used curl or wget:
pi@ixe00:~/helloYou $ curl http://google.com
<HTML><HEAD><meta http-equiv="content-type" content="text/html;charset=utf-8">
<TITLE>301 Moved</TITLE></HEAD><BODY>
<H1>301 Moved</H1>
The document has moved
<A HREF="http://www.google.com/">here</A>.
</BODY></HTML>

pi@ixe00:~ $ wget http://www.google.com
--2020-09-03 19:02:22--  http://www.google.com/
Resolving www.google.com (www.google.com)... 172.217.164.100, 2607:f8b0:4005:805::2004
Connecting to www.google.com (www.google.com)|172.217.164.100|:80... connected.
HTTP request sent, awaiting response... 200 OK
Length: unspecified [text/html]
Saving to: ‘index.html’

index.html              [ <=>                ]  11.84K  --.-KB/s    in 0.001s

2020-09-03 19:02:22 (18.2 MB/s) - ‘index.html’ saved [12127]
These programs are similar, but the above example shows how they differ. Curl does a ‘one-shot’ download of the file, whereas wget gets the forward and then goes to the forwarded address to download the index.html file.
We can use this to get data from the internet! Try:
$ curl extreme-ip-lookup.com/csv/
This looks up the information about Pi’s location through the IP address of the local router.
Weather:
$ curl wttr.in
$ curl wttr.in/moon
This can be used to download files that are hosted on the internet. Download a musical clip that you like that is in a format that can be played on the Raspberry Pi.
How can we view the web from a command line interface? Two ways! First, we can just use a text based browser, like lynx.
$ sudo apt install lynx
$ lynx http://cornell.edu
We can also use X windows to view the internet in a more familiar way:
Epiphany browser: $ sudo apt install epiphany
Midori browser: $ sudo apt install midori
Which one did you like more? Uninstall the other one!
$ sudo apt uninstall [package that you did not prefer]
To use the Raspberry Pi as a webserver, we’re going to install a python-based webserver named Flask.:
pi@ixe00:~/helloWorld $ cat basicserver.py
from flask import Flask

app = Flask(__name__)

@app.route('/')
def index():
    return 'Hello world'

if __name__ == '__main__':
    app.run(debug=True, host='0.0.0.0')


pi@ixe00:~/helloWorld $ python basicserver.py
 * Serving Flask app "basicserver" (lazy loading)
 * Environment: production
   WARNING: This is a development server. Do not use it in a production deployment.
   Use a production WSGI server instead.
 * Debug mode: on
 * Running on http://0.0.0.0:5000/ (Press CTRL+C to quit)
 * Restarting with stat
 * Debugger is active!
 * Debugger PIN: 162-573-883
From a remote browser, check to make sure your webserver is working.
** customize the code enough that the webpage served up is clearly your own, and include a screenshot and any modified code in the lab folder. **

For this exercise, we will set up and run HelloYou the basic Interaction Engine. This is like HelloWorld, but is called HelloYou because it is designed to be interactive and to connect actions and responses across distance.

HelloYou has 3 parts:
- The Arduino sketch,
helloYou.inothat is installed and runs on the Arduino. - The Python code,
server.py, that is installed and runs on the Raspberry Pi. - The html file and associated javascript code,
index.htmlandclient.js, which is served by the Raspberry Pi server to the client browser, and runs on the client’s computer.
Make sure your arduino is connected to your Raspberry Pi with a USB cable. Using the Arduino IDE on the Raspberry Pi, open helloYou/helloYou.ino.
Look at the code. How does the Arduino communicate with the Pi when the code is running? ** What messages are sent from the Arduino to the Pi? ** ** What messages are expected from the Pi to the Arduino? ** ** What happens if the Pi sends an unexpected message to the Arduino? ** ** How fast does the Arduino communicate with the Pi? What would you change to make it send messages less often? **
Compile and flash the helloYou.ino code onto the Arduino.
Using your favorite text editor, open helloYou/server.py.
Look at the code. What interface does the Pi use to communicate with the Arduino when the code is running? What messages are sent from the Pi to the Arduino? What messages are expected from the Arduino to the Pi? What happens if the Arduino sends an unexpected message to the Pi? What part of the code controls what is served when a browser requests a page from the server? What messages are sent to the console? When?
pi@ixe00:~/helloYou $ python server.py
 * Serving Flask app "server" (lazy loading)
 * Environment: production
   WARNING: This is a development server. Do not use it in a production deployment.
   Use a production WSGI server instead.
 * Debug mode: off
 * Running on http://0.0.0.0:5000/ (Press CTRL+C to quit)
Now pull up a web browser on your computer, and look at the webpage being served on the Raspberry Pi on port 5000:


The browser shows the webpage that we loaded, and is also running the associated client.js file.
You will join a network of loosely networked Cornell Tech Things, which use the MQTT to communicate to one another. For the first step in this, we will build a simple client-server between your computer and your Interaction Engine. (Use the HelloThere and HelloFromHere code samples to do this!)
### Important side note
The ``HelloThere`` and ``HelloFromHere`` examples are used to use an MQTT server/broker that is no longer active. In order to test and experiment with these examples please use the ```mqtt.eclipse.org``` address.

Set up your Arduino so that it can control an RGB LED and read input from a button.
Now, change the code for your Interaction Engine so that you can set different buttons on a remote webpage that change the color of the RGB LED. Also, set it so that you can press a button to change the background color on the webpage. (Again, the HelloThere and HelloFromHere code samples show you how to communicate with a MQTT server. Merge the code from those samples into your interaction engine code to control the light and to send messages based on the button press.)
Now we will modify our Interaction Engine to send messages to a MQTT server/broker.
When you start your MQTT client, you will specify “your color”. When you press your button, the client will send this color to the MQTT server, and all the other devices on the server will change their LEDs this color.
We will use mqtt.eclipse.org, channel IxE for a MQTT server/broker for the course. The TA has set up a web camera with her devices being broadcast so that you can see if your actions change the LED of her Thing. You should be able to press your button and see the remote LED change to your color. On the remote webpage, you should be able to press a color button and see it show up on your LED.
When everyone in the class is connected to the server, everyone will be able to push their color out to everyone else’s Things by pressing their own buttons.
Technical specification:
MQTT_boker: mqtt.eclipse.org
Topic: ixe/
Acceptable messages (string): 'red' || 'green' || 'blue' (more to be added later)
We included 4 standard OpenCV examples in the IxE. These examples include contour(blob) detection, face detection with the Haarcascade, flow detection(a type of keypoint tracking), and standard object detection with the Yolo darknet.
Most examples can be run with a screen (I.e. VNC or ssh -X or with an HDMI monitor), or with just the terminal. The examples are separated out into different folders. Each folder contains a HowToUse.md file, which explains how to run the python example.
pi@ixe00:~/openCV-examples $ tree -l
.
├── contours-detection
│   ├── contours.py
│   └── HowToUse.md
├── data
│   ├── slow_traffic_small.mp4
│   └── test.jpg
├── face-detection
│   ├── face-detection.py
│   ├── faces_detected.jpg
│   ├── haarcascade_eye_tree_eyeglasses.xml
│   ├── haarcascade_eye.xml
│   ├── haarcascade_frontalface_alt.xml
│   ├── haarcascade_frontalface_default.xml
│   └── HowToUse.md
├── flow-detection
│   ├── flow.png
│   ├── HowToUse.md
│   └── optical_flow.py
└── object-detection
    ├── detected_out.jpg
    ├── detect.py
    ├── frozen_inference_graph.pb
    ├── HowToUse.md
└── ssd_mobilenet_v2_coco_2018_03_29.pbtxtNow, using design a video doorbell, or any application where you can remotely control and observe action at another location. It is okay to partner up on this assignment so that you and someone else in the class have devices that communicate with one another.
** Please include video of the project ** ** All supporting designs materials and code should be in your lab assignment folder, and documented enough that you could recreate it from scratch if you had memory loss. **