RayWenderlich Unity Tutorial #2
Assignees

Labels
documentation
Improvements or additions to documentation
Comments
|
|

Gizmotronn
added a commit
that referenced
this issue
May 13, 2020
Gizmotronn
pushed a commit
that referenced
this issue
May 22, 2020
acord-robotics/.notes#1

IrisDroidology/python-learning#3

#1 #2

Will also use this for tutoring
Gizmotronn
added a commit
that referenced
this issue
May 22, 2020
Gizmotronn
added a commit
that referenced
this issue
May 22, 2020
Merge pull request #2 from Gizmotronn/master
|
A lot of the notes that I'm/we're doing for this repo:
We're doing them on notion. This was already referenced here: https://github.com/acord-robotics/.notes/commit/4edbc557c619af635e26e1be6e7e5dbd6c2f7942 |
|
Also sending stuff here: acord-robotics/stellarios@917543d |
Gizmotronn
added a commit
that referenced
this issue
May 23, 2020
Gizmotronn
added a commit
that referenced
this issue
May 24, 2020
Gizmotronn
added a commit
that referenced
this issue
May 27, 2020
https://www.notion.so/Part-2-1aa3833b939149aa8daa36808f0069fa

https: //github.com/IrisDroidology/python-learning/issues/3
Co-Authored-By: Liam Arbuckle <liam@acordsoftware.tech>
Gizmotronn
added a commit
that referenced
this issue
May 27, 2020
Co-Authored-By: Liam Arbuckle <liam@acordsoftware.tech>
Gizmotronn
added a commit
that referenced
this issue
May 27, 2020
# Part 2 **What is covered:** - How to use the project window to organise & import your assets - The difference between gameObjects & prefabs - How physics works in Unity - How cameras work and which types of projections are available - The basics of materials in Unity Assets have been imported into Unity and they have also been organised in the Unity project window/tab > Note: You’ll notice that the GameManager has a different icon from the other scripts. Most games have an object called a GameManager which acts as the overall “brain” for the game. This is a standard adopted by many developers. It’s been used so much that Unity created a special icon for it.  > At the end of the day, it’s a script like any other. The icon just helps you recognize it since you’ll access it often. There are special icons for other components as well. You’ll discover these as you dig deeper into Unity. ## Create your first instance Look inside `models/players` in the project folder (in `assets`). A .fbx file was one of the files included here. - .fbx files contain all the data required to make a 3D model, along with other things (like animations) After importing this into the Unity editor, the following error pops up:  - Some image files contain extra information for unity, but are saved in *standard image format* > In this case, p_pod_normal.jpg defines the depths of a surface, which provides surface lighting information without the need to create additional geometry. This is called a normal map. - Unity thinks that it's dealing with a regular image - `Fix now` instructs Unity to treat it as a `normal map` - By default, Unity will *import cameras* with the model - We only need one camera for this game (which is acting as a scene in the repo). This is the `Main Camera` (*game object*). Unchecking `Import Cameras` in the *inspector* window for the file `hextraction_pod` will do this:  - Now we'll/I'll drag the file into the scene view:  ## Working with game objects - Everything in the `hierarchy` tab/window of the Unity game engine/editor will be a `GameObject` of some kind - GameObjects contain a `transform` —> information about the [] of the object: - Scale - Position - Size - GameObjects can be customized by adding *components* to them - Components represent the behaviour and appearance of the object > For instance, you can add a lighting component to illuminate your GameObject. You can add an Audio Source to make your GameObject emit sound. Or you can even write your own components as scripts and attach them to GameObjects. > GameObjects can also act as containers. Hold down the Alt key and click on the disclosure triangle to the left of hextraction_pod in the Hierarchy. This will expand the GameObject and all levels below it. You’ll see the following collection of GameObjects  > A lot of these are empty GameObjects that represent the structure of a model. Unity creates these GameObjects when you import a model. Other GameObjects, such as the children of pod_mesh, contain components such [as] Skinned Mesh Renderers to display geometry on the screen - Some items are labelled in black, and some are labeled in blue (in the hierarchy) - Black colour = standard game object - Blue colour = instance of a model OR connected to other objects with a *prefab* - Game objects can also turn brown —> they've lost the *prefab connection* You can tell that you have an instance of a model by its icon: 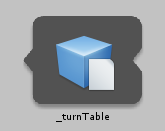 ## Working with Prefabs - It's better to use *prefabs* than to use *model instances* - Prefabs let you save GameObjects so they're easily duplicated, either through: - Code - Dragging new *instances* into the *Scene view* > Prefabs are a bit like using sand forms. Except, the instances of the Prefab are all connected. When you change the Prefab, the instances will change as well. - "When you change the Prefab, the instances will change as well: - Like in the [Space Attackers](https://github.com/acord-robotics/space-attackers) repo, the instances (as in the individual ships) can have their own *transform values* but some settings (particle effects, etc) affect the instances globally (as we will see) > Once you have an instance of a Prefab in the Scene view, you can customize it as you like. There may be times when you want to push these changes to existing Prefabs (because you liked them) or reset the instance to the state of the original prefab (because you messed up). ### Creating prefabs > To create a Prefab, you drag a GameObject from the Hierarchy and into the Project window.  - A new folder is created in the `Space Debris` area of the Unity repo - `Prefabs` - We select `original prefab` in the dialogue box that pops up when we do what we did in the above image, as we don't have an existing prefab > You’ll notice that your icon will turn completely blue. This means you’re working with a prefab instance. > Select hextraction_pod from the Hierarchy. In the Inspector window you’ll see two buttons: Open and Select. There’s also a dropdown called Overrides:  > Open allows you to open the prefab and edit it. This allows you to focus on just the prefab. The Hierarchy will only show the selected prefab. To return back to normal editing, click the back arrow in the Hierarchy.  > Select locates the Prefab in your Project window. This is particularly useful when you misplace your Prefab in a complicated folder structure within your Project window. Try it now to see what happens. **Making changes to a prefab** - When you make changes to a prefab, you're making a change to a *single instance* of the prefab > In Unity-speak, you’re overriding parts of the Prefab. - These changes can be applied to the other prefabs/other instances in the prefab > You can apply these changes to the other Prefabs, Revert the changes, or you can just leave them as is. This is done by pressing the Overrides dropdown.  ### Prefab Grid > Currently, the player’s ship has a tiled grid underneath it, which looks a bit strange. First, you need to edit the prefab. > Select the prefab and in the *Inspector* window, click the *Open* button. Then, select the *tile_reference* GameObject from the *Hierarchy*. This is a direct child of the *hextraction_pod* GameObject. Delete the grid by pressing the *Delete* key on Windows or *Cmd-Delete* on macOS. Click the back arrow in the Hierarchy to exit Prefab editing. You’ll be prompted to save your changes as you exit Prefab mode. Click *Save*. 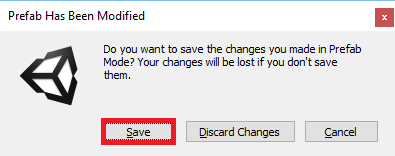 > Next, right click on hextraction_pod in the Hierarchy window, select Rename from the drop down menu that appears, and rename the GameObject to Spaceship. It should look like the following: 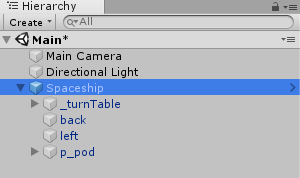 > Dragging a GameObject into the Project window converts it into a prefab without any extra effort on your part. You could create as many instances of the Spaceship as you want by dragging them from the Project window into the Scene view. Currently, this only copies the model, but later it could contain scripts, audio settings, and much more. As you can see, Prefabs can be really helpful.  Go forth my unstoppable army of spaceships! Muhahaha! ## Controlling the camera This section: - Allowing the spaceship to *move* and for the *camera to follow it* Setting up the ship: > Select the Spaceship in the Hierarchy window. Use the Inspector window to set its Position to (X:10.66, Y:1.99, Z:10). Set the Rotation to (X:270, Y:0, Z:0).  - Ship is too close to the camera, so we can either move the ship back (more) or move the camera (which is also a gameObject) > Select the Main Camera in the Hierarchy. You’ll see a Camera component in the Inspector. There are a ton of options here, but for now ignore everything except Projection and Field of View.  Projection: > You can choose Perspective or Orthographic for your projection field. This choice determines the ultimate appearance of the game. - *Perspective projection* behaves like the human eye does - The *closer an object is to the eyes, the larger it appears* - *Orthographic projection* discards depth information > Objects closer to you, or in this case, the camera, will appear the same size as objects farther away.  The two cubes in the left are shown with Perspective projection while the cubes on the right are Orthographic. **Generally, *2D games (in Unity)* should use *Orthogtaphic Projection*, while *3D games* should use *Perspective Projection*** > While your game has 3D elements, the gameplay is essentially 2D. In the Projection field, select Orthographic. Next, set the size to 18.85. Your Game view should look like the following:  ### Making the spaceship fly > A spaceship should fly, shouldn’t it? To do this, you’d have to write some code in C# to move the ship frame-by-frame. To save you some work, the example files contain a ready-to-use script. The question is, how do you add it to your ship? > A script is simply another type of component, and there are lots of ways to add components to GameObjects. You’ll experiment with a few methods in this tutorial. For now, select Spaceship from the Hierarchy. Then select the Component option from the menu bar. At the bottom, you’ll see an option called Scripts with a flyout menu of available scripts. Select the Ship Controller script. > Just as with other components, you can define fields in your scripts that you can access in the editor. This gives you the ability to change properties of your scripts while your game is being played.  - `Rotation speed` set to *2* - `Move Speed` set to 22 The `move speed` variable in the script determines *how fast the ship can move*, while the `rotation speed` variable determines *how quickly the ship can turn* > Hit the Play button in the center top of the Unity interface. This starts the game. Use the arrow keys to move your ship. Unfortunately, your ship will fly off the screen, to Alpha Centauri and beyond. You’ll need to fix that. Add the screen wrap script to the spaceship:  There is a field named `Renderers` in this script: - Takes an *array of skinned mesh renderers* - This is the *geometry that creates a model* > If a renderer isn’t onscreen, then it teleports the GameObject to another position on screen based on its movement direction and current position. Expand the Spaceship node until you find the body GameObject, then drag body into the Renderers field.  # Introducing Physics - Unity uses physics for *collision detection* - If a gameObject doesn't have a `*rigidbody`* attached to it, it's considered a *static collider* - Unity then assumes that the GameObject will *stand still* - This allows for *optimisations* regarding *collision detection* - These *static objects* can still be moved around - when/if they are, Unity has to recalculate these optimisations - To avoid this, a `rigidbody` needs to be attached to the game object (opting in to the physics engine)   > This component has a lot of options. Is Kinematic is the one you’re interested in. Setting this option means that you want to move a GameObject manually, but still want the object to register for collisions. This is useful when you’re moving items via scripts, like you’re doing here, or via animation. Tick the Is Kinematic checkbox. Since you aren’t using gravity in this game [space], uncheck the Use Gravity checkbox  > The object of this game is to fly around and shoot various types of debris. Naturally, handling collisions will play a large role in this type of game. You’ll need to know when the player shoots an asteroid or when a player crashes into something. Colliders let you listen to and respond to collisions. There are many types of colliders to use with basic shapes, such as Sphere Collider and Box Collider. There’s even a mesh collider that’s based on a 3D model. Colliders are displayed in the Scene view using green lines.  # Code & Scripts `Ship Controller` ```csharp using UnityEngine; using System.Collections; public class ShipController : MonoBehaviour { public float moveSpeed; public float rotationSpeed; private Vector3 startPosition; private Quaternion startRotation; private Vector3 moveDirection; private bool canMove = true; private bool isAlive = true; // Use this for initialization /** * Set moveDirection to (0, 0, 0), so that the Ship does not move when the game starts running. * Remember the start position and rotation, to reset the Ship when it is hit. */ void Start() { moveDirection = new Vector3(); startPosition = transform.position; startRotation = transform.rotation; } // Update is called once per frame /** * Check, whether the player is pushing an arrow key. * If this is the case, adjust moveDirection and rotation of the space ship accordingly. * Multiplying with Time.deltaTime makes sure that the game moves the Ship with the same speed independent of frame rate. */ void Update() { if (canMove) { if (Input.GetKey(KeyCode.UpArrow)) { moveDirection.y = 1; } if (Input.GetKey(KeyCode.DownArrow)) { moveDirection.y = -1; } if (Input.GetKey(KeyCode.LeftArrow)) { transform.Rotate (0, -90 * Time.deltaTime * rotationSpeed, 0); } if (Input.GetKey(KeyCode.RightArrow)) { transform.Rotate (0, 90 * Time.deltaTime * rotationSpeed, 0); } Vector3 newPosition = transform.position; newPosition += moveDirection.y * transform.forward * moveSpeed * Time.deltaTime; newPosition.z = startPosition.z; transform.position = newPosition; } } /** * OnTriggerEnter is called when two Colliders collide. * If the Ship collides and was not hit before (isAlive == true) then disable all renderers to make the ship invisible. * The Ship cannot move when it is hit, so set canMove to false. Set isAlive to false, so it cannot be hit a second time. * Then disable the IonCannon, as the Ship cannot shoot when it is hit. * Lastly call Reset(), which will reset the Ship to the start. */ public void OnTriggerEnter(Collider collider) { if (isAlive) { SkinnedMeshRenderer[] renderers = GetComponentsInChildren<SkinnedMeshRenderer>(); foreach (SkinnedMeshRenderer renderer in renderers) { renderer.enabled = false; } canMove = false; isAlive = false; IonCannon ionCannon = gameObject.GetComponent<IonCannon>(); if (ionCannon) { ionCannon.SetCanShoot(false); } } StartCoroutine(Reset()); } /** * Resets the Ship to its start position after 2 seconds. This is done with Coroutines and WaitForSeconds. * After the 2 seconds all renderers are enabled. The moveDirection is set to (0, 0, 0), so that the ship stands still when it reappears. * canMove and isAlive are set to true. * Lastly the ship's rotation and position are set to their initial values. */ public IEnumerator Reset() { yield return new WaitForSeconds(2); SkinnedMeshRenderer[] renderers = GetComponentsInChildren<SkinnedMeshRenderer>(); foreach (SkinnedMeshRenderer renderer in renderers) { renderer.enabled = true; } moveDirection = new Vector3(); canMove = true; isAlive = true; IonCannon ionCannon = gameObject.GetComponent<IonCannon>(); ionCannon.SetCanShoot(true); transform.position = startPosition; transform.rotation = startRotation; } } ``` - Comments & code Co-Authored-By: Liam Arbuckle <liam@acordsoftware.tech>
](https://s3-us-west-2.amazonaws.com/secure.notion-static.com/01f74701-5df3-4cb2-b1c5-d970085d2ffc/Untitled.png](https://s3-us-west-2.amazonaws.com/secure.notion-static.com/01f74701-5df3-4cb2-b1c5-d970085d2ffc/Untitled.png))
](https://s3-us-west-2.amazonaws.com/secure.notion-static.com/4e3c9afb-3470-4d61-a5ce-c9c997603e0a/Untitled.png](https://s3-us-west-2.amazonaws.com/secure.notion-static.com/4e3c9afb-3470-4d61-a5ce-c9c997603e0a/Untitled.png))
](https://s3-us-west-2.amazonaws.com/secure.notion-static.com/b2230663-8b85-4974-948a-8a36a379d007/Untitled.png](https://s3-us-west-2.amazonaws.com/secure.notion-static.com/b2230663-8b85-4974-948a-8a36a379d007/Untitled.png))
](https://s3-us-west-2.amazonaws.com/secure.notion-static.com/c316fa68-b8aa-4761-b9f0-1657f7a0ed14/Untitled.png](https://s3-us-west-2.amazonaws.com/secure.notion-static.com/c316fa68-b8aa-4761-b9f0-1657f7a0ed14/Untitled.png))
](https://s3-us-west-2.amazonaws.com/secure.notion-static.com/e7b1a1c8-d8eb-4783-99f9-ef971ebdba2e/Untitled.png](https://s3-us-west-2.amazonaws.com/secure.notion-static.com/e7b1a1c8-d8eb-4783-99f9-ef971ebdba2e/Untitled.png))
](https://koenig-media.raywenderlich.com/uploads/2018/11/model-icon.png](https://koenig-media.raywenderlich.com/uploads/2018/11/model-icon.png))
](https://s3-us-west-2.amazonaws.com/secure.notion-static.com/a1f6c6c9-7b3f-40e5-9cee-3a4903da37be/Untitled.png](https://s3-us-west-2.amazonaws.com/secure.notion-static.com/a1f6c6c9-7b3f-40e5-9cee-3a4903da37be/Untitled.png))
](https://s3-us-west-2.amazonaws.com/secure.notion-static.com/e4312ad5-a1d4-442d-8495-2a8558e5f701/Untitled.png](https://s3-us-west-2.amazonaws.com/secure.notion-static.com/e4312ad5-a1d4-442d-8495-2a8558e5f701/Untitled.png))
](https://s3-us-west-2.amazonaws.com/secure.notion-static.com/c435a07d-69ca-433f-960b-21817949aa0d/Untitled.png](https://s3-us-west-2.amazonaws.com/secure.notion-static.com/c435a07d-69ca-433f-960b-21817949aa0d/Untitled.png))
](https://s3-us-west-2.amazonaws.com/secure.notion-static.com/696c26e1-4594-465f-abf9-05ce84c977b9/Untitled.png](https://s3-us-west-2.amazonaws.com/secure.notion-static.com/696c26e1-4594-465f-abf9-05ce84c977b9/Untitled.png))
](https://koenig-media.raywenderlich.com/uploads/2019/02/save-prefab-dialog.png](https://koenig-media.raywenderlich.com/uploads/2019/02/save-prefab-dialog.png))
](https://koenig-media.raywenderlich.com/uploads/2018/11/spaceship-2.png](https://koenig-media.raywenderlich.com/uploads/2018/11/spaceship-2.png))
](https://koenig-media.raywenderlich.com/uploads/2016/12/PrefabDuplicates.gif](https://koenig-media.raywenderlich.com/uploads/2016/12/PrefabDuplicates.gif))
](https://s3-us-west-2.amazonaws.com/secure.notion-static.com/2b0c421e-b131-4850-8b41-b15b608aa5b8/Untitled.png](https://s3-us-west-2.amazonaws.com/secure.notion-static.com/2b0c421e-b131-4850-8b41-b15b608aa5b8/Untitled.png))
](https://s3-us-west-2.amazonaws.com/secure.notion-static.com/69cbe0d5-6dea-445d-bf45-59c3df9d58a8/Untitled.png](https://s3-us-west-2.amazonaws.com/secure.notion-static.com/69cbe0d5-6dea-445d-bf45-59c3df9d58a8/Untitled.png))
](https://s3-us-west-2.amazonaws.com/secure.notion-static.com/245b6eb4-330f-40bc-bb8f-1a574b1041e8/Untitled.png](https://s3-us-west-2.amazonaws.com/secure.notion-static.com/245b6eb4-330f-40bc-bb8f-1a574b1041e8/Untitled.png))
](https://s3-us-west-2.amazonaws.com/secure.notion-static.com/699c94e1-4617-40be-a72e-3ef9c597c3fe/Untitled.png](https://s3-us-west-2.amazonaws.com/secure.notion-static.com/699c94e1-4617-40be-a72e-3ef9c597c3fe/Untitled.png))
](https://s3-us-west-2.amazonaws.com/secure.notion-static.com/73b24efd-c416-4eb3-97d6-75ef09fbe527/Untitled.png](https://s3-us-west-2.amazonaws.com/secure.notion-static.com/73b24efd-c416-4eb3-97d6-75ef09fbe527/Untitled.png))
](https://s3-us-west-2.amazonaws.com/secure.notion-static.com/b36b2e54-d9ed-4a09-be7f-62ee9da466f9/Untitled.png](https://s3-us-west-2.amazonaws.com/secure.notion-static.com/b36b2e54-d9ed-4a09-be7f-62ee9da466f9/Untitled.png))
](https://s3-us-west-2.amazonaws.com/secure.notion-static.com/8c2109de-ffb5-4795-9c8e-ebd9b2bea969/Untitled.png](https://s3-us-west-2.amazonaws.com/secure.notion-static.com/8c2109de-ffb5-4795-9c8e-ebd9b2bea969/Untitled.png))
](https://s3-us-west-2.amazonaws.com/secure.notion-static.com/8e58b6d4-e8ee-4bd0-a281-41461e00298c/Untitled.png](https://s3-us-west-2.amazonaws.com/secure.notion-static.com/8e58b6d4-e8ee-4bd0-a281-41461e00298c/Untitled.png))
](https://s3-us-west-2.amazonaws.com/secure.notion-static.com/541429d5-5b1a-4b09-96a1-6ef0a5de84c8/Untitled.png](https://s3-us-west-2.amazonaws.com/secure.notion-static.com/541429d5-5b1a-4b09-96a1-6ef0a5de84c8/Untitled.png))
](https://s3-us-west-2.amazonaws.com/secure.notion-static.com/ecdc8541-2245-4fa0-9887-fa9e9e5b6b2c/Untitled.png](https://s3-us-west-2.amazonaws.com/secure.notion-static.com/ecdc8541-2245-4fa0-9887-fa9e9e5b6b2c/Untitled.png))
](https://s3-us-west-2.amazonaws.com/secure.notion-static.com/05ebee2c-649f-4d82-8cdc-8251252f7b2c/Untitled.png](https://s3-us-west-2.amazonaws.com/secure.notion-static.com/05ebee2c-649f-4d82-8cdc-8251252f7b2c/Untitled.png))
Gizmotronn
added a commit
that referenced
this issue
May 27, 2020
# Introducing Physics
- Unity uses physics for *collision detection*
- If a gameObject doesn't have a `*rigidbody`* attached to it, it's considered a *static collider*
- Unity then assumes that the GameObject will *stand still*
- This allows for *optimisations* regarding *collision detection*
- These *static objects* can still be moved around - when/if they are, Unity has to recalculate these optimisations
- To avoid this, a `rigidbody` needs to be attached to the game object (opting in to the physics engine)


> This component has a lot of options. Is Kinematic is the one you’re interested in.
Setting this option means that you want to move a GameObject manually, but still want the object to register for collisions. This is useful when you’re moving items via scripts, like you’re doing here, or via animation.
Tick the Is Kinematic checkbox. Since you aren’t using gravity in this game [space], uncheck the Use Gravity checkbox

> The object of this game is to fly around and shoot various types of debris. Naturally, handling collisions will play a large role in this type of game. You’ll need to know when the player shoots an asteroid or when a player crashes into something.
Colliders let you listen to and respond to collisions. There are many types of colliders to use with basic shapes, such as Sphere Collider and Box Collider.
There’s even a mesh collider that’s based on a 3D model. Colliders are displayed in the Scene view using green lines.

Add a `sphere collider` to the *spaceship gameObject*

> With the Spaceship selected in the Hierarchy, find your Sphere Collider in the Inspector.
Set Center to (X:0, Y:4.09, Z:-0.72)
Set the Radius to 3.14
Check the Is Trigger checkbox. Kinematic GameObjects can’t register normal collisions, but they can listen to trigger events from other kinematic objects.
Co-Authored-By: Liam Arbuckle <liam@acordsoftware.tech>
](https://s3-us-west-2.amazonaws.com/secure.notion-static.com/111938c5-a761-4e91-8bd8-960a2ef6ea5f/Untitled.png](https://s3-us-west-2.amazonaws.com/secure.notion-static.com/111938c5-a761-4e91-8bd8-960a2ef6ea5f/Untitled.png))
Gizmotronn
added a commit
that referenced
this issue
May 30, 2020
Gizmotronn
added a commit
that referenced
this issue
Jun 12, 2020
Gizmotronn
added a commit
that referenced
this issue
Jun 19, 2020
got a problem in scene "SD Review" where element zero in game manager object isn't appearing, but SpaceDebris scene does work :)
Gizmotronn
added a commit
that referenced
this issue
Jul 27, 2020
Starting a project (with @Blackmagicknight), mini version of http://cinnabargames.com/a-new-game-tiny-space-program/, using assets from unity asset store and itch.io. #8 #7 + Clickup (coming soon)

Co-Authored-By: Liam Arbuckle <allianceofdroidsla@gmail.com>
Co-Authored-By: Blackmagicknight <61495292+blackmagicknight@users.noreply.github.com>
Gizmotronn
added a commit
that referenced
this issue
Aug 1, 2020
CU-20x4bn, CU-20vaz2

https://www.youtube.com/watch?v=GjTTqz39kLY&list=PLX-uZVK_0K_6JEecbu3Y-nVnANJznCzix&index=3

Set up game with www.inscope.me sprites, see prev commits + clickup

Co-Authored-By: Liam Arbuckle <allianceofdroidsla@gmail.com>
Co-Authored-By: Liam Arbuckle <liam@acordsoftware.tech>
Sign up for free
to join this conversation on GitHub.
Already have an account?
Sign in to comment
https://www.raywenderlich.com/9175-introduction-to-unity-getting-started-part-2-2
The text was updated successfully, but these errors were encountered: