CHECK THE ISSUES!!!
!!!WARNING!!! Welcome to the jungle of Junk coding. If you don't know your way in the jungle, don't enter it... ;)
(You need to dive into the code because it is updated on dayly basis. Follow the white rabbit.) Only for c/c++ devils.
Also: I you need manuals on other stuff, ASK! (Super large posters of Google 3d on 300+ dpi) (Video's of 3d objects from 3d window, setting markers, interpolation, recording) (Using geometry/fragment shaders on 3d data/objects) (Voxelizing Wavefront objects and create schematics/region files, automation for creating very large worlds from 2d/3d objects and/or scratch/formulas) (Pacman maze game, using it for animations/recording/creation of very large 2d canvas) (Use of the very large canvas) (Downloading / managing sattelite/street maps endless sized canvas, zoomlevels) (Recording screen, converting video's, playing video's with internal/external ffmpeg player) (How the code-jungle works, etc)
NOTES ACCORDING TO MANUAL.TXT AND HANDLEIDING.TXT AND THE BTE 121 PROJECTION: The directory / pacman / pacman_cuberite contains a number of files of type .on and / or .off The .on should NOT be there, unless you want to include weird stuff in your region files. Therefore, leave only the .off. You can use it to add tunnels with glass/tnt below the surface, add mazes with rails and command blocks, add mountains/water, add tnt, add inside of buildings, etc. For nomal voxelizing they should be renamed to .OFF, and the .ON should not be there.) The add_to_region.on / .off is used to determine whether to update a region file if it exists or not. You can then edit entire octants again by saving the .vox and .dat. After which region files that already exist are not recreated.
Download from Google drive:
https://drive.google.com/drive/folders/1RuIClj5k9hI7i3NJv5cLOhdohfn4S9tR
Source code:
https://github.com/HakkaTjakka/MinecraftWorldEditor
This program is also used by:
https://github.com/HakkaTjakka/Minecraft-Voxelizer
For BTE 121 projection:
https://github.com/HakkaTjakka/MinecraftWorldEditor/blob/master/manual.txt
https://github.com/HakkaTjakka/MinecraftWorldEditor/blob/master/handleiding.txt
Thanks to https://github.com/IDidMakeThat. Code changed (also used in this repo, this one is isolated and speed up with mem. allocation and read/write from memory, memory leak detection with sep. memory allocator) from him:
https://github.com/HakkaTjakka/MCA-NBT-EDIT
Load city data from drive: https://drive.google.com/drive/folders/12TwAJk4L6kch_bv6_96yDbOMX_gp0IfU directory pacman/earth Backspace: Enschede 2 x ctrl-v 4 x shift-k use setup .bat files for /saves/leeg and /saves/test dir (read inside)
Msg me for installing/usage.... gerardwensink@gmail.com
Please do not hesitate to msg me. I will guide you through the setup and usage. Because its a preliminary experimental prototype machine there is no complete manual on the latest devellopmenst. Reverse engineering is (almost) impossible. What you find out in one week i can help you with in 2 minutes. Ok?
https://www.youtube.com/watch?v=e7IMldMbdlw https://youtu.be/BcUfDZcraB0
https://www.facebook.com/gerard.wensink/videos/2764273163635273/
Core building function(s) in:
https://github.com/HakkaTjakka/MinecraftWorldEditor https://github.com/HakkaTjakka/MinecraftWorldEditor/blob/master/PACMAN_CUBERITE/src/test.cpp or https://bitbucket.org/HAKKATJAKKA/minecraft-world-creator/src/master/PACMAN_CUBERITE/src/MCEditor/test.cpp
https://www.onmsft.com/news/its-official-github-is-now-owned-by-microsoft
BECAUSE GITHUB IS SHIT, GET YOUR DOPE AT:
https://bitbucket.org/HAKKATJAKKA/minecraft-world-creator/src/master/
https://bitbucket.org/HAKKATJAKKA/
https://www.youtube.com/watch?v=Q0EHdVRxQAs&list=PL-9ag_EiMQFkyRMaDy6G-otUxXEoXFtfM&index=3
https://www.facebook.com/gerard.wensink/videos/2713032928759297/
https://www.youtube.com/watch?v=ZzYjZEYaP20
https://www.youtube.com/watch?v=ax9qsIWSVhg
https://drive.google.com/open?id=12TwAJk4L6kch_bv6_96yDbOMX_gp0IfU
https://www.facebook.com/Minecraft-Worldeditor-110607880303634/
Complete program with source level data:
PACMAN_GRAPHICS_MINECRAFT_WORLD_GENERATOR_WITH_DEMO_DATA.zip
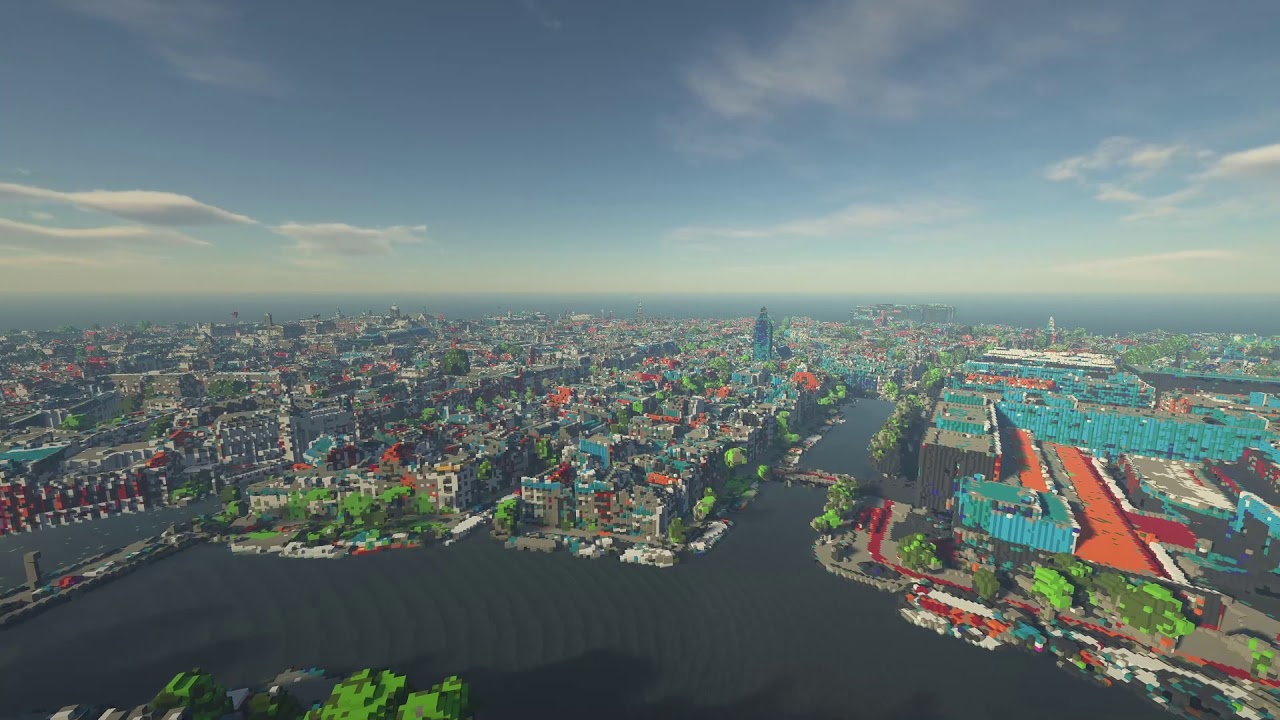
Create Minecraft region files (.mca) from scratch/textures. Use (very) large canvas with 2d textures and graphics as a source for creating 3d minecraft region files. (512x256x512 blocks).
Demo files:
pacman mceditor (from current level in level.txt) or GEN_MAZE.BAT (from level/100x200/013) for creating 3600 region files with maze with rails + tnt!
pacman mceditor 1
(from current level in level.txt)
or
GEN_MAZE_ADD_1.BAT
(from level/100x200/013)
for adding more smaller mazes to existing region files
pacman mceditor 2 (from current level in level.txt) or GEN_MAZE_ADD_2.BAT (from level/100x200/014) for adding more smaller mazes at higher y to existing region files Also adds command blocks for adding corals and klelp in water and places fishes.
Sequence: gen_maze.bat for generating some .mca region files. gen_maze_add_1 for adding more mazes. Gen_maze_add_2 for adding more mazes and adding coral command blocks ( from x,y,z=0,0,0 on floor,latest aqua demo on drive 256,5,256 starting gray coded movement chunk to chunk) and adding fish entities. (Because levels are made in 1.12.2 nbt tag structure, and 1.12.2 does not know coral blocks and kelp etc., the corals are made with command blocks at x,y,z 0,0,0 that run several setblock functions per command block, then give power to next command block). (So much fun…)
Then you end up with in world /saves/test/region 1.12.2 version region .mca files. Works also fine in 1.14 and up.
Program in for creating world in src/MCEditor/test.cpp. Install codeblocks ide first. Set codeblocks->Settings->Compiler->Toolchain executables to mingw seh version binaries. Check source, batch files, directories etc for usage…..
Support: gerardwensink@gmail.com https://www.facebook.com/gerard.wensink https://www.facebook.com/Pacman-Graphics-1601114056700700/
Set up directories: /Saves/Leeg (worlddir)(empty level dir 1.12.2, with one region file as base, r.0.0.mca) /Saves/Test (worlddir)(copy of /Saves/Leeg, where new created files are placed) (See INSTALL_SAVES.bat for support) Then make copy of /Saves/Test, like /Saves/Test.copy, for usage with minecraft, because level might change due to playing it…..
Edit level.dat (with NBTExplorer.exe) and change doTileDrops and doEntityDrops to false, or in game: /gamerule dotiledrops false And /gamerule doentitydrops false Otherwise explosions from tnt from hallways create lots of junk. (-> lag) Train: Place cart with right mouse button, step in, right mouse button, move press forware (w) out: shift.
Mods used: 498.972 fabric-api-0.4.0+build.240-1.14.jar 622.930 fabric-carpet-1.14.4-1.1.0+v190927.jar 358.734 optifabric-0.5.2.jar 3.264.620 OptiFine_1.14.4_HD_U_F3.jar 6.921.382 replaymod-1.14.4-2.2.0-b7.jar
Loader MultiMC 5 Get Fabric instance from: https://fabricmc.net/use/ Use MC 1.14.4 Singleplayer. Select World. Optimize World. Erase cached data. I know what i'm doing. /tp 255 5 255 step on plate F3+N -> Spectator mode, go up. Watch the coral reefs grow from command blocks. Uses forceload x z in commandblocks. According to specs. the forceload does not work from command blocks. Commandblocks on base floor under chunk were the coral will appear. Uses graycode karnaugh path. (from chunk to neighbour chunk).
Thanks to (random order):
https://www.replaymod.com/ https://github.com/ReplayMod/ReplayMod
https://github.com/IDidMakeThat/libnbt
https://github.com/mingl0280/MCEditor
https://github.com/Milerius/sfemovieFix
https://github.com/HubTou/MCA2NBT
https://github.com/cuberite/cuberite
https://github.com/rdp/ffmpeg-windows-build-helpers
https://github.com/retroplasma/earth-reverse-engineering
https://github.com/ytdl-org/youtube-dl
https://github.com/FFmpeg/FFmpeg
https://github.com/gnembon/fabric-carpet
https://github.com/CrushedPixel
Put youtube url and/or youtube ref.id in ./convert/list.txt (See example file)
Click on DOWNLOAD.BAT for downloading files - Files end up in ./convert/files - Also CONVERT.BAT file for manual converting from shell to files with subtitles. - Files with subtitles end up in ./convert/files/out
OR(NOT AND)
Click on BURN.BAT for burning subtitles into the downloaded youtube files. - Files with subtitles end up in ./record
OR(NOT AND)
Click on DOWNLOAD_AND_BURN.BAT for downloading AND burning the subtitles. - Files end up in ./convert/files - Files with subtitles end up in ./record
BURN_AND_DOWNLOAD.BAT: - Resume burning downloaded first, then start downloading list
LIST.BAT - List downloaded/converted movies. - Move to ../convert/converted if converted file is in ../record
Erease and/or move files in case ... ;) Rerun.
Some nifty keys:
F2 Debug on/off; ALT-left,ALT-right Select picture/movie selector option. (Select plot) ALT-up,ALT-down Select picture/movie selector. (Not used, only when SHIFT-p/SHIFT-m/SHIFT-b is used) CTRL-space Change selected option texture. (Select front/back/def) F7 Change front/back when texture selector option plot is send to "def" F8 Plot frame. ALT-v Start downloading youtube movies from convert/list.txt ALT-SHFT-v Start burning subtitles from convert/files/convert.txt SHFT-m Play movies from list record/list.txt. Use record/makelist.bat to make list from burned movies. SHFT-pgup Larger picture. SHFT-pgdn Smaller picture. CTRL-b Fix movie to background. SHFT-v Blend movie. F1 Some functions. SHFT-F1 Some more functions. CTRL-f Screensaver pacman. TAB/SHFT-TAB Select drawing/moving mode. CTRL-TAB Change moving mode. , Playing mode. F4 Time adjust speed. F3 Sync on/off. (Faster/Flicker). CTRL-q Fast exit. ESCAPE Stop downloading movies from download.bat, dab.bat, pacman download, ALT-v, etc. b Stop playing movie. SHFT-r Recording pause on/off. b Load next movie. r Record. Starts in pause mode. movie from 'b' paused. / can be loaded with 'b'. SHFT-b starts recording. SHIFT-r When not in recording mode, change recording movie from 'b' (def.mode), or FULL SCREEN. SHFT-b Play movie large. f Follow ghost. +/- More less ghosts. CTRL-y Large map. CTRL-home Top screen. Go left for start list.... F9 Set position 1 F10 Load position 1 F11 Set position 1 F12 Load position 1 ALT-pgup,ALT-pgdn Rotate left/right (rotating) PGUP/PGDN Rotate left/right DEL(2x) Reset maze ALT-DEL(3x) Delete background. SHFT-d Select background 2 on/off F8 Plot to screen SHIFT-F8 Plot screen to texture (SHFT-p) CTRL-c Size texture to scale. ALT-F8 Save picture. CTRL-SYS-pgup/pgdn Scale x/y ALT-p Reset rotate. etc.
(Just try all key combo's and/or check code .cpp files or check docs or phone home)
set PACMAN.INI files for technical shit. (MAXINMEM=100) ...(FOR CTRL-y) files in directories in file list.txt. run makelist.bat to update list.txt. etc. etc. Manual will follow.
Pacman graphics systems
https://www.facebook.com/pg/Pacman-Graphics-1601114056700700/
Make poster(s)
-
Edit LAT_LONG_CENTER.js and set lat0,lat1,lon0,lon1 (north,south,west,east) (see examples, use Google Maps -> click mouse, lat/lon at bottom of screen) lat0,lon0 = upper left corner lat1,lon1 = lower right corner
-
Make sure you installed javascript (node, right version) run DUMP_OCTANTS.BAT or type: node LAT_LONG_CENTER.JS > city.out Result will be file with c++ program data to insert into pacman_cuberite\src\include\test_data.hpp Add according line in function: std::string areas(int q) {...} and std::string get_area_data(std::string area_name, int &x, int &y) {...} Compile pacman.exe with codeblocks and seh compiler. (See: install codeblocks)
-
Use output from LAT_LONG_CENTER.JS to create batch file with lines like: node DUMP_OBJ_CITY.js 21424171424252435 21 --parallel-search --MIAMI Run the batch file, quit after loading one octant dir, or just run line one from command line. Edit this first .obj file in the downloaded_files\obj\ downloaded octand dir, get first vertex coordinates (before dec. point) for x,y and z. Use these to adapt DUMP_OBJ_CITY.js, lines like: else if (CITYNAME[0]=="--MIAMI") { offset_x=975859; offset_y=-5652918; offset_z=2771644; } and insert correct line with city name and offsets like this. Keep these offsets for later use... Edit file lib\parse-command-line2.js and add city name data also, see examples: if (optional.filter(o => !['--dump-json', '--dump-raw', '--parallel-search','--ENSCHEDE','--MIAMI', '--AMSTERDAM', '--BRUSSEL', '--LA', '--NEWYORK', '--JOCELYN' ].includes(o)).length > 0) errors.push('Invalid parameters.'); CITYNAME: optional.filter(o => ['--MIAMI', '--ENSCHEDE', '--AMSTERDAM', '--BRUSSEL', '--LA', '--NEWYORK', '--JOCELYN' ].includes(o)), Offsets (first octant is the middle one...) will be used to subtract from x,y,z vertex data when downloading, to make them smaller for loading later into GPU Delete the dir with the first octant data Run the batch file to download all octants to downloaded_files\obj When downloaded copy them to downloaded_files\new\cityname Eventually you can use Irfanview and/or powershell Ubuntu batch/.sh files to convert .jpg and .bmp into .png. However, program will (try to load) either type, .jpg||.bmp||.png....
-
pacman.exe: Edit pacman.ini file. Set BITMAPSX and BITMAPSY to minimal size of poster you want, like 100 and 50 for poster size 100x50 hd screens (1920x1080) Make sure your octants are located in one of the three used dirs like downloaded_files\new\cityname Press BACKSPACE to select one of the cities/areas downloaded. Load one of them with '6' or ctrl-6. If ok one octant will be loaded in second screen, fullscreen or window. F11 to change screen <-> window.
Press 'b'. Program will check which of the octants listed in the generated and in test_data.cpp inserted code is present, in on of the 3 dirs: EARTH_ROOT1 or EARTH_ROOT2 or EARTH_ROOT3. When all in one dir (you can use 3 different drives/directories with the earth donwload javascript system) you can put on top (EARTH_ROOT1). Because program will check this dir first for octant dir present or not. If found, the OCTANTNUMBER.dat file generated by the javascript is checked. In it are the min/max values of the object vertexes. If the .dat file is not present, it will generate it by scanning the vertexes in the .obj file. IMPORTANT: When using different language system, set it to dutch (NL), or adapt winapi.cpp: setlocale function. It has to do with writing/reading floating points, with decimal point ('.') or comma (','). Use right combinations of windows settings/setlocale() function. (See source for example). When ok, you have generated a new 3d object, with wireframe only data, of ALL objects downloaded. So the system can load this to access all blocks locations/sizes. It should be in ..\models
Press ctrl-q to exit the 3d window with the one loaded octant. Use backspace to select the 'area' : Models, its in the ..\models dir if ok, and contains the collective octants 3d object. All with corrected x,y,z vertex data. 0,0,0 will be the first loaded octants which will be in the center. Because of the LAT_LONG_CENTER.JS sorts the octants from middle to outer side. You can adapt this code to select circle around this center, or create block shape around it. (See javeascript code of the program).
General keys on loading objects: ctrl+system+alt + left/right/up/down : load previous/next object to the left/right/up/down of the current, and delete the current from GPU memory. ctrl+alt + left/right/up/down : load previous/next object to the left/right/up/down of the current, and KEEP the current. Will be added into GPU memory. 'q': close 3d object window, but keep background thread running. Shift-q: close window and end thread. 'z': Save configuration of loaded objects to OBJECT_ARRAY.TXT. When from main screen shift-v is used (CROSSING=1), then when opening 3d window with '6' or ctrl-6 will load all objects in this file. 'x': Load configuration from OBJECT_ARRAY.TXT. Objects will be loaded like when opened 3d windows with shift-v (CROSSING=1) Delete/rename that file from OS if not wanted/needed. Like when using 'b' (see above) for octants check, otherwise it only will run check on the ones in OBJECT_ARRAY.TXT and create an global object from it. (Used for smaller posters/area's)
When the model is loaded, you can use the mouse trackball to position the whole octants object to the view you want. Use left/middle/right mousebutton and move/rotate/zoom it. Press 'f', you will get a 8x8 size grid showing the frustums. Larger grid (smaller frustums, more): shift+alt+f, less: ctrl+alt+f Less/more horizontal: 'h' / shift-h. Less/more vertical: 'v' / shift-v Start position frustums: ctrl-v / alt-v for vertical ctrl-h / alt-h for horizontal positioning. Size frustums: 'v' / shift-v and 'h' / shift-h F5: debug info on/of, F6/F7/F8 reset rotations/translation/zoom/perspective of octant object. F3 orthografic perspective / normal 3d perspective. Keypad (NumLock on) 7 / 8 : perspective angle. Don't use other keypad numbers for like translation/rotation with ctrl/shift/alt keys etc. They are not recorded. So use the preset/resetted values and use trackball mouse for positioning/translation/rotation. The perspective angles (7/9) and perspective type (F3) are recorded and used.
To be continued soon. (next is ctrl-b in 3d screen, main screen shift-d, shift-g, shift-f6, shift-d, wait few minutes/hours/days for poster.
For the voxel generator:
Put .obj files into dir ../models (seen from within installdir/pacman_cuberite, so installdir models). Set pacman.ini files to right parameters. Like search paths for files. Setup list.txt files in dirs if needed. For downloading Google 3d Earth data see the ../EARTH dir, edit some right files with the right data, see examples. Also check the file in a subdir of the javascript system for inserting a new area name. After generating a list with code to insert into the program, (adapt some see examples, or by file like amsterdam when its large), compile it. Download the first octant. Check the first coordinates and put them in the javascript (see examples). Download all to obj dir, transfer to new dir, run divide.bat, run convert.bat. Setup saves dir for minecraft files (see .bat file). Run pacman.exe program. Press Backspace to select MODELS (so list.txt from ../models dir with complete filepath of .obj objects to load from, like from ../modesl itself with a dir /s/b command to generate the list.txt (see files)) Or AREA NAME from google 3d data. Load one model / part, press Alt-B to generate .nbt files from .obj files. Press B to generate 3d wire model of all data blocks and .dat file with size of object. (Adapt viewer_my_loadobj.cpp function wuppie_vector with right offset settings according height of minecraft level (max 256 blocks), and/or adapt code if you want larger voxel data. (Help yourself).)
Press ctrl-6 or 6 for loading one object. lat_lon.txt for gps coords. OBJECT_ARRAY.TXT for X/Y data when loading large google maps. Press twice ctrl-v from main window. Press 4 times shift-k. (crossing=2 mirror=4 below in screen...) Press alt-b The region files should now be created from the .obj files. Msg me for installing and operating. Manual in progress.
For more support: paypal.me/GerardWensink
Make poster(s)
-
Edit LAT_LONG_CENTER.js and set lat0,lat1,lon0,lon1 (north,south,west,east) (see examples, use Google Maps -> click mouse, lat/lon at bottom of screen) lat0,lon0 = upper left corner lat1,lon1 = lower right corner
-
Make sure you installed javascript (node, right version) run DUMP_OCTANTS.BAT or type: node LAT_LONG_CENTER.JS > city.out Result will be file with c++ program data to insert into pacman_cuberite\src\include\test_data.hpp Add according line in function: std::string areas(int q) {...} and std::string get_area_data(std::string area_name, int &x, int &y) {...} Compile pacman.exe with codeblocks and seh compiler. (See: install codeblocks)
-
Use output from LAT_LONG_CENTER.JS to create batch file with lines like: node DUMP_OBJ_CITY.js 21424171424252435 21 --parallel-search --MIAMI Run the batch file, quit after loading one octant dir, or just run line one from command line. Edit this first .obj file in the downloaded_files\obj\ downloaded octand dir, get first vertex coordinates (before dec. point) for x,y and z. Use these to adapt DUMP_OBJ_CITY.js, lines like: else if (CITYNAME[0]=="--MIAMI") { offset_x=975859; offset_y=-5652918; offset_z=2771644; } and insert correct line with city name and offsets like this. Keep these offsets for later use... Edit file lib\parse-command-line2.js and add city name data also, see examples: if (optional.filter(o => !['--dump-json', '--dump-raw', '--parallel-search','--ENSCHEDE','--MIAMI', '--AMSTERDAM', '--BRUSSEL', '--LA', '--NEWYORK', '--JOCELYN' ].includes(o)).length > 0) errors.push('Invalid parameters.'); CITYNAME: optional.filter(o => ['--MIAMI', '--ENSCHEDE', '--AMSTERDAM', '--BRUSSEL', '--LA', '--NEWYORK', '--JOCELYN' ].includes(o)), Offsets (first octant is the middle one...) will be used to subtract from x,y,z vertex data when downloading, to make them smaller for loading later into GPU Delete the dir with the first octant data Run the batch file to download all octants to downloaded_files\obj When downloaded copy them to downloaded_files\new\cityname Eventually you can use Irfanview and/or powershell Ubuntu batch/.sh files to convert .jpg and .bmp into .png. However, program will (try to load) either type, .jpg||.bmp||.png....
-
pacman.exe: Edit pacman.ini file. Set BITMAPSX and BITMAPSY to minimal size of poster you want, like 100 and 50 for poster size 100x50 hd screens (1920x1080) Make sure your octants are located in one of the three used dirs like downloaded_files\new\cityname Press BACKSPACE to select one of the cities/areas downloaded. Load one of them with '6' or ctrl-6. If ok one octant will be loaded in second screen, fullscreen or window. F11 to change screen <-> window.
Press 'b'. Program will check which of the octants listed in the generated and in test_data.cpp inserted code is present, in on of the 3 dirs: EARTH_ROOT1 or EARTH_ROOT2 or EARTH_ROOT3. When all in one dir (you can use 3 different drives/directories with the earth donwload javascript system) you can put on top (EARTH_ROOT1). Because program will check this dir first for octant dir present or not. If found, the OCTANTNUMBER.dat file generated by the javascript is checked. In it are the min/max values of the object vertexes. If the .dat file is not present, it will generate it by scanning the vertexes in the .obj file. IMPORTANT: When using different language system, set it to dutch (NL), or adapt winapi.cpp: setlocale function. It has to do with writing/reading floating points, with decimal point ('.') or comma (','). Use right combinations of windows settings/setlocale() function. (See source for example). When ok, you have generated a new 3d object, with wireframe only data, of ALL objects downloaded. So the system can load this to access all blocks locations/sizes. It should be in ..\models
Press ctrl-q to exit the 3d window with the one loaded octant. Use backspace to select the 'area' : Models, its in the ..\models dir if ok, and contains the collective octants 3d object. All with corrected x,y,z vertex data. 0,0,0 will be the first loaded octants which will be in the center. Because of the LAT_LONG_CENTER.JS sorts the octants from middle to outer side. You can adapt this code to select circle around this center, or create block shape around it. (See javeascript code of the program).
General keys on loading objects: ctrl+system+alt + left/right/up/down : load previous/next object to the left/right/up/down of the current, and delete the current from GPU memory. ctrl+alt + left/right/up/down : load previous/next object to the left/right/up/down of the current, and KEEP the current. Will be added into GPU memory. 'q': close 3d object window, but keep background thread running. Shift-q: close window and end thread. 'z': Save configuration of loaded objects to OBJECT_ARRAY.TXT. When from main screen shift-v is used (CROSSING=1), then when opening 3d window with '6' or ctrl-6 will load all objects in this file. 'x': Load configuration from OBJECT_ARRAY.TXT. Objects will be loaded like when opened 3d windows with shift-v (CROSSING=1) Delete/rename that file from OS if not wanted/needed. Like when using 'b' (see above) for octants check, otherwise it only will run check on the ones in OBJECT_ARRAY.TXT and create an global object from it. (Used for smaller posters/area's)
When the model is loaded, you can use the mouse trackball to position the whole octants object to the view you want. Use left/middle/right mousebutton and move/rotate/zoom it. Press 'f', you will get a 8x8 size grid showing the frustums. Larger grid (smaller frustums, more): shift+alt+f, less: ctrl+alt+f Less/more horizontal: 'h' / shift-h. Less/more vertical: 'v' / shift-v Start position frustums: ctrl-v / alt-v for vertical ctrl-h / alt-h for horizontal positioning. Size frustums: 'v' / shift-v and 'h' / shift-h F5: debug info on/of, F6/F7/F8 reset rotations/translation/zoom/perspective of octant object. F3 orthografic perspective / normal 3d perspective. Keypad (NumLock on) 7 / 8 : perspective angle. Don't use other keypad numbers for like translation/rotation with ctrl/shift/alt keys etc. They are not recorded. So use the preset/resetted values and use trackball mouse for positioning/translation/rotation. The perspective angles (7/9) and perspective type (F3) are recorded and used.
To be continued soon. (next is ctrl-b in 3d screen, main screen shift-d, shift-g, shift-f6, shift-d, wait few minutes/hours/days for poster.
3d window: (see viewer_my_events.h) f12 hide/show window f9 plane (experimental) (shift-f9 recover, ctrl-f9 visible on/of) ctrl-f12 4k screen (3840x2160 pixels for 4k recordings) (see also pacman.ini for ffmpeg commands, put ffmpeg\bin in path) f11 window/fullscreen. 'm' marker 'e' erase marker file 'p' next marker position shift-'p' play interpolation (200) between markers for every frame. 'r' record.
order:
load the 3d objects from the net with the node.js system in earth
generate with: node LAT_LONG_CENTER.js and/or (adapt) DUMP_OCTANTS.BAT
part of output to put in pacman_cuberite\src\include\test_data.hpp and compile with codeblocks
part of output to download in .bat file
part of file for debugging
run the .bat file with the download commands from output of dump_octants.bat
move the earth\downloaded_files\obj to new\areaname
put the path to the new\ dir in pacman.ini, you can use three different 'downloaded_files\new' directories with dir named after area (see code on area).
set other options in pacman.ini file
start pacman.exe from command line with right paths set (see setpath_seh_64_v7.bat file for path settings to ffmpeg\bin pacman_cuberite\bin node.js etc.
backspace to select model fixed in code (viewer dir), or 'model' for model dir from pacman.ini with list.txt and makelist.bat file for listing 3d objects
f6 full screen load object
ctrl-f6 window load object (f11 change to full)
'b' for creating .dat files with .obj dimensions. Used to create model\areaname.obj with dimensions of all .obj files for later use.
when object loaded from models\ (backspace) positioned, and frustums are set, press:
shift-b for generating models\areaname.cam file. With for each frustem x,y a list of used 3d objects in this area. for later use...
ctrl-b for loading this file, and wait for other window.
other window:
shift-d : select background window
shift-g : select FORMULA=1
shift-f6 : put all empty background textures from levels\XxY\levelnum\picture...png in list
shift-g (2x) : select FORMULA=somenumber is gone...
The loading should begin from the 3d window... then when rendered displayed in the main window.
press ctrl-y for zooming out (uses 8x8 bitmaps in pacman.ini setting, and higher if alt- -/+ is used)
use all sorts of keys to mess things up, also read readme file(s).... (just try...)
Added: alt-b when 3d object loaded makes all .obj files to .nbt (named binary tag) files. (nbtexplorer.exe). Loads significant faster. (see dir viewer*.h* files) ctrl-d use vertex and fragment shader on 3d model displayed. Create depth planes, morphing, effects on gpu etc.
If you want to use the code and system and need a manual: gerardwensink@gmail.com (when still alive...)
Posters:

Video recordings:
https://www.youtube.com/watch?v=-oKbAVgY40Q
https://www.youtube.com/watch?v=0Xry20e64t4
https://www.youtube.com/watch?v=1--mdOGf9yY
https://www.youtube.com/watch?v=17ecaH5FKgU
https://www.youtube.com/watch?v=1hnng4Ox6Ic
https://www.youtube.com/watch?v=1jYP3AJigWo
https://www.youtube.com/watch?v=27Y0BxvMOr4
https://www.youtube.com/watch?v=2_VktKgIPX0
https://www.youtube.com/watch?v=2aO-z6zFGMs
https://www.youtube.com/watch?v=3ZGFT8vSu1k
https://www.youtube.com/watch?v=4BPX15TABjg
https://www.youtube.com/watch?v=4Roou02S2HU
https://www.youtube.com/watch?v=7q-RElaCzuo
https://www.youtube.com/watch?v=8FnkB6y_vrI
https://www.youtube.com/watch?v=91SrOq-05TM
https://www.youtube.com/watch?v=9MbNoYnSgz0
https://www.youtube.com/watch?v=9eIsK7KQ_tE
https://www.youtube.com/watch?v=Ae9fL6AUXBk
https://www.youtube.com/watch?v=Bvkh_usaN_A
https://www.youtube.com/watch?v=CEN1CdW1vfE
https://www.youtube.com/watch?v=Ejb1YhHMzB8
https://www.youtube.com/watch?v=GdzbyRKVDI8
https://www.youtube.com/watch?v=Gi4v5jTUFJs
https://www.youtube.com/watch?v=Ho7Ui6UQWGA
https://www.youtube.com/watch?v=Hpg7TjccrL4
https://www.youtube.com/watch?v=IC8RvQHWlxg
https://www.youtube.com/watch?v=Jjds_Mud4zw
https://www.youtube.com/watch?v=Jv6SGmeWXlg
https://www.youtube.com/watch?v=KHQlX7nopUk
https://www.youtube.com/watch?v=KycoZ3dXztc
https://www.youtube.com/watch?v=L-G4hHoWeO0
https://www.youtube.com/watch?v=M0scSkI5_Ew
https://www.youtube.com/watch?v=N2PSnAvQVrk
https://www.youtube.com/watch?v=ORY3lP6D83g
https://www.youtube.com/watch?v=Otw-ZDBts8c
https://www.youtube.com/watch?v=Pljt19Q1RMI
https://www.youtube.com/watch?v=PoId7rPuYak
https://www.youtube.com/watch?v=Q6WhQf-sHJk
https://www.youtube.com/watch?v=RtjcJ7tPpOM
https://www.youtube.com/watch?v=RwHEy2etne4
https://www.youtube.com/watch?v=SK6M4mCtKYQ
https://www.youtube.com/watch?v=Sea8eRD8Qgk
https://www.youtube.com/watch?v=SrvCSY4mgZA
https://www.youtube.com/watch?v=TwPi5Bg4PA8
https://www.youtube.com/watch?v=Uc6SIL0psZw
https://www.youtube.com/watch?v=UrQSv8Rnc9M
https://www.youtube.com/watch?v=VymcUfT-KxU
https://www.youtube.com/watch?v=W3cichfCItM
https://www.youtube.com/watch?v=W8ZrhkFP69w
https://www.youtube.com/watch?v=WX_GFx9846Q
https://www.youtube.com/watch?v=WsPNLfZrsnM
https://www.youtube.com/watch?v=Xamp8V2j94g
https://www.youtube.com/watch?v=Y_Wi2Kn6LQ4
https://www.youtube.com/watch?v=Zrjiq7H7TtM
https://www.youtube.com/watch?v=_Vu0awPpqag
https://www.youtube.com/watch?v=a7xS0ucrN6A
https://www.youtube.com/watch?v=allsOiU3ue0
https://www.youtube.com/watch?v=bJ41pDOo6pM
https://www.youtube.com/watch?v=bosJ-J0ZA24
https://www.youtube.com/watch?v=dL-oq476DII
https://www.youtube.com/watch?v=fIh9V_qzDlg
https://www.youtube.com/watch?v=g69OMYgD1b0
https://www.youtube.com/watch?v=iB3_Rz4ISQc
https://www.youtube.com/watch?v=iaIuK8wFyew
https://www.youtube.com/watch?v=ie8eYCCRrMA
https://www.youtube.com/watch?v=ii6f9RWm6sA
https://www.youtube.com/watch?v=jnBZOVK0O88
https://www.youtube.com/watch?v=kgv4Qk_vUTI
https://www.youtube.com/watch?v=l75tm78Yfqk
https://www.youtube.com/watch?v=lGWYEE3qItA
https://www.youtube.com/watch?v=lIZ9QAWWTZk
https://www.youtube.com/watch?v=loY5ODkiUL0
https://www.youtube.com/watch?v=nvXGRH4CH2c
https://www.youtube.com/watch?v=oQoou-LviCM
https://www.youtube.com/watch?v=oyb_sfgAaPg
https://www.youtube.com/watch?v=qHpHOxs9B2o
https://www.youtube.com/watch?v=r89ZHYpDhW4
https://www.youtube.com/watch?v=sCKs95NrtJ0
https://www.youtube.com/watch?v=sbMIC87NSKI
https://www.youtube.com/watch?v=tdeSRfwaA54
https://www.youtube.com/watch?v=vOHlYxMrzAM
https://www.youtube.com/watch?v=wItYpc1xnd0
https://www.youtube.com/watch?v=wJJKsyREQ6Y
https://www.youtube.com/watch?v=wtipsS8hws0
https://www.youtube.com/watch?v=xBr8zk91QLs
https://www.youtube.com/watch?v=xOBQ2tkGg-g