Home
- What is BlenderXR?
- How to use the Blender VR User Interface
- Navigating in VR
- Using the Radial Menus
- The Tool Menu
- The Tool Options Menu
- The "Shift" Button
- The "Control" Button
- Undo and Redo
- Delete and Duplicate
- Edit Mode Switch
- Coordinate System Switch
BlenderXR is a hardware abstraction layer (HAL) that allows developing VR/AR user interfaces for Blender by making it possible to use popular VR device APIs such as Oculus Rift and OpenVR (HTC Vive, WindowsMR).
BlenderXR is intended as a temporary work-around while no open and universal standard for VR/AR/XR development exists. It is intended to be replaced by the OpenXR standard as soon as it becomes available to the public.
Blender itself does not have a VR user interface yet.
So we are developing a user interface for Blender in a separate branch of Blender, which is included in this repository.
So you need to download this version of Blender, which can be used in VR.
This is a temporary solution to provide early access until the BlenderXR user interface is accepted into the normal Blender version. It is not intended as a separate branch (or clone) of Blender.
Compiled executables (binaries) are available at:
Windows: https://drive.google.com/file/d/1iO-zqUxb9hV3-A7JG-XIFOLRnwiWzfkf/view?usp=sharing
Linux: https://drive.google.com/file/d/1k-E13qWhKxOGIczW1TwfXLLphf4jwXsU
Extract the zip folder and download the BlenderXR library for your VR device and place it in the Blender folder (next to the blender.exe).
Windows & HTC Vive: https://github.com/MARUI-PlugIn/BlenderXR/tree/master/bin/Windows/SteamVR
Windows & WindowsMR*: https://github.com/MARUI-PlugIn/BlenderXR/tree/master/bin/Windows/SteamVR
Windows & Oculus Rift: https://github.com/MARUI-PlugIn/BlenderXR/tree/master/bin/Windows/Oculus
Windows & Fove: https://github.com/MARUI-PlugIn/BlenderXR/tree/master/bin/Windows/Fove
Linux & HTC Vive: https://github.com/MARUI-PlugIn/BlenderXR/tree/master/bin/Linux/SteamVR
- For using WindowsMR headsets, you need Steam and the Steam App "Windows Mixed Reality for SteamVR" available in your Steam installation under "Library"->"Software".
When you first start Blender, it will show the normal Blender user interface.
You can use Blender normally in this window with your mouse or stylus pen.
To use your VR device, open a new "VR Window" by selecting from the title menus: "Window" -> "New VR Window".
This new window will then show the view through the headset.
You are not using the correct Blender version. You must download the version of Blender provided by this project.
You must use the Blender version provided at https://www.marui-plugin.com/blender-xr/#download
If this happens, Blender was unable to detect your VR device. Either, you have not copied the BlenderXR library into the Blender folder, or your VR device is not ready.
- Make sure you have the appropriate VR software installed for your device (eg: Steam for HTC Vive).
- Make sure you have the corresponding BlenderXR libraries downloaded into the same folder as Blender. Note that HTC Vive and Windows MR, and Fove require two files (openvr_api.dll or FoveClient.dll respectively).
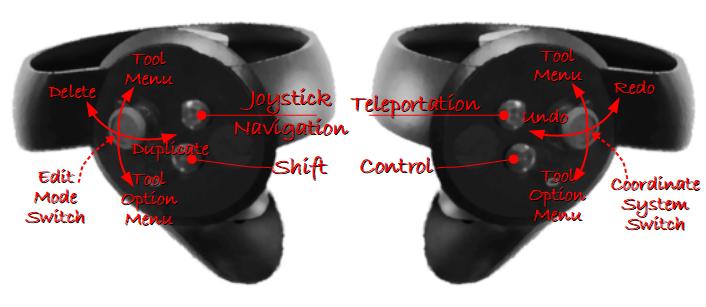
The images below show which functions are mapped to which buttons of the controllers of each VR device. The individual functions will be explained in more detail below.


Squeeze the grip-buttons (the buttons on the side of the controller grip, under your middle finger) to "drag yourself" through the virtual Blender scene.
Move the controllers closer together or further apart to zoom in and zoom out.
While holding the grip buttons, you can activate or deactivate locks on your touch-pad or thumb-stick. For example, you can lock the "up" axis so that your scene will always remain upright or you can lock the scene elevation so that the floor of your scene will always remain at the same height.
In the same menu, you can also set the scene scale so that distances in Blender scene units are equal to real-world distances.
An alternative way of moving through your scene is to use your controller like a joystick.
Press and hold the "joystick navigation" button on your left controller:
[Oculus Rift] the "Y" or "B" button on your left controller.
[HTC Vive] the upper part of your touch-pad on your left controller.
[Windows MR] the upper part of your touch-pad on your left controller.
While holding the joystick navigation button, move the controller forward, backward, or sideways to move.
Rotate the controller to rotate your viewpoint.
In order to travel quickly to a different part of the scene, you can use the teleportation navigation widget on your right controller.
To use teleportation, press and hold the "Teleportation" button on your right controller:
[Oculus Rift] the "Y" or "B" button on your right controller.
[HTC Vive] the upper part of your touch-pad on your right controller.
[Windows MR] the upper part of your touch-pad on your right controller.
A sphere will appear that will indicate your position after teleportation. Move the controller forward to send the sphere to the distant place to where you want to teleport.
Most of Blender's functionality is accessible through circular menus that can be used with your controllers thumb-sticks (Oculus Rift & WindowsMR) or touch-pad (HTC Vive).
To open these menus, you first need to activate it. For example, the Tool Menu can be activated by pushing the thumb-stick forward (Oculus Rift & WindowsMR) or pressing the left side of your touch-pad on your right controller.
Once the menu is activated, it will be displayed around the thumb-stick or touch pad, and will provide several menu items arranged in a circle around the center. Push the thumb-stick or touch-pad into the direction of the item that you want to activate and then release the thumb-stick or touch-pad to activate it.
The Tool Menu allows you to switch the currently selected tool.
Note that you can have two different tools selected, one for each controller.
You can activate the Tool Menu in the following way:
[Oculus Rift]: Push the thumb-stick forward on either controller.
[HTC Vive]: Press the right side of the touch-pad on the left controller, or press the left side of the touch-pad on the right controller.
[WindowsMR]: Push the thumb-stick forward on the either controller.
Once the tool menu is open, you can select the tool by pushing the thumb-stick in the direction of the respective tool icon (Oculus Rift / Windows MR) or pressing the touch-pad in the direction of the respective tool icon (HTC Vive).
See the Tool wiki page for details on each tool.
The Tool Options menu offers options and settings for the currently active tool.
You can access the Tool Menu in the following way:
[HTC Vive]: Press the lower part of the touch-pad on the right controller.
[Oculus Rift]: Pull the thumb-stick backward on the right controller.
[WindowsMR]: Pull the thumb-stick backward on the right controller.
The items in the Tool Options menu depend on the currently active tool. See the Tool wiki page for details on each tool and its options.
The "Shift" button on your controller has a similar function to the shift button on your keyboard. For example, when selecting objects, holding the Shift button will allow you to select multiple objects, and when using the Transform tool, holding the Shift button will scale down the motion to allow precision editing.
You can activate the Shift button in the following way:
[HTC Vive]: Press the "Menu" button on the left controller.
[Oculus Rift]: Press the "X" or "A" button on the left controller.
[WindowsMR]: Press the left side of the touch-pad on the left controller, or press the right side of the touch-pad on the right controller.
The "Control" button on your controller has a similar function to the control button on your keyboard. For example, when selecting objects, holding the Control button will allow you to remove objects from your selection, and when using the Transform tool, holding the Control button will activate snapping.
You can activate the Control button in the following way:
[HTC Vive]: Press the "Menu" button on the right controller.
[Oculus Rift]: Press the "X" or "A" button on the right controller.
[WindowsMR]: Press the right side of the touch-pad on the left controller, or press the left side of the touch-pad on the right controller.
You can undo and redo operations in the following way:
Undo:
[HTC Vive]: Press the left side of the touch-pad on the left controller.
[Oculus Rift]: Push the thumb-stick to the left on the right controller.
[WindowsMR]: Push the thumb-stick to the left on the right controller.
Redo:
[HTC Vive]: Press the right side of the touch-pad on the right controller.
[Oculus Rift]: Push the thumb-stick to the right on the right controller.
[WindowsMR]: Push the thumb-stick to the right on the right controller.
Your controllers feature two buttons to quickly delete and duplicate objects.
To delete objects:
[Oculus Rift]: Push the thumb-stick to the left on the left controller.
[WindowsMR]: Push the thumb-stick to the left on the left controller.
To duplicate objects:
[Oculus Rift]: Push the thumb-stick to the right on the left controller.
[WindowsMR]: Push the thumb-stick to the right on the left controller.
To switch to "Edit Mode" (ie. to work with single vertices, edges, or polygons instead of whole objects), press the "Switch Component Mode" button.
[HTC Vive]: Press the center of the touch-pad on the left controller.
[Oculus Rift]: Press the thumb-stick on the left controller.
[WindowsMR]: Press the lower part of the touch-pad on the left controller.
Some of the tools, such as the Transform Tool and Extrude Tool, display some manipulator handles. These can be based on either the selected object (local) or the Blender Scene (global).
The Coordinate System Switch allows to switch between the different coordinate systems:
[HTC Vive]: Press the center of the touch-pad on the right controller.
[Oculus Rift]: Press the thumb-stick on the right controller.
[WindowsMR]: // Press the lower part of the touch-pad on the right controller.