How to Compile and Run an Example in Toro
The objective of this HOWTO is to compile and run the examples that come with torokernel. These examples are a good starting point with torokernel. They are simple examples that shows some particular functionality of Toro. To start, first clone the code of torokernel by doing:
git clone git@github.com:MatiasVara/torokernel.git
The code of the examples can be found in torokernel/examples
On Windows, examples can be compiled either by using Lazarus IDE or by the command-line. The former option is straight and only needs Lazarus. The later needs more work. We explain both ways in the following. We base on Windows 10 for x86-64.
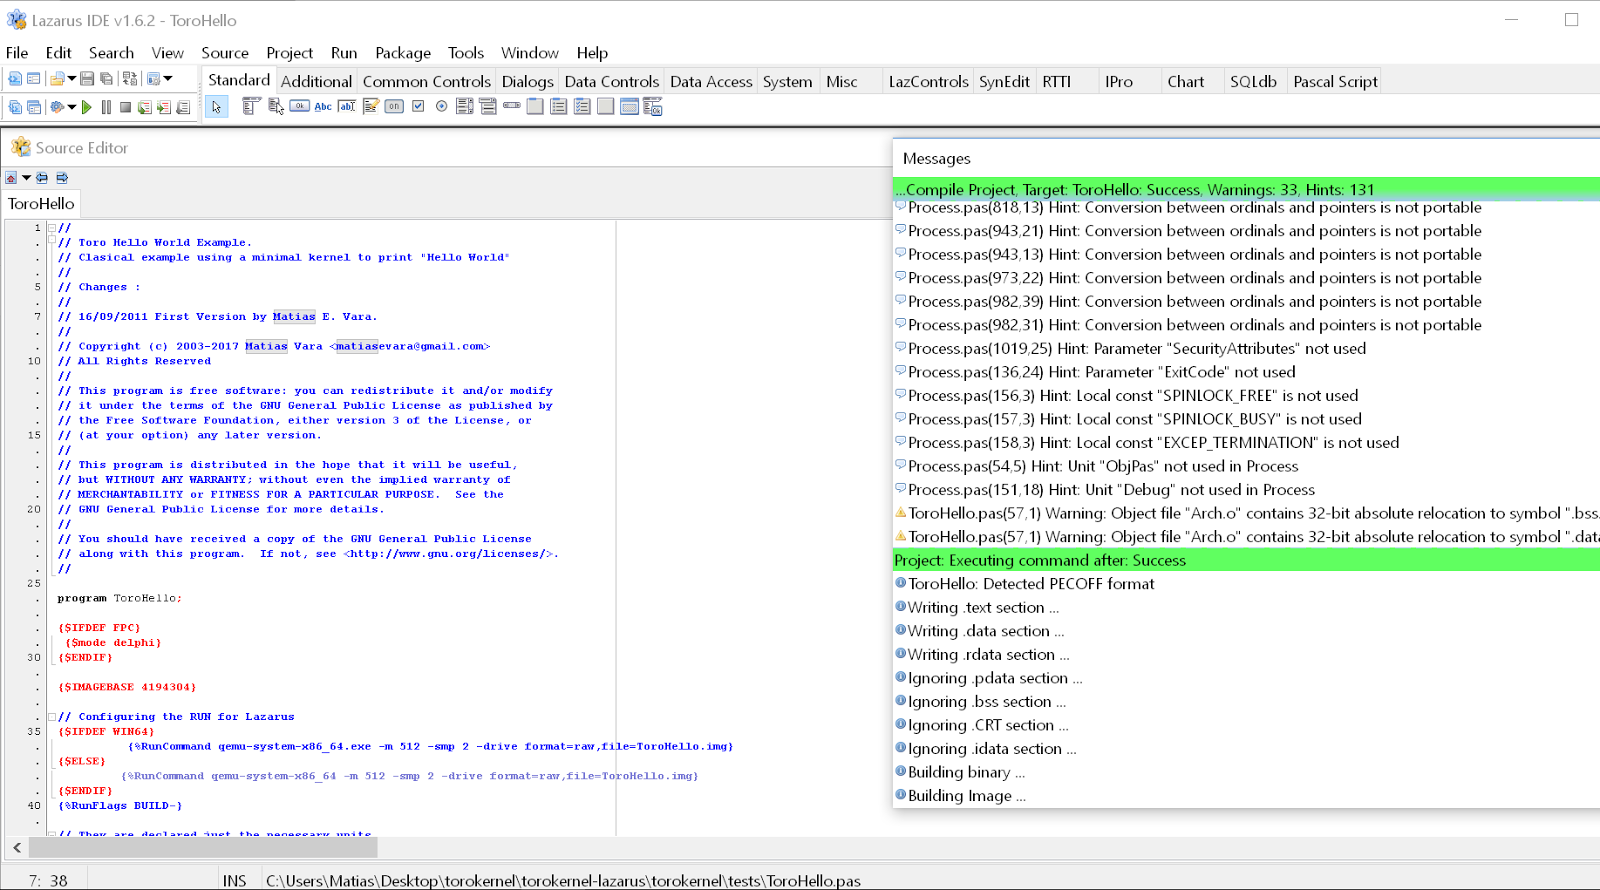
The first step is to download Lazarus IDE (v1.6.2) that contains the FPC compiler from here. Second, you have to use Lazarus to open the project ToroHello.lpi which is located in torokernel/examples/ToroHello.lpi. This is a simple example that only prints something in the screen, however, it is enough to show how compilation and running work. To compile ToroHello.pas once opened it, you only need to go to Run > Compile or just pressing CTRL+F9. If everything works well we will get the following screen:
If it fails, it would be necessary to use the whole path of the tools to compile correctly. Please go to Project > Project Options, and then select Compiler Commands. There, complete the path of fpc and build.exe command with the full path. Note that build.exe will be generated in Execute before, and it should be located in torokernel/builder directory.
Finally, to run ToroHello.pas, it is needed to first install QEMU. This can be downloaded from here. In Lazarus, before RUN, we have to check the box On run project execute Run File command instruction which is located in Run > Configure Build and Run File. If everything is correctly set up, we can run the application by pressing F9 or going to Project > Run. We will get the following screen:

If Lazarus fails to execute QEMU, please set up the full path of QEMU. This can be done by going to Run > Configure Build and Run File. And then, in Run tab, edit the Run command by setting up the full path. For example, if QEMU is located in Program Files, the path will result:
{%RunCommand "C:\Program Files\qemu\qemu-system-x86_64.exe" -m 512 -smp 2 -drive format=raw,file=ToroHello.img}
The procedure presented below can be applied for all the projects in examples.
The projects ToroPing.lpi and ToroHttp.lpi presents the use of the Toro stack tcp. To run these examples, it is need to first install a TAP vpn device and name it TAP2. To do so, download openvpn from here. After installed, it is need to set up the adapter properties as follows:

This configures the host IP as 192.100.200.10. The IP of Toro VM is static to 192.100.200.100. For the example ToroPing.lpi, it could be possible that the Firewall blocks the ICMP packets to host. In that case, it is needed to disable the Firewall to make the example works.
The project TorowithFileSystem.pas illustrates the use of the Toro Virtual Filesystem. This example is a http server that read index.html from either a Fat or Ext2 Filesytem. The current example uses the Fat interface that QEMU provides. Roughly speaking, QEMU allows the sharing of a directory between the host and the guest thus avoiding the need of creating static images. To make the example works, you need first to create a directory in examples/ named ToroFiles. In this directory, you need to create a second directory named web and store your index.html in that directory.
If you want to use an Ext2 Filesystem, you need to modify the example accordingly. To easy the creation and population of Ext2 images on Windows 10, the repository provides the script _Populate.ToroFiles.cmd. This script is based on genext2fs which is a tool that enables to create an Ext2 image and to populate it.
To illustrate the use of Populate.ToroFiles.cmd, we first create a directory named ToroFiles in torokernel/examples/ which contains the following files:
./web
./web/index.html
Then, we invoke the script Populate.ToroFiles.cmd to create an ext2 image and populate it with the ToroFiles directory. This script generates a 8MB image named ToroFiles.img that contains the files in the directory ToroFiles. To check if the files are correctly set up, we can compile and run the project TorowithFileSystem.pas and access to 192.100.200.100 from a web browser. If everything went well, it should show the content of index.html previously generated.
This procedure explains how to compile Toro examples on Ubuntu Xenia (64 bits). To ease this task, we first propose to use a docker image that includes all the tools needed to compile Toro. In the second procedure, we present how to install from scratch all the tools needed to compile and run Toro.
To compile Toro using a docker image, you need first to install docker (see here). Once installed, you need to clone torokernel repo and then pull the docker image that contains all the tools:
docker pull torokernel/ubuntu-for-toro
Second, use ClouidIt.sh to compile and run any example. For example, by running this command in ./torokernel/examples/ you will compile and run ToroHello example:
./CloudIt.sh ToroHello
Note: You need first to install KVM to be able to run the example.
This procedure explains how to compile Toro examples in Ubuntu Xenia (64 bits). To compile the examples, we base on Wine and Lazarus. You can find the link to download Lazarus in the section above. To install Wine, run the following commands in a console:
sudo dpkg --add-architecture i386
sudo apt-get update
sudo apt-get install xvfb wine
Xvfb :99.0 &
wineboot -i
winetricks -q corefonts
We then download and install Lazarus (Here I renamed the installer as lazarus.exe):
DISPLAY=:99.0 wine lazarus.exe /VERYSILENT /DIR="c:\\lazarus"
This installs Lazarus in c:\lazarus. Once installed, we install KVM and the bridge utilities:
sudo apt-get install qemu-kvm libvirt-bin ubuntu-vm-builder bridge-utils
Finally, we have to clone toro repository and use the script examples/CloudIt.sh to run the examples. This work is still experimental so we clone from the work-in-progress branch.
git clone -b toroonkvm git@github.com:MatiasVara/torokernel.git
Note that the script examples/CloudIt.sh must be edited to set up the correct path to lazarus.exe. Then, we have to invoke the script with the correct parameters. For example, to compile and run ToroHello we do:
./CloudIt.sh ToroHello
This compiles ToroHello and then creates a guest in KVM with the corresponding image. The script set up the console by using vnc at port 590x of host. If there is only one guest the port will be 5901. To make the VNC to listen in all interfaces, edit /etc/libvirt/qemu.conf and uncomment vnc_listen = "0.0.0.0". This makes possible to get the guest's console from a remote host by using the ip of the host:

If compilation successes, the script returns a serial connection to the guest as is shown in the follow:
Domain installation still in progress. Waiting for installation to complete. Connected to domain ToroHello Escape character is ^] 26/06/2017-21:56:18 CPU0 Thread#0 Initialization of debugging console.
To escape from the serial console press ^].
Note0: When CloudIt is used, the script looks for a .kvm file to get the parameters to pass to kvm. These parameters are memory, number of cpus, network card, etc.
Note1: If you want to run the guest without recompiling the application just add the onlykvm option:
./CloudIt.sh ToroHello onlykvm
Note2: If you face the issue could not open disk image : Permission denied, edit /etc/libvirt/qemu.conf and uncomment user/group to work as root, then restart libvirtd. For more details see https://github.com/jedi4ever/veewee/issues/996
To easy the creation and population of Ext2 images on Linux the repository provides the script _Populate.ToroFiles.sh. This script is based on genext2fs which is a tool that enables to create an Ext2 image and to populate it. In Linux, this tool can be installed by using apt-get or yum install. Once installed, to generate a ToroFiles.img, please see the Note for Filesystem examples in the Windows section.
This section explains how to create a private network in which the guest and the host are connected. To do so, it is needed to have installed bridge-utils. Then, execute the following command in examples directory:
virsh net-create toro-kvm-network.xml
This command creates a network named toronetwork and a bridge named toro-bridge. This command is not persistent so it must be executed after a reboot. Networking can be tested by running the example TorowithFileSystem as we did with ToroHello. If we open TorowithFileSystem.kvm, we will see something like this --network=bridge:toro-bridge,model=e1000 which tells KVM to connect to the bridge by using a e1000 network card. The guest can be found in 192.100.200.100. This ip is static and can be changed by editing TorowithFilesystem.pas.
To connect guest to outside, we base on nat forwarding which allows to redirect traffic from host's ports to guest's ports. You can find more information in http://wiki.libvirt.org/page/Networking#Forwarding_Incoming_Connections and in https://jamielinux.com/docs/libvirt-networking-handbook/nat-based-network.html.
To ease the set up of port forwarding, we provide the file examples/hook-qemu. This is an script that will run when the guest TorowithFileSystem is started and it forwards the port 80 of host to port 80 of guest. This script can be edited and extended to other guests. To install it, execute this in examples/ directory.
cp hook-qemu /etc/libvirt/hooks/qemu
chmod +x /etc/libvirt/hooks/qemu
Then, restart the service by doing service libvirtd restart and start the guest.