MANUAL
Before you can run the Phoniebox, you need to have it installed and configured. Make sure to go through the installation and configuration first.
In this manual you will learn:
- How to connect to the Phoniebox from any computer to add and edit audio files.
- How to register RFID cards using the web app
- Registering cards manually (through samba without the web app)
- How to add webradio stations and other web streams to the playout files - and even mix web based and local files.
- How to control the Phoniebox through the web app.
- How to assign cards specific tasks such as changing the volume level or shutting down the Phoniebox.
To get going, this will create a few (German) kids podcasts:
cd /home/pi/RPi-Jukebox-RFID/scripts/helperscripts/; ./CreatePodcastsKidsDeutsch.sh
If you just finished your install and you want to see if it works, you can create some sample content with the following command in the terminal:
cd /home/pi/RPi-Jukebox-RFID/scripts/helperscripts/; ./CreateSampleAudiofoldersStreams.sh
This will create a collection of:
- podcasts
- sample audio files (.mp3, .wav, .aac, .flac, .ac3, .ogg, .m4a, .aiff, .wma)
- live streams
- nested folders
You can later delete these folders with the following command:
cd /home/pi/RPi-Jukebox-RFID/scripts/helperscripts/; ./DeleteSampleAudiofoldersStreams.sh
Changing the behaviour or your Phoniebox can be done in the WebUI under the menu item "Settings". Here is a list of the other available settings.

Language
Volume is set in percentage from 0% to 100%. You can specify the following:

- Volume: the actual volume. This can also be done on the home screen of your Phoniebox.
- Maximum Volume: if you increase the volume with the + or - buttons in the WebUI, this will set the maximum limit. Useful because the maximum volume differs from soundcard to soundcard.
- Vol. Change %: using the + and - buttons in the WebUI will in-/decrease the volume in steps specified here (default 3%). If you use a rotary knob to change the volume, you might want to decrease the steps here.
- Startup Volume: this will be the volume set after each reboot of your Phoniebox. Off means that the volume will remain on the same level as it was when shutting down.

- Stop Playout Timer: like a snooze option this will stop the player after x minutes but keep the Phoniebox switched on.
- Shutdown Timer: like a snooze option that will also shutdown the Phoniebox.
- Idle Shutdown: will shutdown the Phoniebox if idle for x minutes.
Add one or more WiFi networks here.

- Priority: Your WiFi's priority (0-100). If more than one WiFi is found the box will connect to the one with the higher priority.

Read IP address of wlan (wifi) each time after booting? (useful if you hook your Phoniebox into a new wlan networt with dynamic IP)
Contains settings for the WebUI. Currently available:
- Show covers beside the albums and playlists on the main page? (see Show covers in web app below for how to add covers)
Activate or deactivate services of the Phoniebox. Currently available:

- GPIO Buttons: if you use buttons to control the playout (e.g. pause, record, etc.).
- Rotary Knob: if you use a rotary knob to control e.g. the volume.
- RFID Reader: if your RFID reader is not connected via USB.
When you swipe the same RFID a second time, what happens? Start the playlist again? Toggle pause/play? These are the options:
- restart the playlist from the beginning (RESTART)
- toggle pause and play (PAUSE) for the current playlist
- skip to the next track in the playlist (SKIPNEXT)
- ignore will do nothing to the playout, second swipe will only do system things like volume up (NOAUDIOPLAY)
NOTE: in the web app you can set Resume for each folder, which means that the content of this folder starts from the time where it was last stopped. This can have implications when combining this behaviour with the second swipe: If you choose Restart for the Second Swipe AND Resume for a folder is enabled, swiping the card a second time will seem to do nothing - the playout continues. However, this is the correct behaviour: swiping the same card a second time triggers stop and play. The play command then checks if the folder has Resume enabled, if it does, it will play from the last stored stop position - which was the same second swipe.
If you are a developer, here you can set the logging for specific parts of the Phoniebox. Note: the tail of the log file is also visible in the web app under Info. There you also find the option to empty the log file.
This is a file containing a string, by default PCM.
Inside settings/Audio_iFace_Name is the iFace name of the sound card. By default for the RPi this would be PCM. But this does not work for every setup. If you are using phatbeat as a DAC for example, you need to change the content of Audio_iFace_Name from PCM to Master or Speaker. Other external sound cards might use different interface names. To see if PCM could work for you, type sudo amixer sget PCM.
To list all available iFace names, type sudo amixer scontrols.
If your sound card supports multiple audio outputs with separate volume controls (e.g. speaker, headphone) like WM8960 Hi-Fi HAT does, you can switch between two outputs by placing the iFace name of the primary output in file settings/Audio_iFace_Name_0 and the iFace name of the secondary output in file settings/Audio_iFace_Name_1. The swap can be triggered by RFID card command "Switch between primary/secondary audio iFace", see Phoniebox controls using RFID cards.
Restriction: Only works with amixer as volume manager and MPD output set to a general iFace (e.g. "Playback").
Contains the latest RFID used, which could start an audio playout but might also
control the system (e.g. volume up or shutdown).
Created in script rfid_trigger_play.sh
Contains the latest RFID that triggered an audio folder
piped to playout_controls.sh -c=playlistaddplay -v=...
Created in script rfid_trigger_play.sh
Contains the last folder that was being played.
Created in playout_controls.sh AND rfid_trigger_play.sh (currently all play triggers - webapp and RFID are
piped through rfid_trigger_play.sh. So it seems redundant. But who knows if at a later dev stage
some scripts might use only playout_controls.sh).
Contains the last playlist name that was being played.
Used in rfid_trigger_play.sh to establish if a second swipe on the same playlist was made.
Contains the absolute path to the folder containing playlists.
Default value: "/home/pi/RPi-Jukebox-RFID/playlists"
Used in rfid_trigger_play.sh.
Contains the poweroff command executed when triggering a shutdown (manually via interface or via auto shutdown), by default sudo poweroff.
If you are powering your RPi via the extension board MoPi2, you can change the content of Poweroff_Command to sudo mopicli -wsd 1. This will trigger the MoPi2 to power off the RPi in the prefered way which finally also turns off the extension board. In general, this option provides a hook for whatever stuff you likes to add before the actual power off, e.g. some LED illumination or daytime dependend shutdown sound.
Many things can be done via the web app. For some things, you might want to connect to the Phoniebox to upload a bunch of files at once or add RFID cards to change the Phoniebox system behaviour. There are two ways to connect to the Phoniebox.
- Using SSH to log into the Phoniebox
- Connect over the home network
Most of the Phoniebox management should be done with the second option: connecting over your home network. This is the easiest way to add and remove audio files, because you are using your file manager to copy and paste files onto the Phoniebox. Copying files to the Phoniebox using the SSH login is actually more complicated.
Find out more about how to connect over SSH from Windows, Mac, Linux or Android on the official RPi page.
- Start the Finder application.
- Select Go pulldown menu and go to Connect to server...
- As the server address, type
smb://followed by the IP address of your Phoniebox. In my case this would be:smb://192.168.178.199 - The following screen requires you to login as a Registered User. Name and password are the ones you specified when installing the Samba server. I suggested to use
piandraspberry. - Selecting Remember this password... will connect to the Phoniebox automatically.
- Now, if you go to the finder, at the bottom left menu under Shared you will find the IP address of your Phoniebox.
- Clicking on the IP in the left menu will open the files on the Phoniebox. Under
pi_networkyou should see:audiofolders,shotcuts,placeholderand once you registered RFID cards also the filelatestID.txt(all of which will be explained later).
- Open the windows manager.
- Navigate to Network in the left menu or select File > Connect to server... from the pulldown menu.
- Clicking from Network to Windows Network will bring you to the Raspberry Pi home network.
- If you chose File > Connect to server..., type
smb://followed by the IP address of your Phoniebox. In my case this would be:smb://192.168.178.199 - In both cases, you will be exposed to the login screen eventually.
- Open the Windows Explorer
- Enter
\\directly followed by the IP address of your Phoniebox, e.g.\\192.168.1.1 - Press enter, and when asked enter and confirm username and password
- Manage audio files in the 'phoniebox_audiofile' subfolder
Registering a card means: linking the card ID to an action (like: volume up) or a folder (containing audio files or a link to a podcast or live stream). Then, when swiping the card, the audio folder is being played or the action performed. The easiest way to add and edit cards is done using the web app. Let's start with an empty Phoniebox.
You can do this through a tablet or phone, but it might be easier managing files and folders through your PC. Go to the Phoniebox web app by typing the IP address into a browser. Select the section Folders and files in the navigation:

In this section, you can do one of these:
- Upload files into an existing folder
- Create a new folder (or subfolder)
- Create a new folder and upload files into this folder
The form at the top allows you to upload files and optionally create a new folder to upload in. The bottom form is specifically for creating folders only.
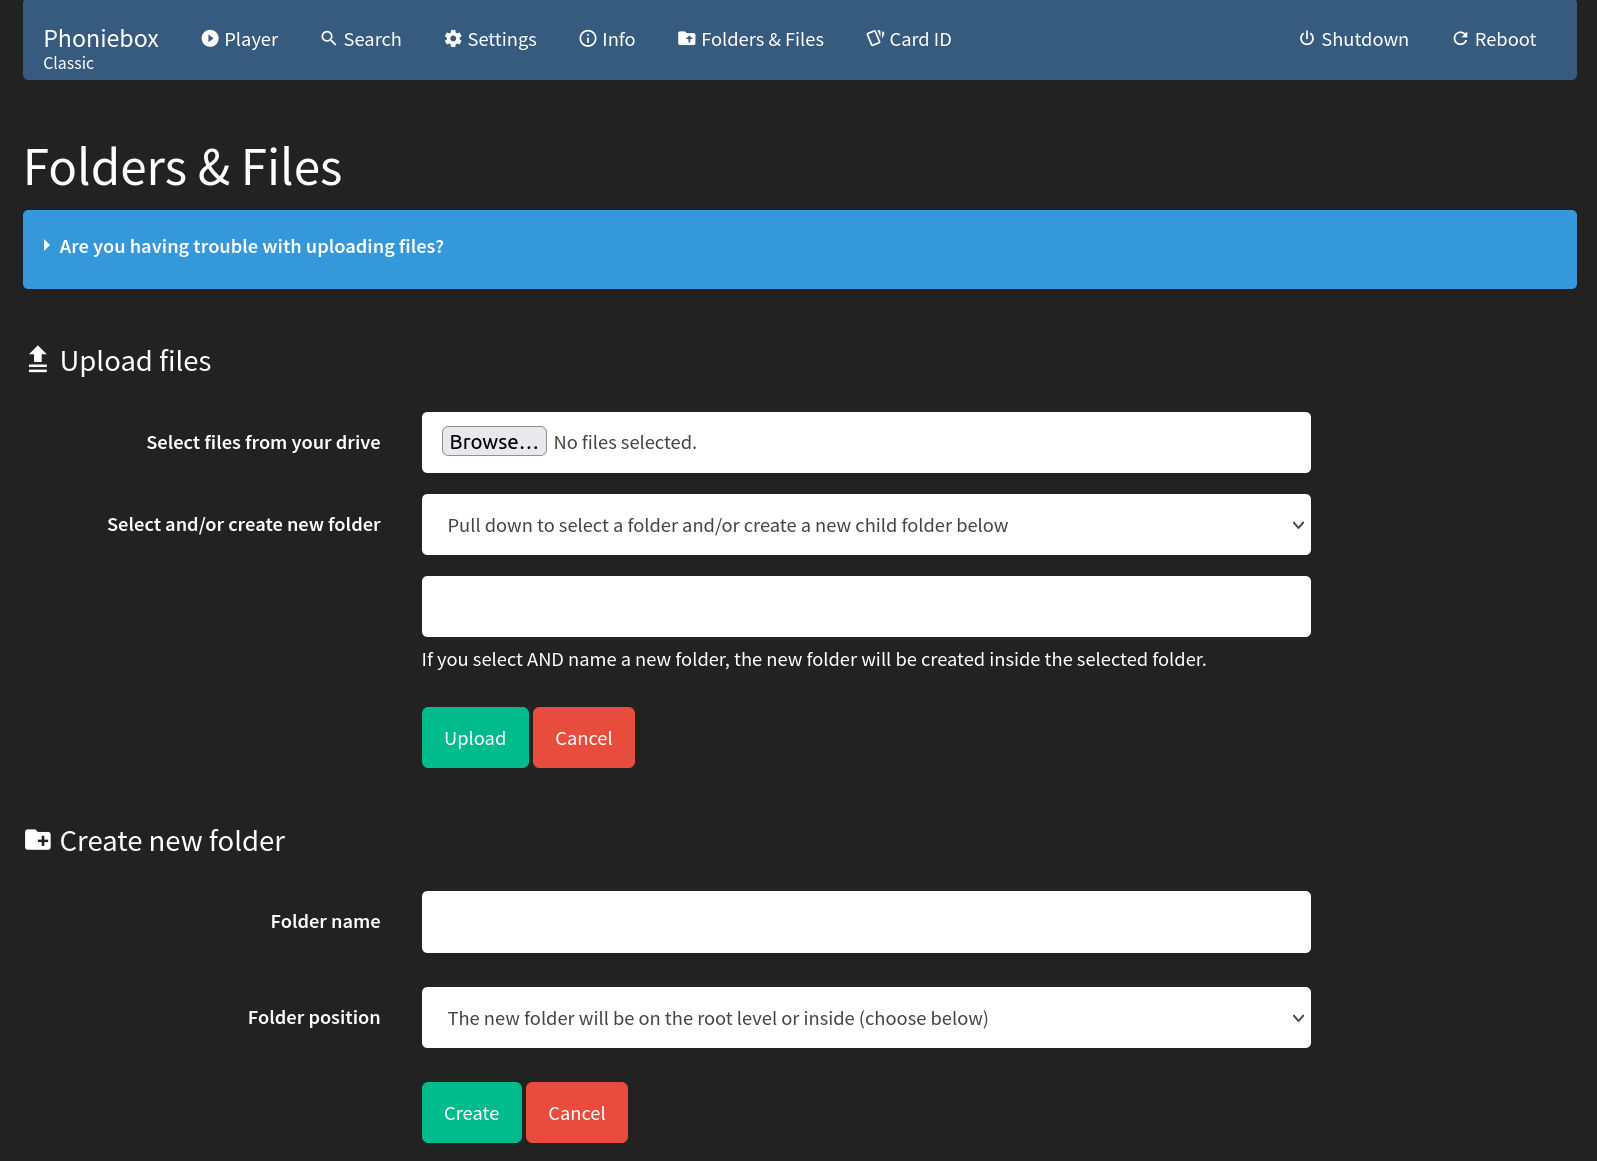
If you want to upload files into an existing folder:
- Select the files you want to upload using "Browser" in the first line of the form.
- Select a folder to upload the files into with the pulldown element in the second line of the form.
If you want to create a new folder and upload files at the same time:
- Select the files you want to upload using "Browser" in the first line of the form.
- Type the name of the new folder into the third line of the form.
- Placing the new folder:
- If you don't select any folder in the pulldown menu (second line in the form), the folder will be a top level folder
- If you want to create the folder in an existing folder (i.e. make a subfolder), select the folder where you want to create the new one.
Go to the web app (i.e. open the Phoniebox's IP address in the browser of a connected device/PC). Near the top of the page you will find a button saying "Register new card ID". Click it.

- This will bring up a form looking like this:

The card ID will be updated as you swipe a new card over the Phoniebox. Do not try to edit the card ID manually, it will revert to the last swiped ID.
- Either select an audio folder in the drop down menu near the top OR
- Add the URL of a webradio, podcast, live stream, select the type of stream and give this new stream a name.
- Press 'submit' and you are set.
On the home page you will find a link in the list of audio folders to the card that is registered to this folder. Click the card ID with the wrench next to it, so come to the edit form.

This is how you figure out the ID of a RFID card:
- Boot up the Phoniebox.
- Swipe the RFID card across the Phoniebox (you should hear a 'beep' sound when the reader recognises the card).
- Open the shared folder in your windows manager over the home network (see above for details on how to connect).
- Open the file
latestID.txtby double clicking it. This file contains the information you need.
The file contains information about the card like the following:
Card ID '0594672283' was used at '2017-02-02.12:26:08'.
This ID has been used before.
The shortcut points to audiofolder 'stop'.
The first line lists the ID of the card: 0594672283.
The second line tells us that the card has been used before. Note that every time you swipe a card, the file latestID.txt is being created. Therefore it is very likely this file notes a card has been used before.
The third line is giving us information about a human readable shortcut given to this ID. In this case, there is a folder named stop - which can contain audio files or text files with links to web streams.
Note: Having folders that are named according to card IDs (example 0594672283) rather than having "human readable" folder names helps to keep the audio to folder links active when reinstalling the Phoniebox and copying (restoring) the audiofolders to the new install. See issue for further details.
Imagine you have a card with a sticker of birds on it. Every time somebody swipes the bird card across the Phoniebox, you want it to play a lot of bird sounds. And when you add or delete birds from the playlist, you don't want to need to know the card ID. You just want to drop the files into a folder called birds.
This is why you can assign human readable names for card IDs. This is how you do it:
- Swipe the card across the Phoniebox.
- Open the file
latestID.txtto find out the card ID (e.g.0594672283). - Navigate to the folder
shortcutsin your windows manager. - Open the file of the same name as the card ID with a text editor.
- Change the content of that file to
birds
Now you have told the Phoniebox that every time the card with the ID 0594672283 is swiped across, play what's in the folder birds. Let's continue and make that folder and the audio files inside.
Important:
- Make sure your editor does not add a line break at the end of the shortcuts file. It must only contain the folder name.
- If your folder contains white spaces (e.g.
bird songs) do not escape the white spaces in the shortcuts file (e.g. do NOT writebird\ songs). - If you are linking a subfolder, add the relative path to your audio folder. Correct:
animal songs/bird songs. Not correct:home/pi/RPi-Jukebox-RFID/shared/audiofolders/animal songs/bird songs.
Following the previous step, we now have a card that triggers the Phoniebox to seek the folder birds and play the contents of that folder as an audio playlist. This is how you create the folder and fill it with content:
- Open your windows manager and connect to the Phoniebox via the home network.
- Navigate to the folder
audiofolders. - Create a new folder inside this folder called
birds. - Copy audio files into this folder.
That's it. If you swipe the card across the Phoniebox, it will play all the files in the folder birds.
Note: files are played in alphabetical order. If you want to change the order, rename the files accordingly.
If your audio folder contains a file called cover.jpg (lowercase!) it will be displayed in the web app above the player controls.
If you have your audio files on an external USB stick, you need to point the folder audiofolders to the external USB device. The USB-stick is automatically mounted to /media/usb0.
You can do this by creating a symbolic link to the USB stick with the following command:
ln -s /media/usb0/* /home/pi/RPi-Jukebox-RFID/shared/audiofolders/
To make the USB stick fully accessible to the web app, too, here is what you need to do:
Assuming your USB stick has been formatted to FAT32 (which is the common format allowing easy access in Windows and OSX), you need to install usbmount to mount the stick automatically.
sudo apt-get install usbmount
Change the config file:
sudo nano /lib/systemd/system/systemd-udevd.service
and change MountFlags=slave to MountFlags=shared.
Now you can see the USB stick under /media/usb0. But it is read only, not writeable. To change that, edit the config:
sudo nano /etc/usbmount/usbmount.conf
And add the following:
FS_MOUNTOPTIONS="-fstype=vfat,flush,gid=users,uid=33,umask=007,iocharset=utf8"
The problem are the access rights for the user pi and www-data (the webserver). The above line fixes this, because:
-
piis part ofgid=users -
www-datahas theuid=33
This is work in progress, please share more insights in the issue section.
It is also possible to use bind mount to link the USB audiofolders to the RPi-Jukebox-RFID audiofolders. No extra software is needed for this solution and the web interface should work without problem.
For this to work an entry in the file /etc/fstab is needed. You can append the following template into your fstab:
Replace "[...]" with your setup. The example uses an ext4 USB stick patition. Perhaps that has to be adopted (See field types of fstab for details)
# Phoniebox: Mount USB Stick fixed into a folder:
/dev/[your USB stick partition] /media/pi/[your mount folder name]/ ext4 defaults 0 0
# Bind mount audiofolders of USB stick into Phoniebox folder
/media/pi/[your mount folder name]/audiofolders/ /home/pi/RPi-Jukebox-RFID/shared/audiofolders/ none bind 0 0
See issue for more details.
In short:
- Create a folder inside
shared/audiofolders/ - Add a textfile inside the new folder containing the URL of the stream (see below for naming conventions)
- Assign the new folder to a card ID (see above)
An audio stream from the web can mean two things:
- A live stream that plays endlessly (e.g. webradio station).
- A clip or file on the web that has a URL (e.g. soundcloud audio file).
These two are actually very different and will result in different behaviour of the Phoniebox. A live web stream never stops. This means that it will continue to play until you shut down the machine or start something else by swiping a different card across the Phoniebox.
A static file on the web is more or less the same as a local file. The Phoniebox will play the content of the file and once it's finished, it will be idle waiting for the next card or continue playing the next file in the folder (see about mixing audio files and web streams in the next section).
This is how you add a web stream to a specific card:
Firstly, you need to get the URL from the file or stream.
-
Static files: these will point straight to the file and will look something like this:
http://www(...)/filename.mp3 -
Web radio streams: often, radio stations list their URL to the stream. In some cases, they link to a file ending with e.g.
m3uor.pls. This would be a playlist which in turn will contain the stream URL. Save the file, open it with a text editor and use the last URL inside (sometimes the first URLs play jingles).
Now you are ready to add the stream to your Phoniebox.
- Register the card, create a shortcut and the matching folder as described above.
- Navigate to the folder you just created.
- Create a text file ending with
.txt. For streams uselivestream.txt(because I am working on podcasts andpodcast.txtwill be processed differently, same goes forspotify.txtat a later stage). - Open the text file and copy the URL of the live stream (or static file) into the file.
That's it. Now, if you swipe with the card, the Phoniebox will open the matching folder, open the text file and send the content to the audio player.
Good to know: you can find a number of radio stations at the Community Radio Browser. When you find a station you like, click on the Save icon which will download a file radio.pls. You can open this file with a text editor and within the file find the URL of the live web radio stream.
Troubleshooting:
- if you are playing files with a high quality, they might break off and/or stutter. This is a buffering issue. See troubleshooting.
- if you add a web stream or URL which is invalid, this might create the audio player to revert to what it played the last time it was launched. If your Phoniebox seems to become erratic, check the URLs in your audio folder.
As described above, the media player will (attempt to) play any content it finds in a folder in alphabetical order. I decided to work with the audio player because it is very robust and really tries to play anything it can. This means it also mixes audio files and web streams.
If you want to create such a mix, simply mix the content inside the audio folder. The Phoniebox will play all content in alphabetical order. Keep this in mind if you plan the order of the playlist.
Note: if you add a URL from a live web station to the playlist, the Phoniebox will never get to play the files after this URL - because the live radio never stops.
The podcast feature allows you to play a podcast on your Phoniebox. The latest episode will be played automaticall. Using the previous and next option on the web app, with RFID cards or GPIO buttons, you can skip to other episodes as you would in any other playlist. The number of episodes the Phoniebox will play depends on the number of episodes listed in the podcast.
In short:
- Create a folder inside
shared/audiofolders/ - Add a textfile named
podcast.txtinside the new folder containing the podcast URL - Assign the new folder to a card ID (see above)
Good to know: A podcast is an RSS-feed containing a list of items featuring the special enclosure tag. This special tag has the url attribute pointing to an audio file on the web. The file ending for a podcast is often .rss or .xml.
You can control the Phoniebox with your mobile phone, smart TV or through a browser on a computer. On any device connected to the same WiFi home network as your Phoniebox, open the browser and type in the static IP address of your Phoniebox. If you do this on your phone, the web app should something look like this:

At the top of the page, you can select the volume level in a pulldown menu. Hit Set volume and the volume on your Phoniebox will be changed. This change will remain active even after a reboot.
All the folders and containing audio files are listed in the web app. In case there are more folders on the Phoniebox than RFID cards in use, you can also play the audio files which have no corresponding RFID card using the web app.
Scroll to the folder you want to play and hit the Play icon left of the folder name. This will start the playout on the Phoniebox.
If you want to see the files contained inside an audio folder, click on the folder name. This will list the content beneath the folder name. A second click on the folder name will hide the list of files again.
Below the player, you see the long list of folders with files that you have on your Phoniebox. You can toggle certain behaviours on and off for each folder. These are:
- Resume: the content of this folder starts from the time where it was last stopped.
- Shuffle: the tracks in this folder are played in a random order.
- Single: stops after every track. For example for a guessing game with animal sounds. Also a good choice for audio books.
(Note: there is also a shuffle mode in the top of the web app, where the player is. This will shuffle the playout of the currently playing playlist. It does not change the setting for the folder.)
At the top of the page you can see the Stop Player icon. If you are using a mobile device, this option might be hidden within the navigation, in which case, click the hamburger icon to see the Stop Player option.
Click on the Stop Player icon to stop the playout on the Phoniebox.
At the top of the page, on the right side, you can see the option Shutdown. If you are using a mobile device, this option might be hidden within the navigation, in which case, click the hamburger icon to see the Shutdown option.
Click on Shutdown to shutdown the RPi gracefully. While it is perfectly save to shutdown the RPi the hard way by unplugging the power supply, it is being rumoured that a graceful shutdown extends the life expectancy of the SD card in your RPi. I have no clue if that is true and scientifically proven.
If you use the Shutdown option, unplug the RPi power supply after the machine has shut down to save energy.
You can control the Phoniebox via RFID cards, like pause, stop, skip to next track, volume up, switch off wifi, start / stop recording, and the like. You don't need to use the arcade buttons for these controls. A complete list of things that can be controlled via RFID cards in this file: rfid_trigger_play.conf.sample. Take a look.
During the installation, a copy is made of this file, named: rfid_trigger_play.conf which sits inside the settings folder.
Once you have logged in to the RPi over SSH or booted with monitor and keyboard attached, open the script in the nano editor:
$ nano /home/pi/RPi-Jukebox-RFID/settings/rfid_trigger_play.conf
Scroll down until you see the list of available commands:
CMDMUTE="%CMDMUTE%"
CMDVOL30="%CMDVOL30%"
CMDVOL50="%CMDVOL50%"
CMDVOL75="%CMDVOL75%"
CMDVOL80="%CMDVOL80%"
CMDVOL85="%CMDVOL85%"
CMDVOL90="%CMDVOL90%"
CMDVOL95="%CMDVOL95%"
CMDVOL100="%CMDVOL100%"
CMDVOLUP="%CMDVOLUP%"
CMDVOLDOWN="%CMDVOLDOWN%"
CMDSTOP="%CMDSTOP%"
CMDSHUTDOWN="%CMDSHUTDOWN%"
CMDREBOOT="%CMDREBOOT%"
Insert RFID card IDs where you need them. You can figure out the RFID ID inside the web app of Phoniebox. In the menu you can select 'RFID Cards', then swipe a card and it will show the ID on the page in the web app.
Change the values of the commands you want to assign, leave the other ones unchanged. In our example, the changed list might look like this:
CMDMUTE="1352647584"
CMDVOL30="%CMDVOL30%"
CMDVOL50="%CMDVOL50%"
CMDVOL75="%CMDVOL75%"
CMDVOL80="%CMDVOL80%"
CMDVOL85="%CMDVOL85%"
CMDVOL90="%CMDVOL90%"
CMDVOL95="%CMDVOL95%"
CMDVOL100="%CMDVOL100%"
CMDVOLUP="984000025364"
CMDVOLDOWN="2636453782"
CMDSTOP="%CMDSTOP%"
CMDSHUTDOWN="%CMDSHUTDOWN%"
CMDREBOOT="%CMDREBOOT%"
Save the changes and close the editor. The changes takes effect immediately.
Note: if you (accidently) assign a command and an audio folder to the same card, the Phoniebox will not play the audio. It will only execute the command.
... moved to a new document: Troubleshooting-FAQ.md