ProgrammingGuide
 |
is brought to you by |  |
- Concepts, Tips & Tricks (Read first)
- User's Guide (Read first)
- System Administrator's Guide
- Point & Click Programming Guide (this guide)
- Reports and Transaction Setup Guide
- Point & Click Programming Integration API Guide
- Point & Click Programming Tutorial
- Overview
- Library programming
- Documents
- Document page editor
- Fields
- Parties
- Document page editor cheatsheet
- Customize logic in a document
- Advanced programming of a document
- Button message sets
- Document styles
- Drop downs
- Email templates
- Files
- Images and Logos
- Property sets
- Packages
- Serial generators
- Fields and Parties
-
Packages
- Package document configuration
- Package party configuration
-
Customize logic in a package
- Conditional actions - OR, AND or NOT. All blank, Any blank, Some but not all blank, Comparison, Expired Timer, Update API event,
- Set field value action
- Calculate field value action
- Calculate date action
- Calculate date interval action
- Calculate monthly payment action
- Send email action
- Send SMS/text message action
- HTTP Send action
- Change tran/party status action - Cancel transaction, clear cancel transaction, suspend transaction, resume suspended transaction, skip document, skip document party, skip party, activate party, redo document party, redo party
- Show error/message action
- PayPal credit card charge action
- Change File field access action
- Set/cancel timer action - Set timer, cancel timer, cancel all timers
- Map report fields
- Package import configuration
All customization and programming of documents, workflows and emails is done through the web-based interface. No programmers are needed. For those who prefer to have professional help, though, Yozons has partnered with other companies that offer professional services to handle all of your needs, or perhaps to get you started so that you can then just make new versions as necessary going forward.
The joy, power and control of eSignForm's Point & Click Programming is unique. Those who have outgrown the limitations of mass-marketed, one-size-fits-all alternatives will be favorably impressed by our alternative. The most "tricky" part when building a document is to use notation like '${firstName}' in your document where you want an input field to enter someone's first name. Check out our Programming Tutorial for a step-by-step learning approach.
Yozons eSignForms was, in 2011, initially created based on over 10 years of developing hand-coded (in Java and JSP), custom electronic signature and electronic contracting solutions for thousands of customers across a wide range of verticals. It all started with GE Capital, then Schwab, Enterprise, Citrix, Pitney Bowes, several colleges and universities, and eventually a large number of financing companies, sales departments, HR departments, consulting and other small businesses.
Even Yozons found it hard to keep a large group of dedicated, talented software professionals who could meet the growing demand for our custom-built solutions, and we charge $175 to $250 per hour. The only solution was to stop training yet another programmer, and instead focus on making customized solutions a do-it-yourself option, with no programming experience required.
Programming is much easier if you have a Full HD or better monitor to give you adequate "screen real estate" to edit the document, fields, etc.

All programming is done by opening the Programming menu item, which includes links to the Libraries, Packages, Transaction Templates and Report Templates.
The general idea is that you create a library to hold all of your documents, images/logos, email templates, configurable properties and the like. If you have multiple independent companies or departments sharing the same system, you may want to have each work in their own libraries.
Then, once you have your documents ready, you create a package template that defines one or more documents that you want to process together. The package also specifies custom processing rules as well as defines the data fields from your documents that you allow to be included in custom reports.
Then, once your package is ready, you can create one or more transaction templates that will use the package. This gives you the opportunity to create multiple transactions using the same package, but with each specifying a distinct "branding library" that can override images/logos and property values, and each with distinct permissions. The general rule for resolving external components is first to look in the document version itself; if not found, then look in the transaction's brand library; if not found, then look in the current document's library; if not found, then look in any other libraries that have documents in the package; if not found, then look in the library ESF/Library/Template.
And finally, you can build custom reports that specify which data fields to include for easy tracking, searching and control of transactions, as well as make available for download in Excel or CSV format.
This is a rough overview of the steps of modifying a working document, such as to fix typos, add more text, etc. This also applies to images/logos, emails, and the like, but the changes are done to those objects, not the document objects.
- Put yourself in TEST: Development mode using the selection list in the upper left corner. This ensure any transactions you start or reports you run will show only test transactions, not production ones.
- Under Programming->Libraries choose the Library your documents are in.
- Click on the Documents item to list your documents.
- Click on the document to change.
- Click on Create next Test version to make a new version that is not in production. Click Save.
- Click on the page to update and make your changes and click Save. Test as needed while in the document editor.
- Run a test transaction -- not needed for simple typo fixes probably. If the tests are good, return to the document and then click the Make Test version Production to put it back into production.
- Put yourself in TEST: Like Production mode, and test it again to ensure it's working as you want as this will create a test transaction using only production-level components. If testing is good, then you are done and can just put yourself back in PRODUCTION: Live mode. If there's an issue, you probably want to return to that document and click Revert to Test so it's not longer in production (and the prior version will be back in production until your fixes are done).
When you click on Programming->Libraries from the menu, you will see a list of libraries that are available to you.
Libraries provide a handy way to bundle documents and related configuration together across various projects, departments or even partner companies. A library may also play the role of a "branding library" as defined in a Transaction Template, which allows for "brand" overriding of selected components. The brand override works on all library components, except for documents, provided they have the same name.
Click on a library to view or configure it. To create a new library, you must select a template library or an existing library you have permission to access and click the Create new empty library button.
(Note: To program the contents of a library, open the Programming->Libraries arrow to reveal each library you are allowed to view or program and then click on the desired library to access its components.)
There is one special library, ESF/Library/Template, that provides a minimal, common set of documents, logos, emails and properties for a working system "out of the box." It includes platform-specific emails, too, such as those related to password issues and the default notification to a party to access a transaction. In general, you will not make any changes to this library.
Configuring a library is straightforward:
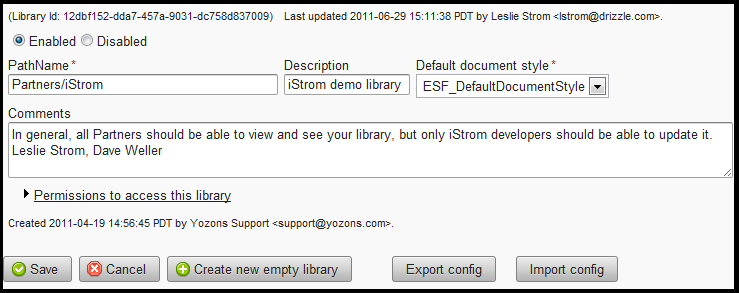
- For an actively used library, ensure it is Enabled. You can mark it as Disabled if the library is no longer going to be used.
- The PathName should identify the purpose or group that will control its contents.
- The Description is a short phrase that describes the purpose of the library.
- The Default document style is the document style that new documents you create in the library will use. This helps ensure your documents have a common look. The ESF/Library/Template contains a default ESF_DefaultDocumentStyle that can be used for a modern, fresh, easy to read look.
- The Comments can be used to maintain notes regarding the library.
- The Permissions to access this library are the standard List, View Details, Create, Update and Delete. Just select which groups should be allowed to do those operations. Note that this also applies to all of the components defined in the library, as they do not have independent permissions. That is, all components in a library share the permissions defined for the library itself.
Click the Create new empty library to create a new, empty library. Currently, there is no "create like" for a library as we do not want to encourage putting the same documents in multiple libraries to avoid confusion.
Click the Export config button to download the configuration for one or more components defined in the library as an XML file. This file is suitable to be imported in another library, whether in the same deployment or in another.
Click the Import config button to upload the configuration previously exported and then select which components to add to the library.
Click on the Export config button in a library to select which components you'd like to export (download to your computer):
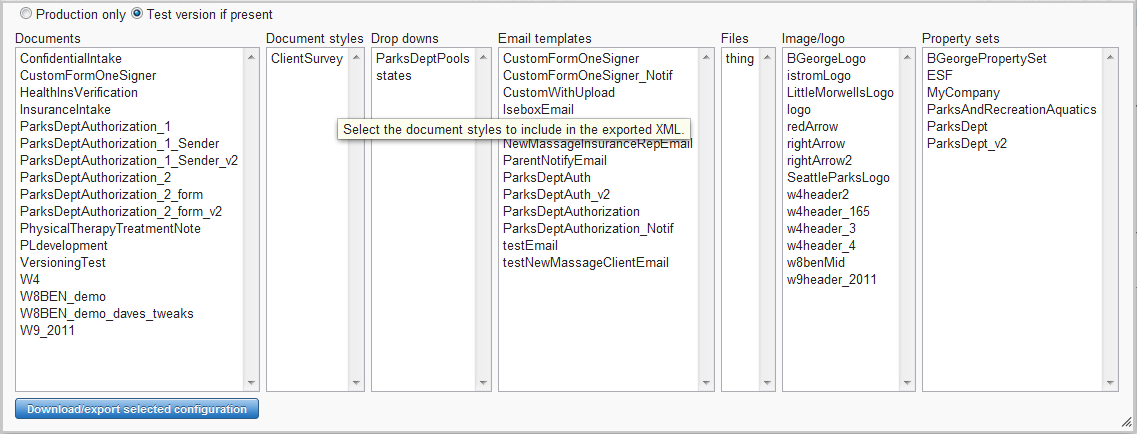
By default, no components are automatically selected for export.
- Select Production only to list only those components that are configured at the Production level. Or select Test version if present to include components that may also be at the Test level, so that if you export, you will get the latest version regardless of it being at the Production or Test level.
- Click on any number of Documents to select the documents to export, including all configured fields, parties and images.
- Click on any number of Button message sets to select the button message sets to export.
- Click on any number of Document styles to select the document styles to export.
- Click on any number of Drop downs to select the drop down lists to export.
- Click on any number of Email templates to select the email templates to export.
- Click on any number of Files to select the files to export.
- Click on any number of Image/logo to select the image files to export.
- Click on any number of Property sets to select the property sets to export.
Once you have selected the items to include in the exported file, click on the Download/export selected configuration button to save the XML data file containing the specified configuration to your computer.
Click on the Import config button in a library to select a previously exported file to upload:
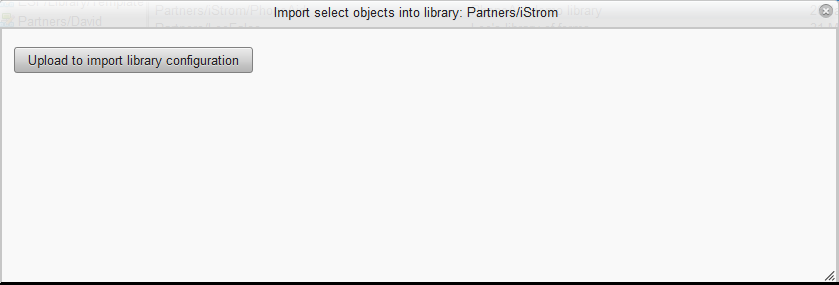
Once you have selected the file, click on the Upload to import library configuration button to upload the configuration from a previous export. Note that nothing is actually added to the library at this step.
You will be presented with the components that were contained in the file:

By default, all components are automatically selected for import. Unselect any components you do not want to import into the library at this time.
Check the Overwrite existing Test versions? box to allow any existing test versions of components with the same name to be overwritten. If you uncheck this box and your library already has a Test version component of the same name, the imported version will be skipped and not loaded into your library.
Note that all components will automatically be at the Test level (nothing is imported as Production-ready). If you already have a Production component with the same name, a new Test version will be created. Use the Overwrite existing Test versions? checkbox to control the behavior should your library already have a Test version of the same component.
Click the Import selected objects into library button once you are ready to import the configuration into your library.

Click on one of the libraries listed when you open the Programming->Libraries arrow to access the contents of that library.
You will be presented with a page that lists all of the component types available:
Each component, except for documents, can be overridden using a "branding library" defined in a transaction template. For example, if you define an email or image logo in a library and a document in that library references them, by default it will find those components by name using the library where the document is defined. But if you also redefine those components using the same name in a different library, you can specify that library as a branding library in a transaction template so that at run-time, those transactions will reference those redefined components instead of the original. This allows a given document to carry different branding information without having to create duplicate documents and packages that only differ by the brand to be used.
Click on one of the following to program that type of component:
- Documents defines all documents (forms) and package+disclosure pages.
- Button message sets defines the button labels and related messages you want to use. The default button message set is defined in the ESF/Library/Template's ESF_DefaultButtonMessage.
- Document styles defines any special document styles you want to use besides the ESF/Library/Template's default ESF_DefaultDocumentStyle.
- Drop downs define drop down lists, also known as select boxes, so your forms can allow a user to choose from a set of options. You can override drop downs in a branding library to change the values available.
- Emails define the emails that will be sent, such as emails inviting parties to complete documents or notifications sent to others when transactions are completed, customers have signed, etc. You can define both a regular text email as well as an optional HTML-version of that email should the recipient's email client allow the display of HTML email. You can override emails in a branding library to change the contents of emails.
- Files define PDF, Word, HTML or other files that are linked in your documents for users to download "as is."
- Images/Logos define the images and logos that you display in your documents. You may also define images that are document-specific in the document editor. While you may reference images from anywhere on the Web in your documents, it is not recommended as the URL for such images may change over time, or the image at that URL may change and cause layout or content issues in the future. You can override images/logos in a branding library to use alternative images and logos.
- Property sets define small data elements that you can externalize from a document, such as company name, address, contact phone, fax numbers, etc. If you externalize these values, you can just change the property sets if their values change. You can override property sets in a branding library to change such values. It also supports using a different value when in Test or Test Like Production mode.
- Fields define commonly used fields in multiple documents so that you can choose them when creating a new field in a document and avoid having to reconfigure its options. It also helps keep common fields consistently named to lessen confusion (was it first_name or FirstName or Name_First?). This is not commonly used.
- Parties define commonly used parties in multiple documents so that your party names are consistent across documents. Also, if a given party name belongs to a group of users (like "Accounting" or "Payroll"), you can specify a To Do Group name that associates a Group of users who will be allowed to act in the party's role. You can override parties in a branding library to specify a different group of users to act as this party.
- Tips just displays the programming tips page that is displayed when you first open a library for programming.

Click on Documents to show all documents in the selected library.
Creating documents is the focus of programming on eSignForms. Everything begins with a document. Here's a document list along with the versions associated with the selected document (Selected document CustomDocumentForSignature, Version 2 in Test mode):

In the left side list are all of the documents, showing the current Production and Test versions, when present. To filter the list of documents:
- Enter part of the Document EsfName to search by name. It defaults to a "contains" search, but you can prefix with "^" for a "starts with" search. You can also specify to see only Enabled or Disabled documents. Click the Filtered button to get a filtered list, or click Show all to list all documents.
Note that a document in a package can be skipped, but there's no mechanism to skip pages in a document. If you have optional pages based on party or the like, you should instead develop those as separate documents. Documents can be skipped, as well as parties, as well as parties to a document, but you not pages in a document. You can also use Java advanced programming in your document page to optionally show sections of a document page based on party.
Click on a document to view it along with all of its versions.
On the right side list are all of the versions of the selected document. Document versions are either Test (most recent if present), Production (most recent if no test version), or Old (prior Production versions). By default, when you select a document, the most recent version will be selected. Only a Test version is available to be changed.
To create a new document and test version from scratch, click the Create new button.
When a document is selected, the document and version forms are displayed below:

On the left side is information about the document, regardless of version:
- Click Enabled for the document to be actively available, or click Disabled to keep that document from appearing in other lists of active documents.
- The HTML file name spec sets the file name for this document when it's exported or attached to an email. It can be a simple name like
Contract.htmlor may contain field and property specifications so it's customized, such asContract for ${firstName} ${lastName}.html. - The EsfName is the document's unique name in the library. Once you create a production version, you will no longer be able to change this name.
- The Display name is the name shown to parties when they view this document.
- The Description is a short description the document.
- Use Comments to track any information you want regarding this document. We recommend including a log of the updates to help you remember why new versions are being created.
Click the Save button to save any changes to the document and currently selected version.
Click the Cancel button to discard any changes made and revert to view-only mode. You can click the Edit button to return to edit mode.
Click the Create new like button to create a new document, like the currently selected document and version. In general, you want to create a new VERSION of a document when you are making changes to an existing document such that the new version will be used in place of the older versions going forward. You may want to create a new document LIKE an existing one if BOTH documents will be used at the same time, such as creating a state-specific version of an otherwise standard document.
On the right side is information about the selected version:
-
It includes a list of pages in the document. Many multi-page documents are implemented as a 1-page document because they are "web pages," meaning that the document can be very long with simple scrolling. Click on a page to bring up the page editor. If there is more than one page, a Delete button will appear to allow you to delete a page. Click the Add page button to add a new blank page. You may drag and drop pages to re-order them. Multi-page documents are presented with all "Edit" or "Edit and review" pages first, and then once all pages are filled, a final review is shown that is composed of "Review" and "Edit and Review" pages concatenated together. Most people use multiple pages to implement a simple wizard so users can fill out a document in parts, and then review the complete document when it's all done.
Long documents: Due to system limitations, the generated Java code for your document pages cannot exceed 64KB bytes. If during testing you receive an error suggesting it has exceed this byte limit, you must split your document into multiple pages.
-
The DOCTYPE used to render this document. Originally, all documents used XHTML 1 (HTML 4 using XML format). The default document type is HTML 5.
-
The Locale that identifies the language of the document. The default locale for a new document is set in the Deployment view. This sets the language attribute 'lang' for HTML 5 documents, and its locale is used to resolve built-in error messages.
-
The Document style is the document style to be used for this document. We recommend you use as few different document styles as possible to keep a consistent look, and the built-in ESF_DefaultDocumentStyle is a nice, modern look.
-
The Orientation specifies the intended page orientation as Portrait (taller than wide) or Landscape (wider than tall). Portrait is the default. It is currently only used for PDF generation as browsers have no such limitation/concern. If you select multiple documents to combine into a single PDF, if any document is defined as Landscape, then all documents in that PDF will be landscape.
-
The E-Sign record location specifies where the electronic signature process record will appear if the document is signed. Choose "Final own page" to put it on the last page, by itself (so if printed, it will appear on its own page). Choose "End of document" to just put it at the end of the document without inserting a page break; this is useful if your last page has space to include this extra information. Choose "Do not show" to suppress it entirely (not recommended).
If you are working on a Test version, click the Make Test version Production after you have tested the document and shown that it works as expected. You must make it Production in order to use it in production-level transactions. Click the Delete button to delete the Test version. If there is no Production version, this will also delete the Document definition as well as the version.
If you have selected a Production version and there is no existing Test version, click on the Create next Test version to create the next version of the document. While generally not recommended, if you need to make a quick tweak to a Production version (and no Test version exists), click on the Revert to Test button to put the current Production version back to Test mode, and if there is a previous Old version, it will become the Production version again. This should only be done if you are sure there are no users as they could receive run-time errors (if on reverting there is no new Production version) or version mismatches (since the prior Old version will be used as the new Production version). If you must revert, make your changes quickly and then put it back into production to reduce the chance of such errors occurring.
Click the Test button to view the document in the standalone document tester.
From the document version form, if you click on a page, the document page editor is displayed:
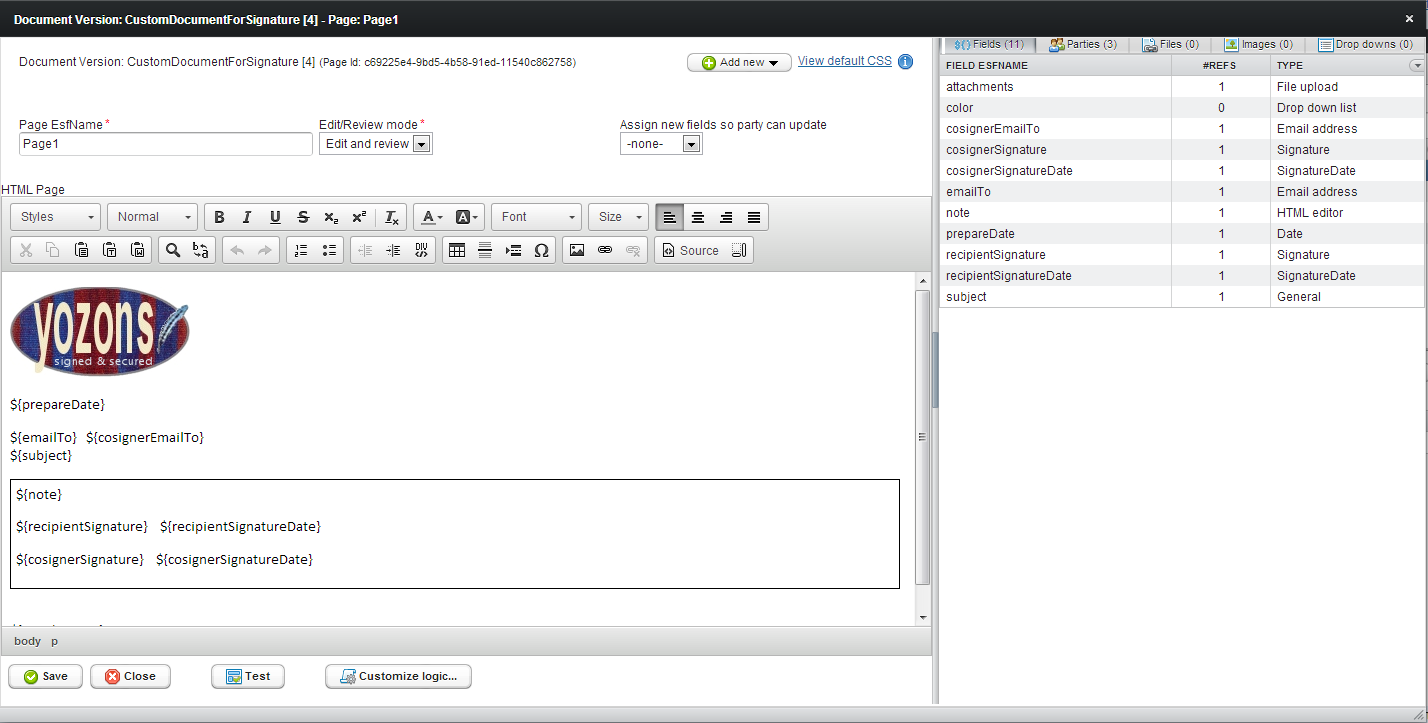
We use the CKEditor component for WYSIWYG document layout, which is shown on the left side. The right side contains the list of Fields, Parties and Images defined within the document page.
We recommend that you layout only line-by-line, and run the Test button to see how it renders frequently when you are learning the system. This will help you understand just what is happening and make it easier to detect problems as you add the next line. Also, when renaming fields, we recommend you only rename a single field between clicks of the Save button.
On the left side editor:
- The Page EsfName is the unique page name in this document.
- The Edit/Review mode specifies how a given page will be used. By default, it's for both "edit" mode, which means parties can fill it out, and "review" mode, which is shown as the final step before submitting a completed document. Choose "Edit and review" if the page is to be filled out and included in the final review. Choose "Edit only" if it's just for collecting data, such as in wizard, but won't be used in the final review. Choose "Reivew only" if it's just for the final review and will otherwise not have any input required.
- The Assign new fields so party can update drop down lists all defined parties for the document, or "-none-", so that as you are building a new document, if you select the party who will fill out the respective fields, when you click Save, all new fields will automatically be associated with that party. Don't worry if you forget as you can assign which fields each party can update by clicking on the Party in the right side list.
- The Add new button
will let you manually create a new field, party, file, image or drop down.
- The View default CSS list may be useful to more advanced programmers who understand CSS (cascading style sheets). The styles shown when you click on the link are provided for all pages, so you can use these style class names as necessary. It may also be useful if you need to override any in your document (just redefine via the 'Source' mode and add
!importantto ensure your style class is used). - The (i) info button has various tips and useful information (cheatsheet) for defining fields in your document.
 will let you manually create a new field, party, file, image or drop down.
See below for CKEditor tips.
Click the Save button to save changes to the page, fields, parties or images. You can also use CTRL-S in the editor to save. We recommend clicking Save after any renamed field template to avoid issues with renaming a field to an existing field name that will result in an error and require that you discard the document changes and start over.
Note that when in SOURCE mode, the CKEditor does not inform the server of changes to the contents. Therefore, you must either click Save twice, or click outside of the editor (so the editor loses focus) and then click Save. Alternatively, you can return to WYSIWYG mode and then click Save.
Click the Close button to close the page editor.
Click the Test button to test the page in the document-only tester, which shows you your document as it will appear for any of the defined parties.
Click the Customize logic button to add document-specific actions and data validations. It is very similar to the customize logic configuration for a package except that it only operates on the specified document and thus should generally only contain rules that are always true when using the document regardless of how it's packaged. By default, document custom logic rules run before package custom logic rules. Update the package custom logic rule in any case where the package rule should run before your document rule.
To use one of the editor's styles, highlight existing text to change, then click the Styles drop down and choose a new style.
To use one of the editor's text styles, highlight existing text to change, then click the second drop down and choose the appropriate look as shown in the drop down.
Most of the editor icons have a tooltip if you hover over it.
Select bold, italics, underlined, strike-through, subscript, superscript or remove formatting.
Select colored text or colored background for text (like a highlighting marker).
Click the Font drop down to change the font on the selected text.
Click the Size drop down to change the font size on the selected text.
Click one of the text alignment buttons for: left justified, centered, right justified, fully justified (both left and right justified).
Click the cut, copy, paste, paste as plain text or paste as Word to paste whatever is in your clipboard. If you are copying from a Word document, we recommend using the 'Paste as Word' button.
Click the Find or Find & Replace to look for text in the editor.
Click the arrows to undo or redo changes.
Click the numbered/ordered list or unordered list to make the highlighted text into a list.
Click the Outdent or Indent buttons to decrease or increase the paragraph indentation, and use the DIV button to add a <div> tag.
Click the Table icon to add a table. This is a common tool for dealing with column data in your forms. If you drag the size of the table or its columns, the sizes will be fixed as you specify it in the editor. But you can also set their sizes to percentage widths and the layout will expand and contract with the browser size.
Click the Insert Horizontal Line button to add a line across the page.
Click the Insert Page Break button to force a page break when the user prints the document from their browser.
Click the Insert Special Character button to add one of the listed characters.
Click the Image button to insert an image defined in the document, the document's library or from the ESF/Library/Template.
Click the Link button to make a hyperlink. Click on the Browse button to make a link to a file you have uploaded in the document's library. Click the Unlink button to remove a hyperlink from selected text.
Click the Source button, for advanced users, who want to see the HTML generated. You may enter HTML directly in this mode and then click it again to return to the WYSIWYG mode. In Source mode, you can also add javascript or style sections as necessary. When in SOURCE mode, the CKEditor does not inform the server of changes to the contents. Therefore, you must either click Save twice, or click outside of the editor (so the editor loses focus) and then click Save. Alternatively, you can return to WYSIWYG mode and then click Save.
Click the Show Blocks button to display the page in terms of blocks, indicating the type of tags used to create them.
On the right side is the Fields tab and list of fields:

This shows all fields defined in the document using the ${ } notation. It shows the number of references as well as the field's type.
Click on a field to change its configuration:
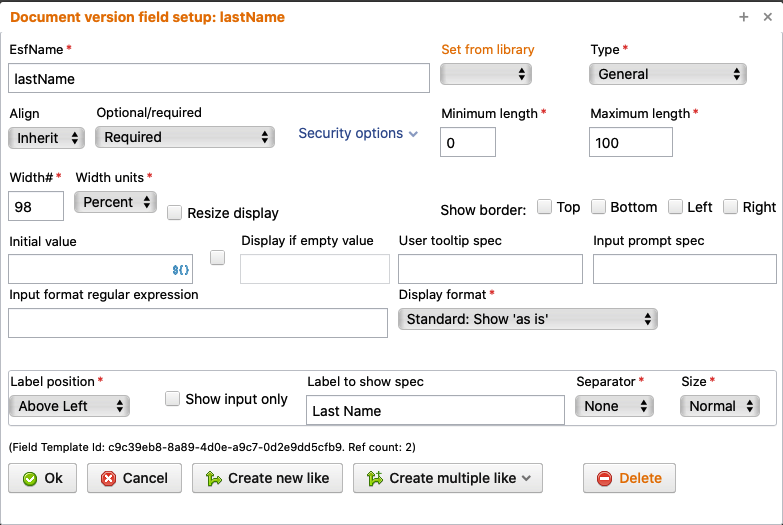
By default, new fields are given the General type, meaning they are standard text input fields:
- EsfName specifies the field's name, which must be unique in the document.
- Use the Set from library drop down to select any pre-defined fields from the library. Note that using this will update all fields on the form.
- Use the Type drop down to choose the correct type for this field:
- General is a text input field for entering a single value, like a name.
- Checkbox is a traditional checkbox field, either checked or not.
- Credit card # is a text input field that expects a legal credit card number. This type currently supports Visa, MasterCard, American Express, Discover numbers.
- Date is a text input field that includes a calendar selector or lets the user enter the date directly.
- Date+time is a text input field that includes a calendar selector or lets the user enter the date directly, followed by drop downs to select the hour, minute, seconds and timezone.
- Decimal is a text input field that expects a valid decimal number, like 123.4. It differs from the Money type only in that it doesn't show a currency symbol.
- Drop down list lets you choose a drop down list defined in your library so that parties can select a valid value from the list.
- Email address is a text input field that expects a valid email address.
- File confirm click is a special way to select a file from the document or library that will track whether parties have clicked on the link to view/download it if the field is required for the party. You can also set this field to another File EsfName at runtime if the required file is not known when configured. For a given party, you may use one of the "Blank" condition checks to see if an optional file confirm click field has been clicked or not.
-
File upload is a special field that allows files to be attached (or removed) when in edit mode, or listed and viewed when in display mode. When assigned to a party, that party will be able to upload/remove files.
- You can specify a Limit # files value to restrict the number of files that can be uploaded. All parties are required, by default, to click on these files before continuing. (See the custom logic action Change File field access to change this behavior for parties who are not uploading if you'd like to block their ability to view/download, or to make it optional that they view/download the files.) The value of this field is the number of files uploaded so you can use a standard number-based comparison to check how many files have been uploaded; also, you can use any of the 'blank' conditions as a shortcut for the value being zero (0).
- You can also set the Display format to use the default 'Standard: list of files' to have it list the uploaded files; or 'Show images: max-width *' so that non-image files are in a list, but image files are shown using the specified max-width in pixels; or 'Show resized images: max-width *' so that non-image files are in a list, but uploaded image files are rotated and resized using the specified max-width in pixels; or 'Only images: max-width *' to block uploading non-image files (images are identified by their content/mime-type being a GIF, JPEG or PNG); or 'Only resized images: max-width *' to block uploading non-image files, but rotate and resize the uploaded images using the specified max-width in pixels. Note that image rotation/re-orientation (such as images uploaded from a smart phone or tablet) and resizing only takes place if the resulting image is smaller than the original.
- Finally, you can set a PDF Export option to 'Include any uploaded files when downloading/exporting PDFs' to include these files when downloading PDFs via the reports; or 'Exclude any uploaded files when downloading/exporting PDFs' to not include these files when downloading PDFs via the reports; or 'Include and append any uploaded PDFs to the bottom of its Document PDF' to append any uploaded PDFs to the bottom of the Document's PDF when downloading a copy of the document as PDF; or 'Include and prepend any uploaded PDFs to the top of its Document PDF' to prepend any uploaded PDFs to the top of the Document's PDF when downloading a copy of the document as PDF.
- HTML editor puts a CKEditor field in your document, allowing the party to enter rich text, or paste from Word, etc. We recommend you only provide this feature to parties who are part of your company.
- Integer is a text field that expects an integer/counting number value, such as -5 or 20. Decimal points are not allowed. This type also supposed an Extra options value to specify whether to show normal integers like 1, 2, 3, or to show the value as an ordinal number, like 1st, 2nd, 3rd.
- Money is a text input field that expects a valid amount of money to be entered, like 15.25 or $20. It differs from the Decimal type in that it displays a currency symbol rather than just the number.
- Phone is a text input field that expects a valid phone number. You can specify what the default country is for phone number so it can be properly interpreted and formatted.
- Radio button is a traditional radio button that is typically defined with other values and are put in a group so that only one of the radio buttons in the group can be selected at a time.
- Radio button group is a non-visual field type that actually holds the value of the selected radio button defined as part of the group. We recommend giving a meaningful name via the Label for error messages. The label is not displayed in the document, but for errors, the radio button group label is shown if set.
- Signature is a text field stylized for the purpose of having the party type their name to indicate they are signing. It will also trigger the additional of the electronic signature process record for the party who signs.
- SignatureDate is a non-entry field associated with a Signature field by having the same name as the Signature field, but with "Date" added. So if you define a signature field as "CustomerSignature" you can have a date field added and automatically assigned with the actual signing date by defining a SignatureDate field named "CustomerSignatureDate" ("CustomerSignature" with "Date" added at the end).
- SSN is a text field suitable for the entry of US-based social security numbers. It can also be used to format as an employer identification number (EIN).
- Text area is a multi-line text field that allows for greater input by a user. It is generally used to enter plain text comments, additional contract terms, descriptions, free form mailing addresses, etc.
- Zip code is a text field suitable for the entry of US-based zip codes, either 5 or 9 digits.
- Use the Align drop down to change the alignment of the field. "Inherit" is commonly used.
- Select Required from the Optional/required drop down list if the field is required, else Optional. There are occasions when a field is only required under certain conditions implemented via custom logic rules. Use Optional style required for such fields so the field will appear as if it's required, while actually being optional when performing automatic field validations; of course, you must define the custom logic rule to show a message if the field is not provided to enforce when it is required.
- Click the Security options list to add special options such as whether the field should support "Auto complete" or not (meaning that if the user has entered similar data elsewhere, the browser will offer up alternative choices, and if not checked, the browser will not offer suggestions); "Mask on input" is for creating a password type input field where the data entered is masked; "Mask in data snapshot" is for sensitive data that you may store in your forms, but if the data is exported it must be masked; "Suppress copy value" is for making it harder for a party to copy the value of a given field value; "Suppress paste value" is for making it harder for a party to paste a value into a given field; and "Copy value on tran clone" specifying whether this field's value can be copied if a new transaction is created from an existing transaction (for example, signature fields generally should not be copied since the new transaction should not assume they have typed to sign).
- Enter the Minimum length this field may have in number of characters.
- Enter the Maximum length this may have in number of characters.
- Enter the Width and Units to specify how big the field should be. If your fields are defined in a table column, you may want to choose 100% to have it fill the available space. Or choose "Auto" in the Units (Width value is hidden) to have the field sized according to its natural size, which is useful for fields like checkboxes, drop downs, radio buttons, etc.
- Check the Resize display field if you want the field to display in its natural size when in view/display mode (not in input/edit mode).
- Check Top, Bottom, Left and/or Right to include borders around the field.
- The Initial value specifies a fixed value or a field specification, like
${transaction:firstName}, which is used to set the field's initial value when the transaction is started. Furthermore, the system will attempt to set the value again whenever a party retrieves a document and no value has yet been set so you can set it to a value from a prior document or even the current document. You generally cannot reference other fields in the document (since the order they are initialized is not defined), but you can set it to values posted when the transaction was started by an external process or a document field from a prior document or the current document when you know it's reference value is set. If the initial value field specification cannot be found and the Display if empty value option is enabled, then the field will be left blank rather than set to the missing field name. - The Display if empty value specifies a fixed value or a field specification, which is displayed for this field when the value is blank (null, spaces, empty string, etc.) To activate this, you need to check the box to its left.
- The Auto POST checkbox allows you to submit all data on the form to the server when it's value changes. This is generally only done when linking two drop boxes such that the second drop box list is set dynamically based on the value of the first drop down list.
- The Dynamic drop down list name spec appears for drop down list fields so that the actual drop down list used can be based on the value of other fields.
- The User tooltip allows you to enter a tooltip that will display when the party hovers the mouse over the field on the document (${} field specs allowed).
- The Input prompt allows you to set a short tip (${} field specs allowed) that will appear inside the field when it's in input mode. Once any data is entered into the field, the input prompt will disappear. It is often used for a simple tip (and it is not recommended to be used in place of a label), such as put 'mm/dd/yyyy' in a date selection field, for example, or '(999) 555-5555' for a phone field, etc. Note that field has no value set until something is entered into the field and the input prompt disappears.
- The Input format specifies the expected format for input into the field. See below for links to advanced configuration for this.
- The Display format specifies the format to use when displaying the field (not in input/edit mode).
There are a few data types that allow for customization using Java's built in capabilities, but they are a bit technical. For advanced folks who need them, here are some useful links to documentation that describe these more.
For Date, use DateTimeFormatter specifications.
For Decimal and Money and even Integer, use DecimalFormat specifications.
For General, use regular expression Pattern specifications to limit input to match the patterns.
Each field can also be displayed with its label, automatically. By defining the label that goes with the field, when there is a data validation error, the field and label can be highlighted to help the party know what is wrong, and this name will be used in reporting any automatic field validations. We recommend laying out your forms with the label in the "Above left" position to create a professional, consistent look that is clear to your users (although for checkbox and radio buttons, we recommend "Right").
- Select the Label position to use when allowing the label to be automatically shown with the field. Select "None" to prevent the label from automatically appearing with the field. We recommend you do put the label somewhere nearby, though, using the syntax
${label:fieldName}. - Check Show input only if the label should only be shown when the field is open for input (edit mode). This is mostly useful for a field inside a paragraph of text where the label is useful as a field prompt, but once populated the label no longer is necessary.
- For Label to show enter the value to show as the field's label (${} field specs allowed). This name is also used in automatic field validation messages.
- Choose the Separator drop down to define the separation of the label and the field as "None" (no separator), "Colon :" (put a colon and space between), or "Space" (put a space between).
- Choose the Size of the label as "Small" (use a smaller font, which is typical when using a label position of "Above Left") or "Normal" (use the same font size for the label).
Click the Ok button to save your changes to the field template.
Click the Cancel button to discard the changes made to the field template.
Click the Create new like button to create a new field like this one. Note that you will want to update your document to reference the new field using ${ } notation.
Click the Create multiple like button lets you create 2 to 10 more fields like this one, appending a sequence number to the end of the EsfName.
Click the Delete button to delete the field. Note that you must also remove the associated ${ } specification in the document because when you save the document page, all undefined fields will be re-created as a General type field. Unlike other buttons, this one will also Save the document version to avoid issues of creating new fields using the deleted field's name, or renaming an existing field to the deleted field's name. This does mean you cannot 'cancel out' the document version updates if you delete a field template.
On the right side is the Parties tab and list of parties who work on this document:
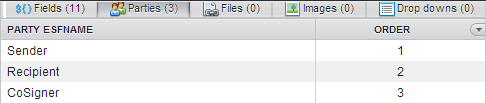
This shows all parties defined in the document. You only need to define parties who are expected to fill out portions of the document. You do not need to specify any parties who will only view the document. You can drag to reorder the parties listed so that they appear in the expected order that the document will be completed.
Use the special party ESF_reports_access to define special access for updating this document via the reports when the report is configured to allow such updating.
Click on a party to change its configuration:
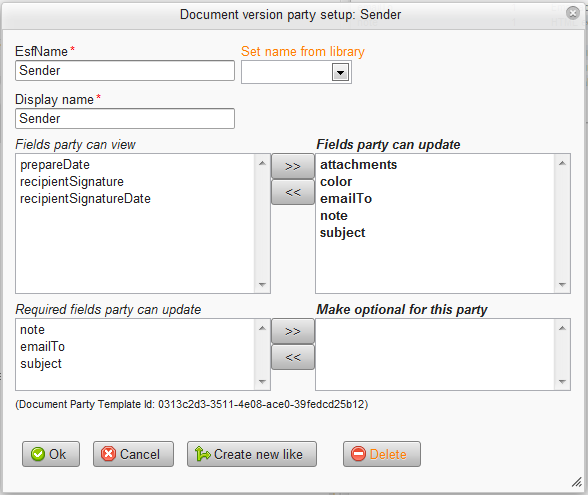
- EsfName is the unique name of a party to this document who is expected to enter data or sign.
- Choose from the Set name from library drop down to select a pre-defined party in your library. This only changes the EsfName and Display name fields, but keeps them consistent across your documents. Consistent names will make it easier to configure packages when you add multiple documents in.
- The Display name is the name of this party when displayed on a document or otherwise describing the party's step or role.
- Select fields from Fields party can view and click the >> button to convert them into Fields party can update. The fields listed on the right side are the fields the party will be allowed to type into. Use the << button to remove the selected fields from the update column if the party should not be allowed to update them.
- Select fields from Required fields party can update and click the >> button to make those fields defined with the Required checkbox optional for this party. Often a required field may not be known by an early party (like the person who starts the transaction and then sends it along for processing by another party), so while the field truly is required, it may be considered optional for another party. Use the << button to remove the optional nature of that field for the party so it's required as defined in the field template.
Click the Ok button to save your changes to the party.
Click the Cancel button to discard the changes made to the party.
Click the Create new like button to create a new party like this one.
Click the Delete button to delete the party.
On the right side is the Files tab and list of files linked to in this document:

This shows all files defined in the document. For files like HR policies that will likely appear in more than one document, we recommend you define those in the library. But many files are tied specifically to a single document, and this is the place to add those files.
Click on a file to change its configuration:
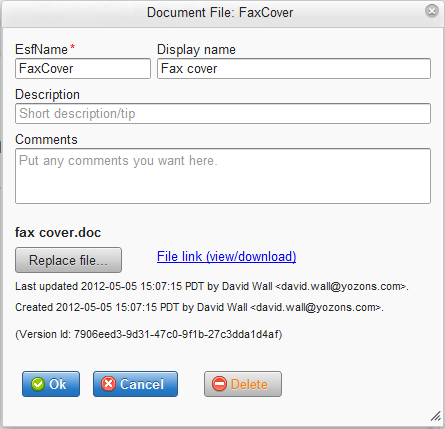
- EsfName is the unique name of an file in this document.
- Display name is the auto-generated text shown in the link to this file.
- Description is a short description of the file.
- Comments is any other information you want to maintain about the file.
If the file has already been specified, click the Replace file... button to select a different file to use. When you first create a new file, use the Set file button to select the file to upload.
Click on the File link (view/download) link to download the file.
Click the Ok button to save your changes to the file.
Click the Cancel button to discard the changes made to the file.
Click the Delete button to delete the file.
On the right side is the Images tab and list of images that are used only in this document:

This shows all images defined in the document. For images like logos that will likely appear in more than one document, we recommend you define those in the library. But some images are tied specifically to a single document, and this is the place to add those images.
Click on an image to change its configuration:
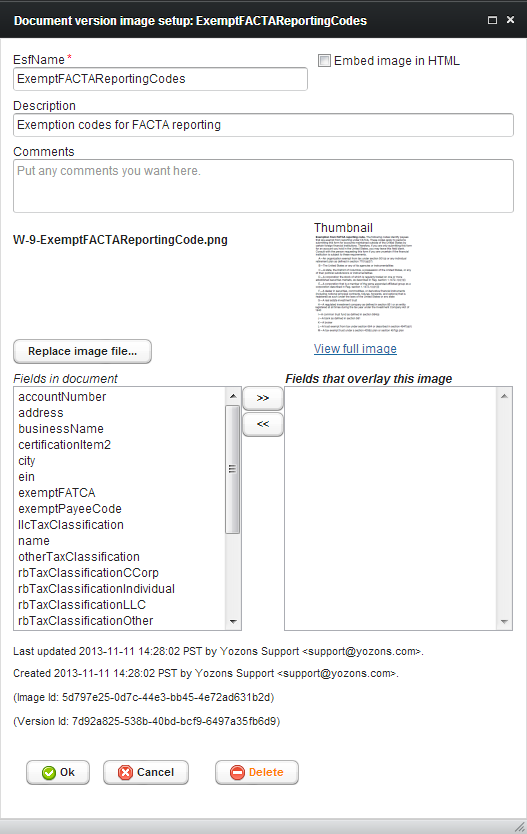
- EsfName is the unique name of an image in this document.
- Check Embed image in HTML to include the image data directly in the HTML web page using a 'data URI'. If not checked, the image will be served using a separate link/URL and request. Normally, this should not be checked, but it may be desirable when using image field overlays so the base document image is included in digitally signed HTML. Note that this option for images in Email templates (HTML format) will convert the 'data URI' into a 'cid URI' with the image provided via a multi-party attachment.
- Description is a short description of the image.
- Comments is any other information you want to maintain about the image.
If the image has already been specified, click the Replace image file button to select a different image to use. When you first create a new image, use the Set image file button to select the image to upload.
Click on the View full image link to display the image "as is".
Note that the thumbnail image may appear to have a black background when the original images uses a transparent background.
For images that have fields defined on top of them, select from the Field in document left-side list and move to the Fields that overlay this image right-side list. If fields are defined to overlay the image, a Position overlay fields... button will appear to allow you to set the top, left, width and height values relative to the image where the fields will be positioned.
You can typically reference your image in CSS using the image's ESF name, like: img[alt="YourImageEsfName"]
A typical use for CSS selection is for image overlays when you use a higher resolution image and let the browser resize it to fit a page using CSS like: <style> div.imageOverlay img[alt="W9Image"] { width: 770px; } </style>
Click the Ok button to save your changes to the image.
Click the Cancel button to discard the changes made to the image.
Click the Delete button to delete the image.
If you have specified that some fields overlay your image, you will then have to specify the position (left and top) and size (width and height) on the image where the field is to be placed.
Note that only fields can overlay the image. If you need to position property values or the like, you will need to set a field to the value.
We recommend setting a label for field templates that overlay an image even if you don't show the label because it will be used in error messages for missing/invalid input.
The top left corner of the image is considered to be a top position 0, left position 0. The bottom right corner of the image essentially has a top position of the image's height, and the left position of the image's width.
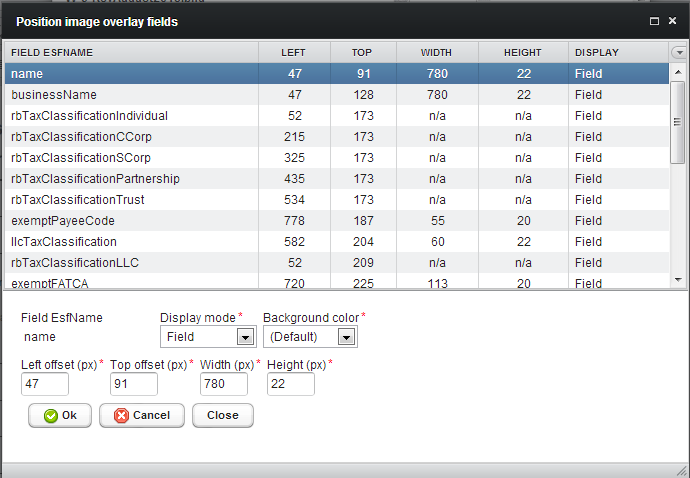
- The Field EsfName is displayed to remind you which field is being positioned.
- The Display mode is generally "Field" for a standard field overlay (similar to using ${field:XXXX} in the HTML document editor), or "Display only" to just show the field's value (similar to using ${out:XXXX}). You may also select "Field+Label" to position the field and it's label, but this is generally rare for image overlays.
- Choose the Background color to use for the overlay field. By default, it'll just place the value on top of the image, which is the most typical need. But you may select a color, such as "White", to make the field stand out more if the image underneath the field would otherwise make it hard to read.
- Specify the Left offset (px) to specify how far in pixels from the left edge of the image where your field's upper left corner will be in.
- Specify the Top offset (px) to specify how far in pixels from the top edge of the image where your field's upper left corner will be in.
- Specify the Width (px) to specify how wide in pixels the field will occupy. Note that if you left, center or right align the field, it will be within this specified width. Radio buttons and checkboxes do not support width or height.
- Specify the Height (px) to specify how tall/high in pixels the field will occupy. You will find most text fits nicely in 20 or 22 pixel height. Radio buttons and checkboxes do not support width or height.
Note that the width and height create a "box" where the field will be placed. If width specified is wider than than the field will naturally display, you likely want to change the field template to use 100% width so it fills the entire box's width.
Click Ok to save your change, Cancel to abandon the change, and Close to dismiss the field overlay positioning window.
For those who use image overlays, a new image overlay tool has been added to make it easy to determine the top, left, width and height of one or more fields. It's not currently integrated, but you can specify an image, drag and drop as many fields areas (similar to selecting regions on the image), provide a handy name reference, and then have it calculate the all of the specified field overlay positions.
There are lots of image processing tools that can help you with the positioning of overlay fields. This is just a quick tip for the free/bundled Microsoft Paint program.
Using Paint's "Select" tool, draw a box on the image where a field should be positioned. Then note the left and top position, as well as the width and height of the box you drew.

Above, we have used the "Select" tool to draw an area in the "Signature of U.S. person" field. At the bottom of Paint, it shows the left position offset of 151 and the top offset of 748. Next to it is the width of 380 and the height of 25.
For Linux users, 'gimp' offers a similar ability when using a rectangular selection tool, with the size and position information shown in the status bar.
On the right side is the Drop downs tab and list of drop downs used only in this document:
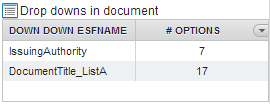
This shows all drop downs defined in the document. For drop downs that will likely appear in more than one document, we recommend you define those in the library. But many drop downs are tied specifically to a single document, and this is the place to add them.
Click on a drop down to change its configuration:
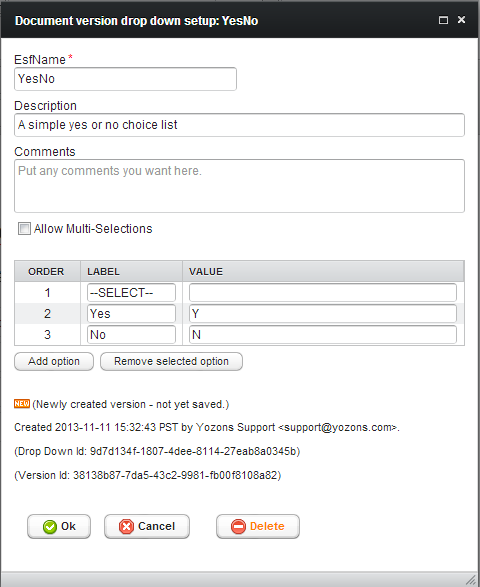
- EsfName is the unique name of a drop down in this document.
- Description is a short description of the drop down.
- Comments is any other information you want to maintain about the drop down.
- Check Allow Multi-Selections if the drop down should allow the user to select more than one value from the list.
A drop down can have one or more options specified, with the label being the value that is shown to the user in the drop down list, and the value is what is stored in the field that uses this list. Submitted values are checked to ensure they match a defined value. Click the Add option button to add a new row. Click on a row and then the Remove selected option to delete a row. And finally you can drag each entry to change the order it will appear.
Click the Ok button to save your changes to the drop down.
Click the Cancel button to discard the changes made to the drop down.
Click the Delete button to delete the drop down.
We recommend that when you want to build a new document, start from the top, lay out the first line, test, then lay out the second line, test, etc. This will make it easier to spot layout errors before too much is built.
Next, add in your fields using the generic ${fieldName} syntax inside the document. For each such ${ } specified, a general purpose field will automatically be created for you. Just lay out all of the fields and do not worry about which party will manipulate which field.
Once your testing shows the document layout working as expected, with general fields, you can then use the 'Fields in document' tab to update their types as necessary. At this stage, you can also define the parties who will fill out the document and assign the fields to the respective parties.
${fieldName} specifies a document field called 'fieldName'. Examples include ${firstName}, ${streetAddress}, ${SSN} etc. We recommend that each document have a field for each variable element so it will work more easily when packaged with other documents. However, a document may reference a field (display-only value) from another document using the notation: ${documentName.fieldName}. ${fieldName} is equivalent to ${fieldlabel:fieldName}, with the former preferred as it's easier to type.
If the documentName prefix portion is set to the literal 'document' it is interpreted as the "current document" which is the same as not using the documentName at all. Use the prefix 'transaction' to access data from the transaction data, including startup data and to access related fields from the transaction (id, displayname, user.* fields, etc.).
The names are used as programming variables and thus have are limited to 50 characters in length, must begin with a letter, and then can contain numbers, uppercase or lowercase letters and the underscore (_). So firstName and First_Name are valid, while First name and 1stName and first-name are not.
If a given field appears in multiple locations in a document, only one should be used for input with the standard field notation. The other references to the field, where it's only displayed, should use:
-
${out:fieldName}will show the field 'fieldName' for display-only. It also can be used to make a field use the output format specification defined in its field template rather than use its default format. -
${xmlout:fieldName}will show just the field 'fieldName' for display-only in XML format (generally for field specs used to generate XML). -
${outv:fieldName}will show the formatted value of the 'fieldName' for display-only. No HTML layout surrounds the value. -
${xmloutv:fieldName}will show the formatted value of the field 'fieldName' for display-only in XML format (generally for field specs used to generate XML). -
${val:fieldName}will show the plain, unformatted value of the 'fieldName' for display-only. No HTML layout surrounds the value. -
${xmlval:fieldName}will show the plain, unformatted value of the 'fieldName' for display-only in XML format (generally for field specs used to generate XML).
While fields are often shown together with a label, you can specify these be shown individually using the notation:
-
${label:fieldName}will show the label configured for the field 'fieldName'. -
${field:fieldName}will show just the field 'fieldName' without any configured label. -
${xmlfield:fieldName}will show just the field 'fieldName' value in XML format (generally for field specs used to generate XML).
If you select a file using the Editor's link feature, the file link will appear in the document while editing. However, you may also use this notation to specify a configured file:
-
${file:FileName}will insert a link to the file named 'FileName' in that location.
If you select an image using the Editor's image feature, the image will appear in the document while editing. However, you may also use this notation to specify a configured image:
-
${image:ImageName}will insert the image named 'ImageName' in that location.
To insert the value of a configured property, you may use this notation:
-
${property:PropertySetName.PropertyName}will insert the value of 'PropertyName' as configured in the property set named 'PropertySetName'. -
${htmlproperty:PropertySetName.PropertyName}will insert the value of 'PropertyName' as configured in the property set named 'PropertySetName' as if the value were valid HTML (no escaping special characters to HTML entities).
-
${document:esfname}is replaced by the document's configured name. -
${document:displayname}is replaced by the document's display name. -
${document:id}is replaced by the document's unique id. -
${document:id_esfname}is replaced by the document's unique id formatted as an EsfName, typically only used when adding your own custom Save button to a Document by using it as a suffix to the Save button's nameDocumentSaveButton_prefix. -
${document:version}is replaced by the document's version number. -
${document:version.id}is replaced by the document version's unique id. -
${document:version.lastupdateddate}is replaced by the document version's last updated date using the system default date format. For other date forms, set a Date field to this value. -
${document:page.esfname}is replaced by the document version page's name. (Only valid when used in a document, not in a field spec.) -
${document:page.id}is replaced by the document version page's unique id. (Only valid when used in a document, not in a field spec.) -
${document:page.number}is replaced by the document versions page's number. (Only valid when used in a document, not in a field spec.) -
${document:party.esfname}is replaced by the package party's name. (Only valid when used in a document, not in a field spec.) -
${document:party.displayname}is replaced by the package party's display name. (Only valid when used in a document, not in a field spec.) -
${document:package.pathname}is replaced by the package's path name. -
${document:package.version}is replaced by the package's version number. -
${document:package.id}is replaced by the package's unique id. -
${document:package.version.id}is replaced by the package version's unique id.
NOTE: Use prefix xmldocument: to have the values above shown in XML format, suitable for embedding in XML structures.
-
${transaction:id}is replaced by the transaction's unique id. -
${transaction:pathname}is replaced by the transaction template's path name. -
${transaction:displayname}is replaced by the transaction template's display name. -
${transaction:esf_status}is replaced by the transaction's current status. -
${transaction:esf_status_text}is replaced by the transaction's current status text. -
${transaction:esf_status_reason}is replaced by the transaction's current status reason set when forcing a status change (cancel/reactivate, suspend/resume). -
${transaction:ESF_Start_Timestamp}is replaced by the date-time it was created. -
${transaction:ESF_Started_API_Mode}is true if the transaction was started using the API mode (from an automated start rather than a user). It is false otherwise. -
${transaction:ESF_Started_By_User_Id}is replaced by the user id of the person who started this transaction if it was started by a logged in user. -
${transaction:ESF_Started_By_User_Email}is replaced by the email address of the person who started this transaction if it was started by a logged in user. -
${transaction:ESF_Started_By_User_Email_Address}is replaced by the full email display name and email address of the person who started this transaction if it was started by a logged in user. -
${transaction:ESF_Started_By_User_Personal_Name}is replaced by the first/personal name of the person who started this transaction if it was started by a logged in user. -
${transaction:ESF_Started_By_User_Family_Name}is replaced by the last/family name of the person who started this transaction if it was started by a logged in user. -
${transaction:ESF_Started_By_User_Employee_ID}is replaced by the employee id of the person who started this transaction if it was started by a logged in user and this optional field has been set. -
${transaction:ESF_Started_By_User_Job_Title}is replaced by the job title of the person who started this transaction if it was started by a logged in user and this optional field has been set. -
${transaction:ESF_Started_By_User_Location}is replaced by the location of the person who started this transaction if it was started by a logged in user and this optional field has been set. -
${transaction:ESF_Started_By_User_Department}is replaced by the department of the person who started this transaction if it was started by a logged in user and this optional field has been set. -
${transaction:ESF_Started_By_User_Phone_Number}is replaced by the phone number of the person who started this transaction if it was started by a logged in user and this optional field has been set. -
${transaction:paramName}is replaced by the value of the named parameter passed at startup (X prefix is needed if original param started with a number; '-', '/' or '.' replaced by '_'). -
${transaction:ESF_Request_Header_headerName}is replaced by the value of the named header passed at startup ('-', '/' or '.' replaced by '_'). -
${transaction:ESF_Request_Method}is replaced by 'GET' or 'POST' based on type of original startup HTTP request. -
${transaction:ESF_Request_ContentType}is replaced by HTTP request's mime-type/content-type when specified. -
${transaction:ESF_Request_RequestURL}is replaced by HTTP request's original URL. -
${transaction:ESF_Request_QueryString}is replaced by HTTP request's query string portion of the URL. -
${transaction:ESF_Request_RemoteAddr}is replaced by HTTP request's remote address (typically an IP address). -
${transaction:party.isredo}is replaced by "true" if the current party is marked for redo (previously completed; correcting and resubmitting a document); "false" otherwise. -
${transaction:party.redodatetime}is replaced by the date-time this party was marked for redo (correcting and resubmitting a document); when the party is processing normally (not a redo), this will be blank. -
${transaction:user.id}is replaced by the user id of the logged in user who is acting as the current party if it's a logged in user. -
${transaction:user.email}is replaced by the email address of the logged in user who is acting as the current party if it's a logged in user. -
${transaction:user.email_address}is replaced by the full email display name and email address of the logged in user who is acting as the current party if it's a logged in user. -
${transaction:user.personal_name}is replaced by the first/personal name of the logged in user who is acting as the current party if it's a logged in user. -
${transaction:user.family_name}is replaced by the last/family name of the logged in user who is acting as the current party if it's a logged in user. -
${transaction:user.employee_id}is replaced by the employee id of the logged in user who is acting as the current party if it's a logged in user and this optional field has been set. -
${transaction:user.job_title}is replaced by the job title of the logged in user who is acting as the current party if it's a logged in user and this optional field has been set. -
${transaction:user.location}is replaced by the location of the logged in user who is acting as the current party if it's a logged in user and this optional field has been set. -
${transaction:user.department}is replaced by the department of the logged in user who is acting as the current party if it's a logged in user and this optional field has been set. -
${transaction:user.phone_number}is replaced by the phone number of the logged in user who is acting as the current party if it's a logged in user and this optional field has been set. -
${transaction:user.mobile_phone_number}is replaced by the mobile phone number of the logged in user who is acting as the current party if it's a logged in user and this optional field has been set. -
${transaction:ESF_Canceled_Timestamp}is set to the current date-time when the transaction is canceled. -
${transaction:ESF_Canceled_Reason}is set to the reason text specified when the transaction is canceled. -
${transaction:ESF_Auto_Cancel_Reason}is set to the reason text specified when the transaction is set to be automatically canceled in the future. It is removed if the transaction''s auto-cancel date is subsequently cleared. -
${transaction:ESF_Suspended_Timestamp}is set to the current date-time when the transaction is suspended. -
${transaction:ESF_Suspended_Reason}is set to the reason text specified when the transaction is suspended. -
${transaction:ESF_Resumed_Timestamp}is set to the current date-time when the transaction is resumed. -
${transaction:ESF_Resumed_Reason}is set to the reason text specified when the transaction is resumed. -
${transaction:ESF_Completed_Timestamp}is set to the current date-time when the transaction is completed. -
${transaction:ESF_Completed_Party}is set to the transaction party EsfName who completes the transaction.
NOTE: Use prefix xmltransaction: to have the values above shown in XML format, suitable for embedding in XML structures.
-
${transaction:documents.todo}specifies where the generated list of documents the specified party has access to are listed.
-
${LINK}specifies where the generated HTTP Link or URL will be placed in the email notification. -
${EMAIL}specifies where the party's address will be placed in the email notification, TO/CC/BCC, and/or subject. - Tip: Use
${out:DocumentName.FieldName}instead of just${DocumentName.FieldName}in email text if you need the output formatting specification for the field as defined in that document.
-
${LINK}specifies where the generated HTTP Link or URL will be placed in the email notification. -
${NAME}specifies where the user's display name will be placed in the email notification and/or subject. -
${EMAIL}specifies where the user's address will be placed in the email notification, TO/CC/BCC, and/or subject.
We recommend not using the following field names, regardless of capitalization, in your documents to avoid confusion with the built-in fields which are expanded prior to document fields. If you have such fields in your document, you must use syntax like ${DocumentName.email} or ${out:email} to reference your document field rather than the built-in.
-
${LINK}specifies the current party's generated HTTP Link or URL. -
${URLENCODEDLINK}is the same as ${LINK} but is URL encoded for use as parameter in other URLs. -
${EMAIL}specifies where the party's email address -
${URLENCODEDEMAIL}is the same as ${EMAIL} but is URL encoded for use as a parameter in other URLs.
-
${serial:SerialName}is replaced by the next serial number defined with the name 'SerialName'. Numbers for test and production transactions are maintained separately. This generally should only be used to set another field value as it will return a new value every time it is referenced (i.e. not to be used directly in your document layout).
Various configuration fields allow for the specification of field specifications, which are basically the same as the field accesses above, but can be a literal or combination of other fields.
For example, these are valid field specifications:
-
this literal string- This literal-only field specification simply is "expanded" to the same literal string: this literal string -
${transaction:id}- This field-only specification expands to the ID of the current transaction, such as: 6ae1f380-8184-4a0a-ad0a-e3597d968462 -
StoresIn${state}- This combines a literal StoresIn with the current document field state, assuming the state of Washington would result in something like: StoresInWA -
${firstName} ${lastName}- This combines the field firstName with a space literal and another field lastName to create a full name, resulting in something like: Steven Gates
Most fields that supporting entering such a field spec will show ${} on the right side.

Click on the ${} to open the field spec lookup tool:
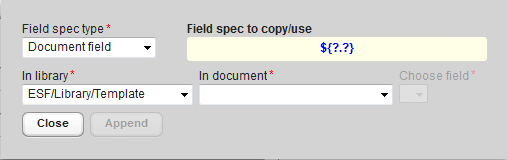
- Click Field spec type to choose if you are looking for a field defined in a document, a property in a property set (regular or HTML properties), serial generator or one of the built-in fields for a document or transaction.
- Select In library to select the library, when appropriate.
- Select In document to select the document, when appropriate.
- Select Choose field to select a field in a document, when appropriate.
Note that the Field spec to copy/use will hold the field specification string you can copy and paste as needed, or click the Append button to add it to the text field you clicked the ${} icon in.
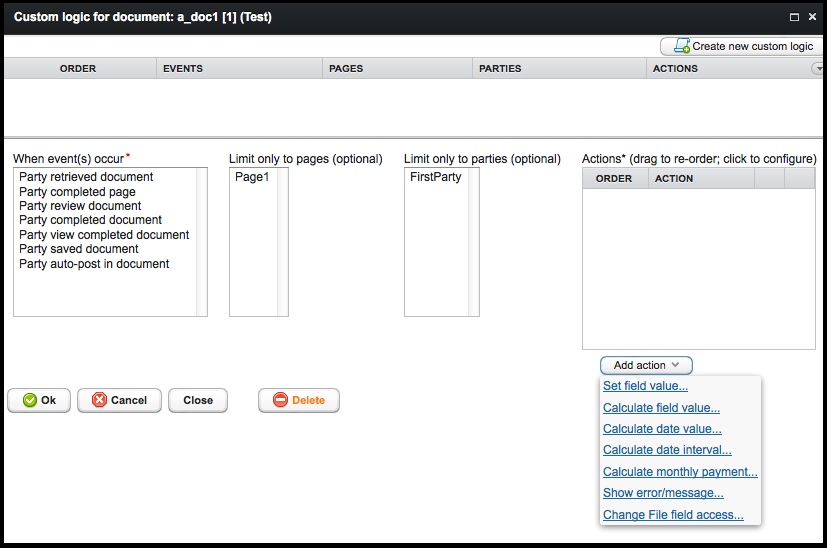
Customizing logic for a given document is very similar to customizing logic in a package except that it only applies to the document. It also operates on a restricted set of events and actions, though it can operate on page-level events which are not available to the package. By default, custom logic rules in the document run before custom logic rules in the package. Update the package rule if you need it to run before the document rules.
This is the best place to put document-specific extra data validations. Just select the Party review document event and use Show error/message actions with appropriate conditions to detect invalid form data.
- In When event(s) occur select at least one type of event that describes when you'd like the associated actions to run. You can choose from:
- Party retrieved document occurs when a party first retrieves a document.
- Party completed page occurs when a party clicks the Continue button on a given page in a document. It is used primarily for custom validations as a user goes from page to page in a multi-page document. The party cannot continue to the next page if any action produces an error or warning message.
- Party review document occurs when a party has filled out the form or is signing and clicks the review button. The party cannot continue to review the completed document if any action produces an error or warning message.
- Party completed document occurs when a party completes a given document. The party cannot complete the document if any action produces an error or warning message.
- Party view completed document occurs when a party views a document that has already been completed.
- Party saved document occurs when a party clicks the 'Save' button, such as updating a document via the ESF_reports_access party when accessing the transaction from a report.
-
Party auto-post in document occurs when a party changes the value of a dropdown box that is configured for auto-post so the values are updated based on the change. You can simulate an auto-post yourself using HTML+Javascript, such as for the following button example:
<button type="button" id="mybutton" onclick="esf.autoPost(this)">Calculate</button>
- In Limit only to pages (optional) check any pages where the actions should only fire when the selected event(s) occur, but also only when the specified page is being processed. If you do not select any, then it will not matter which page is involved.
- In Limit only to parties (optional) check any parties if the actions should only fire when the selected event(s) occur, but also only when the specified party is processing the document. If you do no select any, then it will not matter which party is involved.
- In Actions you can drag to re-order existing actions or click the Delete button to remove it.
- Click the Add action button to add the actions you'd like to occur when the specified event arises, possibly limited based on the documents and parties selected.
- Choose Set field value action to change any field values in your documents.
- Choose Calculate field value to calculate a value (add, subtract, multiply, divide).
- Choose Calculate date value to calculate a date by adding a positive (future) or negative (past) number of days, weeks, months or years.
- Choose Calculate date interval to calculate an interval (days, months or years) between two dates.
- Choose Calculate monthly payment to calculate a monthly payment amount based on the loan amount, term in months, and interest rate (APR).
- Choose Show error/message to display a message or report an error to the user (mostly used during the Party review document and Party completed page events).
- Choose Change File field access to specify block or make optional the need for a party to view/download the files associated with this field. Of course, if the party is supposed to upload files, this has no bearing. Note that a document party could be mapped to more than one package party, so it's possible this will apply to more than one package party at runtime.
See conditional actions in a package for details on conditions which are the same for package-level and document-level custom logic.
There is a special type of document that plays the role of a welcome message, the E-Sign Disclosure (required by law for consumers) and often contains the list of documents contained in the package for a given party.
Since the list of documents for a given party are variable, you can include ${transaction:documents.todo} in the package+disclosure document and it will automatically show the correct list of documents and their status for the party.
The ESF/Library/Template contains a document just for this purpose called StandardPackageDisclosures.
It's contents is some like the following:
${image:Logo}

Welcome to our electronic signature service.

Please note that your continued use of this service constitutes your agreement to use electronic signatures in lieu of a paper document with a traditional hand-written signature. Electronic signatures are legally recognized throughout the United States. Your electronic signature will take place when you type your name and/or initials into the marked areas on the subsequent document(s) and then you click both the Review and Submit buttons on each document to indicate your agreement and/or authorization.

You also certify that these documents are intended for you and that you are authorized to sign the documents. If you have received these by mistake, please do not continue and email us or call ${property:MyCompany.CustomerSupportPhone} to report our error.

If you do not wish to sign these documents electronically, please contact us and do not continue with this process. However, we expect that you will prefer this free, easy-to-use, fast and environmentally sound option.

Document(s) for your review:
${transaction:documents.todo}
You are free to create your own documents with alternative welcome messages, E-Sign Disclosures and/or layout for this purpose. Just specify your package+disclosure document in the Package configuration.
Not everything can be done with point & click programming. Here are a few tips that can be used when CKEditor is in Source mode.
You can add your own styles just by including a standard HTML style tag at the top of your document:
<style type="text/css">
_put your custom styles here_
</style>
You can add your own javascript just by including a standard HTML script tag in your document while in SOURCE mode:
<script type="text/javascript">
_put your custom JavaScript here_
</script>
Such scripts run entirely in the user's browser and are only in effect if their browser is set to support JavaScript. We do not recommend using JavaScript to generate the document layout so that the captured HTML document on signing can be rendered correctly and consistently in the future. JavaScript generally should not be required for the document to work or render correctly, but can be useful to make it more usable, auto-fill after calculations, etc.
Note that the HTML input field element name is the same the document field template name, except all in lowercase letters. So a field template named firstName will use the HTML input attribute name="firstname".
You generally can access such an input field's element using: document.getElementsByName('firstname')[0] or esf.getElementByFieldName('firstName') (note that our function will downshift the field name itself) to get a simple document field, or esf.getElementsByFieldName('rb') to get multi-element fields like radio buttons. With a handle to the element, you can add JavaScript function handlers for events like onchange or dynamically change styles or its value. The examples below are just to show usage, not to accomplish any specific tasks:
<script type="text/javascript">
   // Get a handle to the element (in this case an 'input' element) named 'firstname'.
   // This assumes your field 'firstName' is not used more than once on the page (which is typical)
   var firstNameElementStd = document.getElementsByName('firstname')[0];
   var firstNameElement = esf.getElementByName('firstName');
   // Get the value of the input field
   var firstNameValue = firstNameElement.value;
   // Set the value of input field to some other value
   firstNameElement.value = 'Bob';
   // Make the input element present for 'edit input mode' but readonly so the user can't change it
   firstNameElement.readOnly = true;
   // Add an 'onchange' event handler
   firstNameElement.onchange = function() { /* your javascript to run when the input element value changes */ };
</script>
Note that most JavaScript that operates on input fields can be protected by ensuring it's only included/run when in edit mode, as the input fields won't be present in review or view only modes, or if the party cannot fill them (this example uses Java/JSP code to protect the JavaScript):
<% if ( esf.isEditMode() ) { %>
<script>
   doThisJSFunctionOnlyInEditMode();
</script>
<% } %>
Or if you protect your JavaScript to deal with an element not being present for input, just check that the field exists before using it:
<script>
   var fn = esf.getElementByFieldName('firstName);
   if (fn)
       fn.readOnly = true;
</script>
This example assumes you have defined fields 'numItems' as an Integer, 'unitCost' as a Decimal or Money, and 'totalCost' as a Decimal or Money, all three fields are allowed to be updated by a given party, and your document source is something like:
<div>${numItems} X ${unitCost} = ${totalCost}</div>
The following scripts will wait for you to enter a value in numItems and unitCost and then it will do the math and set your totalCost field to the computed value.
Here's the generic code that does the math and sets the total cost value (typically placed at the top of your document in SOURCE mode):
<script type="text/javascript">
    function calcTotal(unitCostElem, numItemElem, totalCostElem) {
        var unitCostValue = parseFloat(unitCostElem.value);
        var numItemValue = parseFloat(numItemElem.value);
        if (!isNaN(unitCostValue) && !isNaN(numItemValue)) {
            var total = unitCostValue * numItemValue;
            totalCostElem.value = total.toFixed(2);
        }
    };
</script>
And this following JavaScript operates on fields that will only in the HTML DOM after rendering the document so the user can input these values, so we put this at the bottom of the document (via SOURCE mode) to ensure the elements exist:
<script type="text/javascript">
    function setupCalcRowElems(unitCostElem, numItemsElem, totalCostElem) {
      unitCostElem.onkeyup = function() { calcTotal(unitCostElem, numItemsElem, totalCostElem); };
      numItemsElem.onkeyup = function() { calcTotal(unitCostElem, numItemsElem, totalCostElem); };
      totalCostElem.readOnly = true; // we make the total field not changeable even in edit mode
    }
    function setupCalcRow(unitCostFieldName, numItemsFieldName, totalCostFieldName) {
      unitCostElem = esf.getElementByFieldName(unitCostFieldName);
      numItemElem = esf.getElementByFieldName(numItemsFieldName);
      totalCostElem = esf.getElementByFieldName(totalCostFieldName);
      if ( unitCostElem && numItemElem && totalCostElem ) { // if we have all 3, set it up
        setupCalcRowElems(unitCostElem,numItemElem,totalCostElem);
      }
    }

    setupCalcRow('unitCost', 'numItems', 'totalCost');
</script>
You can add your custom Java programming to your document using JSP code syntax such as:
<% _put your custom java code here_ %>
Per standard JSP code syntax, you can include the display value of the Java code in your HTML (generally used for setting javascript variables more than for showing a field's value) using syntax such as:
<%=esf.getFieldSpecValue("${fieldName}")%>
The above syntax is generally used to setting JavaScript code in your page to a value of a field, such as:
<script type="text/javascript">
   var firstName = '<%=esf.getFieldSpecValue("${firstName}")%>';
</script>
Unlike JavaScript, this code runs on the server before the page is rendered to the user's browser. Note that it is important to get the syntax right, especially with respect to open and close brackets for conditions and loops, and the field value will need to be quoted for JavaScript, hence the single quotes around it.
Also, this syntax is only supported on a single line. The starting '<%' and ending '%>' must not span lines.
This is particularly useful for optional HTML to display in a document. The variable esf can be used in your document custom Java code to access the server-side state. The Java interface for this object is shown below:
public interface EsfDocumentPageInterface
{
	/**
	 * @return true if the page is currently in EDIT mode, meaning the party is authorized to fill out fields on the form, the
	 * stage before going into REVIEW mode.
	 */
        public boolean isEditMode();

	/**
	 * @return true if the page is currently in REVIEW mode, meaning the party is authorized to fill out fields on the form while in EDIT
	 * mode but now is reviewing the page before submitting it.
	 */
        public boolean isReviewMode();

	/**
	 * @return true if the page is currently in VIEW-ONLY mode, meaning the party is not authorized to fill out any fields, or is
	 * returning after completing the document so no further changes can be made.
	 */
        public boolean isViewMode();

	/**
	 * @return true if the current party can only view the document and has no fields that can be updated/filled out on any
	 * page in the document.
	 */
	public boolean isViewOnlyParty();

	/**
	 * @return true if the current party is a view-only party that is not even defined as a party to the document.
	 * This party cannot make any changes and is generally defined in the package but is not mapped to a specific document party.
	 */
	public boolean isViewOnlyNonParty();

	/**
	 * @param docPartyName the String document party name to check (should be one of the document party names defined for the document)
	 * @return true if the current party is the specified document party
	 */
	public boolean isParty(String docPartyName);

	/**
	 * @return true if the current party is completed (all documents done)
	 */
	public boolean isPartyCompleted();

	/**
	 * @return true if the current party is a logged in user
	 */
	public boolean isPartyLoggedIn();

	/**
	 * @return true if the current party is marked for redo (previously completed, then re-queued to redo work)
	 */
	public boolean isPartyMarkedForRedo();

	/**
	 * @return the date+time the current party was marked for redo (previously completed, then re-queued to redo work)
	 */
	public EsfDateTime getPartyMarkedForRedoDateTime();

	/**
	 * @return true if the transaction is completed (all parties done)
	 */
	public boolean isTransactionCompleted();

	/**
	 * @return true if the transaction is deleted (the current party has deleted the transaction)
	 */
	public boolean isTransactionDeleted();

	/**
	 * @param packagePartyName the String package party name to check. This is mostly useful for the package+disclosure document that
	 * does not have document parties defined at all.
	 * @return true if the current party is the specified package party
	 */
	public boolean isPackageParty(String packagePartyName);

	/**
	 * @param fieldSpec the String field specification, such as ${firstName} to get the field firstName from the document
	 * @return the String value associated with the field spec. If the field spec is invalid (no such field can be found)
	 * the field spec is returned without any values replacing it.
	 */
	public String getFieldSpecValue(String fieldSpec);

	/**
	 * @param fieldSpec the String field specification, such as ${firstName} to get the field firstName from the document
	 * @return the String value associated with the field spec. If the field spec is not transformed at all, it returns an empty string.
	 */
	public String getFieldSpecValueOrBlankIfNotFound(String fieldSpec);

	/**
	 * @param v the String to check if it's blank (null, empty or just spaces)
	 * @return true if 'v' is blank
	 */
	public boolean isBlank(String v);
	/**
	 * @param fieldSpec the String field specification, such as ${firstName} to get the field firstName from the document
	 * @return true if the resulting field spec is blank (or has no other value we can transform to).  This is
	 * essentially isBlank(getFieldSpecValueOrBlankIfNotFound(fieldSpec))
	 */
	public boolean isFieldSpecBlank(String fieldSpec);

	/**
	 * @param v the String to check if it's non-blank (not null, not empty and not just spaces)
	 * @return true if 'v' is non-blank
	 */
	public boolean isNonBlank(String v);
	/**
	 * @param fieldSpec the String field specification, such as ${firstName} to get the field firstName from the document
	 * @return true if the resulting field spec is nonblank.  This is essentially isNonBlank(getFieldSpecValueOrBlankIfNotFound(fieldSpec))
	 */

	public boolean isFieldSpecNonBlank(String fieldSpec);
	/**
	 * Converts an integer in a String to an int value. If the 'v' is not a valid integer, it will return the default value.
	 * @param v the String containing the integer to convert
	 * @param defaultValue the default integer to return if 'v' cannot be converted
	 * @return the integer value of the string 'v', or if 'v' is not a valid integer, the default value is returned.
	 */
	public int stringToInt(String v, int defaultValue);
	/**
	 * Converts an integer in a String to an int value. If the 'v' is not a valid integer, it will return 0.
	 * @param v the String containing the integer to convert
	 * @return the integer value of the string 'v', or if 'v' is not a valid integer, 0 is returned.
	 */
	public int stringToInt(String v);

	/**
	 * Converts a string into a boolean.
	 * @param b the String to convert to a boolean
	 * @return true if the case insensitive string 'b' is one of: true, y, yes, t or 1
	 */
	public boolean stringToBool( String b );

	/**
	 * Converts a decimal in a String to a decimal value. If the 'v' is not a valid decimal, it will return the default value.
	 * @param v the String containing the decimal to convert
	 * @param defaultValue the default EsfDecimal to return if 'v' cannot be converted
	 * @return the com.esignforms.open.data.EsfDecimal value of the string 'v', or if 'v' is not a valid decimal, the default value is returned.
	 */
	public EsfDecimal stringToDecimal(String v, EsfDecimal defaultValue);
	/**
	 * Converts a decimal in a String to a decimal value. If the 'v' is not a valid decimal, it will return 0.0.
	 * @param v the String containing the decimal to convert
	 * @return the com.esignforms.open.data.EsfDecimal value of the string 'v', or if 'v' is not a valid decimal, 0.0 is returned.
	 */
	public EsfDecimal stringToDecimal(String v);

	/**
	 * Converts a money amount in a String to a money value. If the 'v' is not a valid amount, it will return the default value.
	 * @param v the String containing the amount to convert
	 * @param defaultValue the default EsfMoney to return if 'v' cannot be converted
	 * @return the com.esignforms.open.data.EsfMoney value of the string 'v', or if 'v' is not a valid amount, the default value is returned.
	 */
	public EsfMoney stringToMoney(String v, EsfMoney defaultValue);
	/**
	 * Converts a money amount in a String to a money value. If the 'v' is not a valid amount, it will return 0.0.
	 * @param v the String containing the amount to convert
	 * @return the com.esignforms.open.data.EsfMoney value of the string 'v', or if 'v' is not a valid amount, 0.0 is returned.
	 */
	public EsfMoney stringToMoney(String v);
}
For example, to conditionally show some HTML based on whether the current page is in EDIT or REVIEW mode, you can use code like this:
<% if ( esf.isEditMode() ) { %>
_put the optional HTML here to show only if the document is being filled out and/or signed_
<% } %>
Or:
<% if ( esf.isReviewMode() ) { %>
_put the optional HTML here to show only if the document is being reviewed before submitting_
<% } %>
Or together:
<% if ( esf.isEditMode() ) { %>
_put the optional HTML here to show only if the document is being filled out and/or signed_
<% } else if ( esf.isReviewMode() ) { %>
_put the optional HTML here to show only if the document is being reviewed before submitting_
<% } %>
Note that you can freely use both Java and JavaScript in the same document to alter the document's behavior and what is displayed to a given party.
Java code runs when a page is initially rendered, whether it's for view-only, for edit mode, or for review mode. Therefore the page content is adjusted on the server before being delivered to the party's web browser.
To show a section of a document for a given party, in this case so only the Accounting document party can even see the approvalCode field:
<% if ( esf.isParty("Accounting") ) { %>
  <p>For Internal Use Only</p>
  <p>${approvalCode}</p>
<% } %>
To show a given set of HTML, such as changing the CSS style class associated with a block of HTML, you can set a Java variable approvedCss to the CSS class name depending on whether a given form field has a specific value:
<style type="text/css">
.approved { background-color: green; font-weight: normal; }
.disapproved { background-color: red; font-weight: bold; }
</style>
<p>Select one: ${rbApprove} ${rbDisapprove}</p>
<% String approvedCss = "approve".equalsIgnoreCase(esf.getFieldSpecValue("${rb}")) ? "approved" : "disapproved"; %>
<p class="<%=approvedCss%>">This background will be either red (disapproved) or green (approved) on page review.</p>
To show a given set of HTML depending on whether a given form field has a specific value:
<% if ( "approve".equalsIgnoreCase(esf.getFieldSpecValue("${rb}")) ) { %>
<p>Show this APPROVED section.</p>
<% } else { %>
<p>Show this DISAPPROVED section.</p>
<% } %>
Sometimes you may wish to add your own 'Save' button outside of the default location, typically only when the party is in EDIT mode on a document page. You can do this with code using an INPUT or BUTTON element as shown here:
<% if ( esf.isEditMode() ) { %>
<!-- Example using INPUT element -->
<p><input type="submit" name="DocumentSaveButton_ae06f754_58aa_4d4c_96ad_1a4b8b192df4" value="My Save Button" title="Click to save the incomplete data in this document so you can review and submit it later." onclick="esf.checkConfirmOnPageUnload(false)"></p>
<!-- Example using BUTTON element -->
<p><button type="button" onclick="esf.autoPost(this)" id="MySaveButton">My autopost button</button></p>
<p><button name="DocumentSaveButton_<%=esf.getFieldSpecValue("${document:id_esfname}")%>" onclick="return hideStartButton(this)" type="submit">My Save Button</button>
<% } %>
For a BUTTON/INPUT elements used for auto-post (versus Save), you must supply the 'id' attribute as that's used by the script esf.autoPost(this).
For an INPUT element, the 'name' attribute is 'DocumentSaveButton_' followed by the document id, in which all '-' are replaced by '_'. If the document id starts with a number, you'll prefix it with 'X'. You can use the built-in ${document:id_esfname} for this purpose, which in JSP syntax would be something like name="DocumentSaveButton_<%=esf.getFieldSpecValue("${document:id_esfname}")%>"
JavaScript code runs after a page is rendered in the party's web browser. Changes are reflected immediately in the document without any changes being sent to the server until a button is clicked. If a party has disabled JavaScript in his/her web browser, this code will have no effect.
To change the HTML shown based on whether a Checkbox is checked, using JavaScript so it changes immediately, not just on page review, eSignForm provides a JavaScript method esf.setupDisplayIfChecked(checkboxName,elemIdToShowIfChecked,currentCheckboxFieldValue,checkboxValueWhenChecked) to enable this. In this example, we have a field cb defined as a Checkbox field that is configured to have the value 'Cool' when checked, and the div with id 'showChecked' is not initially displayed and is only shown if and when the user checks 'cb':
<div>${cb}</div>
<div id="showChecked" style="display:none;">
    <h1>You checked it!</h1>
</div>
<script type="text/javascript">
    esf.setupDisplayIfChecked('cb','showChecked','${outv:cb}','Cool');
</script>
To change the HTML shown based on which Yes or No radio button is clicked, using JavaScript so it changes immediately, not just on page review, eSignForm provides a JavaScript method esf.setupDisplayIfYesNoRadioButtonGroupIsYes(yesNoRadioButtonGroupName,elemIdToShowIfYes,currentRadioButtonGroupFieldValue) to enable it. The value of 'Yes' is based on the currentRadioButtonGroupFieldValue's lowercase value starting with 'y' or 't' or '1'. In this example, we have a radio button group field rb with two radio buttons rbYes and rbNo defined so that rbYes sets the field group rb to 'Y' or 'Yes', and the div with id 'showYes' is not initially displayed and is only shown if or when the user selects the 'rbYes' radio button:
<div>${rbYes} ${rbNo}</div>
<div id="showYes" style="display:none;">
<h1>You clicked YES!</h1>
</div>
<script type="text/javascript">
esf.setupDisplayIfYesNoRadioButtonGroupIsYes('rb','showYes','${outv:rb}');
</script>
Note that there's a companion script esf.setupDisplayIfYesNoRadioButtonGroupIsNo(yesNoRadioButtonGroupName,elemIdToShowIfNo,currentRadioButtonGroupFieldValue) that can be used to show the hidden 'div' (or other element) if the 'No' radio button is selected. The value of 'No' is based on the currentRadioButtonGroupFieldValue's lowercase value starting with 'n' or 'f' or '0'.
To change the HTML shown based on which radio button is clicked, using JavaScript so it changes immediately, not just on page review, add an onclick function to each radio button field:
<p>${rbg1} ${rbg2} ${rbg3}</p>

<p id="show1" style="display: none;">This this only shown when ONE is selected.</p>
<p id="show2" style="display: none;">This this only shown when TWO is selected.</p>
<p id="show3" style="display: none;">This this only shown when THREE is selected.</p>
<script type="text/javascript">
// add hook to all rbg radio buttons
var rbgElems = document.getElementsByName('rbg');
rbgElems[0].onclick = function() { esf.displayById('show1'); esf.hideById('show2'); esf.hideById('show3'); }
rbgElems[1].onclick = function() { esf.hideById('show1'); esf.displayById('show2'); esf.hideById('show3'); }
rbgElems[2].onclick = function() { esf.hideById('show1'); esf.hideById('show2'); esf.displayById('show3'); }
</script>
To change the HTML shown based on whether a checkbox is checked or not, using JavaScript so it changes immediately, not just on page review, add an onchange function to checkbox field:
<p>${cb}</p>

<p id="showIfChecked" style="display: none;">This this only shown when the checkbox is checked.</p>

<script type="text/javascript">
// add hook to checkbox
var cbElems = document.getElementsByName('cb');
cbElems[0].onchange = function() { if ( this.checked ) esf.displayById('showIfChecked'); else esf.hideById('showIfChecked'); }
</script>
To change the HTML shown based on which radio button is clicked and the current value of the radio button, using JavaScript so it changes immediately and holds that setting on page review, add an onclick function to each radio button field and set the current visible/invisible style using the radio button group's value. In this example, if rbOne is set to N, we show the rbOneCorr radio buttons TD, and if rbTwo is set to N, we show the rbTwoCorr radio buttons TD (otherwise those respective TDs are made invisible):
<table>
<tbody>
<tr>
<td>Has question one been done?</td>
<td>${rbOneYes} ${rbOneNo}</td>
<td id="rbOneCorr" style="background-color: pink;">Corrected? ${rbOneCorrYes} ${rbOneCorrNo}</td>
</tr>
<tr>
<td>Has question two been done?</td>
<td>${rbTwoYes} ${rbTwoNo}</td>
<td id="rbTwoCorr" style="background-color: pink;">Corrected? ${rbTwoCorrYes} ${rbTwoCorrNo}</td>
</tr>
</tbody>
</table>
<script type="text/javascript">
function setupQuestionRadios(questionRB,noAnswerTD,questionRBValue)
{
<% if ( esf.isEditMode() ) { /* input elements only exist while in EDIT mode */ %>
var rbQuestionElems = document.getElementsByName(questionRB.toLowerCase());
rbQuestionElems[0].onclick = function() { esf.makeInvisibleById(noAnswerTD); }
rbQuestionElems[1].onclick = function() { esf.makeVisibleById(noAnswerTD); }
<% } %>
if ( questionRBValue.startsWith('N') )
esf.makeVisibleById(noAnswerTD);
else
esf.makeInvisibleById(noAnswerTD);
}
setupQuestionRadios('rbOne','rbOneCorr','<%=esf.getFieldSpecValue("${rbOne}")%>');
setupQuestionRadios('rbTwo','rbTwoCorr','<%=esf.getFieldSpecValue("${rbTwo}")%>');
</script>
Unlike the previous example, this sets TD styles so it works well in static PDF versions as well as the dynamic web document. To change the HTML style shown based on which radio button is clicked and the current value of the radio button, using JavaScript so it changes immediately and holds that setting on page review and Java to set the visibility style, add an onclick function to each radio button field and set the current visible/invisible style using the radio button group's value. At the top, we set Java String variables to the style to make the areas invisible based on the value. In this example, if rbOne is set to N, we show the rbOneCorr radio buttons TD, and if rbTwo is set to N, we show the rbTwoCorr radio buttons TD (otherwise those respective TDs are made invisible):
<% String rbOneStyle = esf.getFieldSpecValue("${rbOne}").startsWith("N") ? "" : " visibility: hidden;"; %>
<% String rbTwoStyle = esf.getFieldSpecValue("${rbTwo}").startsWith("N") ? "" : " visibility: hidden;"; %>
<p>rbOneStyle: <%=rbOneStyle%></p>
<p>rbTwoStyle: <%=rbTwoStyle%></p>
<table>
<tbody>
<tr>
<td>Has question one been done?</td>
<td>${rbOneYes} ${rbOneNo}</td>
<td id="rbOneCorr" style="background-color: pink;<%=rbOneStyle%>">Corrected? ${rbOneCorrYes} ${rbOneCorrNo}</td>
</tr>
<tr>
<td>Has question two been done?</td>
<td>${rbTwoYes} ${rbTwoNo}</td>
<td id="rbTwoCorr" style="background-color: pink;<%=rbTwoStyle%>">Corrected? ${rbTwoCorrYes} ${rbTwoCorrNo}</td>
</tr>
</tbody>
</table>
<script type="text/javascript">
function setupQuestionRadios(questionRB,noAnswerTD,questionRBValue)
{
<% if ( esf.isEditMode() ) { %>
var rbQuestionElems = document.getElementsByName(questionRB.toLowerCase());
rbQuestionElems[0].onclick = function() { esf.makeInvisibleById(noAnswerTD); }
rbQuestionElems[1].onclick = function() { esf.makeVisibleById(noAnswerTD); }
<% } %>
if ( questionRBValue.startsWith('N') )
esf.makeVisibleById(noAnswerTD);
else
esf.makeInvisibleById(noAnswerTD);
}
setupQuestionRadios('rbOne','rbOneCorr','${outv:rbOne}');
setupQuestionRadios('rbTwo','rbTwoCorr','${outv:rbTwo}');
</script>

Button messages provides a way to customize the button labels, tooltips on the buttons, messages shown to the party about how to use the button as well as other common messages shown to parties when processing a document. eSignForms comes with a built-in default button messages in the ESF/Library/Template library called ESF_DefaultButtonMessage.
Also, the buttons added to your documents during run-time are placed in a P tag (<p class="buttons">), so you can use your own CSS to control them. For example, by adding this to your document, you can center the buttons:
<style type="text/css">
p.buttons { text-align: center; }
</style>
You may also find that you'd like the electronic signature process record to also be centered, so you could use this combination:
<style type="text/css">
p.buttons { text-align: center; }
div.signatureBlock { margin: 0 auto;}
</style>
The button message set is configured in each package. Note that a transaction template can specify a branding library such that if the same button message set name is defined in that library, then it will be selected at run time.
Click on Button message sets to show all document styles in the selected library.
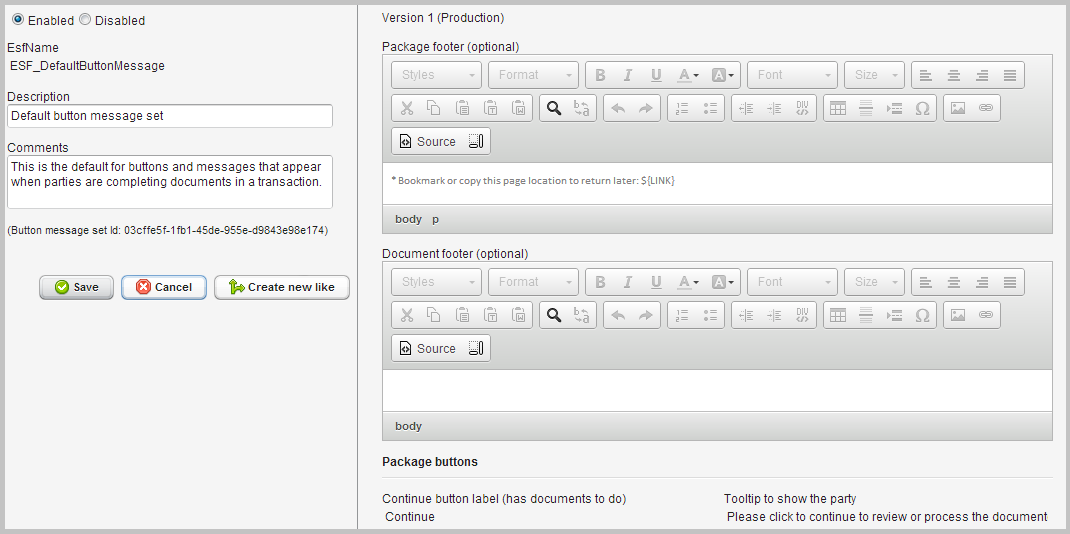
- Choose Enabled to allow the button message set to be used. If a button message set is no longer needed, click Disable.
- EsfName is the unique name for this button message set.
- Description is a short description of the button message set.
- Comments is any other information you want to maintain about the button message set.
The button message set specifies optional package and document footers, the button labels and tooltips (shown if the mouse is over the button) as well as various status messages shown to the party when processing a document.
- Package footer is optional HTML to show at the bottom of the package that lists the documents for the party to process. By default, we include a note to the party to bookmark the link to return at a later time.
- Document footer is optional HTML to show at the bottom of each document. By default nothing is shown.
Under the Package buttons section:
- Continue button label (has documents to do) and Tooltip to show the party define the continue button when a party has a list of documents that need to be processed.
- Continue button label (all documents completed) and Tooltip to show the party define the continue button when a party has completed all documents and can be used to show the first document.
- Edit button label (reports access) and Tooltip to show the party define the edit button that only appears if accessing the transaction as the ESF_reports_access party (update access from a report).
- View button label (document complete) and Tooltip to show the party define the view button that only appears if returning to the package after having completed some of the documents. It also appears when accessing the transaction as the ESF_reports_access party (view access from a report).
- Delete button label (only if no signatures and party authorized) and Tooltip to show the party define the transaction delete button that only appears if no signature have been applied and the party defined in the package has been enabled to delete it.
- Return/not-completing button label (only if a not-completing URL is defined) and Tooltip to show the party define the button label the party can press if they elect not to complete the documents at this time. It is only present if the party in the package has such an URL defined. It can be used when integrating a document process flow so that if they decide not to sign they can be returned to a page where you'll know they did not complete the documents.
- Download PDF button label (only when party completed) and Tooltip to show the party define the download button that bundles all completed documents in a PDF.
Under the Document buttons section is a common button shown to a parties:
- Go to package button label, Tooltip to show the party and Message to show the party define the button on a document that will return the party back to the package list. The message is shown at the top to help the party know what it means.
Under the Document buttons (party can fill/edit) section are the buttons shown to a party when they can fill, edit and/or sign a document:
- Next page button label and Tooltip to show the party define the next page button to go to the next page in a multi-page document.
- Previous page button label and Tooltip to show the party define the previous page button to go to the previous page in a multi-page document.
- Continue to review button label, Tooltip to show the party and Message to show the party define the button when the next step is to review the finalized document that contains all their updates.
-
Save button label and Tooltip to show the party defines the save button that allows a party to save the data they've entered so far without attempting to go into review mode (and without doing data validations). This button is also shown for update access to the
ESF_reports_accessparty when accessing from a report. - Save button position is a drop down with the choices 'In Extra Buttons' (the default, which puts the 'Save' button in a separate P tag styled with class 'extraButtons') or 'Keep together' which places the 'Save' button in the same P tag as the other buttons. You can also create your own save buttons to place as you see fit.
Under the Document buttons (party review after fill/edit) section are the buttons shown to a party in review mode after they have filled out the form, signed, etc.:
- Submit button label (signature added), Tooltip to show the party and Message to show the party define the final submit button if the party signed the document.
- Submit button label (no signature added), Tooltip to show the party and Message to show the party define the final submit button if the party did not sign but otherwise filled in form fields.
- Return to edit button label, Tooltip to show the party and Message to show the party define the button to allow the party to return to edit mode so changes can be made before being submitted.
Under the Document buttons (view-only party initial review) section are the buttons shown to a view-only party when processing a document they have not yet read/reviewed:
- Next page button label, Tooltip to show the party and Message to show the party define the button shown to go to the next page on a multi-page document.
- Previous page button label and Tooltip to show the party define the button shown to go to the previous page on a multi-page document.
- Complete review button label, Tooltip to show the party and Message to show the party define the button to submit indicating that they have completely read the document.
Under the Document buttons (returning completed parties) section defines the buttons shown to parties who have already completed the document but have returned to review/re-read it:
- Next page button label and Tooltip to show the party define the button to go to the next page in a multi-page document.
- Previous page button label and Tooltip to show the party define the button to go to the previous page in a multi-page document.
- Next document button label and Tooltip to show the party define the button to go to the next document in a multi-document package.
- Previous document button label and Tooltip to show the party define the button to go to the previous document in a multi-document package.
Under the General messages shown to parties section are the messages shown to users based on where they are in the process flow:
- Party retrieves a document that is already completed is shown when a party returns to a document that they have already completed.
- Warning message shown to a party if attempts to work on completed document is a warning message shown to a party if they use the BACK/FORWARD browser buttons and try to edit or submit a document that has already been completed.
- View-only party views a document is shown when a view-only party views a document
- Non-signing party reviewing a document before submitting is for a non-signing party who has filled out some of the document when reviewing their updates, but before being submitted.
- Signing party reviewing a document before submitting is for a signing party who is reviewing the final document, but before being submitted.
- Party retrieves a document that needs to be filled out is for a party who retrieves a document that needs to be filled out or signed.
- Party has completed all documents is shown when a party completes all documents in the package. It is shown on the package page. If a "completed URL" is defined in the party in the package, this message will not be shown as the party will be redirected to that URL when all documents are completed.
- Party has deleted the transaction is shown if the party was able to delete the transaction and all related documents.

Document styles provides basic control of the look of your documents. They specify CSS (Cascading Style Sheets) rules. By using a common set of styles, documents will have a consistent look. eSignForms comes with a built-in default style in the ESF/Library/Template library called ESF_DefaultDocumentStyle. It is a clean, modern look.
The values associated with the styles can be seen in the ESF/Library/Template's drop downs.
To use the style, you must set it as the document version's style. You can also set your document style as your library's default value to use when creating new documents.
Click on Document styles to show all document styles in the selected library.
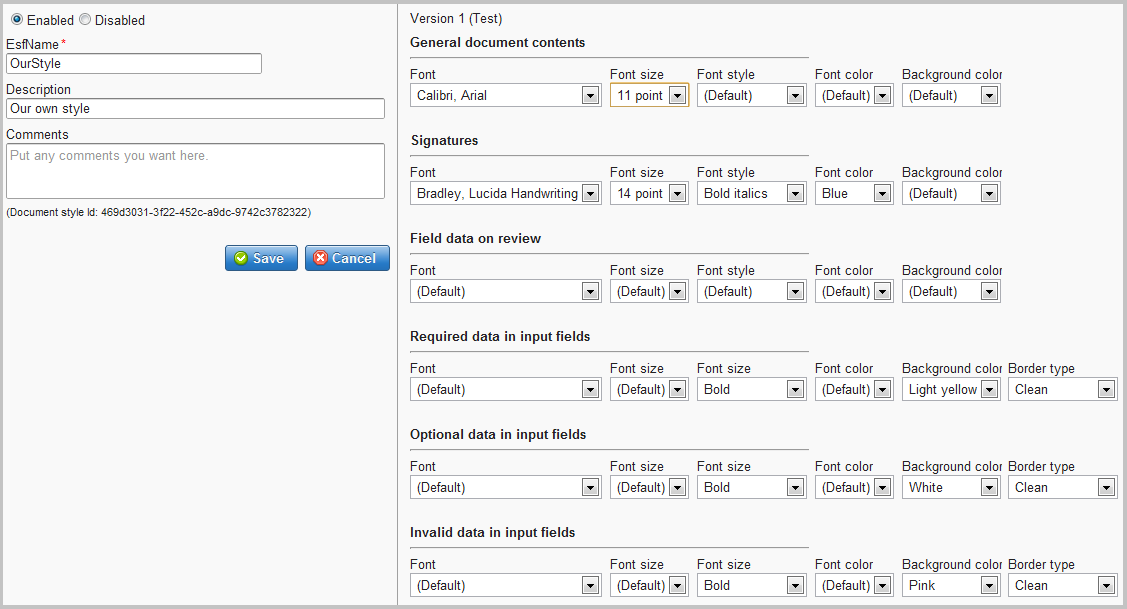
- Choose Enabled to allow the document style to be used. If a document style is no longer needed, click Disable.
- EsfName is the unique name for this document style.
- Description is a short description of the document style.
- Comments is any other information you want to maintain about the styles.
The style is composed of various aspects that are used to override the hard-coded default CSS that ensure basic document functionality. It can be viewed from the document page editor's View default CSS link. Values that are specified as "(Default)" will use the values defined in default CSS. Values that are specified as "Inherit" use the setting of its parent element.
- General document contents sets the font styles for the regular text you put on the page.
- Signatures sets the font styles to use for signatures and signature dates, to give a styled look that makes the typed name electronic signature stand out from the general document contents.
- Field data on review sets font styles to be applied to all fields when in review mode (display mode, compared to edit mode when the field can be entered). This can be useful if you would like all "variable data" in your documents to stand out from the boilerplate text.
- Required data in input fields specifies the styles for input fields that are required.
- Optional data in input fields specifies the styles for input fields that are not required.
- Invalid data in input fields specifies the style for input fields when they contain invalid data and an error has been reported. It helps identify fields that need to be corrected.
- Normal field label specifies the style of normal-sized field label. You may also specify an HTML string (default is '✱') to show after a field's label when it's a required field. This helps with accessibility.
- Normal error label specifies the style of the normal-sized field label when that field has been flagged as invalid. You may also specify an HTML string (default is '❗') to show after a field's label when the field has been flagged as an error. This helps with accessibility.
- Small label specifies the style of small-sized field label. You may also specify an HTML string (default is '✱') to show after a field's label when it's a required field. This helps with accessibility.
- Small error label specifies the style of the small-sized field label when that field has been flagged as invalid. You may also specify an HTML string (default is '❗') to show after a field's label when the field has been flagged as an error. This helps with accessibility.
You may also specify a common set of entries to appear in the HTML HEAD element. This typically includes commonly used entries like <style>, <link> and <script> elements.
Note: You can always specify the fonts for your text directly in the document page editor. But to control labels, error looks, signatures, etc. you need to use the document style.
Default CSS print style note: The default CSS file includes a brief print style: div.newPage will insert an actual page break; fonts are set to 90% of their screen size; and link tags (A HREF) with the "showURL" class will display the value of the link's URL since a printed link would otherwise lose that information.

Click on Drop downs to show all drop downs (selection boxes) in the selected library.
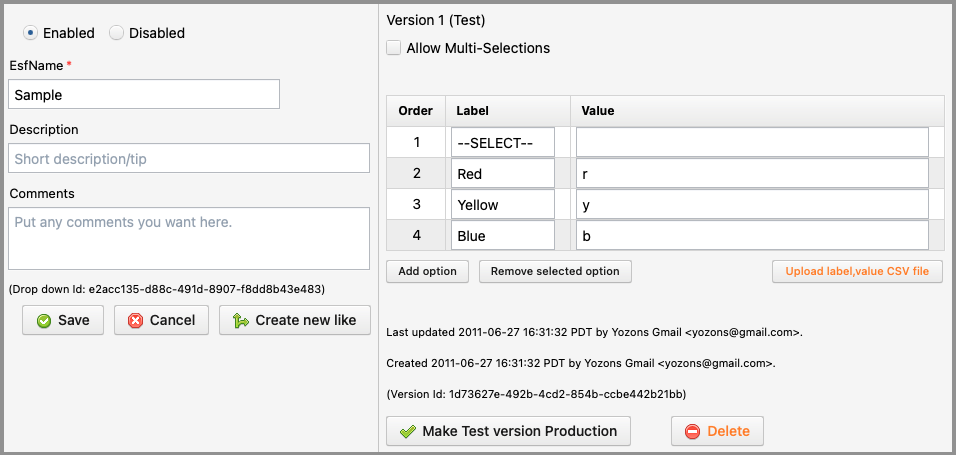
-
Choose Enabled to allow the drop down to be used. If a drop down is no longer needed, click Disable.
-
EsfName is the unique name for this drop down.
-
Description is a short description of the drop down.
-
Comments is any other information you want to maintain about the drop down.
-
Check Allow Multi-Selections if the drop down should allow the user to select more than one value from the list.
-
The Label is the text the user will select from when viewing the drop down list. The Value is the data value that will be stored in the drop down field. The label and value can be set to same.
-
If "no selected value" is allowed, consider creating the first Label as "--SELECT--" with an empty Value.
Click Add option once for each label+value you want to appear in your drop down. It will create a new entry that you can then update.
Select an option by clicking a row so it is highlighted (such as clicking in the Order field or the narrow space between the label and value) and then click Remove selected option to remove that option.
Drag a row to another location to rearrange the order that the drop down displays its options.
Click Upload label,value CSV file to select a CSV file in 'label,value' column order to mass upload label values. It will replace any existing label value options with those from the CSV file. If there's an initial '--SELECT--' label with an empty value, it will be preserved.

Email templates are used to define any email that needs to be sent from the system. Like a document, they can have variable data substituted to customize them for individual parties.
Click on Emails to show all email templates in the selected library.
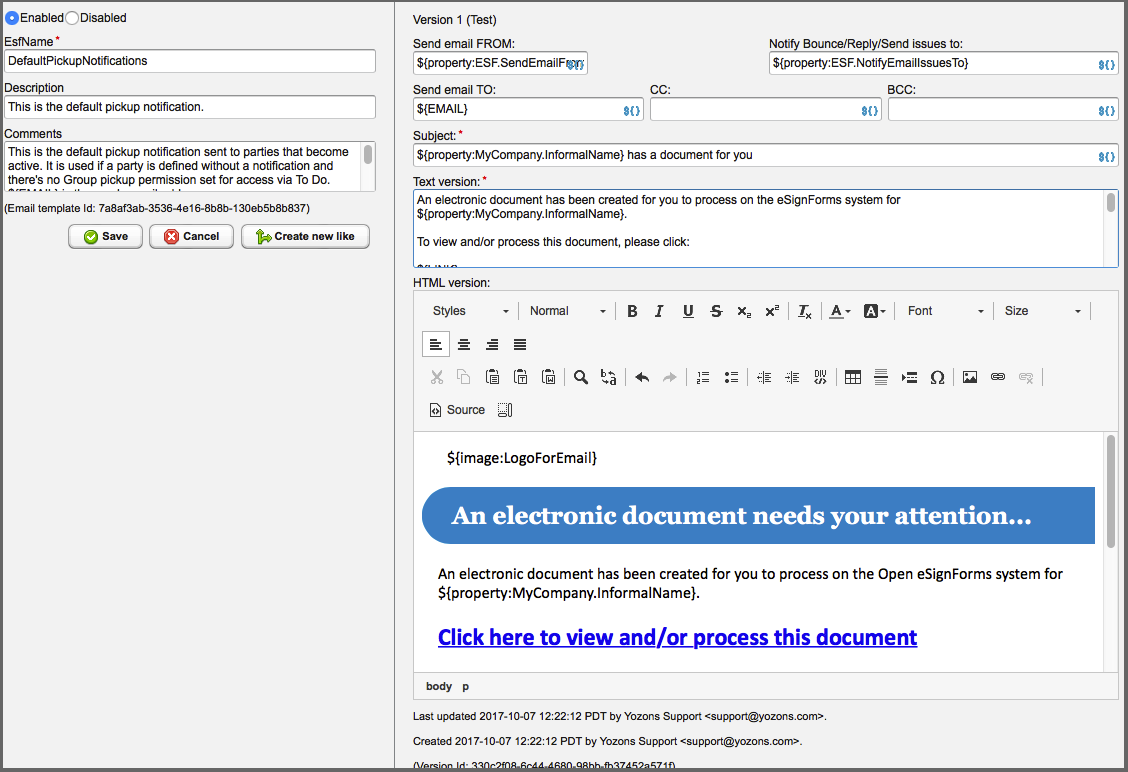
-
Choose Enabled to allow the email template to be used. If an email template is no longer needed, click Disable.
-
EsfName is the unique name for this email template.
-
Description is a short description.
-
Comments is any other information you want to maintain.
-
Send email FROM: specifies the FROM email address that will be used. Often, this is a
NO-REPLY@example.com addressto indicate that the email is an automated email and not a personal email. However, you can use any email address. The default is a property set value${property:ESF.SendEmailFrom}. You can use any field from the documents that are used when the email is sent, or you can use the user who started the transaction with a value like${transaction:ESF_Started_By_User_Email_Address}. -
Notify Bounce/Reply/Send issues to: specifies the email address(es) -- multiple email addresses should be separated by a semicolon (;) -- who should receive any outgoing or incoming issues related to sending this email type. By default, it's set to
${property:ESF.NotifyEmailIssuesTo}which is blank and so no such email notices are sent out. -
Send email TO: specifies who the email will be sent to. For most party-based emails, we recommend using the value
${EMAIL}since that variable can be set (overridden) in various configuration options. For example, in a Package Party configuration, you can set the option labeledNotify email address spec (${EMAIL})to replace${EMAIL}everywhere it's used in this email template (including the email body text). The same is true for the package's custom logic action for sending an email optionEmail address spec (${EMAIL}). Multiple emails can be specified (use a semicolon to separate them). -
CC: specifies any CC recipients.
-
BCC: specifies any BCC recipients (blind-copy so will not appear to other recipients).
-
Subject is the subject of the email.
-
Text version is the email text to show for clients who cannot or will not allow HTML-based emails. A text version is required as it's guaranteed to be used by all email clients. You may specify the field
${LINK}anywhere the party's pickup link should appear. Each party has a unique${LINK}value to ensure the system knows who is retrieving the package of documents. In the package's custom logic action for sending an email optionFor party (${LINK})allows you to control which value to use. Emails sent to a given party will use that party's unique link value. The max length of the expanded text email is 16KB characters. -
HTML version is the HTML version of the email for clients that support HTML. Generally, this field's value should be similar to the text version, albeit with a maximum expanded length of 512KB, but you can use various stylings to make the email more attractive. You may put
${LINK}anywhere you need the party's unique pickup link to appear. If the actual URL of the link is not shown in your HTML version, we recommend showing the full link at the bottom, in a smaller font, with something like this:
If the above link is not active (e.g. nothing happens when you click on it), please copy the link below exactly as shown into your web browser's address or location field:

${LINK}

Files are used to upload and save files (generally not images, though) linked to by your various documents. When a file is only needed for a particular document, you should consider defining the Files linked in a document version. But by defining the files in the library, they are available for other documents, and of course you can easily override them using a Branding Library should the file change depending on who is using the document.
Click on Files to show all files in the selected library.
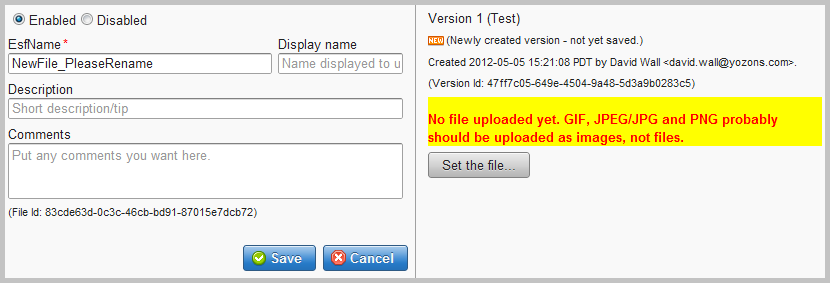
- Choose Enabled to allow the file to be used. If a file is no longer needed, click Disable.
- EsfName is the unique name for this file.
- Display name is the name shown in the link to this file.
- Description is a short description.
- Comments is any other information you want to maintain.
If it's a new file, click the Set the file... button. You can then choose a file (GIF, JPEG or PNG should generally be uploaded as an image, not a file). A link to download the file will be created.
Click the Save button to save the file.
If you are replacing an existing file:
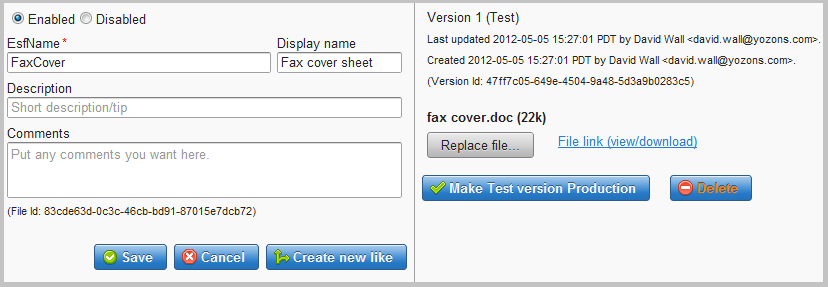
Click the Replace file... button to select a new file to replace the one shown.
Click the Save button to save the new file.
Tip: In a document, while you can reference a file using the ${file:FileName} syntax, you will probably find it easier to use the editor's link button to insert a link to the file so it's visible in the editor.

Images/Logos are used to upload and save images and logos used across your various documents. When an image or logo is only needed for a particular document, you should consider defining the image inside the document version. But by defining the images in the library, they are available for other documents, and of course you can easily override them using a Branding Library should the image change depending on who is using the document.
Click on Images/Logos to show all images in the selected library.

- Choose Enabled to allow the image to be used. If an image is no longer needed, click Disable.
- EsfName is the unique name for this image.
- Description is a short description.
- Alt/Title is a short description added to the 'alt' and 'title' attributes of the HTML 'img' tag element. It should describe the image so a blind person can understand the image a bit better. This setup helps with accessibility.
- Comments is any other information you want to maintain.
- Check Embed image in HTML to include the image data directly in the HTML web page using a 'data URI'. If not checked, the image will be served using a separate link/URL and request.
If it's a new image, click the Set the image file button. You can then choose an image file (GIF, JPEG or PNG should be used for online documents). A thumbnail image will be generated, along with a link to view the full-sized image. Note that images that have transparent backgrounds will show a black background in the thumbnail, but the original image will remain transparent.
Click the Save button to save the image.
If you are replacing an existing image:
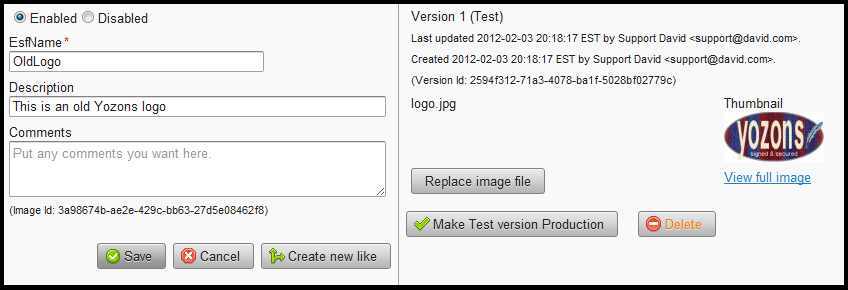
Click the Replace image file button to select a new image file to replace the one shown.
Click the Save button to save the new image.
Tip: In a document, while you can reference an image using the ${image:imageName} syntax, you will probably find it easier to use the editor's image button to insert the image so it's visible in the editor.

Property sets are a bundle of related name-value pairs. This allows you to create more flexible and re-usable documents because certain key information, like company name, address, phone, contact email, etc. can be externalized with the values stored in property sets. Changes can then be made simply by updating the property set, and all documents that reference that property set will automatically begin using the new values without having to update each document.
Properties are referenced first by which property set is being used, and then which property in that set is being referenced: PropertySetName.PropertyName.
When testing, it is sometimes important that a different value be used for a given property. If you define the same property name with a _TEST suffix, that property will be used when in Test or Test Like Production modes. When testing, it will first look for PropertySetName.PropertyName_TEST and if not found, then look for the expected property PropertySetName.PropertyName.
Also, if you support multiple brands, you can create the property set (with the same name) in a branding library so that multiple companies can use the same document, yet each gets their company name, address, phone, etc. in their documents.
Click on Property sets to show all property sets in the selected library.
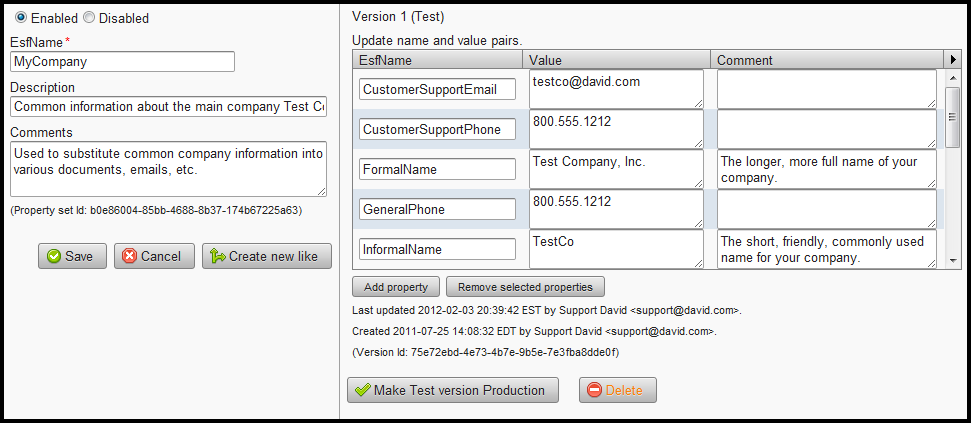
- Choose Enabled to allow the property set to be used. If a property set is no longer needed, click Disable.
- EsfName is the unique name for this property set.
- Description is a short description.
- Comments is any other information you want to maintain.
In the table of name-value pairs on the right side, the fields are:
- The EsfName is the name of the property (must be unique within this property set).
- The Value is the value to show when this property is referenced. It can be more than one line.
- The Comment is any information you'd like to maintain about the property.
Click the Add property button one or more times to add one more new properties. Just replace the name and value as needed.
To remove properties, click on one or more rows so they are highlighted, then click the Remove selected properties button. It can be tricky to select a row, but if you click in the row, but not inside a input field, it should highlight to show the row been selected.
Property sets can be referenced in your documents, email templates and the like using ${property:propertySetName.propertyName} notation. The propertySetName is the name of the property set, and propertyName is the name of the individual property defined in that property set. In Test or Test Like Production modes, it will first look for propertyName_TEST to see if a special testing value should be used instead.
Tips: Normally, property values are encoded to be HTML-safe when displayed in your documents, but if you have taken care to create a property value containing valid HTML, you can include that in your document using ${htmlproperty:propertySetName.propertyName} notation. You can use this as a simple, flexible way to insert variable or common HTML in your documents, including custom styles you frequently use in your documents.
Using a custom action to set a field value, you can look up a property value using another field as the key, giving a simple DB-like lookup capabilities.
For example, let's say you have a field, productId, and it perhaps is set from a drop down list, but it's values are 1, 2, 3, etc.
We can create a property set, say ProductInfo, with a property values such as:
Id1_Price = $5.00
Id1_Description = This describes the first item.
Id2_Price = $25.50
Id2_Description = This describes the second item.
Id3_Price = $19.99
Id3_Description = This describes the third item.
Now, you want to get the product's price by it's id, you could create a field productPrice and in a custom action set it based on the current productId value using nested field specs: ${property:ProductInfo.Id${productId}_Price}
And you can get it's description using: ${property:ProductInfo.Id${productId}_Description}
This same technique also works if to select a property set (and/or the property name within the set), so if I instead had property sets named Product_1, Product_2, Product_3, etc. and they each had properties name Price and Description, we'd have property sets set something like:
Product_1.Price
Product_1.Description

Product_2.Price
Product_2.Description

Product_3.Price
Product_3.Description
which could be accessed depending on the productId using:
${property:Product_${productId}.Price} and ${property:Product_${productId}.Description}
I hope this is a useful tip for those who need a simple lookup database that is based on some other value. The trick is that property set names and property names are limited to our standard field naming convention, so it must start with a letter, be composed of letters, numbers and underscores and be no longer than 50 characters each.

Serial generators are used to create unique, serial numbers. They are often used to automatically assign customer numbers, purchase order numbers, etc. It manages two numbers, one for test transactions and the other for production transactions. Like other items in the library, you can override a serial generator via the branding library defined for a transaction template.
Click on Serial generators to show all serial number generators in the selected library.
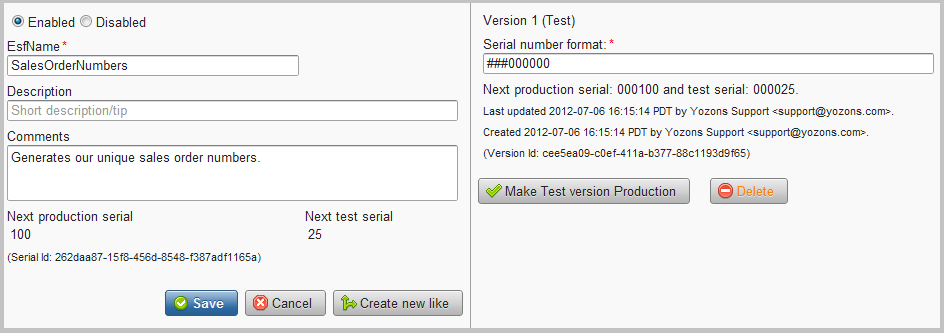
- Choose Enabled to allow the serial number generator to be used. If a serial generator is no longer needed, click Disable.
- EsfName is the unique name for this serial number generator.
- Description is a short description.
- Comments is any other information you want to maintain.
- Next production serial can be set when a new generator is being created. It will be the first serial number returned when used in a production transaction. Subsequently, it will just show the current production serial number generator value.
- Next test serial can be set when a new generator is being created. It will be the first serial number returned when used in a test transaction. Subsequently, it will just show the current production serial number generator value.
On the right side, the version-specific field is:
- The Serial number format specifies how the serial number will appear. Use '#' for each digit where if it's a leading zero, it will be suppressed. Use '0' for each digit where it will be shown even if it's a leading zero. You can use fixed letters before (prefix) and after (suffix) the # and 0 pattern. A typical pattern is ###000000000 or with a prefix like ACCT000000000. If the number is bigger than the pattern, the additional digits will be shown.
Serial number generators can be referenced in your documents using ${serial:serialName} notation. The serialName is the name of the serial generator. Once a serial number is issued, it will not be issued again. To reduce gaps, we recommend you set your serial number field (such as a purchase order number) to a value like '#PENDING' and use a custom logic rule to set that field to the serial number when the order is submitted (or at the very least on review).

Click on Fields to show all field templates in the selected library.
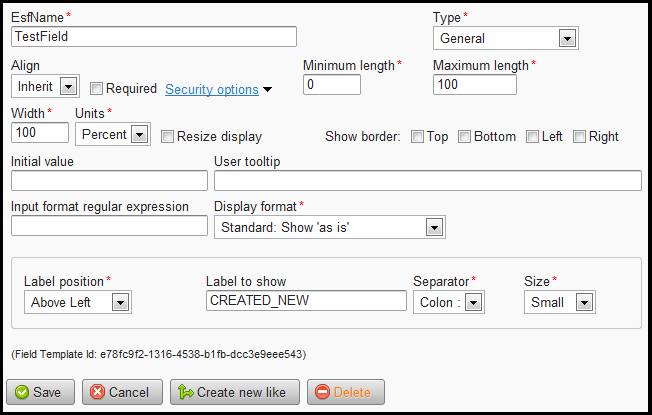
Most fields, of course, are defined in the document, which you can reference for details on configuring them. The process is the same.
The main purpose for a field template defined in a library is to create "standardized" field names and configuration. When creating documents, you can create fields based on those defined in the library so that their values take on the standard definition. Of course, any value can be overridden in the specific document's definition.

Click on Parties to show all party templates in the selected library.
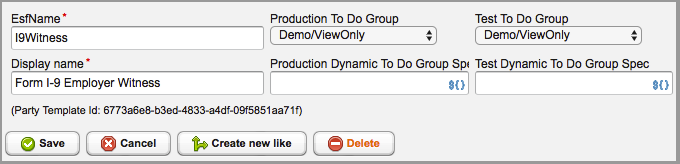
Most parties, of course, are defined in the document.
The main purposes for a party template defined in a library are 1) to create a "standardized" name for your parties so that as you create multiple documents, you tend use the same name for the same roles across those documents; and 2) if you configure a party in a package as a 'To Do' party, then you can define the group that represents members of the party so that any member in the group can process transactions when the party is active.
If the package party is defined for To Do purposes, specify the Production To Do Group and Test To Do Group that represents the users who will be able to play this role. Also, if you support multiple companies, each branding library is able to set their own group to play the given role. So if you have an "Approver" role, you can set it to be one group for one company, but another group for the other company. The production versus test settings allow different users to play the role based on whether doing a production or test transaction.
The Group name to use supports a dynamic name using field spec notation in the Production Dynamic To Do Group Spec and Test Dynamic To Do Group Spec. This allows the To Do group to be associated with a party to be dynamically defined rather than only a fixed group name. Enter the field spec that should expand to a valid, enabled Group at runtime. If the expanded group cannot be found, it will default to the Production To Do Group or Test To Do Group setting.
To use To Do, do the following:
- Check if there there is an existing Group of users (listed under Access control) defined that represents the people who will play the role of the party. If not, create one like the most similar existing group and update the users who belong in it. #. Inside the Library, under the Parties, create a new Party and set the "Production To Do Group" and "Test To Do Group" to the group determined in step 1.
- In the Package, select the party listed in the package that needs access to the To Do. Then set its "To Do Party EsfName" to be the party created in step 2.
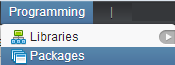
Packages allow you to bundle one or more documents so that they are processed as a group. Each party will be able to process one or more of the documents in the package. It is possible to have some parties only see a subset of documents.
You also configure the package parties who will process the documents. The initial list of parties come from the names defined in the documents you add. But you may find that you need to rename or group the parties; for example, one document may say call the party who fills in the document as "FirstParty" while another document may have called that party "Customer". In the package, if these are really the same person, you can bundle them together.
Click on Programming->Packages to show all packages of documents that are available to you. You must have LIST and VIEW DETAILs permissions on the package for it to appear here.
Click on a package to view or configure it. To create a new package, select a template or similar existing package you have permission to access and click the Create new like button.
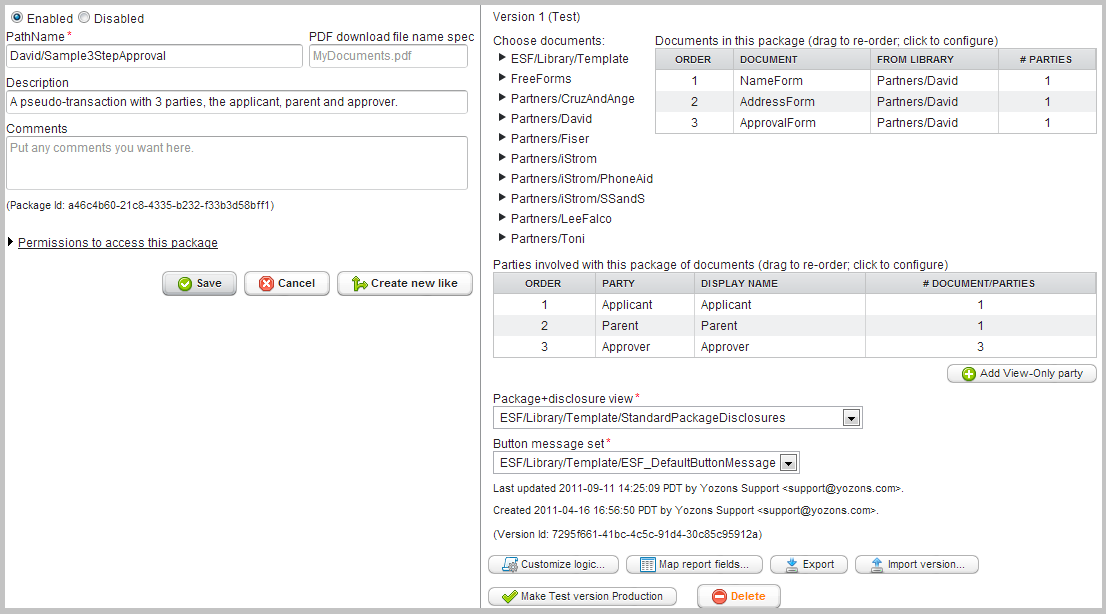
- Choose Enabled to allow the package to be used. If a package is no longer needed, click Disable.
- PathName is the unique path name for this package.
- PDF download file name spec is an optional default file name to use when parties download their documents after completing them all, as well as in reports. The default is generally 'MyDocuments.pdf' but when downloading an individual document, if that document has it's own naming specification, that name will be used.
- Description is a short description.
- Comments is any other information you want to maintain.
- Permissions to access this package contain the standard List, View Details, Create Like, Update and Delete permission lists. Just choose which groups are allowed to do each of these operations on a package. Normally, the "programming" group has permission to this as it's not a general user task.
For the list of documents and parties on the right side, the fields are:
- The Choose documents shows each Library that is available to you. If you open the arrow, it will show the documents defined in each. Just click and drag a document from this list into the Documents in this package table. If other documents are already in the list, note the insertion bar when you drag the document over to choose to place it at the top (first), between documents, or at the bottom (last). Of course, you can re-order at any time.
- The Documents in this package table lists each document in the package and the order they will be presented. If you drag a document from the table back to the Choose documents tree and drop it anywhere there, the document will be removed from the package and will automatically be returned to the correct library where it came from.
- The Parties involved with this package of documents table lists all parties defined in the package, as well as the order in which they should process the package of documents. The first party is the "initiator" who starts the transaction and can be a normal user or an automated API party. If for any reason your package needs more parties than are defined in the documents, such as adding a party who may need to see the completed documents when done, you can use the Add View-Only party button to add a package party that will be given 'View only' access to all documents in the package. You can then modify that party as needed, including renaming to any other party name and then give them non-view-only access.
- The Package+disclosure view drop down list lets you choose the special document that plays the role of welcoming the parties, showing E-Sign disclosures, as well as the list of documents the party is expected to process. By default, this is the ESF/Library/Template/StandardPackageDisclosures document.
- The Button message set drop down list lets you choose the button message set to use for this package. By default, this is the Esf/Library/Template/ESF_DefaultButtonMessage set.
Click the Make Test version Production button to move a Test version package to Production.
If the package is already a Production version, use the Create next Test version button to create the next package that you can test until you are ready to make it production. You can also use the Revert to Test button to temporarily take the package out of production for a quick fix before you make it production again (do this with caution since a production transaction will get an error, or use the prior production version if one exists, while you are making this update).
Click the Customize logic button to add special processing rules to this package of documents.
Click the Map report fields button to define the fields in the documents you have selected that you would like to include in reports or To Do lists for your internal parties.
Click the Export button to export the package configuration so it can be imported in another deployment. You will be prompted to save the configuration to your local computer disk.
Click the Import version... button to import the package configuration previously exported elsewhere so that it overwrites the configuration of the package version. The package version must be a Test version to change it this way.
Note that after any change to the package, including any changes made in other screens related to the package, you will have to click the Save button keep those changes.
Note that you can drag to re-order the documents, or drag it back to the Choose documents list of libraries to remove it.
Click on a document from the Documents in this package table to configure the parties who will process that document.
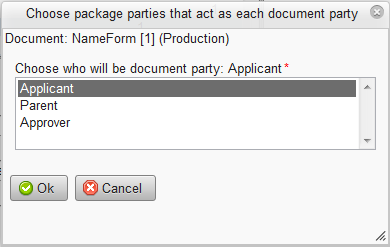
Since package parties are defined initially from the parties defined in the various documents, it is possible that the names used in various documents are not consistent. This allows you to specify which package party will play the role for a given document party. Select the package party or parties who will be allowed to play the specified document party.
Click Ok to remember the changes. Click Cancel to discard any changes.
Tip: To save your changes, remember to click the Save button for the package.
Note that you can drag a party to re-order the processing flow. The special ESF_reports_access party, when defined, will always be the last party listed as it is not in the package processing flow. If after you are done you have parties defined that do not reference any documents, you can remove them using the Remove X unused package parties button 
Click on a party in the Parties involved with this package of documents to configure the package party.
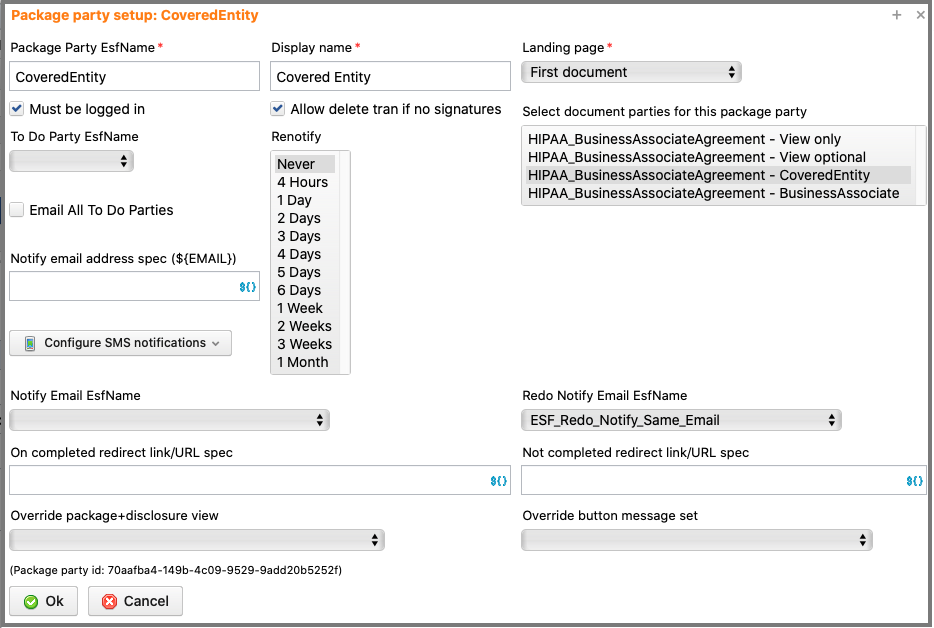
- Package Party EsfName is the name of the party as used in the package. Remember, package parties initially default to the names they were given in the documents, but the names may not (most likely will not) be consistent across all of the documents, so this allows you to specify the name as it makes sense for this package.
- Display name is the name this party will use whenever it is shown to a user.
- Landing page defines the page the party will see when they first access the package of documents. The default is "Package (disclosures)" which shows the welcome message, E-Sign Disclosures and list of documents to be processed as specified on the package's "Package+disclosure view". You may also select "First document" to land on the first document in the package that the party is allowed access to. Select "First To Do or First document" to land on the first document the party must work on, or the first document if all documents have been processed; this is used when a party may come back over time to complete the package so they resume on the first document that needs their action. Select "First To Do or Package" to land on the first document the party must work on, or the package document if all documents have been processed.
- Check Must be logged in if this party is supposed to be an internal user. This ensures that step is taken only by authenticated users.
- Check Allow delete tran if no signatures to allow the party to delete the transaction, if no signatures have been applied, from the package document. This is generally used only on the first party since they may start the transaction, and then decide not to continue. If the user does not complete it, or delete it, it will be in that user's To Do queue so they can resume later. If they are external users, the transaction will not progress unless the user comes back with the unique pickup link for it (like if they bookmarked the page or your process sent them an email with the link).
- For Select document parties for this package party select all document+party combinations that apply. You can use the special "View only" party to require this party view the document, but otherwise not be able to change it (or sign it). You can also use the special "View optional" party to allow this party to view the document using the 'View' button on the package, but they are not required to view it and the general process flow will not include this document. It is possible to have an "invisible" document+party attached to the package party, such as if you remove the document from the package after it was assigned. If your package party says it's using a document+party, but you cannot see any assigned to it, you have this issue. Just click to select any other document+party, then unselect it, and the package party should now show as having no document+parties assigned and will be available to be removed. Of course, if you do not want to remove the package party, you can just re-select the one(s) you want by first selecting the first, then adding in any others. The initial selection will effectively unselect all entries, including any invisible ones.
- Select a To Do Party EsfName if this party actually belongs to a group of users. In a Library, you can define a Party template that is associated with a To Do Group so that anybody who belongs to the group can process the transaction via the To Do work queue. Select that Party name defined in a Library and be sure it has a group associated with. Note that by creating transaction templates with separate branding libraries, it is easy to set up a package where such a party belongs to different groups, such as when running the service for multiple companies or departments.
- In Renotify select the various intervals that you'd like an email re-notification to be sent to the party until the party step is completed (and the transaction is in progress). It is good to be able to remind a user to complete a document, but you don't want to pester them either.
- Check Email All To Do Parties if you've also set a To Do Party EsfName and you would like all users who belong to the group associated with the party to receive an email notification.
- If SMS is enabled, the Configure SMS notifications button appears to setup SMS texting notifications:
- Check Send SMS/text message to All To Do Parties if you've also set a To Do Party EsfName and you would like all users who belong to the group associated with the party to receive a text message notification.
- In Mobile phone spec specify a phone number or a document and field specification that contains the phone number of the person to notify when this party is activated.
- In SMS text message spec specify the text message to send. Simple text messages should not be longer than 140 characters. Use ${LINK} to send the pickup link for this party to access the transaction.
- In Redo SMS text message spec specify the text message to send if this party when the workflow has queued it back to this party for "redo."
- In Notify email address spec (${EMAIL}) enter an email address or a document and field specification that contains the email address of the person to notify when this party is activated. The value will replace the
${EMAIL}specification used in the Email template. - In Notify Email EsfName specify the Email template to use to notify this party. Leave blank to not send an email to this party when activated.
- In Redo Notify Email EsfName specify the Email template to use to notify this party when the workflow has queued it back to this party for "redo." Most typically this occurs if a subsequent party can return a form for correction to be resubmitted. The default is ESF_Redo_Notify_Same_Email which just uses the email setting from Notify Email EsfName. You can set it to blank for no such email being sent out automatically, or set it to a distinct email template name that makes it clear that forms have been returned and need to be redone (corrected and resubmitted).
- In On completed redirect link/URL spec you can put in a literal URL or any combination of field and property specifications. If specified, when the party completes all documents in the package, the party will be redirected this URL rather than be shown the completed package page.
- In Not completed redirect link/URL spec you can put in a literal URL or any combination of field and property specifications. If specified, when the party has not yet completed the package of documents, the package will show a "Go back (not completing now)" button that will redirect the user back to this URL to indicate that they have chosen not to complete the package at this time.
Click Ok to keep any changes, otherwise click Cancel.
Tip: To save your changes, remember to click the Save button for the package.
It is often necessary to add additional processing logic to fine tune the process flow, especially for prefilling one document's data from a prior document, setting up cancel timers for transactions never fully submitted, and for sending out additional non-party invitation emails. You can set up special custom rules based on when in the process flow you want it, whether it's limited to a given set of documents or parties, and then add various actions you'd like to take place then. For events that are specified both in a document and the package containing the document, the document's custom logic will run first unless you check the option to make the package custom logic rule run before the document rules.
Click on the Customize logic button on the package version to configure additional logic.
Click on the Create new custom logic button 
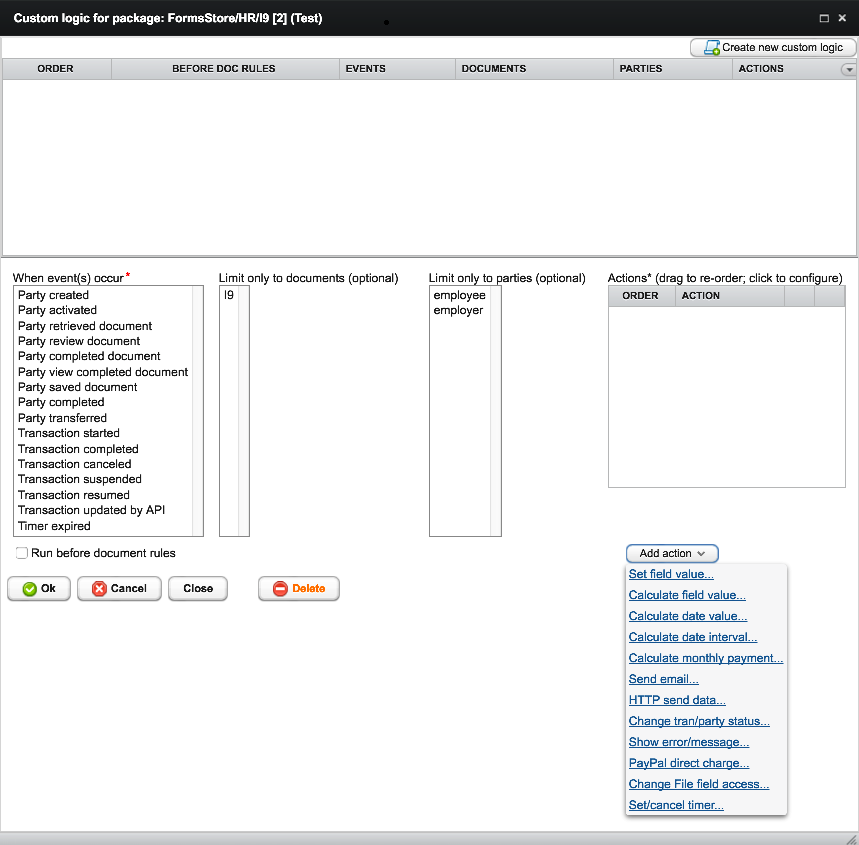
- In When event(s) occur select at least one type of event that describes when you'd like the associated actions to run. You can choose from:
- Party created occurs when a package party is created.
- Party activated occurs when a package party is first activated to process the package.
- Party retrieved document occurs when a package party first retrieves a document.
- Party review document occurs when a package party has filled out the form or is signing and clicks the review button. The party cannot continue to review the completed document if any action produces an error or warning message.
- Party completed document occurs when a package party completes a given document. The party cannot complete the document if any action produces an error or warning message.
- Party view completed document occurs when a package party views a document that has already been completed.
-
Party saved document occurs when a party clicks the 'Save' button, such as updating a document via the
ESF_reports_accessparty when accessing the transaction from a report. - Party completed occurs when a package party complete all documents in the package that are assigned to him or her.
- Party transferred occurs if a user transfers a given package party to another person through the transaction details page in reports and general transaction search. This occurs when a transaction is started and it turns out there was an error, such as invalid email address, or you find another person actually needs to process it.
- Transaction started occurs when the transaction is first started. Normally you do not limit by party or document. But if you do limit by party, it will match the rule if the specified party is currently an Active party.
- Transaction completed occurs when the transaction is completed. Normally you do not limit by party or document. But if you do limit by party, it will match the rule if the specified party is currently an Active party.
- Transaction canceled occurs when the transaction is canceled. Normally you do not limit by party or document. But if you do limit by party, it will match the rule if the specified party is currently an Active party.
- Transaction suspended occurs when the transaction is suspended. Normally you do not limit by party or document. But if you do limit by party, it will match the rule if the specified party is currently an Active party.
- Transaction resumed occurs when a suspended transaction is resumed. Normally you do not limit by party or document. But if you do limit by party, it will match the rule if the specified party is currently an Active party.
- Transaction updated by API occurs when an external system updates the transaction using the Update API. Because the update API occurs independently of regular processing (no party is processing a document at the time), you should not select limiting documents or parties. However if you do limit by party, it will match the rule if the specified party is currently an Active party. The update event name is called "UpdateAPI" by default, but the system that uses the update API may set a custom name using the ESFEVENTNAME param so it can be differentiated using a condition. The Update API event can fire even after the transaction is completed. However, if it fires when the transaction is canceled, the event name will be renamed by appending "-Canceled". And if the transaction is suspended, the event name will be renamed by appending "-Suspended". This allows you to handle an Update API event for canceled or suspended transactions if you really need to do so, but it won't match your standard event name when canceled or suspended unless you specify the event name with the appropriate suffix.
- Timer expired occurs when a user-defined timer expires. Because a timer fires independently in the future (no party is processing a document at the time), you generally should not select limiting documents or parties. However, if you do limit by party, it will match the rule if the specified party is currently an Active party. A timer expired event can fire even after the transaction is completed. However, if it fires when the transaction is canceled, the timer will be renamed by appending "-Canceled". And if the transaction is suspended, the timer will be renamed by appending "-Suspended". This allows you to handle a timer event for canceled or suspended transactions if you really need to do so, but it won't match your standard expired timer name when canceled or suspended unless you specify the timer name with the appropriate suffix.
- In Limit only to documents (optional) check any documents if the actions should only fire when the selected event(s) occur, but also only when the specified document is being processed. If you do not select any, then it will not matter which document is involved.
- In Limit only to parties (optional) check any parties if the actions should only fire when the selected event(s) occur, but also only when the specified party is processing the transaction. If you do no select any, then it will not matter which party is involved.
- In Actions you can drag to re-order existing actions or click the Delete button to remove it.
- Click the Add action button to add the actions you'd like to occur when the specified event arises, possibly limited based on the documents and parties selected.
- Choose Set field value action to change any field values in your documents.
- Choose Calculate field value to calculate a value (add, subtract, multiply, divide).
- Choose Calculate date value to calculate a date by adding a positive (future) or negative (past) number of days, weeks, months or years.
- Choose Calculate date interval to calculate an interval (days, months or years) between two dates.
- Choose Calculate monthly payment to calculate a monthly payment amount based on the loan amount, term in months, and interest rate (APR).
- Choose Send email to send an email. You only need to send emails that are not invitations for a party. Party invitations are specified in the package party configuration.
- Choose Send SMS/text message to send a text message. You only need to send text messages that are not invitations for a party. Party invitations are specified in the package party configuration.
- Choose HTTP send data to send data to another system via HTTP(S) GET/POST.
- Choose Change tran/party status to cancel the transaction now or in the future, clear a future auto-cancel, suspend a transaction, resume a suspended transaction, skip a party step, skip a document party, skip an entire document, or activate a party out of normal sequence.
- Choose Show error/message to display a message or report an error to the user (mostly used during the Party review document and Party completed page events).
- Choose PayPal credit card charge to specify credit card fields in your document that will be submitted to the PayPal DoDirectPayment NVP or PayPal Payflow Pro API for a credit card sale.
- Choose Change File field access to block or make optional the need for a party to view/download the files associated with this field. Of course, if the party is supposed to upload files, this has no bearing.
- Choose Set/cancel timer to set a new timer that will fire a Timer expired event in the future, or to cancel a previously set timer. You may also cancel all timers.
- Check Run before document rules to make this rule run before the same event triggers document custom logic. This may be necessary for document rules that operate on field values that you wish to prefill from another document first. By default, package custom logic rules run after the document's rules.

Click Ok to keep any changes, otherwise click Cancel.
Click Close to close the custom logic window.
Click Delete to delete the selected custom logic rule.
Tip: To save your changes, remember to click the Save button for the package.
When you configure an action, you can specify a condition that will be checked before running your action. Conditions can be arbitrarily complex, but in practice few are.
By default, the initial condition associated with an action is called AND and by itself does nothing more than ensure all sub-conditions added to it must all be true to pass the test. You can convert it to an OR condition so that only one of the sub-conditions added to it must be true to pass the test.
Or you can negate any condition which basically evaluates to the opposite (also known as NOT), so if your condition is true, negating it means it will not pass, but if your condition is false, then negating it means it will pass.
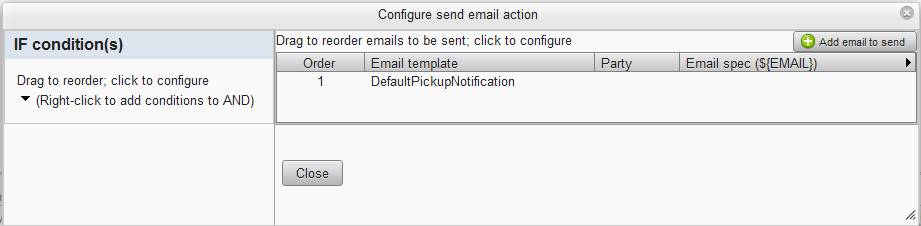
On the left side of the action configuration shows the condition editor.
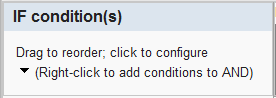
Initially, when there are no conditions yet set, it prompts you to Right-Click to add a new condition to the default AND condition. The top level condition must be an AND or OR condition. You cannot delete this top level condition, but you can convert the default AND to an OR condition, and you can of course negate whichever you choose.
You may also click and drag a condition to a new location, but you cannot put any condition above or below the top level AND or OR condition. There can only be one top level condition and it must be an AND or an OR condition.
Right-click on (Right-click to add conditions to AND) to add new conditions to the top level AND condition:
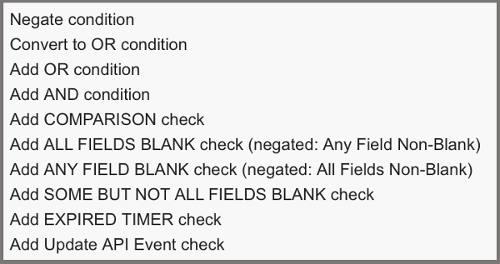
- Click Negate condition to convert the selected condition to do the opposite of what it normally would be, also known as NOT the condition.
- Click Convert to OR condition to change a selected AND condition (all conditions added to it must be true) to an OR condition (one condition added to it must be true). When the condition is an OR condition already, this option will let you convert it to an AND condition.
- Click Add OR condition if you need to add a condition that itself is true only if one of the sub-conditions you add to it is true.
- Click Add AND condition if you need to add a condition that itself is true only if all of the sub-conditions you add to it are true.
- Click Add COMPARISON check to a condition with tests if a field equals, starts with, ends with or contains another value.
- Click Add ALL FIELDS BLANK check to add a condition in which all fields you specify must be blank (have no value, or for File Upload fields have no files uploaded). If you negate this check, it means "ANY FIELD is NON-BLANK," that is, it's true if any of the list fields has a value. You can just specify a single field to check.
- Click Add ANY FIELD BLANK check to add a condition in which any (at least one) of the fields you specify must be blank. If you negate this check, it means "ALL FIELDS are NON-BLANK," that is, it's true if all of the list of fields have a value. You can just specify a single field to check.
- Click Add SOME BUT NOT ALL FIELDS BLANK check to add a condition in which at least one field is blank and at least one field has a value. To work as expected, you must specify at least two fields.
- Click Add EXPIRED TIMER check to add a condition that checks if a specific timer expired. Generally, this is only used when the custom logic action is for a Timer expired event.
- Click Add Update API Event check to add a condition that checks if a specific Update API event has occurred. Generally, this is only used when the custom logic action is for a Transaction updated by API event.
After you have added or changed a condition, just click on the condition to configure it further.
AND and OR conditions have no specific condition editors, so for these special types of conditions, you just right-click on them to negate them, convert them from one type to the other, delete it (and all of its sub-conditions), or to add further sub-conditions to them.
You can also negate this condition by checking the Negate condition (NOT) box. Note this applies to the entire condition, not any given field specification.
Click on the All blank: condition to change which fields are checked to be blank. For File Upload fields, blank is a shortcut for zero files uploaded. You can specify one or more fields to check. A popup editor will appear.
Click the Add field to check if blank button to specify a new field to check that it's blank (has no value).
- Choose from In document the name of the document where the field to check resides.
- Choose from Field the name of the field in the selected document to check.
You can specify one or more fields to check. In this case, all specified fields must be blank to pass the test.
If you negate this condition (NOT ALL BLANK), it passes if any of the fields specified has a value (ANY NON-BLANK).
Like always, click Ok to save your changes. Click Cancel to abandon the change. Click Close to close the popup window. Click Delete to delete a selected field check.
Tip: To save your changes, you will want to click the Ok button on the custom logic rule as well as click the Save button for the package. Once you do, when you click on the IF condition button, your conditions will be updated.
Like the All blank condition, Any blank works the same way except that it is true if any of the fields you specify is blank. At least one blank field must be present to be true.
If you negate this condition (NOT ANY BLANK), it passes if all of the fields specified have a value (ALL NON-BLANK).
Like the All blank condition, Some but not all blank works the same way except that it is true if at least one field is blank and at least one field is non-blank (has a value). This condition only makes sense if at least two fields have been specified.
You rarely will negate this condition, but if you do it will be true if all of the fields are blank, or if all of the fields have a value.
You can use a comparison condition to check if a field matches another value.
Click on the Compare: condition to change which fields are to be compared. Only a single field comparison can be configured. A popup editor will appear.

You can negate this condition by checking the Negate condition (NOT) box.
- Choose from In document the name of the document where the field to check resides.
- Choose from Field the name of the field in the selected document to check.
- Choose from Comparator the type of comparison to perform. Fields that are integers, decimals, money, dates or date+time, you generally want to limit the comparator to the equals, less than and greater than as the others will treat these types as if there were strings.
- Equals will match if the two string values are the same.
- Starts with will match if the field starts with a given value.
- Ends with will match if the field ends with a given value.
- Contains will match if the field contains the other value anywhere within its value.
- Less than will match if the field's value is less than the other value.
- Less than or equals will match if the field's value is less than or equals the other value.
- Greater than will match if the field's value is greater than the other value.
- Greater than or equals will match if the field's value is greater than or equals the other value.
- Same length will match if the field's value has the same length as the other value.
- Shorter than will match if the field's value is shorter than the length of the other value.
- Shorter than or same length will match if the field's value is shorter than or the same length as the other value.
- Longer than will match if the field's value is longer than the length of the other value.
- Longer than or same length will match if the field's value is longer than or the same length as the other value.
- Set the Literal or field spec (${}) to the value to check against the specified field. It can be a simple string literal, or it can contains a field specification like
${DocumentName.FieldName}to compare against another field value. - Check the Case sensitive? box if you want the comparison to be case sensitive (uppercase and lowercase letters must match exactly). The default (unchecked) allows a match regardless, so "Bob" would be equal to "BOB".
If you negate this condition (NOT COMPARISON), it passes if the field does not match the specified value.
Like always, click Ok to save your changes. Click Cancel to abandon the change. Click Close to close the popup window.
Tip: To save your changes, you will want to click the Ok button on the custom logic rule as well as click the Save button for the package.
Click the Add expired timer check button to specify a new timer to check if it just expired.
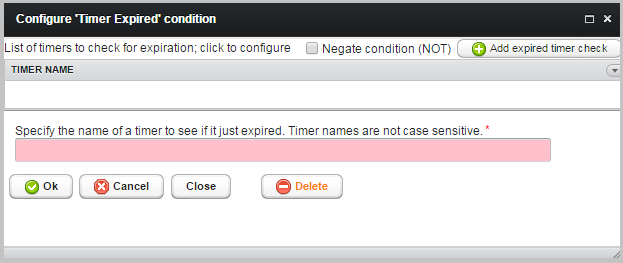
- Specify the name of the timer to check if it expired. The timer name is not case sensitive. The corresponding timer is named in a SET TIMER action.
If your condition should be true if any one of several timers expired, simply add additional timers. The condition will be true if any one of the listed timers expired. You can think of this as a list of timers checked with an OR condition. A 'timer expired' event will occur only after one timer has expired.
Like always, click Ok to save your changes. Click Cancel to abandon the change. Click Close to close the popup window. Click Delete to delete a selected field check.
Tip: To save your changes, you will want to click the Ok button on the custom logic rule as well as click the Save button for the package. Once you do, when you click on the IF condition button, your conditions will be updated.
Click the Add Update API Event check button to specify a new Update API event to check if it just occurred.
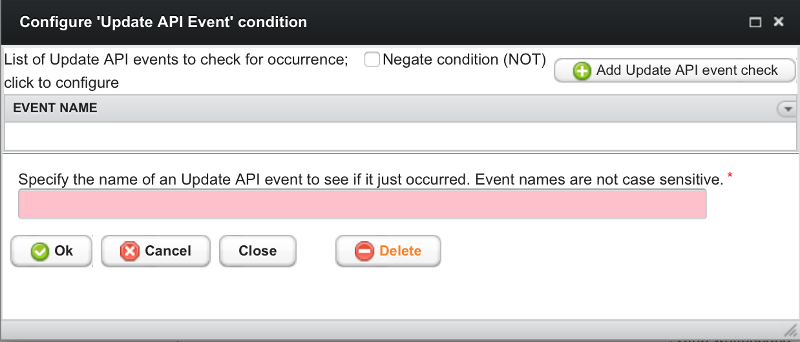
- Specify the name of the Update API event to check if it occurred. The event name is not case sensitive. The corresponding event is named in the Update API request sent by the integrated system via the ESFEVENTNAME param. By default, the name is "UpdateAPI".
If your condition should be true if any one of several Update API calls have occurred, simply add additional event names. The condition will be true if any one of the listed Update API event names occurred. You can think of this as a list of event names checked with an OR condition. For example, you could list "UpdateAPI" and "UpdateAPI-Canceled" if you wanted your action to fire when the Update API occurs normally or even if the transaction is canceled. Of course "UpdateAPI-Suspended" can be checked, assuming the event name of "UpdateAPI", if you need to handle this event taking place while the transaction is suspended.
Like always, click Ok to save your changes. Click Cancel to abandon the change. Click Close to close the popup window. Click Delete to delete a selected field check.
Tip: To save your changes, you will want to click the Ok button on the custom logic rule as well as click the Save button for the package. Once you do, when you click on the IF condition button, your conditions will be updated.
When you need to change (or clear) a value, use the Set field value action. Click the Add field to set button 
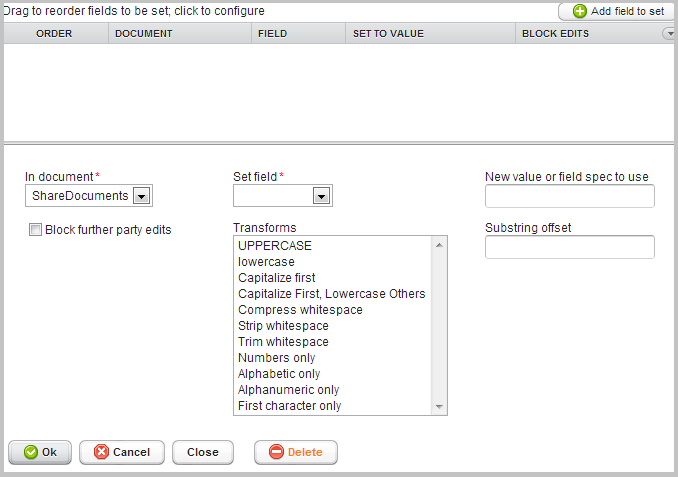
- For In document select the document where the field exists that will be set.
- For Set field select the field in the selected document that will be set.
- For New value or field spec to use enter a literal value (or leave blank to blank out the field) or
${ }notation to specify the new value for the field. - Check Block further party edits only if after setting the value no further edits will be required by parties. This is typically used in situations where a document is used both standalone as well as in a package. For example, when standalone, all of the fields will be filled in by the party. But when in a package, one or more fields may be set from values entered on previous documents (such as name, ID, address, etc.), and once set with those values, the party should not be allowed to change them further.
- Select zero or more Transforms to apply to the value determined by evaluating the New value or field spec to use. There is no guarantee on the order multiple transforms will take place if more than one is selected.
- UPPERCASE will convert all characters to uppercase letters.
- lowercase will convert all characters to lowercase letters.
- Capitalize first will capitalize the first letter only.
- Capitalize First, Lowercase Others will capitalize the first letter in each "word" and make the other letters lowercase.
- Compress whitespace will convert multiple whitespace characters into a single space. This is most useful when concatenating fields, some of which may have not value, so extra spaces are removed.
- Strip whitespace will remove all whitespace characters.
- Trim whitespace will remove all leading and trailing whitespace characters.
- Numbers only will remove all characters that are not digits or whitespace.
- Alphabetic only will remove all characters that are not letters or whitespace.
- Alphanumeric only will remove all characters that are not letters, numbers or whitespace.
- First character only will remove all characters after the first. This is a shorthand for using a substring offset of 0 with a length of 1.
- SubString offset is used to extract a portion of the value after any of the above Transforms are done. The offset specifies the number of characters to skip from the beginning. Leave blank to keep the entire value. Specify 0 to include from the beginning.
- Substring length (appears only if a substring offset is specified) is the number of characters after skipping the specified number of offset characters. If blank (or number less than 1 or longer than the actual number of remaining characters), it will return all characters after the offset characters are skipped. In the string "1234567890" if the offset is 5 and the length is 4, you end u with "6789".
Click the Ok button to keep your changes, or click Cancel.
Click the Close button to close the set field value actions window.
Click the Delete button to delete the selected action.
Note that you can set multiple fields at the same time using this view.
Tip: To save your changes, you will want to click the Ok button on the custom logic rule as well as click the Save button for the package.
When you need to calculate a value (add, subtract, multiple or divide), use the Calculate field value action. Click the Add field to calculate button 
This is only available for Integer, Decimal and Money fields.

You can think of this as doing the following in code:
InDocument.SetField = FromDocument.Field OPERATOR FromDocument.Field
- For In document select the document where the field exists that will be set to the calculated value.
- For Set field select the field in the selected "in document" that will be set by the calculation. This is the field that is changed.
- For From document (left side of operator) select the document where the first field can be found.
- For Field (left side of operator) select the field in the selected "from document" that will be used in the calculation. This field is not changed.
- For Operator select the operation to be applied to the left and right hand fields.
+means addition;-means subtraction;*means multiplication; and/means division. - For From document (right side of operator) select the document where the second field can be found.
- For Field (right side of operator) select the field in the selected "from document" that will be used in the calculation. This field is not changed.
Click the Ok button to keep your changes, or click Cancel.
Click the Close button to close the calculate field value actions window.
Click the Delete button to delete the selected action.
Note that you can calculate multiple fields at the same time using this view. Also, if you have a multi-step calculation, you can set the field to the first party of the calculation, and then in the next calculation reference that field in the left or right side to perform more operations on it.
Tip: To save your changes, you will want to click the Ok button on the custom logic rule as well as click the Save button for the package.
When you need to calculate a date in the future or past, use the Calculate date value action. Click the Add date to calculate button to add a new date to calculate. Or you can click on a previously created rule to update it.
This is only available for Date and Date+Time fields. To set a Date field from a DateTime field, this is your only option, typically using an interval of 0 days, as a Set Field Value action cannot reliably parse the varying DateTime strings into a Date.
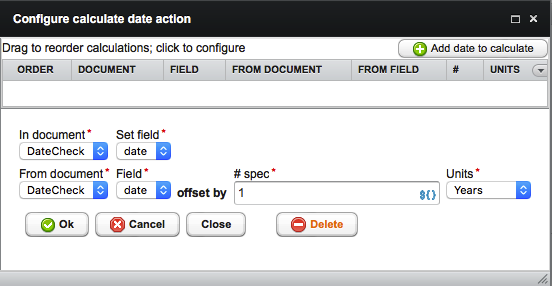
You can think of this as doing the following in code:
InDocument.SetField = FromDocument.Field OFFSET BY # Units
- For In document select the document where the field exists that will be set to the calculated date.
- For Set field select the field in the selected "in document" that will be set by the calculation. This is the field that is changed.
- For From document select the document where the date field can be found.
- For Field select the date field in the selected "from document" that will be used in the calculation. This field is not changed.
- For # spec specifies the integer number of units to use as the offset to be applied to the 'from document date field'. You may alternatively use a field spec that expands to such an integer value.
- For Units choose from Minutes, Hours, Days, Weekdays, Weeks, Months or Years.
Click the Ok button to keep your changes, or click Cancel.
Click the Close button to close the calculate date actions window.
Click the Delete button to delete the selected action.
Note that you can calculate multiple date fields at the same time using this view. Also, if you have a multi-step calculation, you can set the field to the first party of the calculation, and then in the next calculation.
Tip: To save your changes, you will want to click the Ok button on the custom logic rule as well as click the Save button for the package or document.
When you need to calculate the interval between two dates, such as calculating a person's age, use the Calculate date interval value action. Click the Add date interval to calculate button to add a new date interval to calculate. Or you can click on a previously created rule to update it.
This is only available for Date and Date+Time fields that set an Integer field.

You can think of this as doing the following in code:
InDocument.SetIntegerField = INTERVAL FOR FromDocument.FromDateField TO ToDocument.ToDateField
- For In document select the document where the integer field exists that will be set to the interval between the two dates. It will be negative if the "To Date" is earlier than the "From Date."
- For Set integer field select the Integer field in the selected "in document" that will be set by the calculation. This is the field that is changed.
- For Interval select one of: 'Days between', 'Months between', 'Years between'. You can use 'Seconds between', 'Minutes between' or 'Hours between', though these are more meaningful when using two Date+Time fields.
- For From document select the document where the starting date field can be found.
- For From date field select the 'from' date field in the selected "from document" that is the starting date. This field is not changed.
- For Spec? checkbox, click to use a date field spec instead of a date field.
- For From date field spec enter the date field spec (Enter +numDays (i.e. +1 for tomorrow) for the current date plus the specified number of days, or -numDays (i.e. -1 for yesterday) for the current date minus the specified number of days. Use 'now' or +0 or -0 to use the current date. Use yyyy-mm-dd format to specify a fixed date. May be a field path expression using ${} notation that expands to such a specification.) if you have checked the associated Spec? box.
- For To document select the document where the ending date field can be found.
- For To date field select the 'to' date field in the selected "to document" that is the ending date. This field is not changed.
- For Spec? checkbox, click to use a date field spec instead of a date field.
- For To date field spec enter the date field spec to use if you have checked the associated Spec? box.
Click the Ok button to keep your changes, or click Cancel.
Click the Close button to close the calculate date interval actions window.
Click the Delete button to delete the selected action.
Note that you can calculate multiple date intervaal fields at the same time using this view.
Tip: To save your changes, you will want to click the Ok button on the custom logic rule as well as click the Save button for the package or document.
When you need to calculate a monthly payment, use the Calculate monthly payment action. Click the Add payment to calculate button 
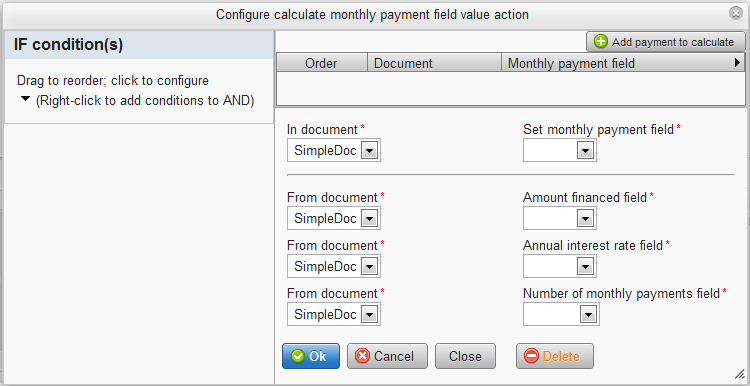
- For In document select the document where the field exists that will be set to the calculated monthly payment value.
- For Set monthly payment field select the "Money" field in the selected "in document" that will be set by the calculation. This is the field that is changed.
- For From document select the document where the amount financed field can be found.
- For Amount financed field select the "Money" field in the selected "from document" that will be used in the calculation. This field is not changed.
- For From document select the document where the annual interest rate field can be found.
- For Annual interest rate field select the "Decimal" field in the selected "from document" that will be used in the calculation. This field is not changed.
- For From document select the document where the number of monthly payments field can be found.
- For Number of monthly payments field select the "Integer" field in the selected "from document" that will be used in the calculation. This field is not changed.
Click the Ok button to keep your changes, or click Cancel.
Click the Close button to close the calculate monthly payment value actions window.
Click the Delete button to delete the selected action.
Note that you can calculate multiple monthly payments at the same time using this view.
Tip: To save your changes, you will want to click the Ok button on the custom logic rule as well as click the Save button for the package.
When you need to send an email other than the party activation email (which is set in the package party view), use the Send email action. Click the Add email to send button 
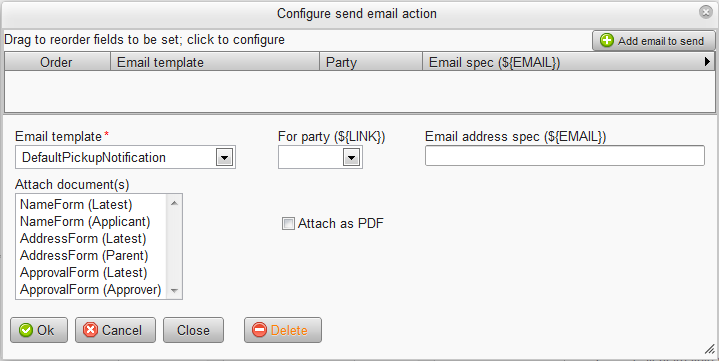
- For Email template choose the email template to send.
- For For party (${LINK}) select the party whose unique link will be used anywhere
${LINK}is specified in the selected email template. Note that whoever receives such a link will be able to act as that party. - For Email address spec (${EMAIL}) enter an email address or
${ }field specification that will resolve to the email address to send to. You may specify multiple email addresses with a semicolon or comma between them. This will replace the${EMAIL}wherever used in the selected email template. If the For party above is selected and this email address specification is blank (or set to${EMAIL}-- better to leave blank), the system will attempt to use the configured package party's email notification specification. If the package party must be used to resolve the email addresses, and the package is set to a To Do group with 'Notify all' selected, it will send the email to all members of that To Do group party (the group associated with a To Do party is specified in the branding library's Parties). - For Attach document(s) select one or more documents from the package to send with the email. This will be the document snapshot that exists for the selected document and party. Of course, you can also choose the "Latest" party for a document to send whatever is the latest snapshot of that document at the time the email is being sent.
- Check Attach as PDF to combine the document snapshots into a single PDF file rather than sending them as attached HTML files. If any of the selected documents is configured for 'Landscape' orientation then all documents will be rendered as landscape in the PDF.
- If Attach as PDF is selected, a PDF file name spec is shown so you can give the file name of the attached PDF. It's can be a simple file name, such as
Agreement.pdf, or it may include field specifications and properties for a customized name, such asAgreement for ${firstName} ${lastName}.pdf. - If your package allows for files to be uploaded and attached to the transaction, an Attach uploaded file(s) selection list will appear so you can include any of those files to the email as well.
Click the Ok button to keep your changes, or click Cancel.
Click the Close button to close the send email actions window.
Click the Delete button to delete the selected action.
Note that you can send multiple emails at the same time using this view.
Tip: To save your changes, you will want to click the Ok button on the custom logic rule as well as click the Save button for the package.
When you need to send a text message other than the party activation SMS (which is set in the package party view), use the Send SMS/text message action. Click the Add test message to send button 
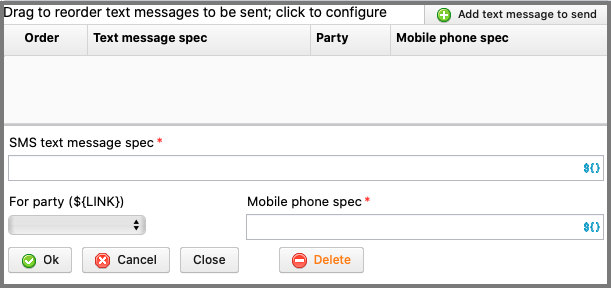
- For SMS text message spec enter the text message to send. Text messages generally should not be more than 140 characters in length. Include ${LINK} to include the party pickup link if you also specify the For party so it knows which party link to include.
- For For party (${LINK}) select the party whose unique link will be used anywhere
${LINK}is specified in the SMS text message spec. Note that whoever receives such a link will be able to act as that party. - For Mobile phone spec enter a phone number or
${ }field specification that will resolve to the phone number to send to. If the For party above is selected and this phone specification is blank, the system will attempt to use the configured package party's SMS notification specification. If the package party must be used to resolve the phone number, and the package is set to a To Do group with 'Notify all' selected for SMS, it will send the text message to all members of that To Do group party (the group associated with a To Do party is specified in the branding library's Parties).
Click the Ok button to keep your changes, or click Cancel.
Click the Close button to close the send SMS actions window.
Click the Delete button to delete the selected action.
Note that you can send multiple text messages at the same time using this view.
Tip: To save your changes, you will want to click the Ok button on the custom logic rule as well as click the Save button for the package.
When you need to send data to another system (integration of applications), use the HTTP send data action. Click the Add HTTP Send button 
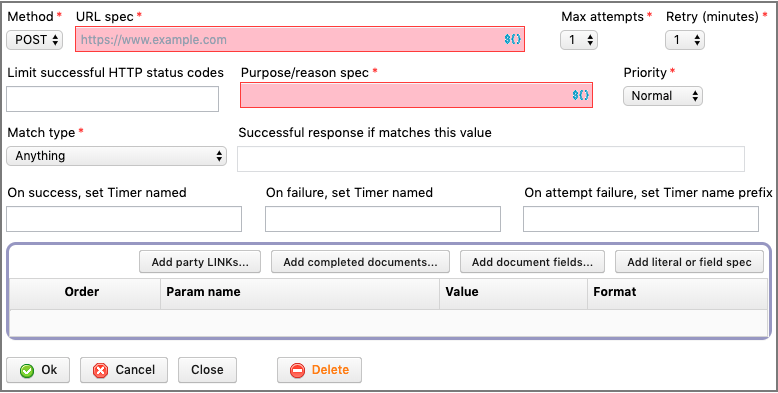
- For Method choose the HTTP method to send the data to the specified URL, either a GET or a POST. In general, use POST unless a GET is all that you can use as GET requests will generally record all of your data parameters into web server logs that may not be secure if the data you are sending should be secure.
- For URL specify the URL that will accept your data. It must begin with
http://(data is in the clear over the Internet) orhttps://(data will be encrypted over the Internet), then have the server domain name and optional port number, along with any path specifiers. Alternatively, you can start with${urlspec}that expands to the URL. You can even include some hard-coded name-value params with optional field specs. A typical URL looks likehttps://open.esignforms.com/demo/HttpVariableTester.jsp. Note that every deployment has just such an URL available using your deployment's server name and application name. You can use this when testing as it will echo back all of the data it receives and can be used to help ensure you are sending the data you expect; note that you can add the ESF_TRUNC param to cause long values, especially useful when transferring files, to echo back values truncated to 100 characters, or you can add ESF_TRUNC=50, for example, to truncate fields longer than 50 characters. If your URL needs to change based on Test versus Production modes, we recommend using a propertyset to configure the URL so that when in test mode it will use the same property name with_TESTadded as a suffix. You can then set the HTTP Send Action's URL to something like${property:MyConfig.URL}which will expand at run-time (and when in test mode, it will automatically find propertyMyConfig.URL_TESTif you have defined it). - For Max attempts enter the number of times to attempt to send the data. Each attempt is recorded, including both the request sent and the response received. If the attempt is considered a success, no further attempts will be made. If the attempt is not considered a success, it will try again if you specify a value greater than 1.
- For Retry (minutes) select the number of minutes that should pass before a retry is attempted. This only has meaning if Max attempts is greater than 1.
- For Limit successful HTTP status codes enter one or more numbers (standard HTTP status codes) separated by semicolons (;) that must be returned by the URL to indicate a successful send. Note that '200' is the normal HTTP status for a successful request. Leave this field blank if the HTTP status code should be ignored.
- For Purpose/reason spec enter a literal and/or field specification that explains why the HTTP Send is taking place. The reason appears in the transaction activity log.
- For Priority select Normal for a typical HTTP Send request. Select Batch/low priority for HTTP Send requests that typically take a very long time (several minutes). The Batch/low priority will allow your Normal priority requests to not get stuck waiting for time-consuming requests.
- For Match type select the type of match to apply to the response returned from the URL to determine if it was a successful request.
- The match type Anything means that any response would indicate a success (this is not recommended unless you can rely on the HTTP status codes instead).
- Must contain means that the response must contain the associated value somewhere in the response to be considered successful.
- Must not contain means that the response must not contain the associated value anywhere in the response to be considered successful.
- Must start with means that the response must start with the associated value to be considered successful.
- Must not start with means that the response must not start with the associated value to be considered successful.
- Must match regular expression means that the Java regular expression must find a match in the response to be considered successful.
- Must not match regular expression means that the Java regular expression must not find a match in the response to be considered successful.
- For Successful response it matches this value specify a literal string (or a regular expression if the match type is for a regular expression) to apply based on the selected match type. This is generally a value that is included in the response that indicates it was successfully received.
- On success, set Timer named can be used to specify a Timer Event name to be set (expiring right away) that you can process via the custom logic's "On Timer Expired" event, using actions that have a Condition set to match the timer name set here, to do anything special after this HTTP Send action succeeds.
- On failure, set Timer named can be used to specify a Timer Event name to be set (expiring right away) that you can process via the custom logic's "On Timer Expired" event, using actions that have a Condition set to match the timer name set here, to do anything special after this HTTP Send action fails (no more retries will be done).
- On attempt failure, set Timer name prefix can be used to specify a Timer Event name to be set (expiring right away) that you can process via the custom logic's "On Timer Expired" event, using actions that have a Condition set to match the timer name prefix set here, appended with a hyphen and the attempt number, to do anything special after any HTTP Send action attempt failures. If you name the prefix HTTPSEND_ATTEMPT_FAILURE, then if the first attempt fails, a timer named HTTPSEND_ATTEMPT_FAILURE-1 will be triggered, etc. for each attempt number up to the max attempts configured.
(See below for more information about specifying the name-value pairs to send.)
Click the Ok button to keep your changes, or click Cancel.
Click the Close button to close the HTTP send action window.
Click the Delete button to delete the selected action.
Note that you can send multiple HTTP requests at the same time using this view.
Tip: To save your changes, you will want to click the Ok button on the custom logic rule as well as click the Save button for the package.
Next, you need to specify the data you'd like to include in the HTTP(s) GET/POST request that is sent out.
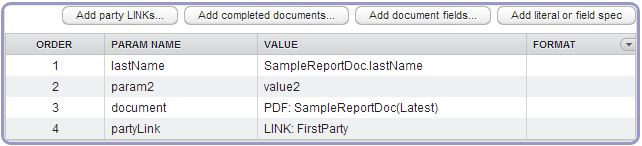
You can use drag and drop to reorder the list of fields shown.
Click on a row to modify it. You are free to change the param name to match the name expected by the receiving system (at the URL specified).
For document fields, you may optionally change the format for the field. By default, it will use the field's definition in the document (it's output/display format), which basically matches what the parties see when completing the document. But if you need a different format for the receiving system, you can adjust it here.
For literal/field specs, you can also update the value to the specified literal string or field specification using ${} notation.
Click the Ok button to accept and changes made. Click the Cancel button to ignore any changes made. Click the Delete button to delete the name-value from being included in the HTTP Send.

For the HTTP Send Action, use the Add literal or field spec button to add one literal (with or without a field specification using ${} notation) to be sent. You will have to update the name and value by clicking on it from the list.

For the HTTP Send Action, use the Add document fields... button to add one or more fields from your document(s) to be sent.
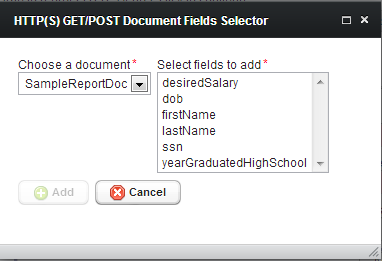
- For Choose a document select the document that has the fields you'd like to send out.
- For Select fields to add click on one or more fields from the selected document to send out.
Click the Add button to add the selected fields to be sent out. Click Cancel to not add any fields.
If the document field is a File type (for uploaded files), the param name you specify will be associated with the BASE-64 encoded file data. Two additional params are automatically included by appending __fileName and __fileMimeType to your file field's param name to supply the respective file name and mime type as it was uploaded. If multiple files were uploaded, you will receive the set of 3 params multiple times (on the receiving end, this often appears as receiving an array of values). So if your File field param name is attachment then for each uploaded file associated with the field, you'll get params: attachment and attachment__fileName and attachment__fileMimeType. Note two underbars are used between the param name you supply and these additional fields.

For the HTTP Send Action, use the Add completed documents... button to add one or more document(s) to be sent.
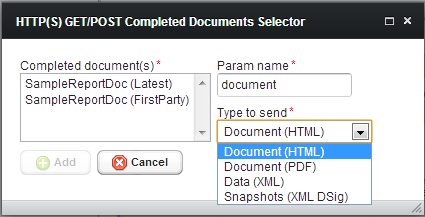
- For Completed document(s) select one or more completed documents that you'd like to send out. Note you can send any version based on a particular party or the latest party. If multiple documents are selected, you will get multiple 'Param name' param-values sent except for the PDF format that combines them into a single file. Note that if you select a 'Latest' version that happens to be the same version as the a selected party-specific version, only one copy will be sent. Also, if no version exists for a given party (it hasn't taken place yet), no value will be sent with the 'Param name'.
- For Param name select the name of the parameter that will be used. It defaults to 'document'.
- For Type to send select the type of document to send. Use 'Document (HTML)' to send the original HTML document the party completed. Use 'Document(PDF)' to send over the selected documents as a combined PDF file. Use 'Data (XML)' to send over the document's data in XML format. Or use 'Snapshots (XML DSig)' to send over the document and data snapshots as XML, both including their XML digital signatures.
Note that all documents are sent using Base-64 encoding.
Base-64 encoding converts data into an ASCII format, essentially emitting 4 ASCII characters for every 3 input bytes. It has only three special characters: +, / and = (the equals sign for padding at the end only), but oddly enough all three have special meaning in URLs (and for URL encoding for name-value params for HTTPS GET/POST). Therefore, when viewing the Base-64 encoded data in the HTTP Send logs, you will see URL-encode Base-64, so + is replaced by %2B, / is replaced by %2F and = is replaced by %3D.
Click the Add button to add the selected documents to be sent out. Click Cancel to not add any documents.

For the HTTP Send Action, use the Add party LINKs... button to add one or more party pick up links to be sent.
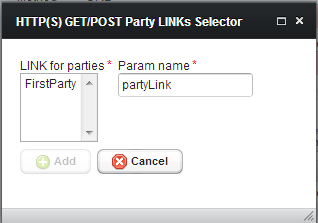
- For LINK for parties select one or more parties whose pick up LINK you'd like to send out. If multiple parties are selected, you will get multiple 'param name' params sent.
- For Param name select the name of the parameter that will be used. It defaults to 'partyLink'.
Click the Add button to add the selected parties' pick up LINKs to be sent out. Click Cancel to not add any party links.
When you need to cancel a transaction (now or in the future), skip a document, skip a document for a party, skip a party step in your workflow, redo a previously completed party, redo a document for a previously completed party, or activate a party step ahead of its normal workflow sequence, use the Change tran/party status action. Click the Add status change button 
Change the Status change type to 'Cancel transaction':
- For Status change type choose 'Cancel transaction'.
- For # specify the number of Cancel time units before the transaction is canceled. This has no meaning for Now or Forever cancel times.
- For Cancel time choose when the transaction should be canceled. If you select Now, the transaction will be canceled when this action takes place. You can specify a future date so it will cancel automatically in the future if it's not completed or the cancel transaction is turned off later.
- For Reason spec provide a reason (it can include field specifications
${ }for variable substitution) why the transaction is being canceled. The reason appears in the transaction activity log. - If you'd like to change the default retention (as set in the transaction template for production/test modes) for a canceled transaction, check Retention after cancel and choose a new retention value that will be applied if the transaction is canceled. This is generally used to remove new transactions that do not get past the first party or otherwise never reach a state where the transaction cannot be completed in a timely manner. This retention value will apply if the transaction is canceled or until another 'Cancel transaction' action or 'Clear cancel transaction' action is done.
If you set a future date for a transaction to auto-cancel if it has not yet completed, you can clear the auto-cancel requested earlier. This also clears any changed retention setting for canceled transactions. This is often done when you want a transaction to auto-cancel if the first party does not complete the documents in a specified amount of time, but if they do complete it, then you want it to go forward normally and no longer need to complete within the original timeframe.
- For Status change type choose 'Clear cancel transaction'.
- For Reason spec provide a reason (it can include field specifications
${ }for variable substitution) why the transaction is no longer going to be canceled. The reason appears in the transaction activity log.
Allows you to suspend a transaction. A suspended transaction will not progress until resumed, but unlike a canceled transaction, it's not considered "done." You can use reports to search for suspended transactions to resume them manually. If you also perform an Error or Warning message action when the document party completes the document, the transaction will be suspended, but the document will not be completed. This allows that party to resume where the party left off if it's later resumed, often by picking it up again via the To Do list.
- For Status change type choose 'Suspend transaction'.
- For Reason spec provide a reason (it can include field specifications
${ }for variable substitution) why the transaction is being suspended. The reason appears in the transaction activity log.
Allows you to resume a suspended transaction. Once resumed, it will be at the last workflow step (party and document) that was in progress when it was suspended.
- For Status change type choose 'Resume suspended transaction'.
- For Reason spec provide a reason (it can include field specifications
${ }for variable substitution) why the transaction is being resumed. The reason appears in the transaction activity log.
Change the Status change type to 'Skip document':
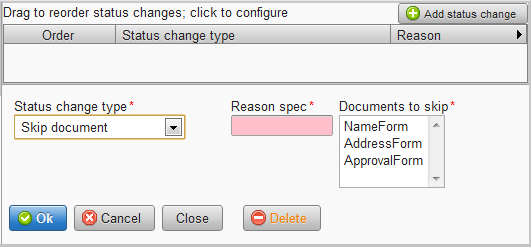
- For Status change type choose 'Skip document'.
- For Reason spec provide a reason (it can include field specifications
${ }for variable substitution) why the document is being skipped. The reason appears in the transaction activity log. - For Documents to skip select one or more documents to skip.
Click the Ok button to keep your changes, or click Cancel.
Click the Close button to close the transaction/party status change window.
Click the Delete button to delete the selected action.
Note that you can do multiple status change actions using this view.
Change the Status change type to 'Skip document party':
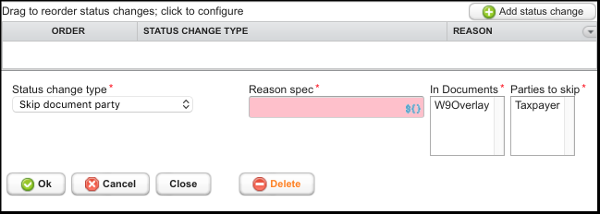
- For Status change type choose 'Skip document party'.
- For Reason spec provide a reason (it can include field specifications
${ }for variable substitution) why the document is being skipped for the specified party. The reason appears in the transaction activity log. - For In Documents select one or more documents.
- For Parties to skip select one or more parties to be skipped for the specified document(s).
Click the Ok button to keep your changes, or click Cancel.
Click the Close button to close the transaction/party status change window.
Click the Delete button to delete the selected action.
Note that you can do multiple status change actions using this view.
Change the Status change type to 'Skip party':
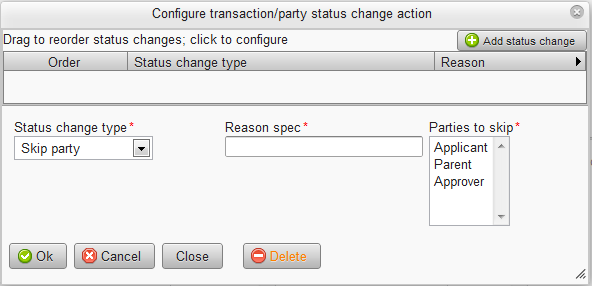
- For Status change type choose 'Skip party'.
- For Reason spec provide a reason (it can include field specifications
${ }for variable substitution) why the party is being skipped. The reason appears in the transaction activity log. - For Parties to skip select one or more parties to skip.
Click the Ok button to keep your changes, or click Cancel.
Click the Close button to close the transaction/party status change window.
Click the Delete button to delete the selected action.
Note that you can do multiple status change actions using this view.
Tip: To save your changes, you will want to click the Ok button on the custom logic rule as well as click the Save button for the package.
If a party needs to be activated before it normally would be activated in party sequence, you can use this action to activate a party. Generally this is used for "final step" parties who will access the transaction for review purposes only.
Change the Status change type to 'Activate party':
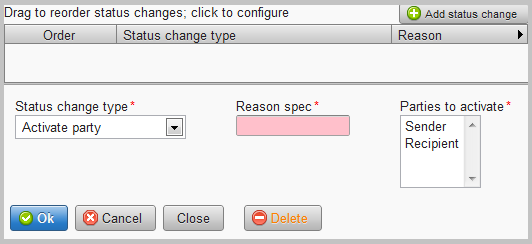
- For Status change type choose 'Activate party'.
- For Reason spec provide a reason (it can include field specifications
${ }for variable substitution) why the party is being activated (out of the normal party order). The reason appears in the transaction activity log. - For Parties to skip select one or more parties to skip.
Click the Ok button to keep your changes, or click Cancel.
Click the Close button to close the transaction/party status change window.
Click the Delete button to delete the selected action.
Note that you can do multiple status change actions using this view.
Tip: To save your changes, you will want to click the Ok button on the custom logic rule as well as click the Save button for the package.
Change the Status change type to 'Redo document party':
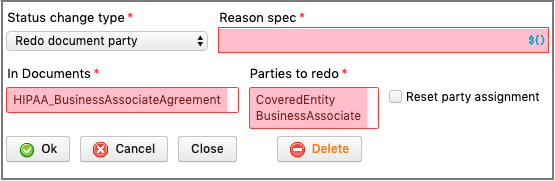
- For Status change type choose 'Redo document party'. You use this to request that a prior completed party redo a document to correct or otherwise make a change before resubmitting it.
- For Reason spec provide a reason (it can include field specifications
${ }for variable substitution) why the document is being redone for the specified party. The reason appears in the transaction activity log. - For In Documents select one or more documents.
- For Parties to redo select one or more parties to be redone for the specified document(s). Normally, the "rejecting" party is also specified to be redone along with the party who originally completed the document. This allows the prior completed party to redo the document, and then the party who rejected it to confirm the redone work is acceptable.
- Check Reset party assignment only when the parties being re-done aren't necessarily the same persons who originally acted in the parties' roles. It effectively resets any user, To Do group and email address previously assigned to the selected parties to redo. Leave this unchecked if the same person should re-do the work for the respective parties.
Typically, this action is only done on the "party completed" event for the "rejecting" party who has requested that a prior party redo one or more documents. You may only mark a completed party for redo. The original completed party pickup code/${LINK} will change status to "Transferred for redo" and a new party link will be created to control the redo effort.
Click the Ok button to keep your changes, or click Cancel.
Click the Close button to close the transaction/party status change window.
Click the Delete button to delete the selected action.
Note that you can do multiple status change actions using this view.
Change the Status change type to 'Redo party':
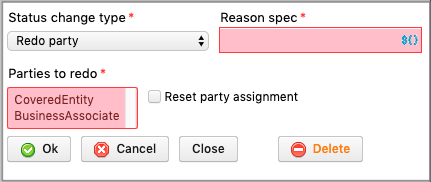
- For Status change type choose 'Redo party'. You use this to request that a prior completed party redo all documents to correct or otherwise make a change before resubmitting them.
- For Reason spec provide a reason (it can include field specifications
${ }for variable substitution) why the party is being redone. The reason appears in the transaction activity log. - For Parties to redo select one or more parties to redo. Normally, the "rejecting" party is also specified to be redone along with the party who originally completed its step. This allows the prior completed party to redo all documents, and then the party who rejected it can confirm the redone work is acceptable.
- Check Reset party assignment only when the parties being re-done aren't necessarily the same persons who originally acted in the parties' roles. It effectively resets any user, To Do group and email address previously assigned to the selected parties to redo. Leave this unchecked if the same person should re-do the work for the respective parties.
Typically, this action is only done on the "party completed" event for the "rejecting" party who has requested that a prior party redo one or more documents. You may only mark a completed party for redo. The original completed party pickup code/${LINK} will change status to "Transferred for redo" and a new party link will be created to control the redo effort.
Click the Ok button to keep your changes, or click Cancel.
Click the Close button to close the transaction/party status change window.
Click the Delete button to delete the selected action.
Note that you can do multiple status change actions using this view.
Tip: To save your changes, you will want to click the Ok button on the custom logic rule as well as click the Save button for the package.
When you need to display a message or report a custom data validation error, the show error/message action can be used. For data validations, you should use this action in a rule that specifies the Party review document event.
If you report an error or warning on the review step, the user will not be able to complete the document until it is fixed so it no longer matches the condition specified with this action. You can also only highlight fields when doing an error or warning to call attention to the field.
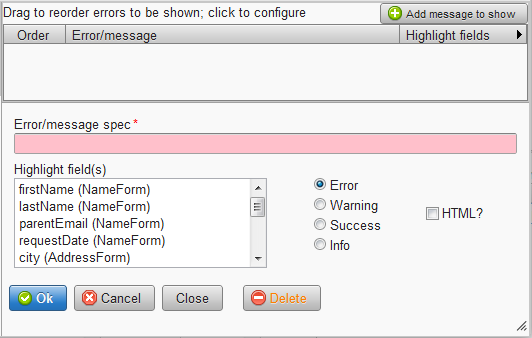
- For Error/message spec enter the message or error to show the user. It may contain field specifications (${}).
- Choose the message type: Error, Warning, Success or Info.
- Check HTML? if the error/message is in HTML format already (contains HTML tags). Leave it blank normally.
Click the Ok button to keep your changes, or click Cancel.
Click the Close button to close the show error/message actions window.
Click the Delete button to delete the selected action.
Note that you can show multiple messages at the same time using this view.
Tip: To save your changes, you will want to click the Ok button on the custom logic rule as well as click the Save button for the package.
When you need to charge a credit card using your PayPal Web Site Pro or Payflow Pro account, use the PayPal credit card charge action. Click the Add PayPal charge button 
Use the Show on failure option to display a payment error to the party (typically on the package event "Party completed document") so the party can try again rather than have the party be completed for the document.
This action depends on which PayPal API you are using. For PayPal Web Site Pro (DoDirectPayment NVP API), you must configured the Property Set named PayPal_NVP_API with properties for LogNVP, PWD, SIGNATURE, USER and URL that are part of the PayPal NVP API service. For the PayPal PayFlow Pro API, you must configure the Property Set named ** PayPal_Payflow_Pro_API** with properties for LogNVP, PWD, USER, VENDOR, PARTNER and URL. There's a corresponding "_TEST" property that is used for test transactions and is generally pointed to the PayPal Sandbox where testing can take place without actually doing a credit card charge. (When you order either service from PayPal so you can charge cards directly, you will be given a PWD, SIGNATURE and USER to authenticate the DoDirectPayment API calls or will use PayPal Manager to setup your Payflow API and ensure the money is credited to your account.)
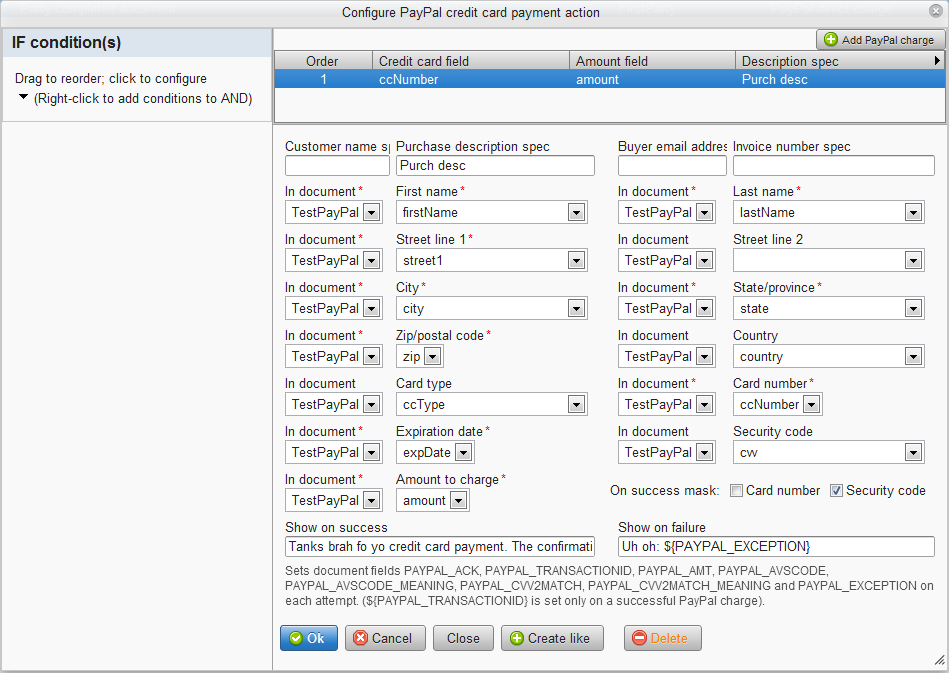
- For Customer name spec enter a fixed value or a field specification of the customer name (like the company name, not the billing name, though it can be the same). This sets the CUSTOM param in the API. It is optional.
- For Purchase description spec enter a fixed value or a field specification of the item that has been purchased. This sets the DESC param in the PayPal DoDirectPayment NVP API or the COMMENT1 and ORDERDESC param in the Payflow API. It is optional and will default to "Online sale" if not specified.
- For Buyer email address spec enter a fixed value or a field specification of the buyer's email address This sets the EMAIL param API. It is optional.
- For Invoice number spec enter a fixed value or a field specification of your invoice/order number that goes with this sale. This sets the INVNUM param in the API. It is optional and will default to the transaction id.
For all of the following fields, the user should enter the billing information, not their personal information, so that it matches the names and addresses associated with their credit card. They are required unless noted otherwise.
- For In document and First name select the document and field that contains the billing first name.
- For In document and Last name select the document and field that contains the billing last name.
- For In document and Street line 1 select the document and field that contains the billing street address (line 1).
- For In document and Street line 2 select the document and field that contains the billing street address (line 2). This is optional.
- For In document and City select the document and field that contains the billing city.
- For In document and State/province select the document and field that contains the billing state or province.
- For In document and Zip/postal code select the document and "Zip code" field that contains the billing zip code or postal code.
- For In document and Country select the document and field that contains the billing country (2-letter code). It is optional and defaults to "US". You may want to use the standard drop down ESF_Countries or a modified version of this list. These fields are not used in Payflow.
- For In document and Card type select the document and field that contains the credit card type (Visa, MasterCard, Amex, Discover). It is optional and defaults to a calculated value based on the the card number. A standard drop down named ESF_PayPal_CardTypes has these for easy use. Note that American Express requires a separate agreement with PayPal and American Express to offer it. These fields are not used in Payflow.
- For In document and Card number select the document and "credit card number" field that contains the credit card number. For PCI compliance, it is recommend that this value be masked on review as well as overwritten on successful payment so that it is not stored.
- For In document and Expiration date select the document and "date" field that contains the credit card expiration date in MM/YYYY format. The date formats allow for this type of entry. A party can select any day of the month if using date selector. Normally for this field, you'll want the MM/YYYY that assumes that last day of the month.
- For In document and Security code select the document and field that contains the credit card security id (aka CCV or CVV), a 3-4 digit number printed on the card itself (on the front for American Express, and on the back otherwise). It is optional, but may be required to successfully do a charge to prove that the card was present for the online purchase. This field should also be masked on review and must be masked out on successful payment because PCI compliance requires that it not be stored once the payment is done.
- For In document and Amount to charge select the document and "money" field that contains the amount to be charged. PayPal has a default max of $10,000 that is allowed.
- For On success mask we recommend you check both the Card number and Security code since they are not needed after the charge and PCI compliance generally requires it.
- For Show on success enter a message (with field specs if desired) that will be displayed after a successful payment is made.
- For Show on failure enter an error message (with field specs if desired) that will be displayed if there's an error with the charge. Showing an error message on failure when done under an event like "Party reviewed document" or "Party completed document", the party will see the error and be allowed to fix it and try again.
- For PayPal API choose either Payflow Pro API or DoDirectPayment API as you have signed up for with PayPal.
On a successful payment, the PAYPAL_TRANSACTIONID field will be set with the transaction id (not to be confused with the eSignForms transaction id related to your completed form) returned. It will be blank on error.
On error (no charge takes place), the PAYPAL_EXCEPTION field will be set with the error returned by PayPal. It will be blank on success.
For the DoDirectPayment API: additional fields set from the PayPal response include PAYPAL_ACK, PAYPAL_AMT, PAYPAL_AVSCODE and PAYPAL_CVV2MATCH. In addition, two related fields are set with more meaningful values using PAYPAL_AVSCODE_MEANING and PAPAL_CVV2MATCH_MEANING.
For the Payflow API: additional fields set from the PayPal response include PAYPAL_RESULT, PAYPAL_RESPMSG, PAYPAL_AMT, PAYPALPNREF, PAYPAL_RESPTEXT, PAYPAL_AUTHCODE, PAYPAL_AVSADDR, AVSZIP, and PAYPAL_CVV2MATCH. In addition, three related fields are set with more meaningful values using PAYPAL_AVSADDR_MEANING, PAYPAL_AVSZIP_MEANING and PAPAL_CVV2MATCH_MEANING.
Click the Ok button to keep your changes, or click Cancel.
Click the Close button to close the PayPal payment actions window.
Click the Delete button to delete the selected action.
Note that you can do multiple charges at the same time using this view.
Tip: To save your changes, you will want to click the Ok button on the custom logic rule as well as click the Save button for the package.
The default behavior for all parties who do not have access to upload files is to view/download all previously uploaded files. Just as all subsequent parties see all data fields, they are also required to view all attached files. This action can be used to change that behavior when it's not desired.

- In In document select the document where the file upload field is defined.
- In File field select the File Upload field to change.
- In Party select the party whose access is being changed. Note that when configuring this action in the custom logic of a document, a given document party could be mapped to more than one package party, so it's possible this action will apply to more than one package party at runtime.
- Select either Make view/download optional if the party will not be required to view/download the files, or Block view/download if the party should not be allowed to view/download the files.
Click the Ok button to keep your changes, or click Cancel.
Click the Close button to close the Change File field action window.
Click the Delete button to delete the selected action.
Note that you can set multiple parties and file upload fields to skip at the same time using this view.
Tip: To save your changes, you will want to click the Ok button on the custom logic rule as well as click the Save button for the package.
When you need to set a timer to trigger a future action, or to cancel an existing named timer, or to cancel all timers, use the Set/cancel timer action. Click the Add timer action button 
Change the Timer type to 'Set timer':
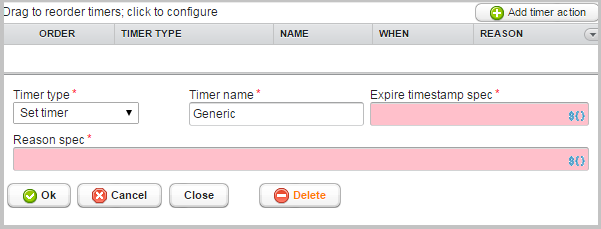
- For Timer type choose 'Set timer'.
- For Timer name specify the name for this timer. The name is not case sensitive. You may use this name to reset the timer in another 'Set timer action' using the same name, or you can use it to cancel the timer.
- For Expire timestamp spec specify a date-time field specification
${ }that holds the date-time the timer should expire, or use literals like +1 to mean 1 day from now. Time values like 'now' and '+0' or any negative time specification will cause the timer to fire soon after. Note that a timer will not necessarily fire exactly at the specified time, but it should fire within a minute of the time specified. - For Reason spec provide a reason (it can include field specifications
${ }for variable substitution) why the timer is being set. The reason appears in the transaction activity log.
Change the Timer type to 'Cancel timer':
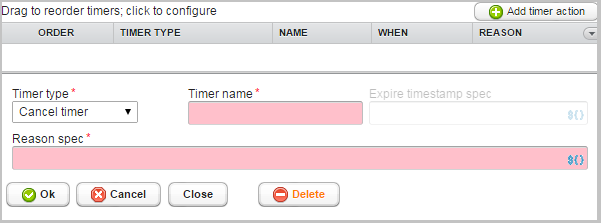
- For Timer type choose 'Cancel timer'.
- For Timer name specify the name for a previously set timer. The name is not case sensitive.
- For Reason spec provide a reason (it can include field specifications
${ }for variable substitution) why the timer is being canceled. The reason appears in the transaction activity log.
Change the Timer type to 'Cancel all timers':
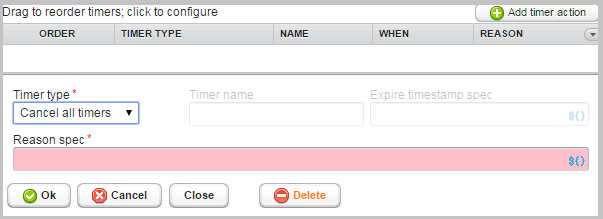
- For Timer type choose 'Cancel all timers'.
- For Reason spec provide a reason (it can include field specifications
${ }for variable substitution) why all timers are being canceled. The reason appears in the transaction activity log.
Sometimes a field is only required if some other field is set to a given value. In this case, configure the field itself as optional, and then add a Condition+Action as follows:
Assume a checkbox named 'cb'. If checked, then a general field named 'other' is required, otherwise it's optional.
- In the field specification, make 'other' optional so it doesn't force it to be required.
- Create a rule for the event "Party review document".
- Add the action "Show error/message".
- Right-click on the AND condition of the Action to add a "Comparison" check. Select the 'cb' field and check if it's equal to its checked value (by default it's 'Y'): cb EQUALS Y
- Right-click on the AND condition to add an "All fields blank" condition and specify the field 'other'. These two conditions basically mean: IF the 'cb' checkbox is checked AND the 'other' field is blank, THEN display an error message saying it's required.
- Next, set the error message to show the user to have them complete the field.
- Mark this as an error or warning so that it will block the party from going into review mode when it's displayed.
- Select the 'cb' and 'other' fields to highlight them to call attention to why the "required error" is being displayed.
By default, all fields in your documents are fully encrypted and can only be accessed by a given package party in a transaction. However, often you may want some fields to be available for reports or shown in the To Do queue. For these reasons, you can map fields from the package to report fields.
Each time a transaction is saved (updated by a package party), all of the field mappings are applied so that reports will have the latest field values.
This also lets you map various fields that may be named "SSN", "SocialSecurityNumber", "so_sec_no" or "Tax_ID" to a single report field name so that you can create a report that essentially merges all such fields into a single report field. Use care when mapping such fields so that you map them to a common set of report fields and don't create multiple report fields that really have the same meaning.
Click on the Report field templates button 
Click the Map report fields button on the package version to set up mappings to report fields.
Click on the Map new report field button 
Click on the Remove invalid mappings button 
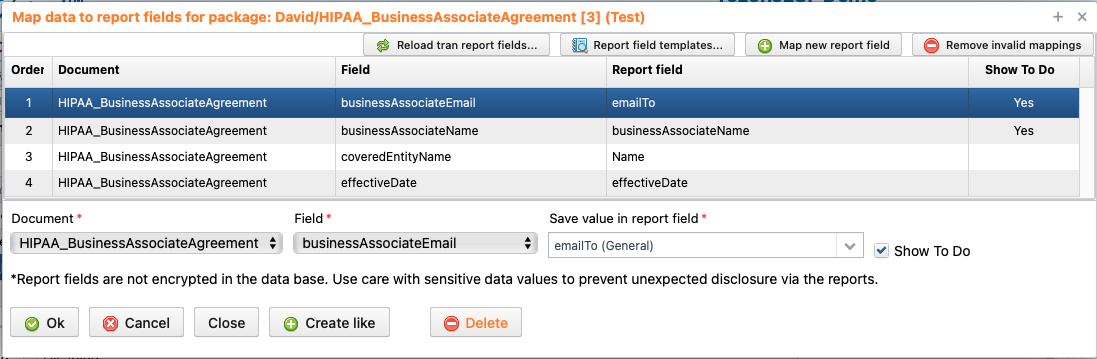
You can drag to re-order existing field mappings to control the order they will appear in the To Do listing. Otherwise, the order does not matter.
- In the Document drop down select the document from the package where the field to be mapped resides.
- In the Field drop down select the field in the selected document to map to a report field.
- In the Save value as report field drop down, select an existing report field that applies. If no such report field exists, type a new name (a + will appear before the name to indicate it's being created new if not already present) to create a new report field with an appropriate type.
- Check Show To Do to have this field appear in the To Do queue for internal users who will process transactions this way.
Click the Ok button to keep your changes (you will need to do this if you re-order fields, too). Otherwise click Cancel to discard them.
Click Close to close the data field mapping window.
Click Delete to delete the selected field mapping.
You can also click the Reload tran report fields button 
Note, too, that you can update the report field mappings and reload transactions that use a given package version at any time, including updating the current production version as well as older versions. Report fields do not change the processing logic and thus can be modified at any time, not just for test versions.
Tip: To save your changes, remember to click the Save button for the package.
To manually reload report fields for existing transactions using the current field mappings, click the Reload tran report fields button from the package's map report fields window.
This will find all matching transactions, and then reload all defined report fields in its related package version. If you have previous package versions and you need transactions based on the older package version to also be reloaded, be sure you have mapped the fields in those package versions as well. If you update multiple package versions, you only need to run the reload once (not once per package version).
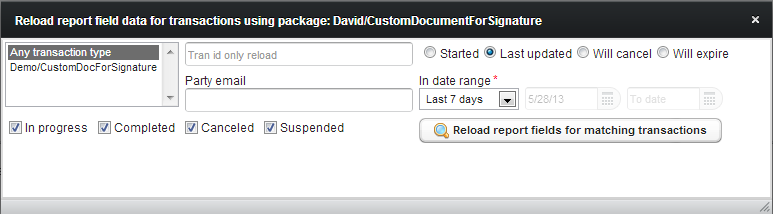
- Select which transaction type(s) should be reloaded. Only those transactions you have access to and which use this package are listed.
- If your current mode is PRODUCTION: Live, this will reload production transactions, otherwise it will reload test transactions.
- Select the type of date and date range to limit which transactions are reloaded.
- In Tran id only reload enter a single transaction id to reload only that one specific transaction. Otherwise leave it blank.
- In Party email enter the email address of a party to limit the reload to just those transactions. Otherwise leave it blank.
- Check In progress to reload transactions that are in progress.
- Check Completed to reload transactions that are already completed.
- Check Canceled to reload transactions that are canceled.
- Check Suspended to reload transactions that are suspended.
Click the Reload report fields for matching transactions button to begin the reload.
Note that this process can take a long time based on the number of transactions that will match your selection criteria. (This process includes first finding all matching transactions, then loading each one, decrypting all of its data, parsing its XML structure, and then running the field mapping specifications.) Whenever possible, define all report field mappings before you start transactions, and if you do create new mappings later, attempt to limit the number of transactions that must be reloaded. You only need to reload them if you have reports or To Do transactions that otherwise show a blank field because the mapping was not in place when those transactions were last updated.
When you import a package configuration, all previous documents, parties, etc. are removed from the package and replaced by the imported configuration.
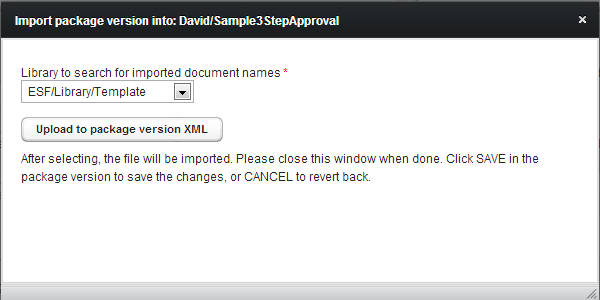
First, select the default library in your system where documents in the package are already defined. When a document is imported, the system will first look for the document in this library. If it's not found, it will attempt to scan your libraries for a matching document name.
Click the Upload package version XML to select the package version XML file on your computer to upload. Review the messages after the import and then close the window to return to the package configuration.
Tip: To save your changes, remember to click the Save button for the package.