A Hackintosh project implementing the MacHyperVSupport package for Windows Hyper-V, built on top of the OpenCore bootloader and OCE-Build build manager.
![]()
Refer to the CHANGELOG or SemVer board for changes implemented per release version.
Supported versions below include macOS versions 10.4 to 14.0.
Note
Installations of OS X Tiger (10.4) to Lion (10.7) are not possible directly. It is recommended to first install a newer version of macOS and restore to the desired version using a disk image provided by Acidanthera.
You can also find other past InstallAssistant.dmg archives on Archive.org.
| macOS Version | Status | Minimum version | Maximum version | |
|---|---|---|---|---|
|
|
✅ | Supported. | (None) |
(Latest) |
|
|
✅ | Supported. | (None) |
(Latest) |
|
|
✅ | Supported. | (None) |
(Latest) |
|
|
✅ | Supported. | (None) |
(Latest) |
|
|
✅ | Supported. | (None) |
(Latest) |
|
|
✅ | Supported. | (None) |
(Latest) |
|
|
✅ | Supported. | (None) |
(Latest) |
|
|
✅ | Supported. | (None) |
(Latest) |
|
|
✅ | Supported. | (None) |
(Latest) |
|
|
✅ | Supported. | (None) |
(Latest) |
|
|
✅ | Supported. | (None) |
(Latest) |
|
|
✅ | Supported. | (None) |
(Latest) |
|
|
✅ | Supported. | (None) |
(Latest) |
|
|
✅ | Supported. | (None) |
(Retail) |
|
|
✅ | Supported. | (None) |
(Retail) |
|
|
✅ | Supported. | (None) |
(Retail) |
Refer to HyperV-versions.md for a complete breakdown of macOS compatibility with Windows Client, Server, and Hyper-V versions.
If you opt to use one of the pre-built releases from this repository, you can skip to 3. Setting up Hyper-V.
To clone this repository, run the below command:
git clone https://github.com/Qonfused/OSX-Hyper-V
cd OSX-Hyper-VThis project uses OCE-Build to automatically version and build this repository's EFI.
Important
To run powershell scripts, you may need to set your execution policy using:
Set-ExecutionPolicy RemoteSigned
To build this project's EFI, run one of the below commands at the root of the project:
# Build for macOS 10.8 and newer
scripts\build.ps1

# Build for macOS 10.7 and older
scripts\build.ps1 --legacy

# Build for macOS 10.4 - 10.5, 10.6 if running in 32-bit mode
scripts\build.ps1 --legacy --32-bitNote
MacHyperVSupport requires Windows Server 2012 R2 / Windows 8.1 or higher. Windows Server 2016 is currently unsupported.
First check that you've enabled Hyper-V before proceeding.
- You can enable the Hyper-V role by running the below command in PowerShell as administrator:
Enable-WindowsOptionalFeature -Online -FeatureName Microsoft-Hyper-V -All
- After rebooting, you can check that you've successfully enabled Hyper-V by running:
Get-WindowsOptionalFeature -Online -FeatureName Microsoft-Hyper-V
Tip
After building or downloading this project's EFI, you can run the create-virtual-machine.ps1 script to quickly bootstrap a new virtual-machine (to skip the below steps).
For example:
$ cd ~/Downloads/EFI-1.0.0-64-bit-DEBUG # Scripts are packaged with releases

# Use the latest version of macOS (cpu=2 cores, ram=8 GB, size=50 GB)
$ scripts\create-virtual-machine.ps1 -name "My New Virtual Machine"

# Use an older version of macOS (cpu=4 cores, ram=16 GB, size=128 GB)
$ scripts\create-virtual-machine.ps1 -name "Catalina" -version 10.15 -cpu 4 -ram 16 -size 128
Below outline the steps to manually create a new virtual machine for macOS:
Format a small (1GB) FAT32 disk initialized with GPT (GUID partition table) and mount it. This will serve as the boot partition for your macOS virtual machine and contain the OpenCore EFI folder.
- Choose one of three ways of creating VHD/VHDX disks:
-
(A) Hyper-V Manager - Navigate to
Action > New > Hard Disk.
- Hard disks are located under
C:\ProgramData\Microsoft\Windows\Virtual Hard Disks\. - You can mount a VHD/VHDX disk by right clicking on the file and selecting
Mount. - You can unmount by right-clicking on the mounted disk and selecting
Eject.
- Hard disks are located under
-
(B) Disk Management - Navigate to
Action > Create VHD.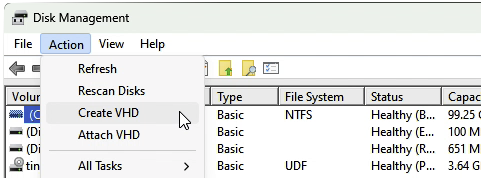
- Make sure to initialize the disk as GPT and create a new FAT32 partition.
- You can mount a VHD/VHDX disk with
Action > Attach VHD. - You can unmount by right-clicking on the volume and selecting
Detach VHD.
-
(C) Powershell - Create a new VHD/VHDX disk with the
New-VHDcommand.(Powershell command)
# Run this command in PowerShell as Administrator

$vhdpath = "$env:USERPROFILE\Desktop\EFI.vhdx"
$vhdsize = 1GB
$vhdpart = "GPT"
$vhdfs = "FAT32"
New-VHD -Path $vhdpath -Dynamic -SizeBytes $vhdsize |
  Mount-VHD -Passthru |
  Initialize-Disk -PartitionStyle $vhdpart -Confirm:$false -Passthru |
  New-Partition -AssignDriveLetter -UseMaximumSize |
  Format-Volume -FileSystem $vhdfs -Confirm:$false -Force
-
Move the EFI folder (the whole folder) to the root of the VHDX disk.
- You should be left with an
EFI/folder at the root of your EFI VHDX disk.
Create or add an installer disk with either of the below methods:
- (A) Download a BaseSystem or Recovery image file directly from Apple using macrecovery.py:
- Follow the Dortania-Guide for steps on downloading macOS installer images.
- Move both
.chunklistand.dmgfiles downloaded by macrecovery to your EFI VHDX disk under a new folder namedcom.apple.recovery.boot. You should be left with both anEFI/andcom.apple.recovery.boot/folder at the root of your EFI VHDX disk.
- (B) Convert a DMG installer to a VHDX disk with
qemu-img:- If you already have a DMG installer for macOS (e.g. on Sierra and older), you can convert the installer image to a VHDX disk directly by running qemu-img with the command:
qemu-img.exe convert -f raw -O vhdx InstallMacOSX.dmg InstallMacOSX.vhdx
- If you already have a DMG installer for macOS (e.g. on Sierra and older), you can convert the installer image to a VHDX disk directly by running qemu-img with the command:
In the Hyper-V Manager, navigate to Action > New > Virtual Machine.
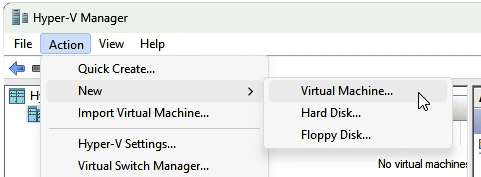
Configure the below options while going through the wizard:
- Specify Generation: Choose
Generation 2. - Assign Memory: Allocate at least
4096 MB(recommended is8192 MBfor Big Sur and newer). - Configure Networking: Choose the default network switch.
- Connect Virtual Hard Disk: Name and select the size of the disk to install macOS on.
Once created, right click on your new virtual-machine (under the 'Virtual Machines' section of the window), and select Settings.
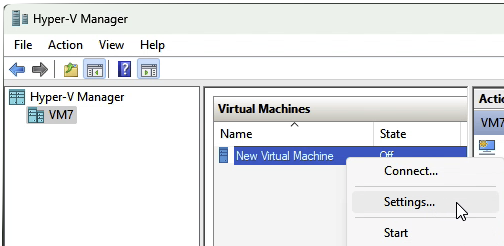
Then configure the below options under the Hardware section:
- Navigate to 'Security' and uncheck
Enable Secure Boot(disable). - Navigate to 'SCSI Controller' and add a new hard drive for your EFI VHDX (and installer VHDX if applicable).
- You'll need to attach your EFI VHDX with a location value of
0and change the location value for your main virtual hard disk to a different value (e.g.1or2). This is to ensure that the EFI disk is the first disk in the boot order.
- You'll need to attach your EFI VHDX with a location value of
Installation of macOS should fall in line with the Installation Process section of the Dortania Guide. Some additional post-install sections are provided to facilitate with Hyper-V (or project) specifics.
There are some known limitations with the base configuration for Hyper-V:
- Display Resolution
- The default virtual display resolution is set to a 1024x768 resolution and is not resizable.
- Graphics Acceleration
- By default, macOS will run without graphics acceleration using VESA graphics drivers (CPU). Additionally, display graphics is limited to 3 MB of video memory.
- GPU acceleration is possible through Discrete Device Assignment (DDA) using a supported GPU, however there exist a couple major caveats:
- AMD GPUs (particularly Navi and older GPUs) generally have poor compatibility with macOS through DDA. Natively supported NVIDIA GPUs (using driver v465 or later on Windows) tend to have the best results.
- GPU patching with Lilu and WhateverGreen is currently not supported (refer to #2299 for tracking). This also applies to other kexts like NootedRed/NootedRX that use Lilu.
- Audio Support
- By default, Hyper-V does not expose an audio device to macOS.
Note
DDA is only available for Windows Server and Microsoft Hyper-V Server versions 2016 and newer. Windows Pro and Windows Enterprise users have no support for DDA with Hyper-V.
To enable iServices functionality, you can:
- Generate SMBIOS data with GenSMBIOS
- Follow the Dortania iServices guide to generate new SMBIOS data for your machine.
- For local builds of this EFI, patch existing SMBIOS data automatically.
- This is automatically patched each time you run a build using the .serialdata file (using existing data or data generated by GenSMBIOS).
- Refer to the .serialdata.example file for an example of the entry format.
Contributions of any size to this project are always welcome!
Refer to CONTRIBUTING.md for instructions (and tips) on making contributions to this project.
- @Goldfish64 for creating and maintaining MacHyperVSupport and it's supporting documentation.