Unit Testing with RestKit
RestKit includes a number of helpful classes to aid in the process of testing your object mappings and loaders. The testing support has no external dependencies and has no opinion about what testing library you use, except that you should definitely be using one.
This guide focuses on the Xcode integrated SenTestingKit support as the lowest common denominator but the classes themselves will work fine under any harness.
NOTE - The testing classes are available as of 0.10.0. This document is current as of version 0.20.0
This guide assumes that you have either already integrated RestKit into your iOS app or are familiar with the installation process. If you need to first tackle installation, please visit the Installation Guide.
Before you can get started testing your RestKit utilization, you are first going to need an Xcode Testing Target.
If you have just created your project, then checking the "Include Unit Tests" checkbox during project creation will suffice to provision the necessary target.

Once Xcode has finished building your project, you'll need to configure the Header Search Path to include the RestKit headers. To do so:
- Switch to the Project Navigator via the View > Navigators > Show Project Navigator menu item.
- Click on your project's name to reveal the Project / Targets editor in Xcode's main editing pane.
- Select the Build Settings tab along the top of Xcode's main editing pane.
- Input "header search paths" into the search bar on the top right of Xcode's main editing pane to filter the Build Settings. Double click on the Header Search Paths setting to reveal the editing sheet. Click the + button to add a new entry, input
"$(BUILT_PRODUCTS_DIR)/../../Headers"and type enter to save the entry. Click outside of the dialog to dismiss it and save the entry.

If you have an existing project without a Tests target, you'll need to add a new one. To do so:
- Switch to the Project Navigator via the View > Navigators > Show Project Navigator menu item.
- Click on your project's name to reveal the Project / Targets editor in Xcode's main editing pane.
- Click on Add Target button at the bottom of the screen to reveal the Target template selection sheet. Select the iOS > Other > Cocoa Touch Unit Testing Bundle and click Next.
- Give your new Target a reasonable name and hit Finish.
- Xcode will now select your new target and navigate you to the Build Phases tab within the Project / Targets editor. Click the disclosure triangle next to the Target Dependencies section header to open the Target Dependencies list editor.
- Click the + button to open the Target Selection sheet, select your main application target, and click Add.
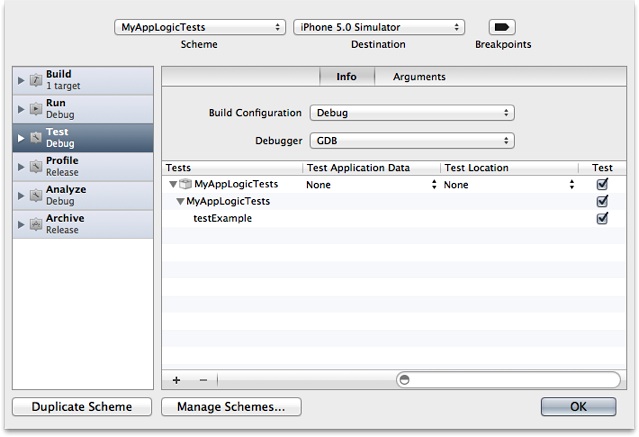
- Go to Schema Toolbar, choose Edit Scheme... and select your main app in the Scheme. This is the scheme you use to run the test cases that are part of the unit-test target. The Test action of the new scheme identifies the unit-test target, and lists the test suites and test cases the scheme runs.
Add your test target to this scheme
- Now select the Build Settings tab along the top of Xcode's main editing pane.
- Input "bundle loader" into the search bar on the top right of Xcode's main editing pane to filter the list of Build Settings. Double click on Bundle Loader and input
"$(BUILT_PRODUCTS_DIR)/YOUR_APP_NAME_HERE.app/YOUR_APP_NAME_HERE", appropriately substituting YOUR_APP_NAME_HERE with the actual name of your app. In the example case, the app name isRKTestingExample, so the value for the Bundle Loader setting configured as$(BUILT_PRODUCTS_DIR)/RKTestingExample.app/RKTestingExample. Type enter to dismiss the dialog. - Clear the search text and replace it with "test host". Double click on the Test Host setting to reveal the editing sheet and enter
$(BUNDLE_LOADER)into the text field, then type enter to dismiss the dialog. - Clear the search text and replace it with "header search paths". Double click on the Header Search Paths setting to reveal the editing sheet. Click the + button to add a new entry, input
"$(BUILT_PRODUCTS_DIR)/../../Headers"and type enter to save the entry. Click outside of the dialog to dismiss it and save the entry.


If you installed RestKit with CocoaPods, you have to do the following additional steps:
- Ensure that you have included the
RestKit/Testingsubspec in your Podfile. The testing classes are not included with the default RestKit installation. - Ensure that your Framework Search Paths includes
$(inherited). If no entry exists, click the + button to add a new entry and input$(inherited)and type enter to save the entry. Click outside of the dialog to dismiss it and save the entry. - Ensure that your Header Search Paths includes
$(inherited) - Ensure that your Library Search Paths includes
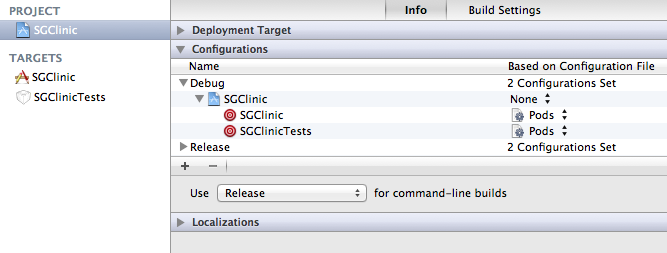
$(inherited) - Ensure that your Test Target is configured to use the CocoaPods Configuration File. To do so, go to Project > Info > Configurations > change
Based on Configuration FiletoPods. Like this:
Before diving into the testing, verify that everything is configured properly. To do so, create a new unit test file and import the RestKit testing interfaces:
- Select the File menu > New > File… (or hit Command + N) to open the new file template selection sheet.
- Highlight the Cocoa Touch section underneath the iOS heading in the left hand pane of the sheet.
- Select the template labeled Objective-C test case class and hit the Next button.
- Give your test class a name and select the appropriate directory to store the new class, then hit the Create button.
- Open the newly created test class and add the following imports:

	#import <RestKit/RestKit.h>
#import <RestKit/Testing.h>- Select the Product > Test menu (or hit Command + U). Build activity should kick off compiling RestKit, your application, and then the unit testing target.
Now that you have configured your application's unit testing target, you are prepared to begin unit testing your RestKit integration.
A good habit to form when working with RestKit's object mapping system is to collect sets of example data that represent realistic snapshots of the kind of information your application will need to process. These files can be added to your unit testing target as Test Fixtures and then fed into RestKit to verify your mappings are configured appropriately. Because the fixtures are added to the testing target, they will never make it into your main application bundle to clutter things up and bloat your app size.
To create a fixture, you must author or download the JSON/XML you wish to use and then add it to your target. For example, let's pretend that we wish to do some testing on the following payload:
{ "article": {
    "title": "RestKit Unit Testing",
    "author": "Blake Watters",
    "tags": ["RestKit", "testing", "tutorials"],
    "created_at": "03/01/2012"
  }
}
Let's add this fixture to your project so we can perform some testing:
- Create a new Group under your Tests group in Xcode to organize the fixtures by control clicking on the group in Xcode and selecting New Group from the context menu. Set the name of the new groups to Fixtures.
- Create a new file within the group by control clicking on the Fixtures group and selecting the Other > Empty template within Xcode.
- Hit the Next button and the File creation sheet will slide in.
- Create a new folder under your target's Tests directory named Fixtures.
- Select the newly created Fixtures directory and ensure that only the Tests target is checked in the Targets section of the sheet. Enter
article.jsonin the Save As: text field and hit Create. - Paste the JSON source into the new file using the Edit > Paste and Preserve Formatting menu.


You now have a simple JSON fixture added to your test target.
Once fixtures have been added to your testing target, we will need to determine the Bundle Identifier for the testing target so that we can access the fixtures within our tests. If you have not made any significant changes to your testing target's Build Settings configuration, then the bundle identifier will follow a simple scheme and is easily determined:
- Click on the Project in the top left of the Xcode Project Navigator panel in the left-most pane of Xcode to reveal the Project and Targets editor.
- Click on your main application target and then click on the Summary tab in the top of Xcode's main editing pane.
- In the section labeled iOS Application Target you will see the Bundle Identifier. This is the Bundle Identifier for your application.
- Append Tests to the Bundle Identifier of your main target and you will have the Bundle Identifier for your Testing Target's Bundle.

Note - In the example application pictured, the app was configured with the org.restkit. company identifier and was named RKTestingExample, so the Bundle Identifier for the testing target is org.restkit.RKTestingExampleTests. Note that you can also manually override the Bundle Identifier for your test target by visiting the Build Settings > Info section within the Xcode target editor.
Now that fixtures have been added to the target and we have determined the bundle identifier for the testing bundle, we are ready to begin working with the fixtures within our tests. To do so, we will work with RestKit's RKTestFixture class (API Docs). RKTestFixture provides a simple static interface for retrieving resources within a designated fixture bundle. To configure the interface, we'll obtain a reference to our Testing Target's bundle and set it as the fixture bundle:
// NOTE: Replace org.restkit.RKTestingExampleTests with your target's bundle identifier
NSBundle *testTargetBundle = [NSBundle bundleWithIdentifier:@"org.restkit.RKTestingExampleTests"];
[RKTestFixture setFixtureBundle:testTargetBundle];
Once the testing bundle has been configured, we can leverage the RKTestFixture interface to easily access fixtures within the bundle:
// Read the contents of a fixture as a string
NSString *JSONString = [RKTestFixture stringWithContentsOfFixture:@"article.json"];

// Read the contents of a fixture as data
NSData *JSONData = [RKTestFixture dataWithContentsOfFixture:@"article.json"];

// Parse the contents of a fixture using the appropriate parser configured via RKParserRegistry
id parsedJSON = [RKTestFixture parsedObjectWithContentsOfFixture:@"article.json"];

// Determine the MIME Type of a fixture (will return @"application/json")
NSString *MIMEType = [RKTestFixture MIMETypeForFixture:@"article.json"];

// Read the contents of a fixture as an image
UIImage *image = [RKTestFixture imageWithContentsOfFixture:@"file.png"];Now that we can easily access test data via the RKTestFixture interface, we can begin unit testing our object mappings. To do so, we'll work with the RKMappingTest (API Docs) and RKPropertyMappingTestExpectation (API Docs) classes. RKMappingTest provides an interface for setting expectations about how an object mapping operation should transform data at a source keyPath into a new representation on a destination keyPath.
Let's take a look at an example:
@interface RKArticle : NSObject

@property (nonatomic, strong) NSString * title;
@property (nonatomic, strong) NSString * author;
@property (nonatomic, strong) NSArray * tags;
@property (nonatomic, strong) NSDate * createdAt;

@end#import <SenTestingKit/SenTestingKit.h>
#import <UIKit/UIKit.h>
#import <RestKit/RestKit.h>
#import <RestKit/Testing.h>
@interface RKArticleMappingTest : SenTestCase
@end
@implementation RKArticleMappingTest
- (void)setUp
{
// Configure RKTestFixture
NSBundle *testTargetBundle = [NSBundle bundleWithIdentifier:@"org.restkit.RKTestingExampleTests"];
[RKTestFixture setFixtureBundle:testTargetBundle];
}
- (RKObjectMapping *)articleMapping
{
RKObjectMapping *mapping = [RKObjectMapping mappingForClass:[RKArticle class]];
[mapping addAttributeMappingsFromDictionary:@{
@"article.title": @"title",
@"article.author": @"author",
@"article.tags": @"tags"
}];
return mapping;
}
- (void)testMappingOfTitle
{
id parsedJSON = [RKTestFixture parsedObjectWithContentsOfFixture:@"article.json"];
RKMappingTest *test = [RKMappingTest testForMapping:[self articleMapping] sourceObject:parsedJSON destinationObject:nil];
[test addExpectation:[RKPropertyMappingTestExpectation expectationWithSourceKeyPath:@"article.title" destinationKeyPath:@"title"]];
STAssertTrue([test evaluate], @"The title has not been set up!");
// or
STAssertNoThrow([test verify], @"The title has not been set up!");
}
@endIn this test case, we have configured RKTestFixture to fetch fixture data from within our testing bundled as discussed previously, then defined a simple object mapping for our example article data, and then actually performed a test by retrieving the article.json fixture from the bundle, configuring a single expectation, and verifying the mapping.
Internally, RKMappingTest is implemented by conforming to the RKMappingOperationDelegate (API Docs) protocol and instantiating an RKMappingOperation (API Docs) to perform the mapping expressed in the test. Each keyPath that is successfully mapped during the execution of the operation is recorded as an event. If mapping completes sucessfully, each expectation added to the mapping test is evaluated by searching for an event that satisfies the expectation. If any expectation is not satisfied, then the call to evaluate will return NO (or the call to verify will raise an exception) and Xcode will report a failure at the specific line.
In the example above, we have done the bare minimum amount of testing for our mappings by expecting that one keyPath in the source object was mapped onto another keyPath in an auto-created destination object. RKMappingTest provides two additional expectation primitives and support for specifying the destination object explicitly.
Let's examine another example:
// NOTE: setUp and articleMapping are omitted for brevity
@implementation RKArticleMappingTest

- (void)testMappingOfTitleWithValue
{
	id parsedJSON = [RKTestFixture parsedObjectWithContentsOfFixture:@"article.json"];
	RKMappingTest *test = [RKMappingTest testForMapping:[self articleMapping] sourceObject:parsedJSON destinationObject:nil];

	// Check the value as well as the keyPaths
	[test addExpectation:[RKPropertyMappingTestExpectation expectationWithSourceKeyPath:@"article.title" destinationKeyPath:@"title" value:@"RestKit Unit Testing"]];
	STAssertTrue([test evaluate], nil);
}

- (void)testMappingOfTitleUsingBlock
{
	id parsedJSON = [RKTestFixture parsedObjectWithContentsOfFixture:@"article.json"];
	RKMappingTest *test = [RKMappingTest testForMapping:[self articleMapping] sourceObject:parsedJSON destinationObject:nil];

	// Use a block to create arbitrary expectations
	[test addExpectation:[RKPropertyMappingTestExpectation expectationWithSourceKeyPath:@"article.title" destinationKeyPath:@"title" evaluationBlock:^BOOL(RKPropertyMappingTestExpectation *expectation, RKPropertyMapping *mapping, id mappedValue, NSError **error) {
            NSString *title = (NSString *)mappedValue;
            return [title hasPrefix:@"RestKit"];
    }]];
	STAssertTrue([test evaluate], nil);
}

- (void)testMappingToExplicitObject
{
	RKArticle *article = [RKArticle new];
	id parsedJSON = [RKTestFixture parsedObjectWithContentsOfFixture:@"article.json"];
	RKMappingTest *test = [RKMappingTest testForMapping:[self articleMapping] sourceObject:parsedJSON destinationObject:article];

	// Check the value as well as the keyPaths
	[test addExpectation:[RKPropertyMappingTestExpectation expectationWithSourceKeyPath:@"article.title" destinationKeyPath:@"title" value:@"RestKit Unit Testing"]];
	STAssertTrue([test evaluate], nil);
}

@endRKMappingTest is designed for extensibility. The block based expectations provide an easy customization path for your application's specific mapping needs. When combined with a category on the RKMappingTest class, one can build a library of expectations for easy re-use. Let's consider an example. Suppose that we wish to quickly verify that mappings occur into a collection class (either an NSArray or an NSSet), optionally verifying the count of objects mapped. We can extend RKMappingTest to include our new expectations like so:
@interface RKMappingTest (RKTestingExampleExpectations)

/**
 Adds an expectation that a mapping occurred between source and destination keyPath with a value that is either an NSSet or an NSArray

 @param sourceKeyPath A key path on the sourceObject that should be mapped from.
 @param destinationKeyPath A key path on the destinationObject that should be mapped to.
 */
- (void)expectMappingFromKeyPath:(NSString *)sourceKeyPath toCollectionAtKeyPath:(NSString *)destinationKeyPath;

/**
 Adds an expectation that a mapping occurred between source and destination keyPath with a value that is either an NSSet or an NSArray and has a specific number of objects in the mapped collection.

 @param sourceKeyPath A key path on the sourceObject that should be mapped from.
 @param destinationKeyPath A key path on the destinationObject that should be mapped to.
 @param count The number of objects the value is expected to contain.
 */
- (void)expectMappingFromKeyPath:(NSString *)sourceKeyPath toCollectionAtKeyPath:(NSString *)destinationKeyPath withCount:(NSUInteger)count;

@end
@implementation RKMappingTest (RKTestingExampleExpectations)
- (void)expectMappingFromKeyPath:(NSString *)sourceKeyPath toCollectionAtKeyPath:(NSString *)destinationKeyPath
{
[self addExpectation:[RKPropertyMappingTestExpectation expectationWithSourceKeyPath:sourceKeyPath destinationKeyPath:destinationKeyPath evaluationBlock:^BOOL(RKPropertyMappingTestExpectation *expectation, RKPropertyMapping *mapping, id mappedValue, NSError **error) {
return [mappedValue isKindOfClass:[NSArray class]] || [mappedValue isKindOfClass:[NSSet class]];
}]];
}
- (void)expectMappingFromKeyPath:(NSString *)sourceKeyPath toCollectionAtKeyPath:(NSString *)destinationKeyPath withCount:(NSUInteger)count
{
[self addExpectation:[RKPropertyMappingTestExpectation expectationWithSourceKeyPath:sourceKeyPath destinationKeyPath:destinationKeyPath evaluationBlock:^BOOL(RKPropertyMappingTestExpectation *expectation, RKPropertyMapping *mapping, id mappedValue, NSError **error) {
return ([mappedValue isKindOfClass:[NSArray class]] || [mappedValue isKindOfClass:[NSSet class]]) && [(NSArray *)mappedValue count] == count;
}]];
}
@end@implementation RKArticleMappingTest
- (void)testMappingOfTags
{
id parsedJSON = [RKTestFixture parsedObjectWithContentsOfFixture:@"article.json"];
RKMappingTest *test = [RKMappingTest testForMapping:[self articleMapping] sourceObject:parsedJSON destinationObject:nil];
[test expectMappingFromKeyPath:@"article.tags" toCollectionAtKeyPath:@"tags"];
STAssertTrue([test evaluate], nil);
}
- (void)testMappingOfTagsWithCount
{
id parsedJSON = [RKTestFixture parsedObjectWithContentsOfFixture:@"article.json"];
RKMappingTest *test = [RKMappingTest testForMapping:[self articleMapping] sourceObject:parsedJSON destinationObject:nil];
[test expectMappingFromKeyPath:@"article.tags" toCollectionAtKeyPath:@"tags" withCount:3];
STAssertTrue([test evaluate], nil);
}
@endIf you are the sort of developer who conforms to the one expectation per test pattern, RKMappingTest can be used to immediately evaluate an expectation. Consider another example:
@interface RKArticleMappingTest

- (RKMappingTest *)articleMappingTest
{
	id parsedJSON = [RKTestFixture parsedObjectWithContentsOfFixture:@"article.json"];
	RKMappingTest *articleTest = [RKMappingTest testForMapping:[self articleMapping] sourceObject:parsedJSON destinationObject:nil];
	return articleTest;
}

- (void)testMappingOfTitle
{
	STAssertTrue([[self articleMappingTest] evaluateExpectation:[RKPropertyMappingTestExpectation expectationWithSourceKeyPath:@"article.title" destinationKeyPath:@"title" value:@"RestKit Unit Testing"] error:nil], nil);
}

- (void)testMappingOfAuthor
{
	STAssertTrue([[self articleMappingTest] evaluateExpectation:[RKPropertyMappingTestExpectation expectationWithSourceKeyPath:@"article.author" destinationKeyPath:@"author" value:@"Blake Watters"] error:nil], nil);
}

- (void)testMappingOfTags
{
	// We add parenthesis around the array declaration because the macro that processes this syntax is currently broken for the new objective c literals.
	STAssertTrue([[self articleMappingTest] evaluateExpectation:[RKPropertyMappingTestExpectation expectationWithSourceKeyPath:@"article.tags" destinationKeyPath:@"tags" value:(@[ @"RestKit", @"testing", @"tutorials" ])] error:nil], nil);
}

@endThe RKMappingTest class is fully integrated with Core Data and uses an identical API for evaluating mapping results on attributes and relationships. In addition, the RKConnectionTestExpectation class is provided for evaluating the results of a Core Data relatiobship connection established during mapping.
To test against Core Data, a few properties must be configured appropriately on the RKMappingTest instance. These properties include:
-
managedObjectContext- A required reference to theNSManagedObjectContextin which the mapping test is to be executed. This context can have either theNSMainQueueConcurrencyTypeor theNSPrivateQueueConcurrencyType, but it is recommended that you test against a private queue for reasons explained later. -
dataSource- An instance ofRKManagedObjectMappingOperationDataSourceis required to be configured on the mapping test in order to support relationship connections, object deletion, and identification/creation of managed objects in relationships. -
managedObjectCache- An object that conforms to theRKManagedObjectCachingprotocol, such as an instance ofRKFetchRequestCacheorRKInMemoryManagedObjectCache.
To simplify configuration, you can opt to provide only a managedObjectContext and managedObjectCache and the mapping test object will configure itself with a data source and a RKFetchRequestCache. These defaults are suitable for most basic unit testing, but you can customize the configuration as appropriate for your needs.
One common task when working with Core Data models is testing that object identification is proceeding as expected. This can be trivially done using a RKMappingTest object. The general approach is to create a NSManagedObject that you expect to be match your identification attributes, configure its attributes appropriately, and then evaluate the mapping test against the JSON fixture you expect to satisfy the identification criteria.
Let's look at an example:
- (void)testManagedObjectIdentification
{
	RKManagedObjectStore *managedObjectStore = [RKTestFactory managedObjectStore];
        NSError *error = nil;
        [managedObjectStore addInMemoryPersistentStore:&error];
        [managedObjectStore createManagedObjectContexts];

	RKEntityMapping *entityMapping = [RKEntityMapping mappingForEntityForName:@"Article" inManagedObjectStore:managedObjectStore];
	entityMapping.identificationAttributes = @[ @"articleID" ];
	[entityMapping addAttributeMappingsFromDictionary:@{
		@"id":		@"articleID",
		@"title":	@"title"
	}];
	NSDictionary *articleRepresentation = @{ @"id": @1234, @"title": @"The Title" };
	RKMappingTest *mappingTest = [RKMappingTest testForMapping:entityMapping sourceObject:articleRepresentation destinationObject:nil];

	// Configure Core Data
	mappingTest.managedObjectContext = managedObjectStore.persistentStoreManagedObjectContext;

	// Create an object to match our criteria
	NSManagedObject *article = [NSEntityDescription insertNewObjectForEntityForName:@"Article" inManagedObjectContext:managedObjectStore.persistentStoreManagedObjectContext];
	[article setValue:@(1234) forKey:@"articleID"];

	// Let the test perform the mapping
	[mappingTest performMapping];

	STAssertEqualsObjects(article, mappingTest.destinationObject, @"Expected to match the Article, but did not");
}
Here we have leveraged the RKMappingTest to provide a convenient wrapper for executing a mapping operation and then asserted on the results. It is easy to extract the common mapping test configuration into a setUp or helper method, and then create derivative tests for all of the attributes, relationships, and connections used by your entities.
As mentioned previously, testing Core Data attributes and relationships uses the same common interface as the non-managed examples presented earlier. If you are leveraging RestKit's support for connecting relationships, then an additional expectation is available for testing the connections.
Imagine that your 'Article' entity is associated with a number of 'Category' entities and they are represented within the JSON as an array of numeric ID's:
{ "articleID": 1234, "title": "Core Data Connections", "category_ids": [1,2,3,4] }RestKit provides a means for establishing a relationship between these entities at mapping time through the RKConnectionDescription class (API Docs). With a connection object, you describe how your entities are related via dictionary of attributes wherein the dictionary keys correspond to attributes on the source entity (in this case, the 'Article') and the values correspond to attributes of the destination (in this case, the 'Category'). During mapping, RestKit will connect the specified relationship by finding all objects in which the source and destination attributes correspond exactly.
To test these connections, the testing module includes the RKConnectionTestExpectation class (API Docs), which is capable of verifying that the specified relationship was connected to the appropriate objects using the expected attributes dictionary.
Let's take a look at using this expectation:
- (void)testManagedObjectRelationshipConnection
{
	RKManagedObjectStore *managedObjectStore = [RKTestFactory managedObjectStore];
	RKEntityMapping *entityMapping = [RKEntityMapping mappingForEntityForName:@"Article" inManagedObjectStore:managedObjectStore];
	entityMapping.identificationAttributes = @[ @"articleID" ];
	[entityMapping addAttributeMappingsFromDictionary:@{
		@"id":				@"articleID",
		@"title":			@"title",
		@"category_ids":	@"categoryIDs"
	}];

	// Add a connection from our Article's list of `categoryIDs` to all Category objects with a matching `categoryID`
	[entityMapping addConnectionForRelationship:@"categories" connectedBy:@{ @"categoryIDs": @"categoryID" }];

	NSDictionary *articleRepresentation = @{ @"id": @(1234), @"title": @"The Title", @"category_ids": @[ @(1), @(2), @(3), @(4) ] };
	RKMappingTest *mappingTest = [RKMappingTest testForMapping:entityMapping sourceObject:articleRepresentation destinationObject:nil];

	// Configure Core Data
	mappingTest.managedObjectContext = managedObjectStore.persistentStoreManagedObjectContext;

	// Create Category objects to match our criteria
	NSManagedObject *category_1 = [NSEntityDescription insertNewObjectForEntityForName:@"Category" inManagedObjectContext:managedObjectStore.persistentStoreManagedObjectContext];
	[category_1 setValue:@(1) forKey:@"categoryID"];
	[category_1 setValue:@"Hacking" forKey:@"title"];

	NSManagedObject *category_2 = [NSEntityDescription insertNewObjectForEntityForName:@"Category" inManagedObjectContext:managedObjectStore.persistentStoreManagedObjectContext];
	[category_2 setValue:@(2) forKey:@"categoryID"];
	[category_2 setValue:@"Objective-C" forKey:@"title"];

	NSManagedObject *category_3 = [NSEntityDescription insertNewObjectForEntityForName:@"Category" inManagedObjectContext:managedObjectStore.persistentStoreManagedObjectContext];
	[category_3 setValue:@(3) forKey:@"categoryID"];
	[category_3 setValue:@"RestKit" forKey:@"title"];

	NSManagedObject *category_4 = [NSEntityDescription insertNewObjectForEntityForName:@"Category" inManagedObjectContext:managedObjectStore.persistentStoreManagedObjectContext];
	[category_4 setValue:@(4) forKey:@"categoryID"];
	[category_4 setValue:@"Cocoa" forKey:@"title"];

	// Configure an expectation for our connection
	[mappingTest addExpectation:[RKConnectionTestExpectation expectationWithRelationshipName:@"categories" attributes:@{ @"categoryIDs": @"categoryID" } value:[NSSet setWithObjects:category_1, category_2, category_3, category_4, nil]]];

	BOOL success = [mappingTest evaluate];
	STAssertTrue(success, @"Expected connection to be satisfied, but was not.")
}Up to this point we have been focused on unit testing by working with fixture data available within our application's unit testing bundle. This is a great way to test the low level details of object mapping, but what happens once we begin leveraging RestKit's object mapping engine within the context of an RKObjectRequestOperation HTTP request/response cycle? As object request operation's are NSOperation subclasses, they are trivially testable using the waitUntilFinished method or by using an NSOperationQueue and invoking waitUntilAllOperationsAreFinished. These methods will block execution of the current thread while the asynchronous HTTP and object mapping activities happen on a secondary thread. Once the operation has completed, the operation will yield control back to the main thread and allow the test to continue execution.
Let's take a look at an example, again using our article.json fixture:
- (void)testArticleObjectRequestOperation
{
	RKResponseDescriptor *responseDescriptor = [RKResponseDescriptor responseDescriptorWithMapping:articleMapping pathPattern:@"/article.json" keyPath:nil statusCodes:[NSIndexSet indexSetWithIndex:200]];
	NSURL *URL = [NSURL URLWithString:@"http://localhost:4567/article.json"];
	NSURLRequest *request = [NSURLRequest requestWithURL:URL];
	RKObjectRequestOperation *requestOperation = [[RKObjectRequestOperation alloc] initWithRequest:request responseDescriptors:@[ responseDescriptor ]];

	[requestOperation start];
	[requestOperation waitUntilFinished];
	STAssertTrue(requestOperation.HTTPRequestOperation.response.statusCode == 200, @"Expected 200 response");
	STAssertEquals([requestOperation.mappingResult count], (NSUInteger)1, @"Expected to load one article");
}
It is important to note that you typically do not want to use completion blocks when unit testing object request operations. This is because the completion block is dispatched asynchronously on the calling thread, so your test expectations will fire before the completion block has been invoked. There are various strategies and asynchronous testing libraries available in the iOS space (see support in Expecta, Kiwi, etc), but they are outside the scope of this article. In general, you will want to unit test directly against the response, mappingResult, and error properties of the object request operation.
The astute reader may have noticed in the test case above that the RKObjectLoader instance initialized for testing targets localhost on port 4567. This is the default port number for Sinatra, an excellent and very simple DSL for creating web applications in Ruby. Within the RestKit framework's own unit tests, we leverage Sinatra to serve test fixtures and to construct responses for specific test cases. We recommend doing testing against some sort of web server that is isolated from your backend environment and find Sinatra to be an excellent choice. Feel free to pick an alternate server in the language of your choice, but we offer the examples below to highlight how easy Sinatra is to work with from RestKit tests:
# RestKit Sinatra Testing Server
# Place at Tests/server.rb and run with `ruby Tests/Server.rb` before executing the test suite within Xcode

require 'rubygems'
require 'sinatra'
require 'json'

configure do
  set :logging, true
  set :dump_errors, true
  set :public_folder, Proc.new { File.expand_path(File.join(root, 'Fixtures')) }
end

def render_fixture(filename)
  send_file File.join(settings.public_folder, filename)
end

# Creates a route that will match /articles/<category name>/<article ID>
get '/articles/:category/:id' do
  render_fixture('article.json')
end

# Return a 503 response to test error conditions
get '/offline' do
  status 503
end

# Simulate a JSON error
get '/error' do
  status 400
  content_type 'application/json'
  "{\"error\": \"An error occurred!!\"}"
end
In the above example, we have done a couple of things:
- Configured Sinatra to serve our test fixtures stored in the Tests/Fixtures directory. All files placed in the directory become immediately available from the server. This enables us to use
RKTestResponseLoaderto access the same fixtures we previously used for our mapping unit tests. - Defined an offline route at /offline. When we send a GET request to /offline, Sintra will send us back a 503 (Service Unavailable) response. We can use to check how the application behaves when the backend is offline or unavailable.
- Defined an error route at /error. When we issue a GET request to /error, Sintra will send us back a response with a 400 status code containing a JSON fragment with dummy error content. We can use this route to test how our application handles error conditions.
In addition to mapping tests and response loaders, RestKit also includes the RKTestFactory class to streamline common tasks every developer must face when authoring tests. The test factory provides a simple, static method interface for tasks such as:
- Setting up and tearing down framework & application state. RestKit relies on a number of shared instance objects. In order to guarantee isolation between test cases, these instances must be reset between tests.
- Initialization of common objects. The factory provides a global configuration point for the baseURL of all client and object manager instances it initializes on your behalf.
- Working from a clean persistent store when testing Core Data components.
Let's take a look at some example code highlighting how to work with the test factory:
@interface RKTestFactoryExamples : SenTestCase
@end

@implementation RKTestFactoryExamples

- (void)setUp
{
	[RKTestFactory setUp];
}

- (void)tearDown
{
	[RKTestFactory tearDown];
}

- (void)testSharedSingleton
{
	AFHTTPClient *client = [RKTestFactory client];
	STAssertNotNil(client, nil);
}

- (void)testTearDownOfSharedObjectManager
{
	STAssertNil([RKObjectManager sharedManager], nil);
}

- (void)testPersistenceToObjectStore
{
	RKManagedObjectStore *objectStore = [RKTestFactory managedObjectStore];
	RKArticle *article = [NSEntityDescription insertNewObjectForEntityForName:@"Article" inManagedObjectContext:objectStore.mainQueueManagedObjectContext];
	article.title = @"Whatever";
	STAssertNoThrow([objectStore.mainQueueManagedObjectContext saveToPersistentStore:nil], nil);
}

- (void)testIsolationOfTestCases
{
	// Create a new Core Data store
	[RKTestFactory managedObjectStore];
	STAssertEqualsValue(0, [RKArticle count]);
}

@end
Out of the box, the test factory provides support for instantiating AFHTTPClient, RKObjectManager, and RKManagedObjectStore instances for you. During tear down, all shared singletons are disposed of. This provides adequate management of the RestKit framework level state, but what about your application's own data model concepts? To make things easy, RestKit provides a few optional callbacks into the factory for the application developer. Let's take a look at some more code:
#import "RKTestFactory.h"

#import <RestKit/Testing.h>
#import "RKArticle.h"
#import "RKUser.h"
@interface RKTestFactory (AppExtensions)

/**
  Create and return an RKArticle object for use in tests.
 */
+ (RKArticle *)article;

+ (void)load;

@end

@implementation RKTestFactory (AppExtensions)

// Perform any global initialization of your testing environment
+ (void)load
{
	// This is a great place to configure your test bundle
	NSBundle *testTargetBundle = [NSBundle bundleWithIdentifier:@"org.restkit.RKTestingExampleTests"];
	[RKTestFixture setFixtureBundle:testTargetBundle];

	// Or set logging levels for your tests
	RKLogConfigureByName("RestKit/ObjectMapping", RKLogLevelDebug);

	[self setSetupBlock:^{
		// Maybe clear the cache between tests?
		[RKTestFactory clearCacheDirectory];
	}];

	[self setTearDownBlock:^{
		// Perform any actions you'd like to occur when [RKTestFactory tearDown] is invoked
		// Clear out the current User in our data model
		[RKUser setCurrentUser:nil];
	}];

	/**
	 Define a new Factory from a block

	 You can now build an article by invoking `[RKTestFactory objectFromFactory:@"Article"]` or `[RKTestFactory sharedObjectFromFactory:@"Article"]`. The `sharedObjectFromFactory:` will return the same object across multiple invocations within a single `setUp` and `tearDown` pair.
	 */
	[self defineFactory:@"Article" withBlock:^id {
		RKManagedObjectStore *objectStore = [RKTestFactory managedObjectStore];
		RKArticle *article = [NSEntityDescription insertNewObjectForEntityForName:@"Article" inManagedObjectContext:objectStore.mainQueueManagedObjectContext];
		article.title = @"RestKit Unit Testing";
		article.body = @"This is some great text.";

		return article;
	}];
}

@end