编译、链接和装载 #47
Comments
延伸阅读
|
编译器的
|
关于静态库、动态库和 framework1. 静态库(Static Libraries)什么是目标文件(object file)? 使用 目标文件有四种形式:
如果你编译一个没有 main 函数的 C 源代码文件,得到的结果就是一个 relocatable 的目标文件。 多个目标文件可以被归档成一个
另外,如果这个 延伸阅读: 2. 动态库(Dynamic Libraries)动态库也是由目标文件打包而成的,它可以被加载到内存中非固定的地址,并且内存中的程序可以在加载时或者运行时链接这些动态库。 MacOS 上的动态链接器(Dynamic Linker)dyld 专门负责这些动态链接。 MacOS 上的动态库一般以 相比于静态库是在编译时由静态链接器静态链接的,动态库是在加载时或者运行时由动态链接库动态链接的。 动态库具有静态库不具备的一些优点,比如上面提到的那几点——内存中的多个程序库可以共享同一个动态库;动态库更新后不需要更新可执行文件。 虽然动态库更新后不需要更新可执行文件,但是你需要考虑 API 的向后兼容。 3. Frameworks and Their StructureFramework 实际上是一个包装各种资源的文件夹,其中包含了 images, xibs, dynamic libraries, static libraries, documentation files, localization files 等文件。 Framework 的目录结构:
4. Linking vs Embedding Frameworks in Xcode在 Xcode 的 target->build settings 中有
参考延伸阅读 |
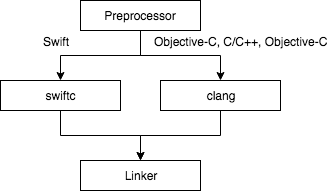
Xcode Build System一、Language Processing System我们平时在开发应用程序时都是用高级语言编写代码的,但是计算机硬件执行只认识机器代码,所以我们需要一个机制将高级语言编写的源代码文件转成二进制可执行文件,这就是 Language Processing System 所做的工作。 在 iOS 和 MacOS 应用开发中也有一个专门的 Language Processing System,叫做 Xcode Build System。 二、Xcode Build Systemlanguage processing systems 一般包括以下 5 个部分:
1. 预处理预处理就是把你写的代码转成编译器可以处理的源代码,主要工作是替换宏定义、分析依赖和解析预处理命令(比如 Swift 编译器没有预处理器,当然,在 Swift 项目中也看不到宏。 在 Xcode 面板中有一个 preprocess 的选项可以查看 Objective-C 代码被预处理后的结果。 2. 编译器编译过程实际上就是将 C/C++、Objective-C 这种高级语言的代码翻译成机器代码的过程。 Xcode 中有两种不同的编译器,一种是 Swift 的编译器,另一种是 C 家族语言的编译器。 clang 是苹果官方提供的专门用来编译 C 家族语言的编译器,而负责编译 Swift 的编译器是
编译器一般分为两个部分:
什么是符号? 3. 汇编器汇编器负责将汇编代码转成机器代码,也就是可重定位目标文件。 Mac OS 上的目标文件就是我们经常所说的 Mach-O 文件。 4. 链接器链接器负责将汇编器生成的目标文件和库合并成一个 Mach-O 可执行文件。 链接器只接受两种形式的输入源:
链接器生成的 Mach-O 文件和汇编阶段产生的 Mach-O 文件有什么区别吗? 5. 加载器加载器实际上是操作系统的一部分,加载器将一个程序(也就是可执行文件)加载到内存中并且执行它,加载器会为程序的执行申请空间,并将寄存器设置为初始状态。 参考 |

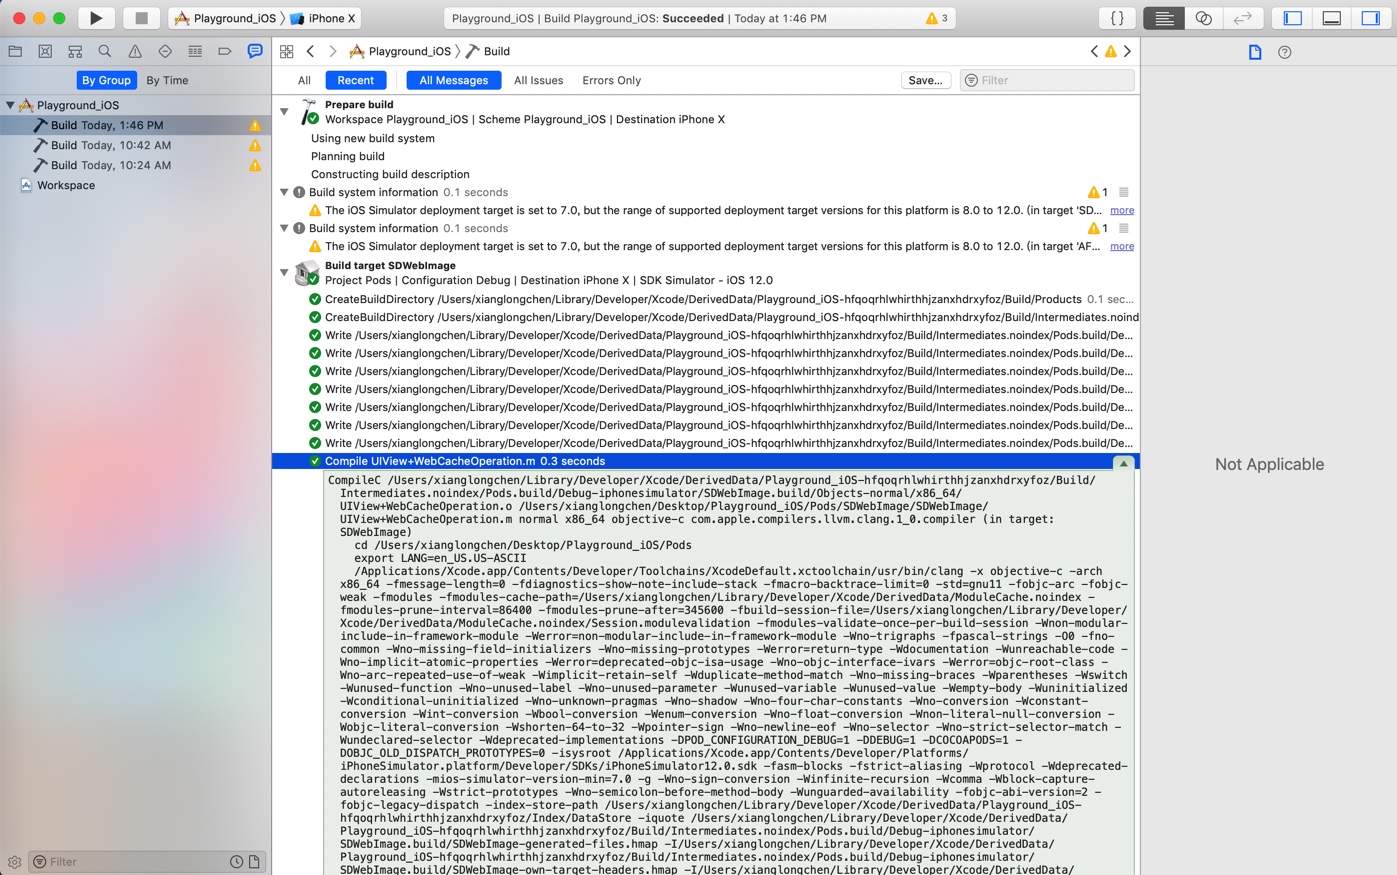
Xcode Build Process一、build 日志在 Xcode 的
每一行任务就是一个 task,每个 task显示的信息有状态、任务名、耗时,点击最右边的箭头,可以展开每条任务的执行细节。类似这种格式: 可以看到上面的任务细节中其实就是由很多条 shell 命令组成的,包括
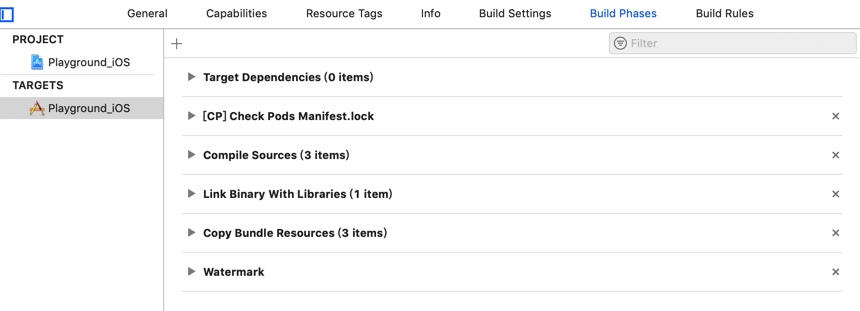
二、build 流程设置1. Build PhasesBuild Phases 从一个高层面上展示了整个构建过程,我们可以在 Build Phases 里设置各个 Phases 的配置项,也可以新加一个或者多个 Build Phase。
上图中所示的工程一共有 5 个 Phases,build 时会按照其指定的顺序执行:
自定义 Build Phases就像 CocoaPods 所做的那样,我们可以添加自定义的 Phases,自定义 Build Phases 可以用来执行脚本、拷贝资源等等。 2. Build RulesBuild Rules 用来指定不同文件类型分别应该如何被编译。通常情况下,我们不需要修改默认的规则,但是如果你想为一些新的文件类型添加自定义处理,你可以添加新的编译规则。 3. Build Settings在 Build Settings 中,我们可以设置每一个具体的 build 任务的细节。 Build Settings 中提供的选项非常丰富,涉及到了 build 的每个阶段,从编译到链接再到代码签名和打包。 更详细介绍的见 Xcode Build System Guide(最新版的 Build Settings Reference 可以在 Xcode Help中查看: 1. In Xcode, choose Help > Xcode Help, or open the Xcode Help website.2. Search for “build settings.”)。
三、Project 文件和 Workspace
我们在前面所讨论的所有设置最终都会被保存到 Xcode Project 文件中去,Xcode Project 文件的格式是 平时我们基本上不会去看这个 我们可以把这个 下面是一个示例项目的 可以看到这个 当你需要自动添加文件到 Xcode 工程中来时,可能就需要好好了解一下这个
参考
|
The Compiler一、编译器做了什么?预处理(Preprocessing) -> 扫描(Tokenization/Lexing) -> 语法分析(Parsing) -> 语义分析(Static Analysis) -> 源代码优化 -> 代码生成 -> 目标代码优化 1. 预处理(Preprocessing)宏替换 2. 扫描(Tokenization/Lexing)源文件内容如下: 使用下面的命令提取标记: $ clang -Xclang -dump-tokens hello.m结果如下: 3. 语法分析(Parsing)4. 语义分析(Static Analysis)
5. 代码生成6. 目标代码优化
二、实践应用1. 使用 libclang 或者 clang 插件打造你自己的 clang
2. 借助 LibTooling 自己写一个代码分析器参考
|
Mach-O 可执行文件这篇文章主要了介绍以下两点:
注:这篇文章的讨论和示例不使用 Xcode,只使用命令行。 准备工作:Xcode 工具链xcrun 是 Xcode 基本的命令行工具,使用 xcrun 可以调用其他工具。 比如查看 clang 的版本,我们可以执行下面的命令: $ xcrun clang -v而不是: $ clang -v如果要使用某个工具,直接执行那个工具的命令就行了,为什么要使用
如果你的电脑上只安装了一个 Xcode,就没必要使用 一、不使用 IDE 来实现一个 Hello World使用 clang 编译一个简单的 Hello World 小程序,然后就可以直接执行最后生成的 编写 helloworld.c: #include <stdio.h>
int main(int argc, char *argv[])
{
printf("Hello World!\n");
return 0;
}然后使用 clang 将该文件编译成一个 Mach-O 二进制文件 $ xcrun clang helloworld.c
$ ./a.out最终可以看到终端上输出了 这个 二、编译器是如何工作的在上面的例子中,我们所选用的编译器是 clang,编译器在将 编译器处理的几个步骤:
1. 预处理这个过程主要是对源代码进行标记拆分、宏展开、 使用下面的命令可以看到 $ xcrun clang -E helloworld.c我们也可以将输出的结果在文本编辑器中打开: $ xcrun clang -E helloworld.c | open -f最后得到的预处理结果大概有 542 行: 与处理结果中那些
2. 编译这个过程主要是对预处理后的代码进行语法分析、语义分析,并生成语法树(AST),然后再翻译成中间代码,并优化代码,最后再针对不同平台生成对应的代码,并转成汇编代码。 我们可以使用下面的命令生成汇编代码: $ xcrun clang -S -o - helloworld.c | open -f生成的汇编代码如下: 以
最后的
3. 汇编汇编的过程就是将汇编代码翻译成机器代码,生成目标文件。 当你用 Xcode 构建你的 iOS App 时,你可以在你的项目的 Derived Data 目录下找到一个 4. 链接链接器负责将各个目标文件和库合并成一个完整的可执行文件。在这个过程中,链接器需要解析各个目标文件和库之间的符号引用。
链接器在链接时就会把所有的目标文件(在我们这个例子中就是 二、可执行文件一个可执行文件中包含多个不同的 segment,,一个 segment 又包含一个或多个 section。 我们可以使用 下面是 当我们运行可执行文件时,系统会把各个 segment 映射到进程的地址空间中,在映射时,各个 segment 和 section 被分配不同的属性,也就是权限。 我们来看看各个 segment 和 section 的具体含义:
1. Section Content我们可以使用 otool 查看目标文件中指定 section 的内容: 得到的结果如下: 上面的机器代码几乎没办法看懂,不过我们可以使用 otool 来查看反汇编后的代码: 得到的结果如下: 2. Mach-OMach-O 是 Mach object file 格式的缩写,Mach-O 是一种可执行文件,Mac OS 上的可执行文件都是 Mach-O 格式的。 使用下面的命令可以查看一下 我们可以使用 otool 查看可执行文件的 Mach-O header: 得到的结果如下: ncmds 和 sizeofcmds 表示的是加载命令(load commands),可以通过 找到 load command 指定了每一个 segment 和每个 section 的内存地址以及权限保护。 下面是 这段代码的 三、一个更复杂的例子我们现在有三个文件,Foo.h、Foo.m 和 helloworld.m,如下。 Foo.h: #import <Foundation/Foundation.h>
@interface Foo : NSObject
- (void)run;
@endFoo.m: #import "Foo.h"
@implementation Foo
- (void)run
{
NSLog(@"%@", NSFullUserName());
}
@endhelloworld.m: #import "Foo.h"
int main(int argc, char *argv[])
{
@autoreleasepool {
Foo *foo = [[Foo alloc] init];
[foo run];
return 0;
}
}1. 编译分别编译 Foo.m 和 helloworld.m 这两个文件: $ xcrun clang -c Foo.m
$ xcrun clang -c helloworld.m
得到两个目标文件: $ file Foo.o helloworld.o
Foo.o: Mach-O 64-bit object x86_64
helloworld.o: Mach-O 64-bit object x86_64为了能够得到一个可执行文件,我们需要将这两个目标文件以及 Foundation 框架链接起来: xcrun clang helloworld.o Foo.o -Wl,`xcrun --show-sdk-path`/System/Library/Frameworks/Foundation.framework/Foundation我们会得到一个最终的可执行文件 $ ./a.out
2019-02-02 17:27:18.207 a.out[4181:265495] ShannonChen2. 符号解析和链接
什么是符号? 每一个我们定义的或者用到的函数、全局变量和类都是符号。 在链接时,链接器会解析各个目标文件以及库之间的符号,每个目标文件都有一个符号表来说明它的符号。 我们可以使用工具 $ xcrun nm -nm helloworld.o
(undefined) external _OBJC_CLASS_$_Foo
(undefined) external _objc_autoreleasePoolPop
(undefined) external _objc_autoreleasePoolPush
(undefined) external _objc_msgSend
0000000000000000 (__TEXT,__text) external _main
然后,我们再看看目标文件 xcrun nm -nm Foo.o
(undefined) external _NSFullUserName
(undefined) external _NSLog
(undefined) external _OBJC_CLASS_$_NSObject
(undefined) external _OBJC_METACLASS_$_NSObject
(undefined) external ___CFConstantStringClassReference
(undefined) external __objc_empty_cache
0000000000000000 (__TEXT,__text) non-external -[Foo run]
0000000000000060 (__DATA,__objc_const) non-external l_OBJC_METACLASS_RO_$_Foo
00000000000000a8 (__DATA,__objc_const) non-external l_OBJC_$_INSTANCE_METHODS_Foo
00000000000000c8 (__DATA,__objc_const) non-external l_OBJC_CLASS_RO_$_Foo
0000000000000110 (__DATA,__objc_data) external _OBJC_METACLASS_$_Foo
0000000000000138 (__DATA,__objc_data) external _OBJC_CLASS_$_Foo在这里, 当这两个目标文件和 Foundation 库链接时,链接器就会根据上面的这些符号表解析目标文件中的符号,解析成功后就能知道这个符号的地址了。 最后,我们再看看最终生成的可执行文件的符号表信息: xcrun nm -nm a.out
(undefined) external _NSFullUserName (from Foundation)
(undefined) external _NSLog (from Foundation)
(undefined) external _OBJC_CLASS_$_NSObject (from libobjc)
(undefined) external _OBJC_METACLASS_$_NSObject (from libobjc)
(undefined) external ___CFConstantStringClassReference (from CoreFoundation)
(undefined) external __objc_empty_cache (from libobjc)
(undefined) external _objc_autoreleasePoolPop (from libobjc)
(undefined) external _objc_autoreleasePoolPush (from libobjc)
(undefined) external _objc_msgSend (from libobjc)
(undefined) external dyld_stub_binder (from libSystem)
0000000100000000 (__TEXT,__text) [referenced dynamically] external __mh_execute_header
0000000100000e90 (__TEXT,__text) external _main
0000000100000f10 (__TEXT,__text) non-external -[Foo run]
0000000100001138 (__DATA,__objc_data) external _OBJC_METACLASS_$_Foo
0000000100001160 (__DATA,__objc_data) external _OBJC_CLASS_$_Foo我们可以看到,跟 Foundation 和 Objective-C runtime 相关的符号依然是 undefined 状态(这些需要在加载程序进行动态链接时来解析),但是这个符号表中已经有了如何解析这些符号的信息,也就是从哪里可以找到这些符号。 比如,符号 而且,可执行文件知道去哪里找到这些需要参与链接的动态库: $ xcrun otool -L a.out
a.out:
/System/Library/Frameworks/Foundation.framework/Versions/C/Foundation (compatibility version 300.0.0, current version 1555.10.0)
/usr/lib/libSystem.B.dylib (compatibility version 1.0.0, current version 1252.200.5)
/System/Library/Frameworks/CoreFoundation.framework/Versions/A/CoreFoundation (compatibility version 150.0.0, current version 1555.10.0)
/usr/lib/libobjc.A.dylib (compatibility version 1.0.0, current version 228.0.0)这些 undefined symbols 会在运行时被动态链接器 3. dyld 的共享缓存有些应用程序可能会用到大量的 framework 和动态库,这样在链接时就会有成千上万的符号需要解析,从而影响链接速度。 为了缩短这个流程,在 macOS 和 iOS 上会针对每个架构,预先将所有的动态库链接成一个库,缓存到 参考 |
ABI (Application Binary Interface)1. 什么是 ABI2. ABI vs. API3. Swift ABI 稳定性意味着什么参考 |
.pbxproj文件The text was updated successfully, but these errors were encountered: