

- Node
- GraphQL
- Cassandra - Astra DB
See the Video Walkthrough of what you will build!
- Deploy a Netflix clone to production
- Learn GraphQL API and how to use it with a database to create the tables and navigate the data.
- Learn about paging and infinite scrolling in web ui
- Leverage Netlify and Astra DB
- Can I run this Project on my computer?
There is nothing preventing you from running the project on your own machine. If you do so, you will need
- git installed on your local system
- node 15 and npm 7 or later
You will have to adapt commands and paths based on your environment and install the dependencies by yourself. We won't provide support to keep on track with schedule. However, we will do our best to give you the info you need to be successful.
- What other prerequisites are there?
- You will need a github account
- You will also need Netlify and Astra DB accounts, but we'll work through that in the exercises
- Use
Chrome or
Firefox for the best experience. Other browsers are great, but don't work well with the GitPod integration we use a bit later.
- Create Astra DB Instance
- Create a security token
- Create table genre with GraphQL
- Insert data in genre with GraphQL
- Retrieve values of genre table
- Create movie table
- Insert values in movie table
- Retrieve values from movie table
- Load a CSV DataSet
- Launch GitPod
- Serverless Functions
- Fetching from the Front-End
- Install the Netlify CLI
- Retrieve application token to securely connect to the database
- Configure Environment Variables and Install Dependencies
- Launch your app
When creating your instance use the promotion code ANIA200 to get 200$ of free credit allowing you about 30 million writes + 30 Million reads + 50GB a month of monthly storage!!
ASTRADB is the simplest way to run Cassandra with zero operations at all - just push the button and get your cluster. No credit card required, $25.00 USD credit every month, roughly 5M writes, 30M reads, 40GB storage monthly - sufficient to run small production workloads.
✅ Step 1a: Click the button to login or register with Datastax. You can use your Github, Google accounts or register with an email.
Make sure to chose a password with minimum 8 characters, containing upper and lowercase letters, at least one number and special character

-
Show me!


Use the following values when creating the database
| Field | Value |
|---|---|
| database name | workshops |
| keyspace | netflix |
| Cloud Provider | Use the one you like, click a cloud provider logo, pick an Area in the list and finally pick a region. |
You can technically use whatever you want and update the code to reflect the keyspace. This is really to get you on a happy path for the first run.
You will see your new database pending in the Dashboard.

The status will change to Active when the database is ready, this will only take 2-3 minutes. You will also receive an email when it is ready.
✅ Step 2a: Create a token for your app to use in the settings screen. Use "Database Administrator" permission.
✅ Step 2b: Copy the token value (eg AstraCS:KDfdKeNREyWQvDpDrBqwBsUB:ec80667c....) in your clipboard and save the CSV, this value would not be provided afterward.
👁️ Expected output
-
Show me!


✅ Step 3a: Open GraphQL Playground by
- Click on your active database
- Click
ConnectTAB - Click
GRAPHQL API - Click the link to your playground.
As shown in the picture below.

Note that values in the picture do no reflect the database name
workshops, reason is we do not reproduce every picture each time
✅ Step 3b: In GraphQL Playground, Populate HTTP HEADER variable x-cassandra-token on the bottom of the page with your token as shown below

✅ Step 3c: In GraphQL Playground, create a table with the following mutation, making sure to replace netflix if you used a different name:
- Copy the following mutation on the left panel
mutation {
  reference_list: createTable(
    keyspaceName:"netflix",
    tableName:"reference_list",
    ifNotExists:true
    partitionKeys: [
      { name: "label", type: {basic: TEXT} }
    ]
    clusteringKeys: [
      { name: "value", type: {basic: TEXT}, order: "ASC" }
    ]
  )
}- Use the arrow in the middle of the screen to execute the query

✅ Step 4a: In the graphQL playground, change the tab to now use graphql. Edit the end of the URl to change from system to the name of your keyspace: netflix
✅ Step 4b: Populate HTTP HEADER variable x-cassandra-token on the bottom of the page with your token as shown below (again !! yes this is not the same tab)

✅ Step 4c: In GraphQL Playground,populate the reference_list table with the following values
- Copy the following mutation on the left panel
mutation insertGenres {
  action: insertreference_list(value: {label:"genre", value:"Action"}) {
    value{value}
  }
  anime: insertreference_list(value: {label:"genre", value:"Anime"}) {
     value{value}
  }
  award: insertreference_list(value: {label:"genre", value:"Award-Winning"}) {
     value{value}
  }
  children: insertreference_list(value: {label:"genre", value:"Children & Family"}) {
     value{value}
  }
  comedies: insertreference_list(value: {label:"genre", value:"Comedies"}) {
     value{value}
  }
  documentaries: insertreference_list(value: {label:"genre", value:"Documentaries"}) {
     value{value}
  }
  drama: insertreference_list(value: {label:"genre", value:"Dramas"}) {
     value{value}
  }
  fantasy: insertreference_list(value: {label:"genre", value:"Fantasy"}) {
     value{value}
  }
  french: insertreference_list(value: {label:"genre", value:"French"}) {
     value{value}
  }
  horror: insertreference_list(value: {label:"genre", value:"Horror"}) {
     value{value}
  }
  independent: insertreference_list(value: {label:"genre", value:"Independent"}) {
     value{value}
  }
  music: insertreference_list(value: {label:"genre", value:"Music & Musicals"}) {
     value{value}
  }
  romance: insertreference_list(value: {label:"genre", value:"Romance"}) {
     value{value}
  }
  scifi: insertreference_list(value: {label:"genre", value:"Sci-Fi"}) {
     value{value}
  }
  thriller: insertreference_list(value: {label:"genre", value:"Thriller"}) {
     value{value}
  }
  realitytv: insertreference_list(value: {label:"genre", value:"Reality TV"}) {
     value{value}
  }
  tvshow: insertreference_list(value: {label:"genre", value:"TV Show"}) {
     value{value}
  }
  musicmusicals: insertreference_list(value: {label:"genre", value:"Music & Musicals"}) {
     value{value}
  }
  classic: insertreference_list(value: {label:"genre", value:"Classic"}) {
     value{value}
  }
  international: insertreference_list(value: {label:"genre", value:"International"}) {
     value{value}
  }
  crime: insertreference_list(value: {label:"genre", value:"Crime"}) {
     value{value}
  }
  cult: insertreference_list(value: {label:"genre", value:"Cult"}) {
     value{value}
  }
}- Use the arrow in the middle of the screen to execute the query
✅ Step 5a: In GraphQL Playground, not changing tab (yeah) list values from the table with the following query.
query getAllGenre {
    reference_list (value: {label:"genre"}) {
      values {
          value
      }
    }
}
👁️ Expected output

✅ Step 6a: Move to tab GRAPHQL-SCHEMA, everything should be set, use the following mutation to create a new table:
_Remember to change the keyspaceName if you used something different.
mutation {
  movies_by_genre: createTable(
    keyspaceName:"netflix",
    tableName:"movies_by_genre",
    ifNotExists: true,
    partitionKeys: [
      { name: "genre", type: {basic: TEXT} }
    ]
    clusteringKeys: [
      { name: "year", type: {basic: INT}, order: "DESC" },
      { name: "title", type: {basic: TEXT}, order: "ASC" }
    ]
    values: [
      { name: "synopsis", type: {basic: TEXT} },
      { name: "duration", type: {basic: INT} },
      { name: "thumbnail", type: {basic: TEXT} }
    ]
  )
}
👁️ Expected output

✅ Step 7a: Move to tab GRAPHQL, everything should be set, use the following mutation to populate movies table:
mutation insertMovies {
  inception: insertmovies_by_genre(
    value: {
      genre:"Sci-Fi",
      year:2010,
      title:"Inception",
      synopsis:"Cobb steals information from his targets by entering their dreams.",
      duration:121,
      thumbnail:"https://i.imgur.com/RPa4UdO.mp4"}) {
    value{title}
    }

  prometheus: insertmovies_by_genre(value: {
      genre:"Sci-Fi",
      year:2012,
      title:"Prometheus",
      synopsis:"After a clue to mankind's origins is discovered, explorers are sent to the darkest corner of the universe.",
      duration:134,
      thumbnail:"https://i.imgur.com/L8k6Bau.mp4"}) {
    value{title}
    }

      aliens: insertmovies_by_genre(value: {
      genre:"Sci-Fi",
      year:1986,
      title:"Aliens",
      synopsis:"Ellen Ripley is sent back to the planet LV-426 to establish contact with a terraforming colony.",
      duration:134,
      thumbnail:"https://i.imgur.com/QvkrnyZ.mp4"}) {
    value{title}
    }

    bladeRunner: insertmovies_by_genre(value: {
      genre:"Sci-Fi",
      year:1982,
      title:"Blade Runner",
      synopsis:"Young Blade Runner K's discovery of a long-buried secret leads him to track down former Blade Runner Rick Deckard.",
      duration:145,
      thumbnail:"https://i.imgur.com/xhhvmj1.mp4"}) {
    value{title}
    }
  }
👁️ Expected output

ℹ️ You can find more movie data in the
datafolder, however, we will be doing a bulk import of all this data shortly.
✅ Step 8a: In GraphQL Playground, not changing tab (yeah) list values from the table with the following command.
query getMovieAction {
    movies_by_genre (
      value: {genre:"Sci-Fi"},
       orderBy: [year_DESC]) {
      values {
        year,
        title,
        duration,
        synopsis,
        thumbnail
      }
    }
}
👁️ Expected output

✅ Step 8b Enable paging: For small datasets you can retrieve all values in the table but for performance or network reasons you need to perform paging. Let's do same query as before now asking for a page size to 2
query getMovieAction {
    movies_by_genre (
      value: {genre:"Sci-Fi"},
       options: {pageSize: 2},
       orderBy: [year_DESC]) {
      values {
        year,
        title,
        duration,
        synopsis,
        thumbnail
      }
    pageState
    }
}
👁️ Expected output

✅ Step 8c: Fetch next page paging: Notice that pageState is also now returned. Let's use it to fetch the next 2 items (next page). Edit the next query to replace your own pageState YOUR_PAGE_STATE
query getMovieAction {
    movies_by_genre (
      value: {genre:"Sci-Fi"},
       options: {pageSize: 2, pageState: "<YOUR_PAGE_STATE>"},
       orderBy: [year_DESC]) {
      values {
        year,
        title,
        duration,
        synopsis,
        thumbnail
      }
    pageState
    }
}
👁️ Expected output

✅ Step 9a: Download the dataset
To download the DATASET, right-click (or CTRL + Click to open in new tab) the button below and download the target file on your machine.
If the file opens in the browser save it with the name
movies_by_genre.csv. This is important as the filename will be the table name.

✅ Step 9b: Open Astra Data Loader Importer
- Locate the
Load Databutton to open the Data Loader.

✅ Step 9c: Upload the dataset
Click on the area Drag n drop a single file and look for the file movies_by_genre.csv on your machine, this file has been downloaded in step 9b.

Once the file has been upload notive the Upload Successful message in green. You can now click NEXT
✅ Step 9d: Define target table
- Locate the field Table Name and make sure it is set to
movies_by_genre
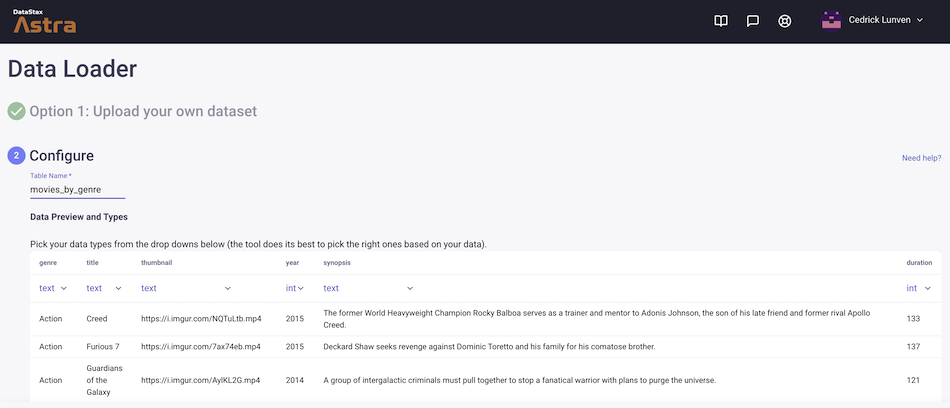
- In
Keys and Clusteringsection entergenreas the partition key.

You can now click on NEXT to move forward.
✅ Step 9e: Define target database

Select the database we are currently using:
| Field | Value |
|---|---|
| Target Database | workshops |
| Target Keyspace | netflix |
and click next to start the process asynchronously.
✅ Step 9f: Wait for the batch to import your data
After a few seconds (about 30s) ,you will get an email informing you that the batch has been scheduled.

As you can see the operation here is asynchronous. About a minute later your will get another email to tell you the data has been inserted.

Congratulations, the Database is SET !!!
- Click the button to launch the GitPod IDE.
- Supported by Chrome and Firefox

ℹ️ It may take minutes (approx. 3-5) for GitPod to fully initialize.
Take a look at functions/getGenres.js
const fetch = require('node-fetch')

exports.handler = async function (event) {

  const body = JSON.parse(event.body)
  const url = process.env.ASTRA_GRAPHQL_ENDPOINT
  const query = `
    query getAllGenres {
      reference_list (
        value: { label: "genre"},
        options: {
          pageSize: ${JSON.stringify(body.pageSize)},
          pageState: ${JSON.stringify(body.pageState)}
        }
      ) {
        values {
          value
        }
        pageState
      }
    }
  `

  const response = await fetch(url, {
    method: 'POST',
    headers: {
      "Content-Type": "application/json",
      "x-cassandra-token": process.env.ASTRA_DB_APPLICATION_TOKEN
    },
    body: JSON.stringify({ query })
  })

  try {
    const responseBody = await response.json()
    return {
      statusCode: 200,
      body: JSON.stringify(responseBody)
    }
  } catch (e) {
    console.log(e)
    return {
      statusCode: 500,
      body: JSON.stringify(e)
    }
  }
}
You'll notice the familiar GraphQL query "getAllGenres" we used previously in the playground. It's been modified a bit to utilize paging.
options: {
  pageSize: ${JSON.stringify(body.pageSize)},
  pageState: ${JSON.stringify(body.pageState)}
}
This section allows us to pass in the desired page size and current page state from the front-end.
{
  values {
    value
  }
  pageState
}
And, in addition to the values of the query, we are also returning the page state from the query.
The serverless function functions/getMovies.js works in much the same way, though we pass in the specific genre we want, and are hardcoding the page size to 6.
query {
  movies_by_genre (
    value: { genre: ${JSON.stringify(genre)}},
    orderBy: [year_DESC],
    options: { pageSize: 6, pageState: ${JSON.stringify(pageState)} }
  ) {
    values {
      year,
      title,
      duration,
      synopsis,
      thumbnail
    }
    pageState
  }
}Let's take a look at how we fetch these serverless functions from the front-end. Start in src/App.js
We have a fetch method defined that will retrieve a page of genres by calling the getGenres serverless function.
const fetchData = async () => {
  if (! isFetching)  {
    setIsFetching(true)
    const response = await fetch("/.netlify/functions/getGenres", {
      method: "POST",
      body: JSON.stringify({pageState, pageSize}),
    })
    const responseBody = await response.json()
    setPageState(responseBody.data.reference_list.pageState)
    setGenres(gs => (gs || []).concat(responseBody.data.reference_list.values))
    setIsFetching(false)
  }
}
We pass in the current pageState and pageSize state variables and receive a response from the serverless function. We then set the pageState var to the new pagestate, and set the genres state variable to the received data. (Note that we are concatenating the new data to the var, since we want to keep all previously fetched data, not replace).
When we render the page, generate a <Section> component for each genre, and set a <div> to detect a mouseEnter to load the next page of genres.
<>
  <NavBar />
  <HeroSection />
  {genres && (
    <div className="container">
      {Object.values(genres).map((genre) => (
        <Section key={genre.value} genre={genre.value} />
      ))}
    </div>
  )}
  <div
    className="page-end"
    onMouseEnter={() => {
      setRequestedPage( np => np + 1 )
    }}
  />
</>
The <Section> component works in the same way, though we will fully replace the data in the movies variable.
const fetchData = async () => {
  const response = await fetch("/.netlify/functions/getMovies", {
    method: "POST",
    body: JSON.stringify({ genre: genre, pageState: pageState }),
  })
  const responseBody = await response.json()
  setMovies(responseBody.data.movies_by_genre.values)
  setPageState(responseBody.data.movies_by_genre.pageState)
}
Now that we know how the front-end works, let's launch our app!
- In the
workshop-graphql-netflixdirectory run the following command to install the netlify-cli
npm install -g netlify-cli
-
Show me!


Use the token you previously generated. If you no longer have the token and did not download a .csv, you can generate a new token using the instructions above
You will also need the GraphQL Endpoint for your keyspace.
First, go to the Astra DB connect page for your database.
 Then scroll down to find the endpoint for your keyspace.

✅ Create .env file (do not leave curly brackets)
ASTRA_DB_APPLICATION_TOKEN=REPLACE_ME
ASTRA_GRAPHQL_ENDPOINT=REPLACE_ME
👩💻 Install all the packages
npm install- Run the application
netlify dev
- The application should automatically launch in the GitPod preview pane
Follow these steps to Deploy the Netflix clone to your own Netlify site!
-
What does the netlify deploy button do?
The Netlify deploy button will:- Create a new repository for you on Github
- Create a site on Netlify
- Link the two together.
-
Click the button to deploy

-
Show me!


This will take a few minutes.
-
If there is an existing account in Netlify, make sure the Netlify account settings show that it's connected to the appropriate git repository,
Show me!

-
Click on
Site deploy in progresswithin the Netlify UI,Show me!

-
Click the top deploy link to see the build process.
Show me!

-
Wait until the build complete
Netlify Build Complete, When you see Pushing to repository you're ready to move on.Show me!

-
Scroll up to the top and click on the site name (it'll be after {yourlogin}'s Team next to the Netlify button).
Show me!


- Click on the
GitHubinDeploys from GitHubto get back to your new repository. Scroll to where you were in the README.Show me!


Use this link to open Gitpod from YOUR repository!
Execute each of the commands below to link your code to your Netlify deployment.
✅ Step 4a: we'll need to STOP the netlify dev command if you still have it running. In the terminal where you executed the netlify command, issue a CTRL+C (control key + the C key) in order to stop the process.
✅ Step 4b: Enter the following command to pop up a browser to authenticate with netlify
netlify login
👁️ Expected output
Opening https://app.netlify.com/authorize?....
⠋ Waiting for authorization...^C
✅ Step 4c: Open the link in a new WINDOW for the link to work, and authorize Netlify CLi to access Netlify on your behalf.
When using GitPod the preview pane will not display this properly. You must click the "open in a new window" button in the very top right of the preview pane._
👁️ Expected output
You are now logged into your Netlify account!
Run netlify status for account details
To see all available commands run: netlify help
gitpod /workspace/appdev-week3-graphql $
✅ Step 4d: link your workspace to the associated site with the following command
netlify link
👁️ Expected output

✅ Step 4e: take the .env file upload it to netlify
netlify env:import .env
Now that you've hooked everything up, time to deploy to production.
- Run
netlify build
- Then run
netlify deploy --prod
- Then finally run
netlify open:site
You've deployed your app to Netlify!

Finally open https://serverlessnetflixclone.netlify.app/
Enjoy Coding!