Adding data
In the previous part, we created a Window with an "Hello World !" text. It is very nice but we cannot do anything really. In order to add data and work with it in our application, let's use the MVC pattern contained into neutrino.
You can see the result of this tutorial by running the command :
cargo run --example add_dataMVC stands for Model-View-Controller. In this application pattern, a Model contains data which is updated by the Controller and displayed by the View. Here is a diagram taken from Wikipedia :
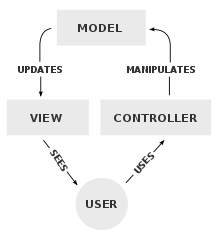
In neutrino, Controllers are called Listener because their functions are triggered by Events.
In order to demonstrate how MVC works in neutrino, let's create a simple application displaying a Button. Each time the user clicks the Button, the label of the Button should be updated to show the numbers of clicks. Let us first create a new project and make a Window with a Button displaying 0. Write the following into your main.rs :
use neutrino::{App, Window};
use neutrino::widgets::button::Button;

fn main() {
    let mut button = Button::new("my_button");
    button.set_text("0");

    let mut window = Window::new();
    window.set_title("MVC");
    window.set_size(320, 240);
    window.set_child(Box::new(button));

    App::run(window);
}
Here is the result we get :

Now that we have our View, let's create our Model. It will be very simple, we only need a number to store the number of clicks. As this project is very simple, we will write all our code in main.rs. For more complex projects, you should split your code in modules. The following shows our new main.rs :
use std::cell::RefCell;
use std::rc::Rc;

use neutrino::{App, Window};
use neutrino::widgets::button::Button;

struct Counter {
    value: u8,
}

impl Counter {
    fn new() -> Self {
        Self { value: 0 }
    }

    fn value(&self) -> u8 {
        self.value
    }

    fn increment(&mut self) {
        self.value += 1;
    }
}

fn main() {
    let counter = Rc::new(RefCell::new(Counter::new()));

    let mut button = Button::new("my_button");
    button.set_text("0");

    let mut window = Window::new();
    window.set_title("Add data");
    window.set_size(320, 240);
    window.set_child(Box::new(button));

    App::run(window);
}
The View did not change, so no screenshot this time. Here we created the Counter model. In the main function, we instantiated the counter by putting it into a Rc<RefCell>. By using that, we get the ability to share the Counter in several objects and still be able to mutate it.
Now that both the View and the Model are created, let's define our Listener. As we are defining a listener for a Button, we must implement the ButtonListener trait. The ButtonListener trait let us mutate the Button state, which contains among other the Button text. Here is the new main.rs:
use std::cell::RefCell;
use std::rc::Rc;

use neutrino::{App, Window};
use neutrino::widgets::button::{Button, ButtonListener, ButtonState};

struct Counter {
    value: u8,
}

impl Counter {
    fn new() -> Self {
        Self { value: 0 }
    }

    fn value(&self) -> u8 {
        self.value
    }

    fn increment(&mut self) {
        self.value += 1;
    }
}

struct MyButtonListener {
    counter: Rc<RefCell<Counter>>
}

impl MyButtonListener {
    fn new(counter: Rc<RefCell<Counter>>) -> Self {
        Self { counter }
    }
}

impl ButtonListener for MyButtonListener {
    fn on_change(&self, _state: &ButtonState) {
        self.counter.borrow_mut().increment();
    }

    fn on_update(&self, state: &mut ButtonState) {
        state.set_text(&self.counter.borrow().value().to_string());
    }
}

fn main() {
    let counter = Rc::new(RefCell::new(Counter::new()));

    let listener = MyButtonListener::new(Rc::clone(&counter));

    let mut button = Button::new("my_button");
    button.set_text("0");
    button.set_listener(Box::new(listener));

    let mut window = Window::new();
    window.set_title("Add data");
    window.set_size(320, 240);
    window.set_child(Box::new(button));

    App::run(window);
}
After several clicks, the Counter should have increased :

Okay so how did it work ? We created a Listener containing the Counter and attached it to the Button. Then we implemented the on_change function which is triggered for each click on the button, and the on_update function which is triggered for each refresh of the View.
You should now be able to play with data in your application ! Look into the docs to see the States defined for each Widgets and try to bind Models to Listeners.