FAQ
I didn't have time to write a short letter, so I wrote a long one instead.
Blaise Pascal / Mark Twain
Please use go-starter/discussions if you have any questions.
Table of Contents
- Frequently Asked Questions
- General
- Local development setup
-
Code
- I don't understand the projects' directory layout!
-
What's in your
docker-compose.yml? - What's in your
/migrations? - Your
Makefileis massive, I don't understand. - What's
./docker-helper.sh? - Which
ENVvariables are possible? - How do I install additional go modules?
- I want to install an additional go module, that I use as CLI and lib.
- I want to install an additional system level or CLI-only dependency.
- I want to add an additional VSCode extension / default setting to the devContainer.
- Why are our generated files not part of
.gitignore? -
I want to compare or update my project/fork to the latest go-starter
master. - I just want to update / upgrade my project!
-
Swagger
- How can I authenticate my user though Swagger-UI?
- How can I write Swagger v2 schemas?
- Most RESTful JSON payloads use
camelCaseidentifiers, but OAuth2 issnake_case? - How I define a field with multiple types inside a Swagger v2 model?
goswaggergenerated types/validations use pointers everywhere, shouldn't we avoid that?- I need an optional Swagger payload property that is nullable!
-
PostgreSQL
-
Why are you using separate
spec,integresql_*anddevelopmentPostgreSQL databases while developing locally? - WTF is IntegreSQL, have you forked PostgreSQL?
- What's
WithTransaction, shouldn't I usedb.BeginTx,db.Commit, anddb.Rollback? - Why can't I use a PostgreSQL
boolean DEFAULT true? - Why do I need to add a foreign key index?
- I've way too many databases! How can I reset?
-
Why are you using separate
-
Testing
- Most tests use
WithTestServer, whats that? - What's
-race -cover -count=1 -coverprofile? - Should I use
t.Parallel()in my tests? - Should I set
-timeoutforgo test ./...? -
Should I use
package pkgfor my*.test.gofiles orpackage pkg_test? -
What are
.goldenfiles? What is snapshot testing? - How do I get the current environment?
- How can I see request or response headers, payloads and query parameters for my debugging purposes?
- How can I see my generated SQL queries?
404Not found. But I've implemented that handler/route?!- How does IntegreSQL assign test-databases? How does it know about changes to my migrations / fixtures?
- Most tests use
-
Deployment
- What are the limitations of your demo environment?
- How can I
docker buildanddocker runthe final image? - What about those Dockerfile
development -> builder -> appbuild stages? -
Should I use
sql-migrate uporapp db migrateorapp server --migrate? - How can I automatically insert seed data?
- Should I use
distroless/baseordebian:buster-slimin the Dockerfileappstage? - My final image fails with
\"CMD\": executable file not found in $PATH"or file not found? - I need to deploy this on top of docker-compose!
- I need to deploy this on top of Kubernetes!
- What does your deployment flow look like?
- I need to (remotely) pprof my running service!
- Maintenance
We use "📖" to mark a main section in this FAQ.
📖 In this section you'll get an introduction to our problem domain, the big picture of our typical development workflow, general key facts about this project and how we use Docker locally.
We at all about apps previously built most backend services with Node.js. We even built and open-sourced our own aaa-backend-stack, which we still maintain for our customer projects running in production since up to 6 years.
When it comes to building monolithic services - and that's still our typical approach, you don't use a micro-service architecture until you really need it - you are in a bad position if you need to rely on a system, that does not have preemptive scheduling baked in at the language level. Just imagine any CPU-intensive business-logic that is blocking or being async forgetting to yield.
Well, since Go 1.14, you have preemptive green threads with goroutines by default. Simply put, the concurrency story of Go is really strong, thus the language is a perfect fit for our typical applications we build at all about apps. For further information about concurrency models see this awesome article: Cooperative vs. Preemptive: a quest to maximize concurrency power.
When it comes to web application frameworks, Go is still pretty fragmented. No full-blown web application framework (like Django, Sprint Boot, Nest.js, Rails in other languages) is stable enough in our opinion. As we have a pretty good understanding about this domain, due to all of our previous projects (including problems we encountered there), we thus set out to build our stack from scratch with Go. Some key facts that were of uttermost importance for us:
- Don't to introduce too many dependencies: Anything within Go's
Standard Libraryis preferred to use. - SQL-first: Stay as close to SQL as possible (while still having good proper ORM) and allow us to use all features of PostgreSQL (our preferred relational database).
- Swagger-first: Stay as close to OpenAPI v2/v3 as possible. We do want to write these by hand and do not want to auto-generate it. Instead, these specifications should be the single-source-of-truth to auto-generate the server (structs and validations) and clients that consume it.
- Fast parallel integration tests with isolated PostgreSQL databases: We thus ported our previous test-strategy to IntegreSQL and integrated this project with it.
- RESTful JSON APIs: We write very specialized services, that are tightly integrated with native mobile Apps (Swift/Kotlin) and SPAs (TypeScript). We won't use GraphQL (does not fit our requirements) and only add gRPC, web sockets, SOAP, etc. integrations when we explicitly need them in customer projects, never in this template. Make it easy for other teams to integrate with us.
- Dev workflows should be easy and fast: go's compiler is insanely fast. Any other build and test related tasks should be as optimized as possible. We thus tweaked our
Makefileas best as we could. - Every dev should be able to quickly get an IDE without any manual setup: As we use the VSCode's devContainers feature, to get this feature for free.
- The dev environment should resemble production as close as possible: Using docker-compose and solely working with docker containers in our local dev environment, we are as close as it gets without having to setup a local Kubernetes cluster.
- Check syntax, formatting and linting: Go provides great tools for auto-formatting src-files and linting (golangci-lint). Don't stop here, we also want syntax checks for
*.sqlfiles and enforce a consistent style over any structured content in our project.
We think these goals turned out pretty well. Please just give this template a try and see if it fits for your use-case.
Projects at allaboutapps typically start on a greenfield, meaning we use this project as a template for our new projects and potentially also remove/adapt certain base functionalities of it.
If we encounter new useful things while working on these projects and identify them as an often encountered requirement, we back-port this functionality into this go-starter project.
Of course, we cannot provide an official guarantee that we will maintain this OSS project forever (best effort as part of customer project maintenances), but we have a strong dedicated team working with this stack in-house day-by-day as part of customer projects (and coming up with ideas to improve it) and it's our very interest to be as transparent and free as possible (as in MIT License), so you can customize a fork of this project to your liking.
You may want to visit majodev/go-beer-punk-proxy.
In the project wiki we guide you though the re-implementation of an API with our typical dev workflow: WIKI: majodev/go-beer-punk-proxy.
Watch the following video to get a glimpse on how our setup feels:
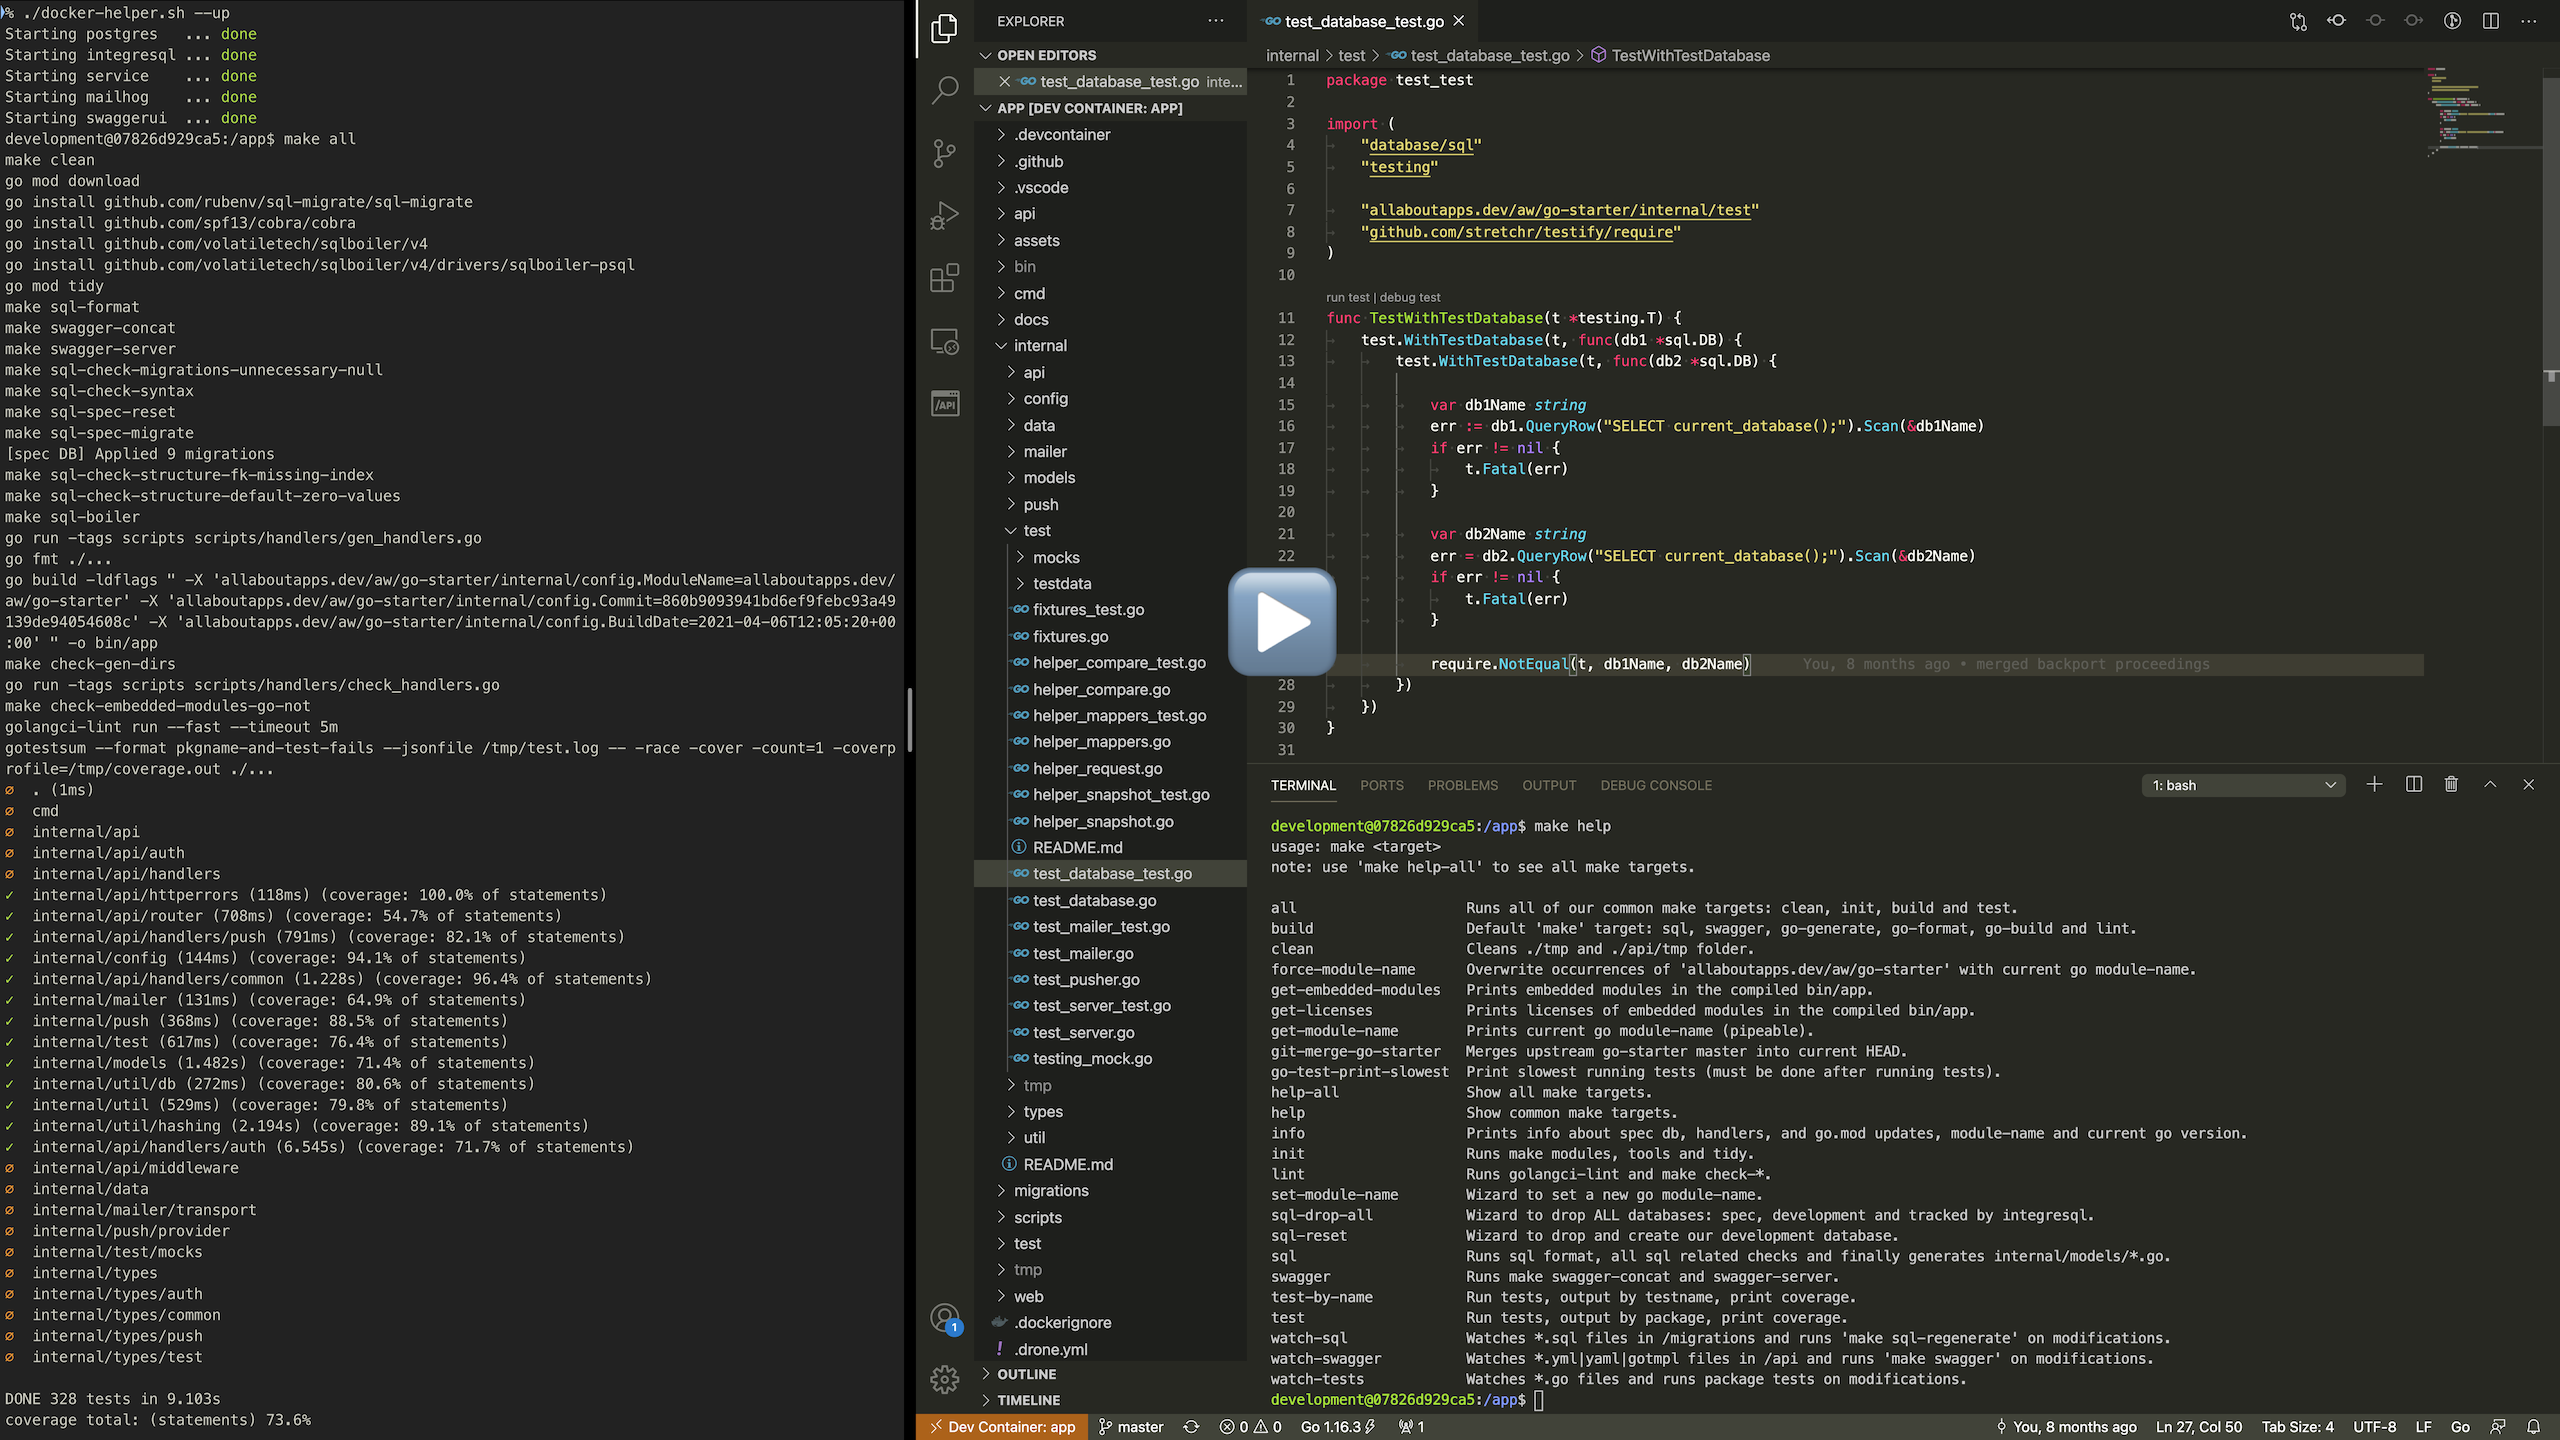
After forking this project, starting docker-compose (./docker-helper --up) and setting the module-name (make set-module-name), you are ready to start.
We typically had an initial specification phase prior to starting a new project. Meaning, we have a rough understanding about the general requirements, user stories and required database structure (ERM).
NOTE: This is not a waterfall process, try to do steps 1-4 per feature/epic and continuously test your product (SCRUM / sprints).
We then set out to design the initial RESTful JSON API by writing plain Swagger v2 YAML files. See /api. As we run within a VSCode devContainer, the OpenAPI (Swagger) Editor extension assists us to define the request/response models/payloads (see /api/definitions) and the actual endpoints (see /api/paths). We use the SwaggerUI available at http://localhost:8081 to get an better overview of what we have already defined.
Quickly regenerate the main /api/swagger.yml and all /internal/types/*.go bindings and validations via make swagger or auto-regenerate on modifications via make watch-swagger.
There exist various tools to help you design an ERM (entity-relationship model), we typically just use Lucidchart. Please refer to the PostgreSQL Wiki for other tools.
Anyhow in the end we require you to specify all database related operations regarding the structure in plain SQL migrations. See /migrations.
You may run make sql anytime to format all *.sql files, check for sql syntax errors, apply all migrations from the beginning (a separate spec database that only holds the current modelled schema is used for this purpose) and finally write the internal/models/*.go. You may also use make watch-sql to auto-regenerate on modifications.
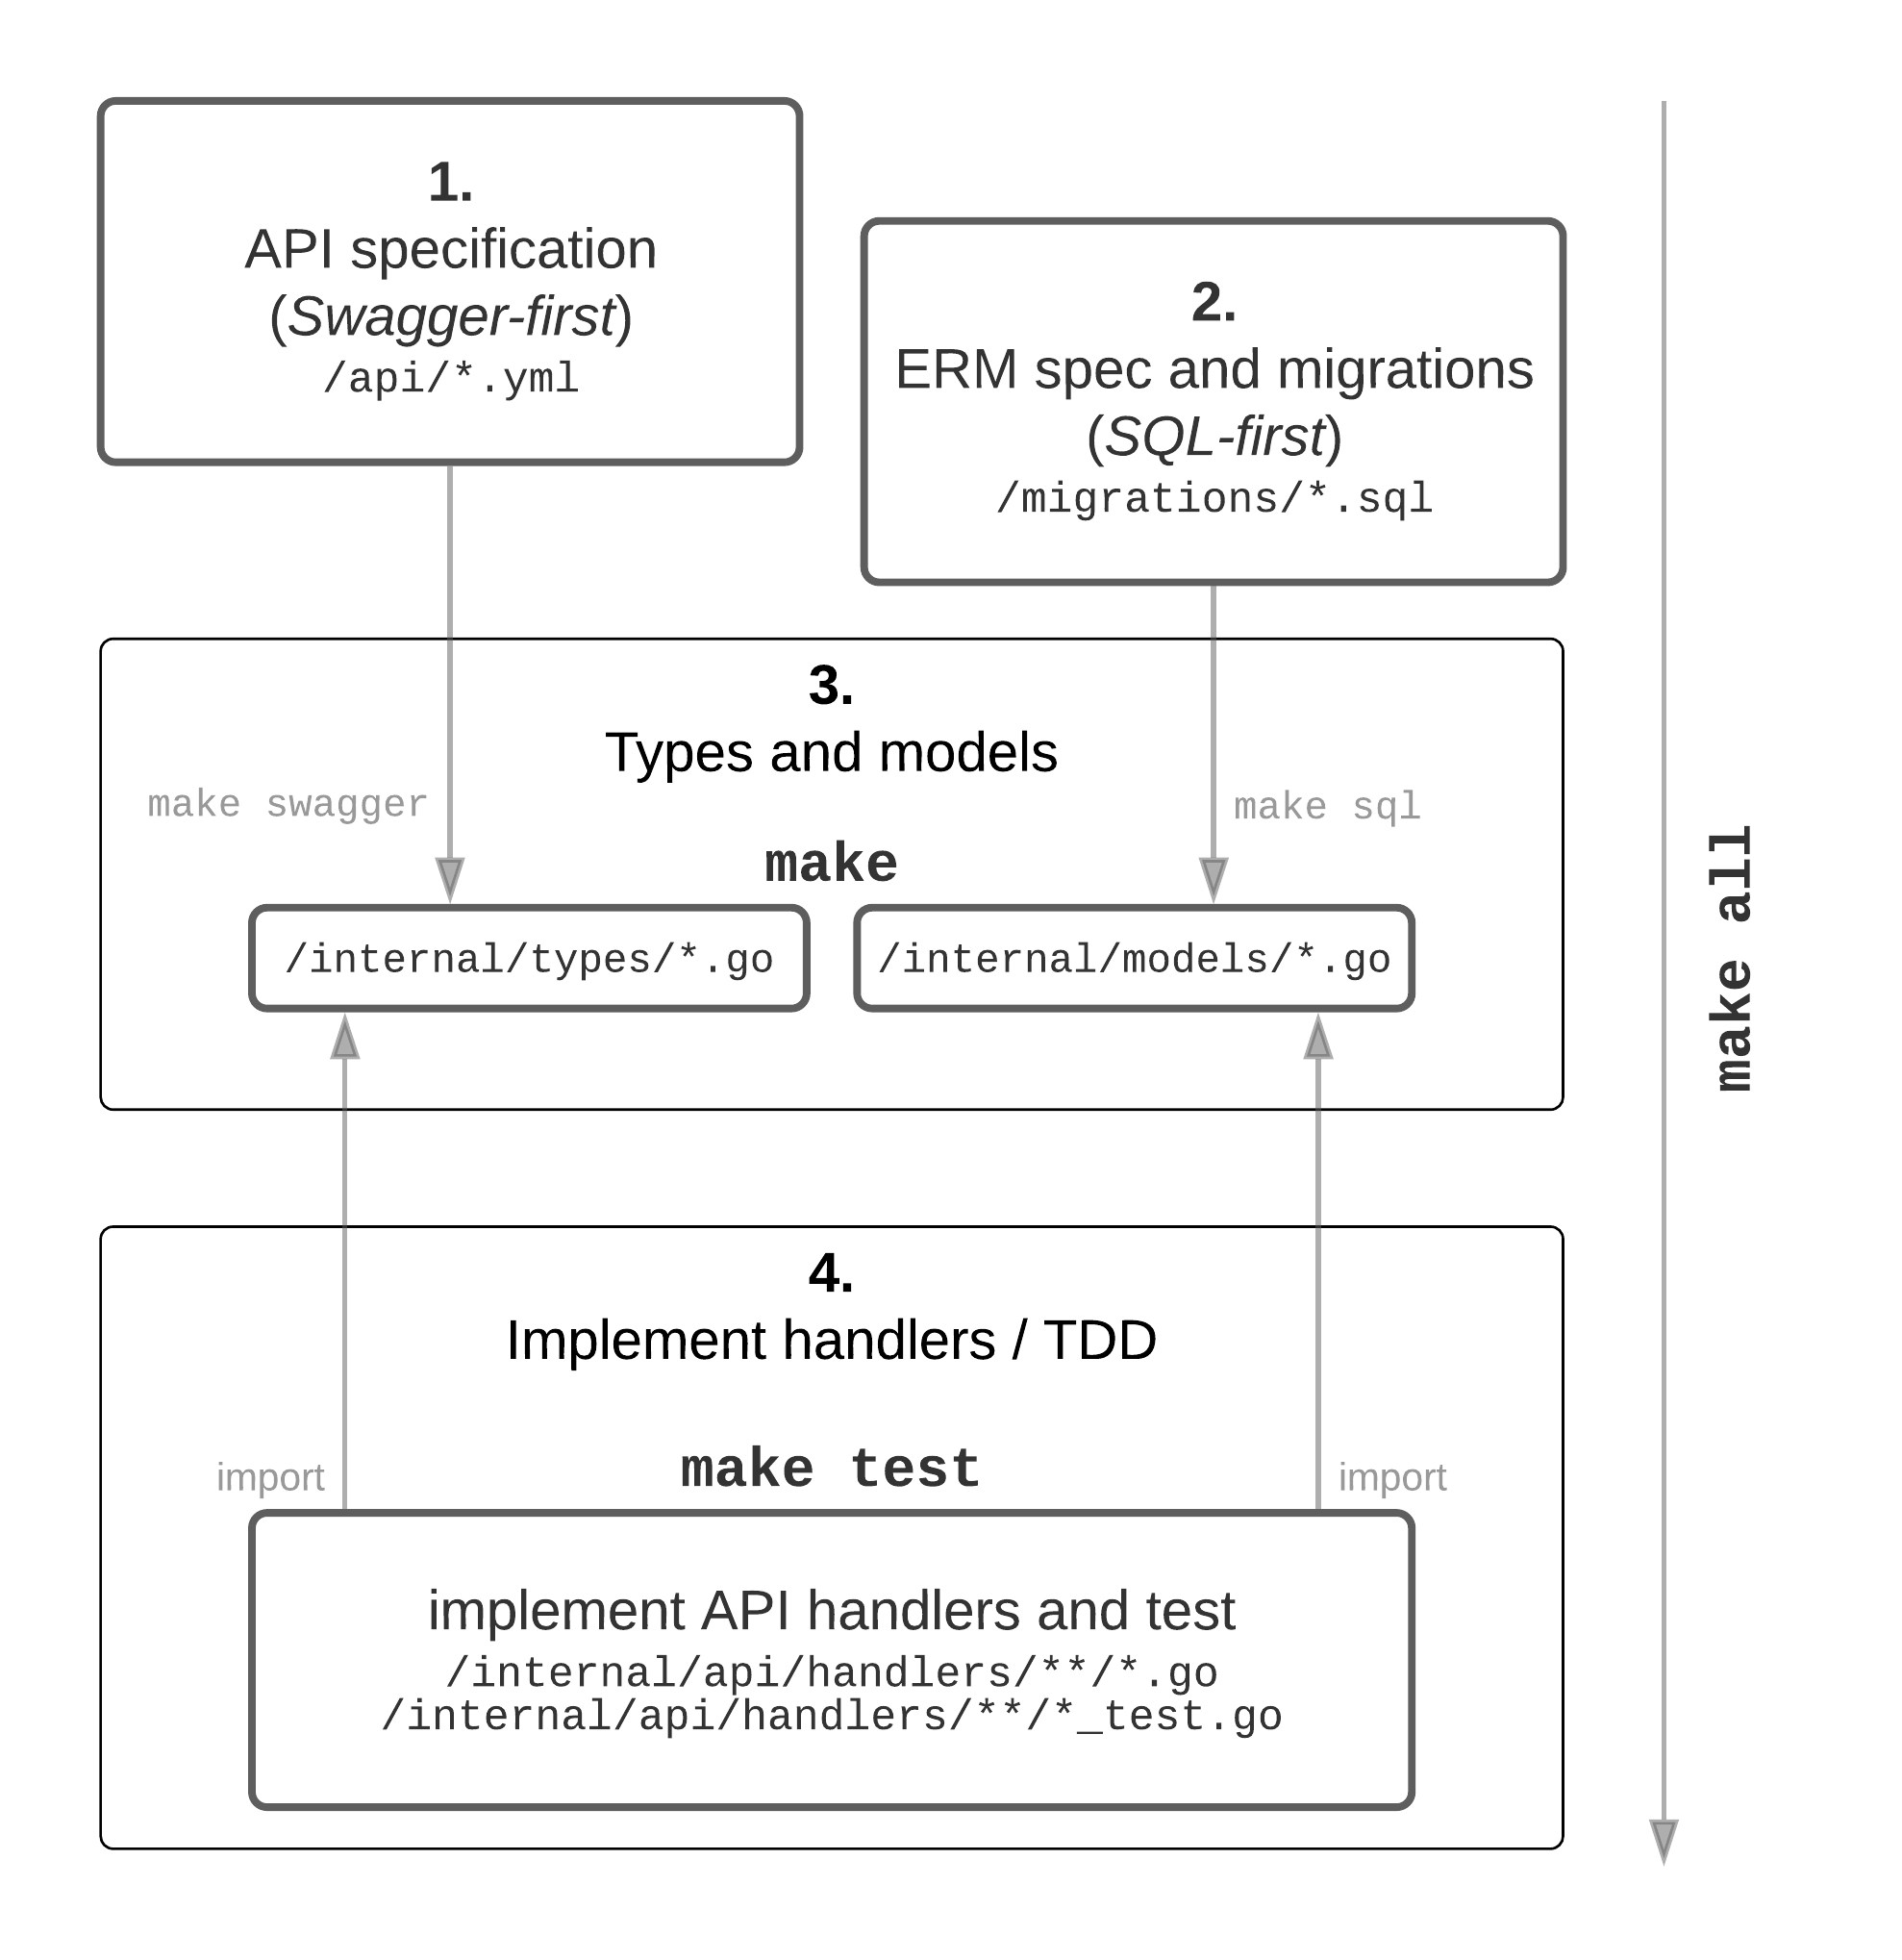
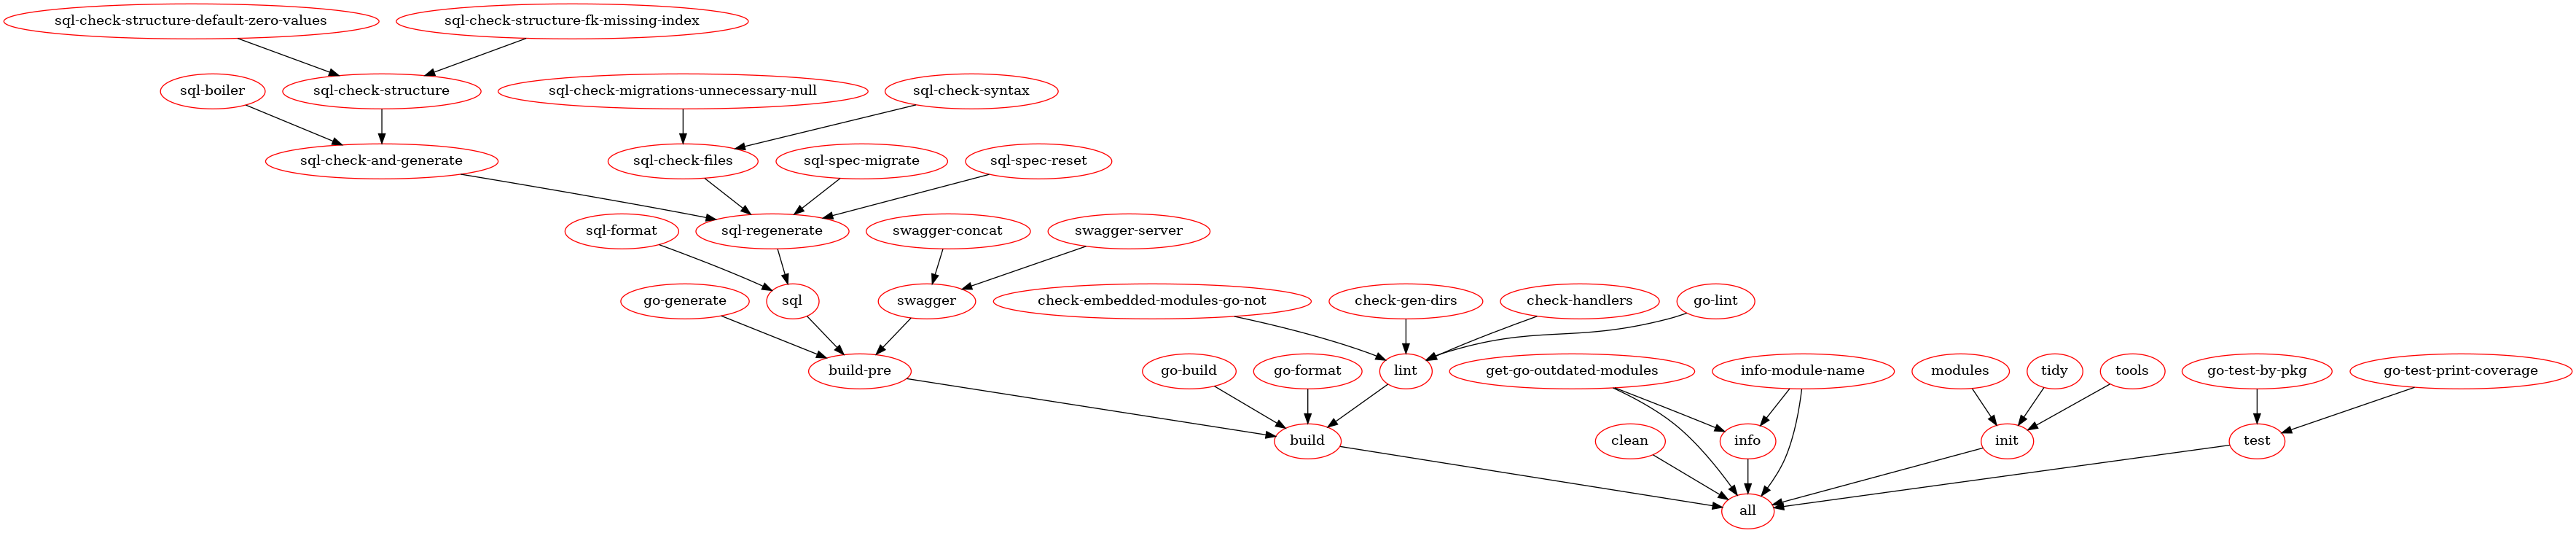
With your API-spec as Swagger v2 YAML files under /api and your PostgreSQL database as SQL files under /migrations, you now need to run make. This triggers various sub-targets including go compilation and linting, but most importantly for us it starts by:
- running
goswaggerviamake swaggerto mix all definitions and paths to a single schema (flattens it into/api/swagger.yml), and finally validates and generates Gostructsandvalidationmethods into/internal/types. - running SQL formatting, validation and introspection via
make sqlto finally generate a tailor-made ORM powered by SQLBoiler available at/internal/models.
We call this our Swagger-first & SQL-first philosophy.
You then continue to implement the business logic (the x in generated database ORM <-> x <-> generated RESTful JSON API types and validations) in Go by glueing those generated files together. Typically you will implement and test API RESTful JSON handlers (see /internal/api/handlers) that comply to the API spec and are properly tested.
Note that the
/internal/api/handlers/handlers.gofile to attach the actual implemented routes to our server is auto-generated and part of amake.
In general we favor integration tests (see any test file utilizing the WithTestServer helper) over unit tests. Execute them by running make test or if you are lazy, just issue make all to reinitialize, install deps, generate, build, lint, test the whole service. You may also use make watch-tests to automatically run package tests after modifications.
Of course, it's not possible for us to build a project like this, without reusing certain functionalities from other great projects. So here are those, that have a big impact on this project incl. resources to get started working with them:
-
VSCode
- We evaluated pretty much all available Go IDEs. The thing that sets VSCode apart is its devContainer functionality. We rely on this feature. We want you to work as close as possible to the final production docker container environment. Furthermore it's very nice that the same dev-environment we use, is available to everyone else and easy to setup.
- The official go language server gopls is now a first-class citizen in VSCode, its VSCode extension vscode-go is now also directly maintained by Google.
-
SQLBoiler
- SQLBoiler is a tool to generate a Go ORM tailored to your database schema.
- Please check out the Getting Started videos on YouTube to get an idea why this ORM is awesome.
- For documentation purposes, refer to:
-
go-swagger
- A golang implementation of Swagger 2.0 (aka OpenAPI 2.0): it knows how to serialize and deserialize swagger specifications.
- With our previous Node.js-based stack aaa-backend-stack we made the mistake to generate a swagger spec from the actual implementation (though a middleware). It should be vice-versa, we want to generate the types and payload validations from our hand-written swagger spec (Swagger-first).
- Note that go-swagger does only support Swagger v2 (not v3)!
- For documentation purposes, refer to:
-
echo
- High performance, minimalist Go web framework
- Well it's fast as hell, comes with minimal abstractions, not leaking into the whole application service and a joy to use for our engineers.
- For documentation purposes, refer to:
-
sql-migrate
- SQL schema migration tool for Go.
- Our migrations should be plain SQL (SQL-first), auto-wrapped by a transaction. This CLI tool provides everything we need, its migrations-handling is easy to integrate into testing workflows and our final deployment jobs.
-
cobra
- Cobra is both a library for creating powerful modern CLI applications as well as a program to generate applications and command files.
- We typically have some scripts in our services that may be manually executed. These should be first-class citizens and compiled into our main-application.
-
allaboutapps/integresql
- IntegreSQL manages isolated PostgreSQL databases for your integration tests.
- Disclaimer, we are the authors.
- We use this utility service to have real PostgreSQL databases that are isolated from each other, easy to setup and optimized for parallel testing.
A detailed overview can be found if you skim our go.mod, our Dockerfile and our docker-compose.yml.
There are actually many factors/benefits involved:
- It's not uncommon to work on multiple customer projects in a single month at allaboutapps (even though we try to limit these context switches to the bare minimum). Therefore, it would be a pretty bad experience if you need to manually reinstall the tool-set in their specific versions required by the project each time (go versions, go tooling, PostgreSQL version, ...).
- Developing directly inside a Docker container guarantees that you use the very same tool-set, which our CI will use to build these images. There are no more excuses why your code builds differently locally versus in our CI.
- Project-specific upgrades to any tool-set dependencies are easily propagated to all team members and just a single
./docker-helper.sh --rebuildaway. - With VSCode devContainers, even all IDE operation solely run within the local Docker container. All developers can expect that their IDE will work the same without manual configuration steps.
- We can use the official
_golangDocker image for compilation, no local installation of go (or any other tools apart from Docker) is required. -
Twelve-factor apps read their configuration from
ENVvariables. Most of our apps are deployed through Kubernetes or docker-compose and supportENVvariables as first-class citizens. We want to have the same support/mechanisms locally without polluting our host-env. - We want you to work as close as possible to the final production docker container environment. We can easily add additional services to the projects'
docker-compose.yml, e.g. _redis, ankane/pghero... - We can easily support local development in all three major OSes (MacOS, Windows, Linux) and even support developing directly in your Browser through GitHub Codespaces.
- Docker is way leaner than spawning a virtual machine (we previously provisioned these local environments via Ansible + Vagrant).
For further reading see:
- Why I'm obsessed with dev containers and Hands-On with VSCode & "Dev Containers"
- Getting Started With Dev Containers
- Try Out Development Containers: Go
📖 Opening our project through VSCode devContainers gets explained step-by-step in this section and is relevant for all host platforms (Linux, MacOS, Windows).
Setting up a local development environment with Docker containers should typically be straight forward (at least on Linux and MacOS). Enabling WSL2 on Windows is not, therefore we provide some guidance here first.
How does this work? It's slow, what am I doing wrong?
You may follow the VSCode WSL2 Guide directly as it's pretty straight forward.
Setup WSL2 on Windows 10 and use the latest stable Docker Desktop for Windows release. Ensure that "Use the WSL2 based engine" in Docker Desktop for Windows is applied.

After setting this up you should be able to check your installation by typing wsl -l -v into the Windows commandline.

If you now open VSCode it should recommend you to install the Docker Desktop - WSL Integration (which provides the code executable for the WSL2 Linux sub system).
Finally launch a new Ubuntu terminal from the Windows Start menu.
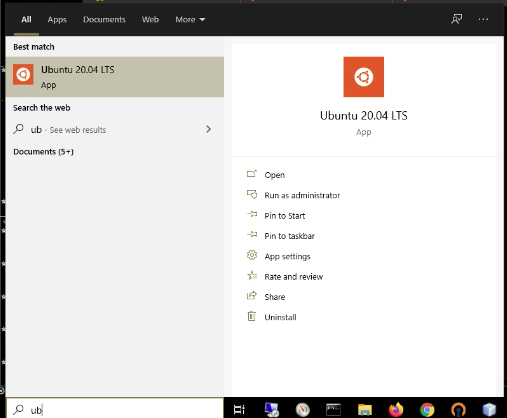
# wsl

# ensure you are *not* within /c/mnt, instead at ~!
pwd

# clone the repo (requires apt-get install git)
git clone https://github.com/allaboutapps/go-starter.git my-service
cd my-service

# opens VSCode in the Linux home connected through the WSL extension
code .

# Now select reopen in container in VSCode or run `./docker-helper --up` directly...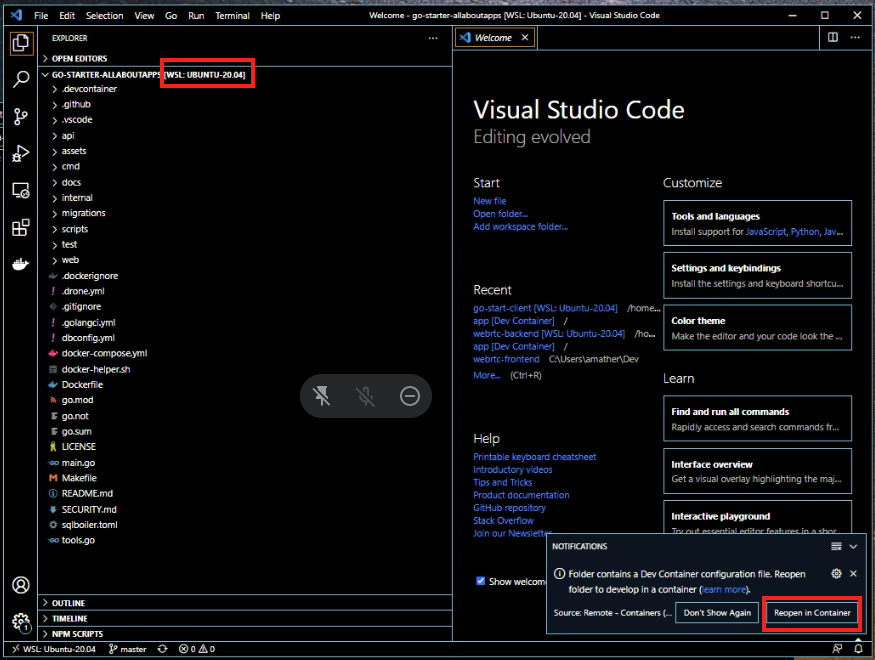
We have some additional recommendations regarding working with WSL2 in the following paragraphs.
Do not store anything that's related to Docker in /mnt/c (the Windows host mount)! Instead store everything in the WSL2 Ubuntu subsystem and run all your host-related commands from within WSL2 (e.g. always git clone from the Linux/WSL2 subsystem, run ./docker-helper --up from within it). Do this by creating a subfolder inside your Linux home directory at ~/**.
It's still possible to directly access the full WSL2 Ubuntu subsystem and your (Linux volume mounted) project through Windows Explorer by accessing \\wsl$ e.g. \\wsl$\Ubuntu-20.04\home\<YOUR_PROJECT>.
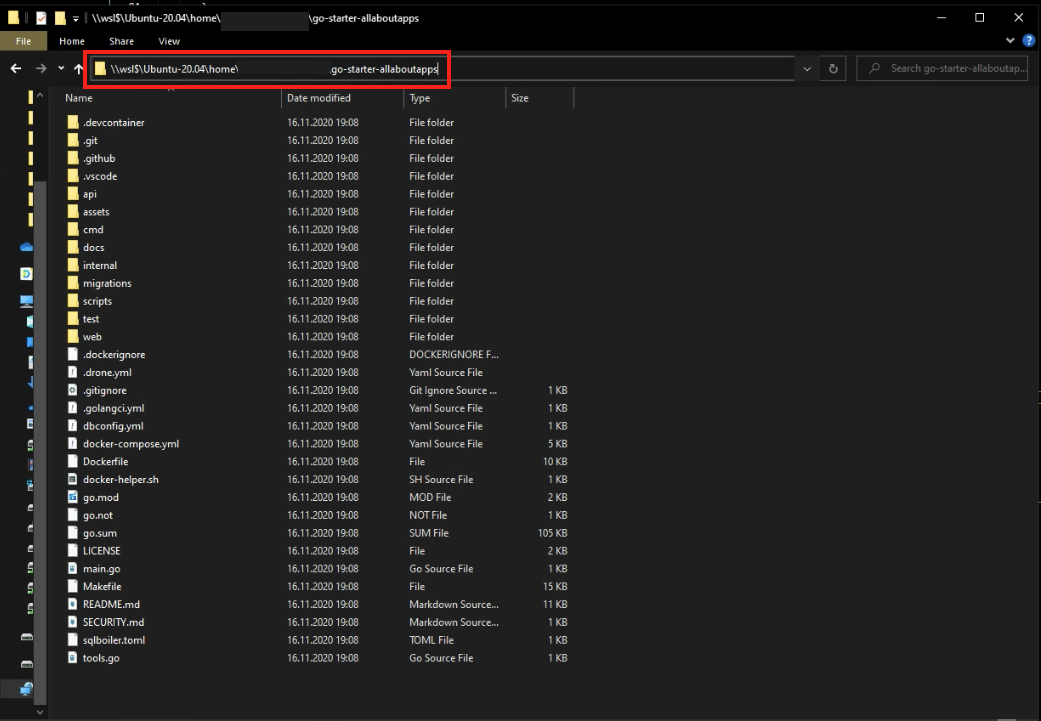
If you don't to this (and instead work from /mnt/c/**), performance will suffer.
See:
- Issue: Docker Desktop 2.3.02 host volume mount performance (includes benchmarks)
- Develop with Docker and WSL 2
Execute the following command to copy your SSH keys from Windows to WSL.
cp -r /mnt/c/Users/<username>/.ssh ~/.ssh
See:
Typically you will need to configure the git cli client in the Linux subsystem again by:
git config --global user.name "Your Name"
git config --global user.email "youremail@domain.com"
However, there may be ways to use other authentication options, see:
Install the new Windows Terminal from the Microsoft Store, it's way convenient to work with.
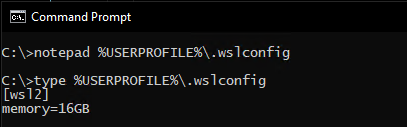
Set assignable memory in %USERPROFILE%\.wslconfig to half of your total available RAM (otherwise it's 80% of your total memory by default).
See:
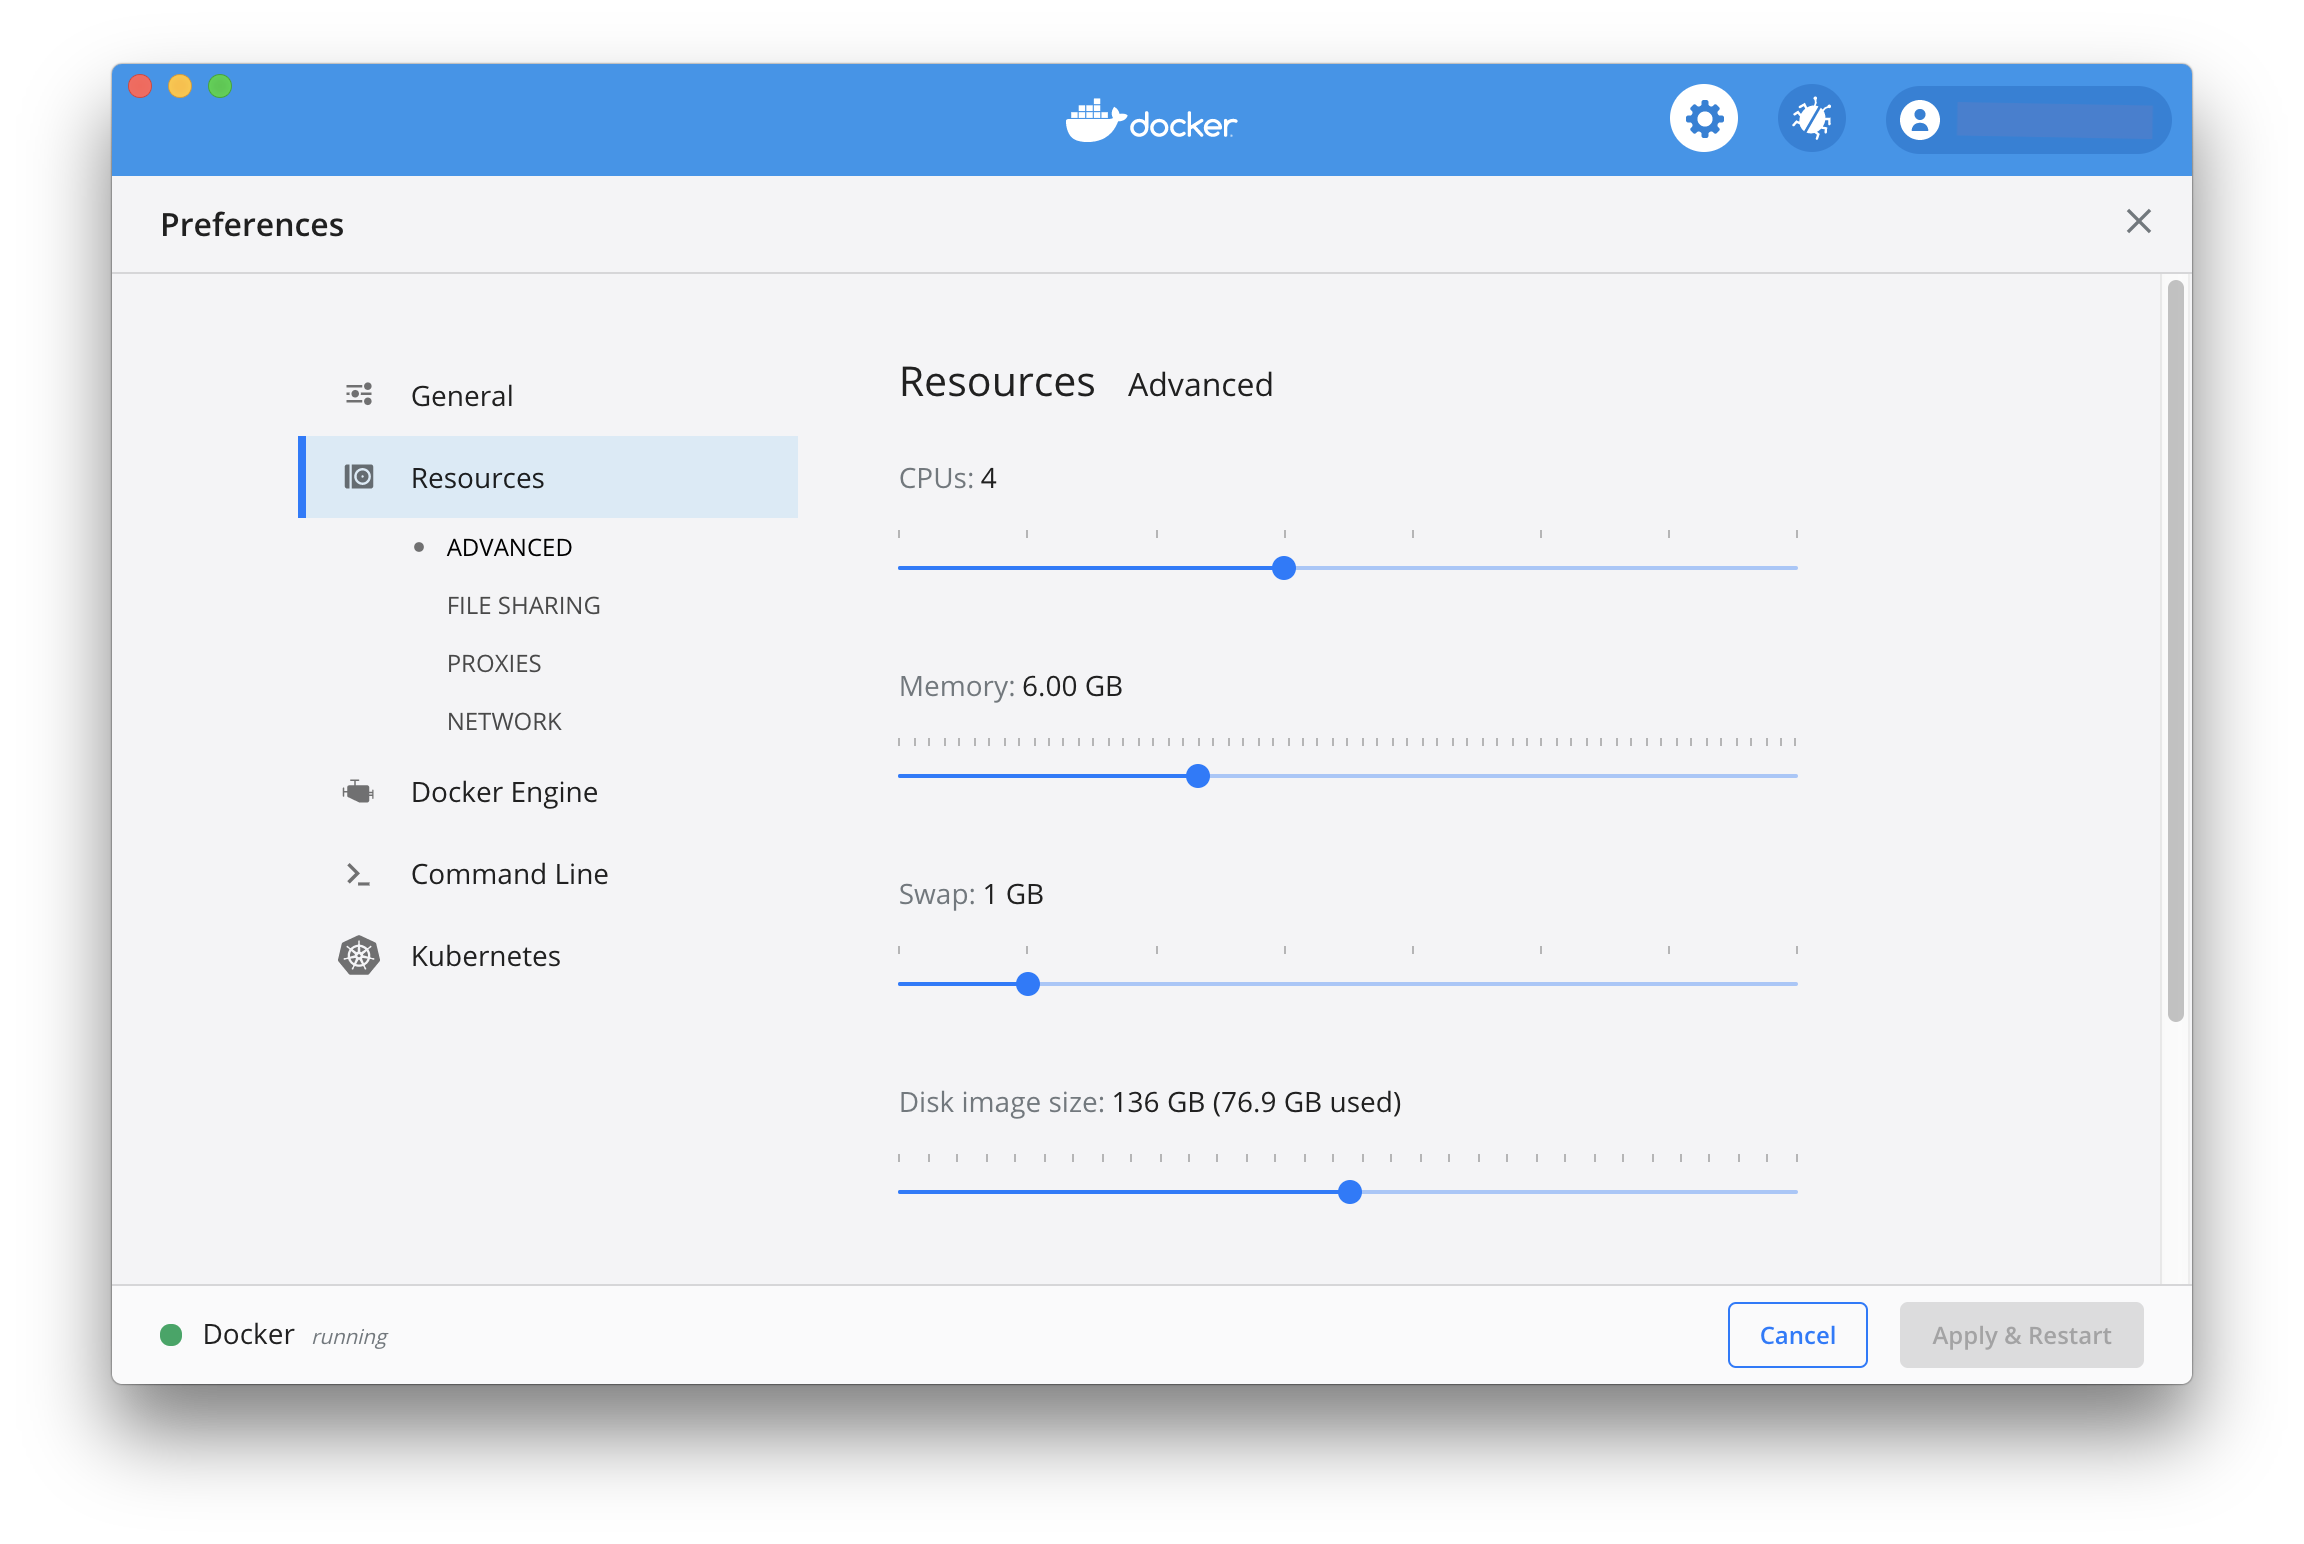
Recommended Docker settings, I'm running out of memory/disk?
If for instance:
- Some test cases fail with no error message but when using
go test ./...(without-race) the test cases work just fine... - You are getting strange database issues or cannot create additional databases...
It may be because of too little RAM in the Docker Linux VM or you no longer have disk space available. Try increasing your memory and disk image size to avoid this problem. We generally recommend that you assign at least 4 vCPUs, 6GB memory and 40GB disk space to Docker Desktop!
We currently expect that you use your first main Linux user account for development. This is typically uid/gid 1000:1000. See Dockerfile.
The development user used within the development docker image receives the above uid/gid, which is typically unproblematic for most system setups. If you encounter problems while sharing files between your host and the Docker container, check the following:
id -u
id -g
If these uids/gids do not match up, you currently need do manually adapt the uid/gid in the Dockerfile. docker-compose does not yet support passing id -u / id -g as part of its config, therefore we can only assume uid 1000 is the most used default.
The Visual Studio Code Remote - Containers extension lets you use a Docker container as a full-featured development environment. It allows you to open any folder inside (or mounted into) a container and take advantage of Visual Studio Code's full feature set. Source: Developing inside a Container
So you have an up-to-date version of Docker (stable) running and installed the VSCode Remote - Containers extension.
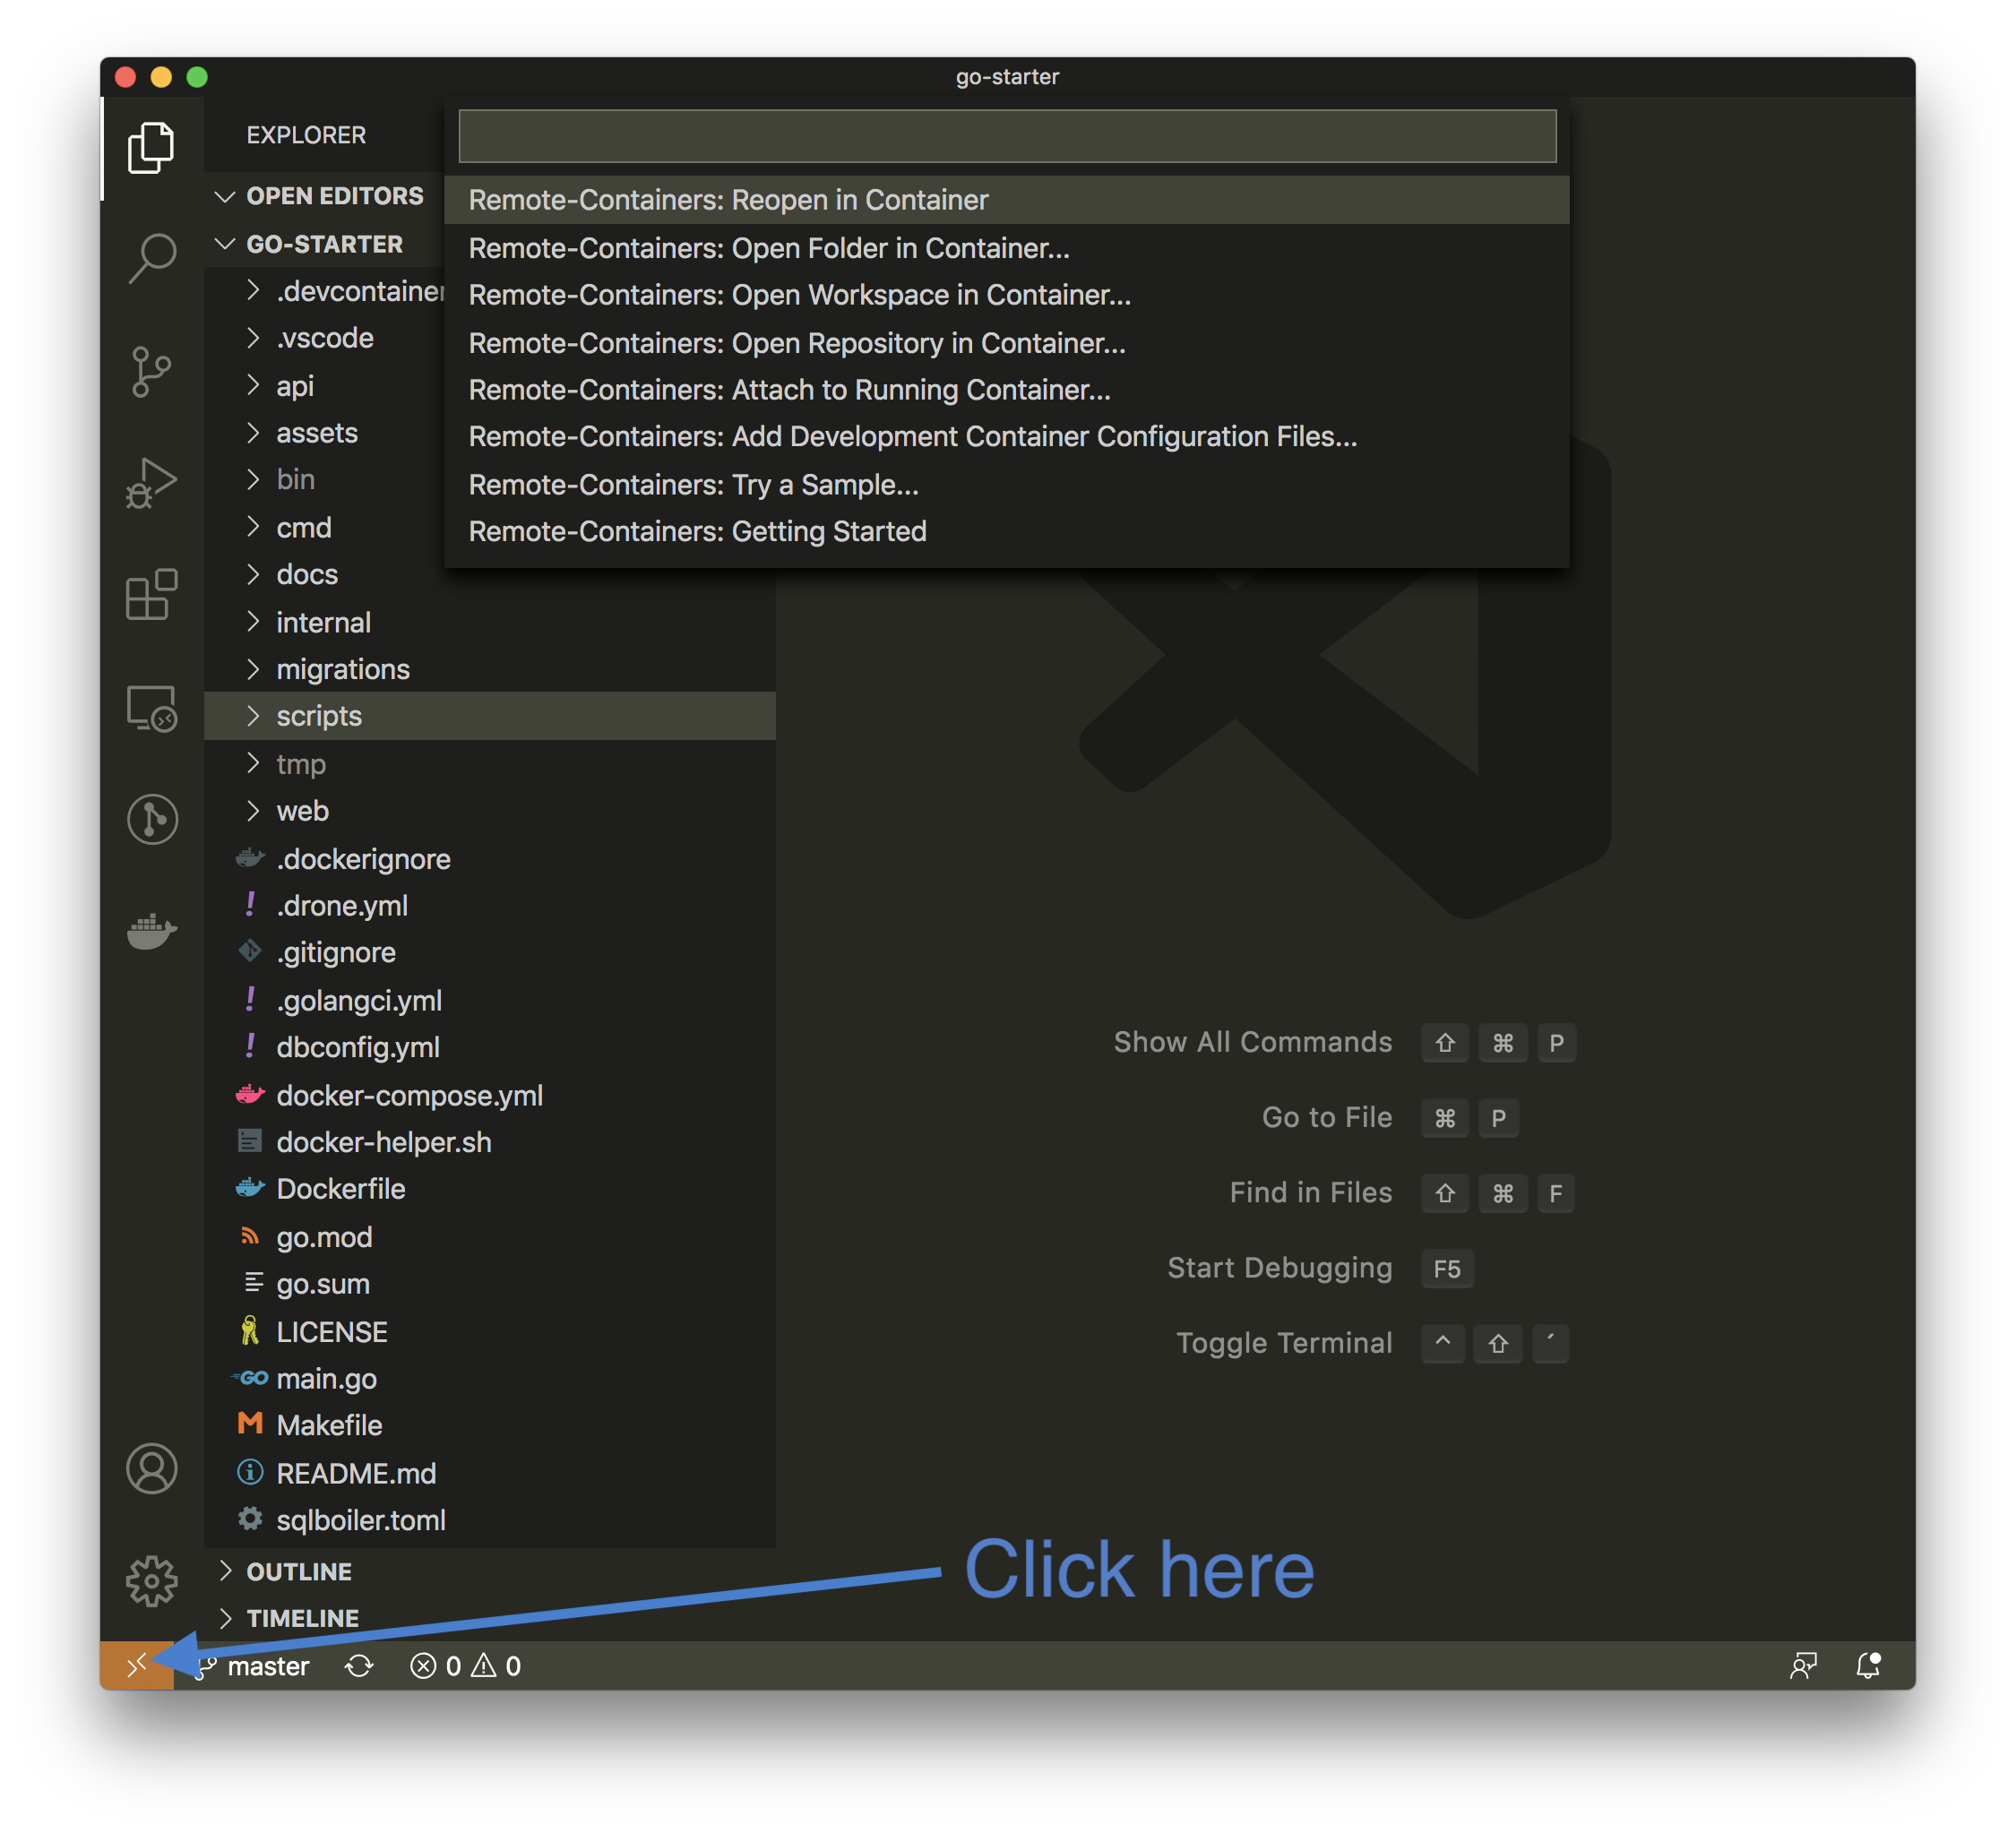
Open the go-starter project (or your go-starter fork) in VSCode (by running code . in the project root - on Windows do this in your WSL2 connected terminal) and either:
- hit
Remote-Containers: Reopen in Containerthrough the command palette (CMD+SHIFT+P) - or click on the yellow button (bottom-left corner).
The containers now spin up (if you previously already started by via ./docker-helper.sh --up, you are immediately attached to it).
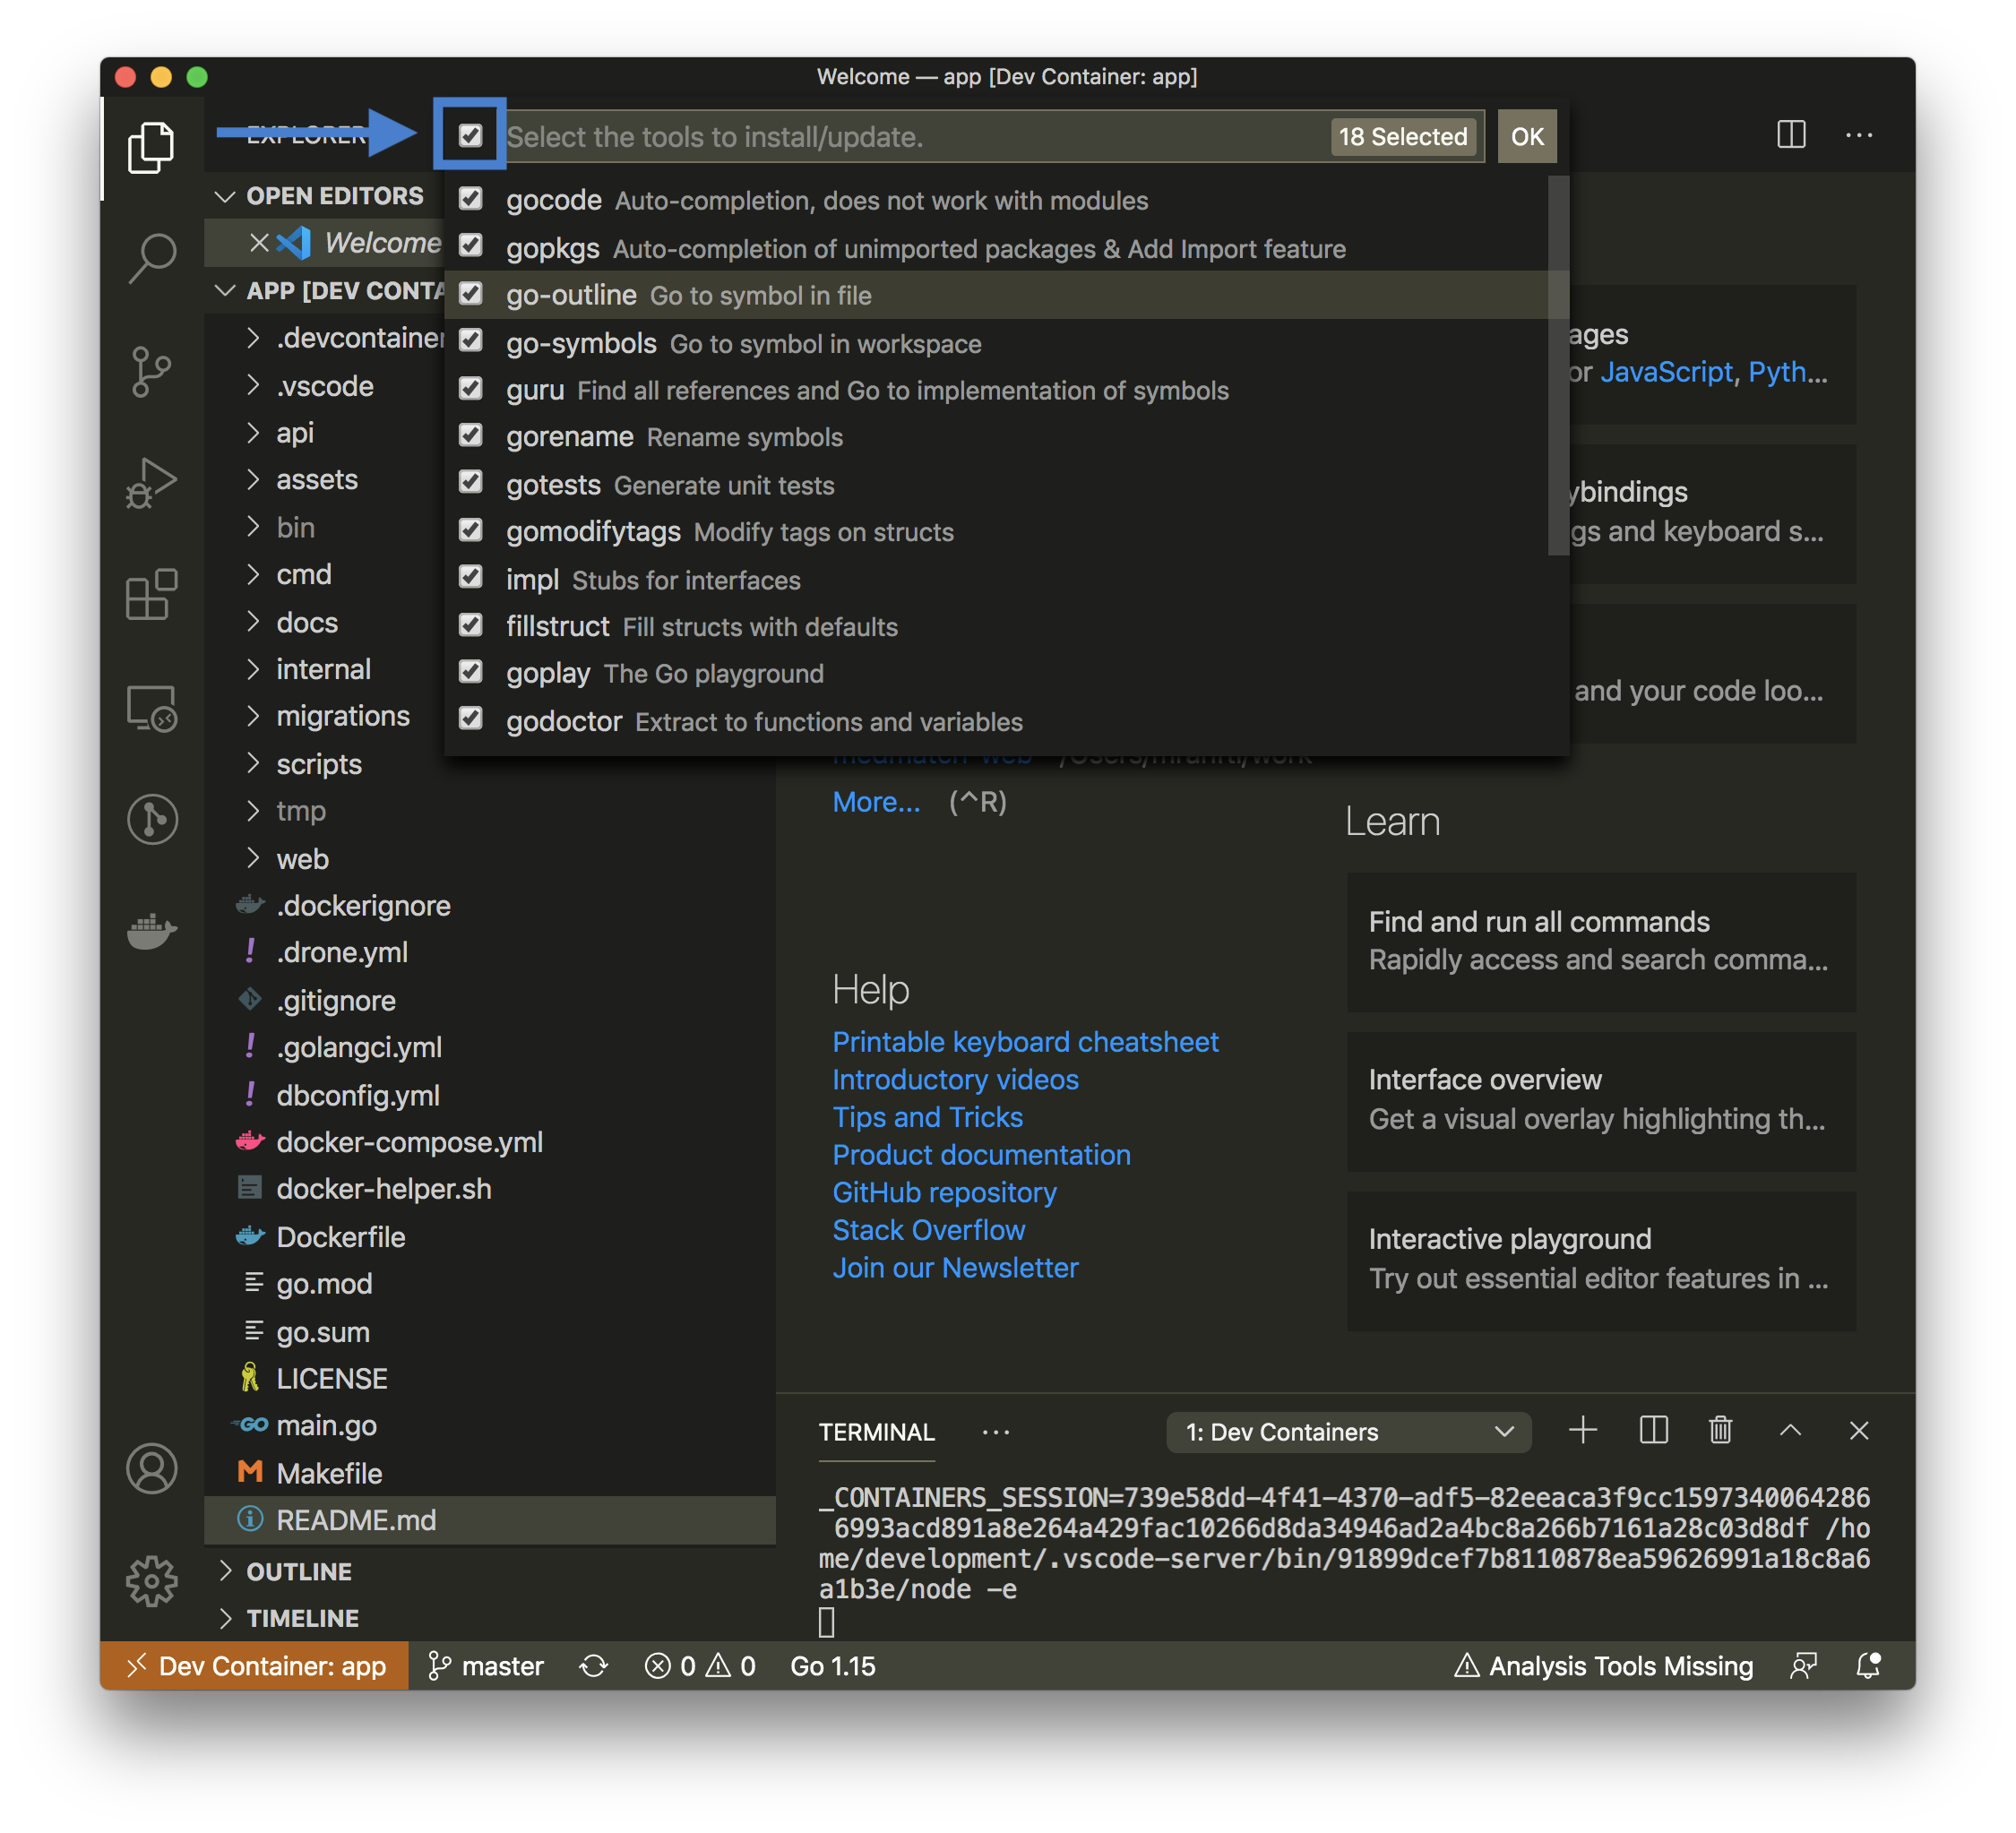
When you are finally inside the container, you should be automatically asked to install all additional go tools into the container. This will only be required after container rebuilds (extension installs are cached). If you are not explicitly asked, open the command palette (CMD+SHIFT+P) and choose Go: Install/Update Tools.
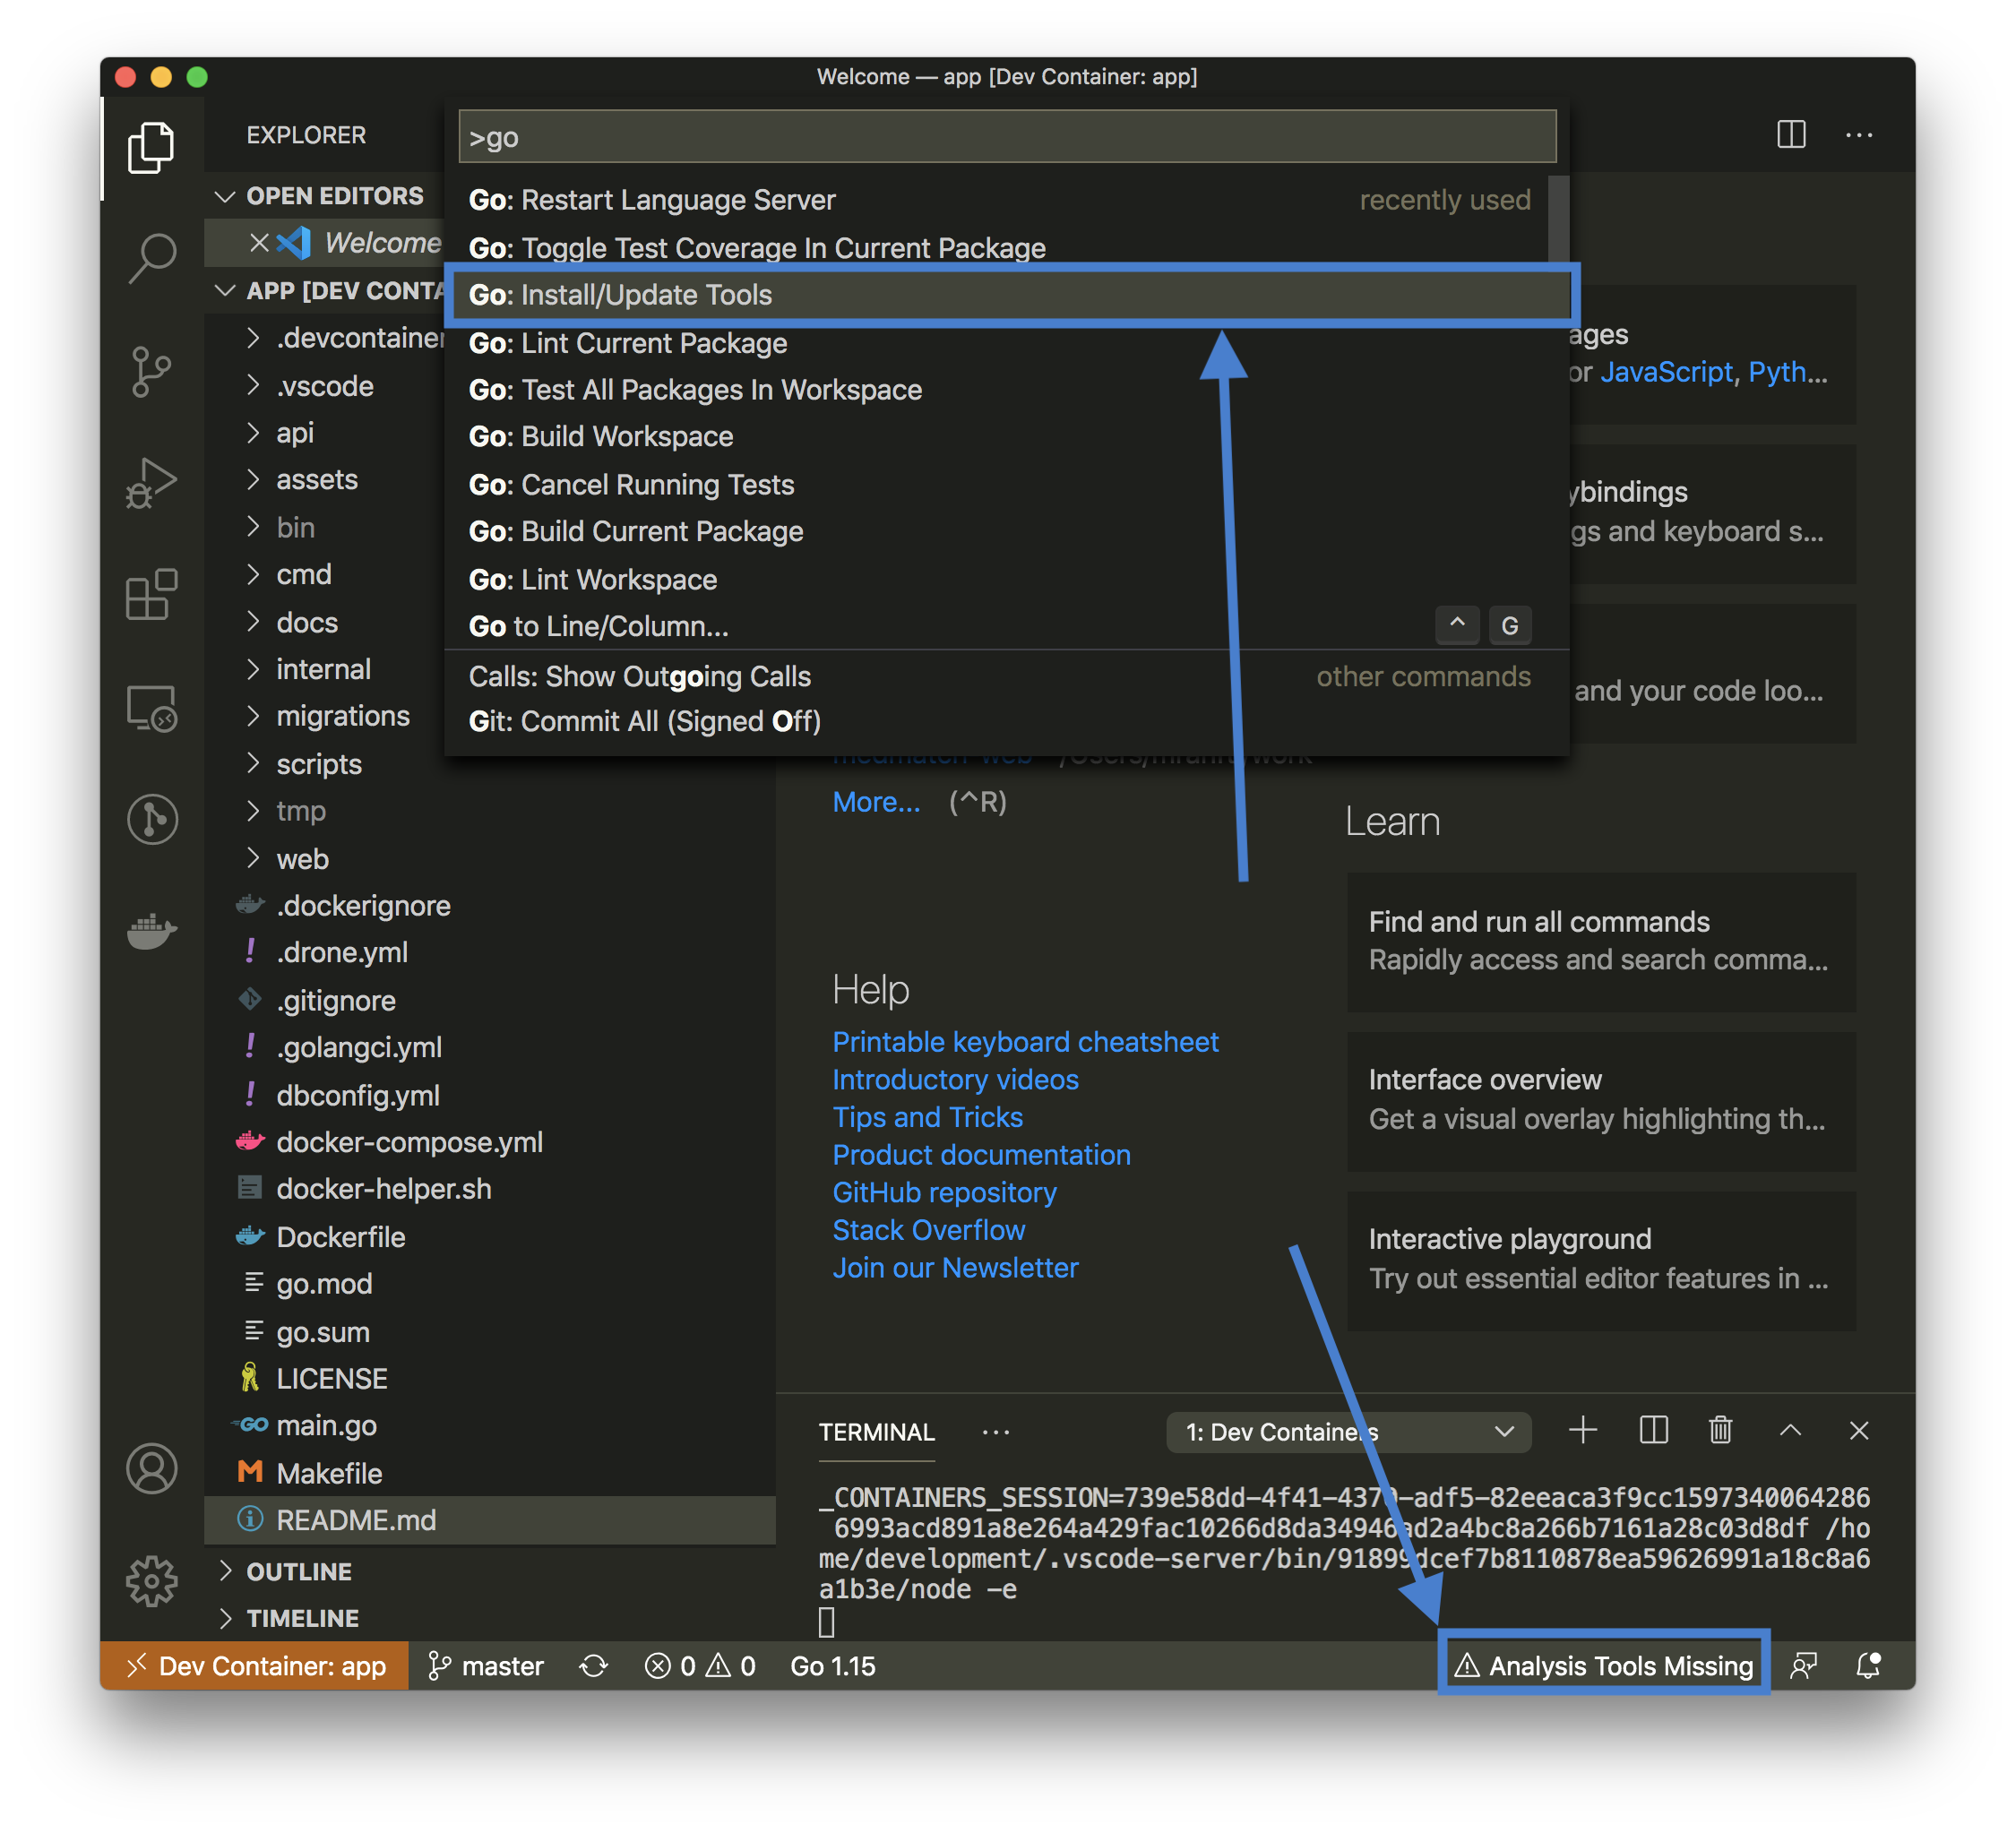
Select all tools.
To check if everything works, you may run a specific test directly in VSCode or use the debugging utils (set a breakpoint).
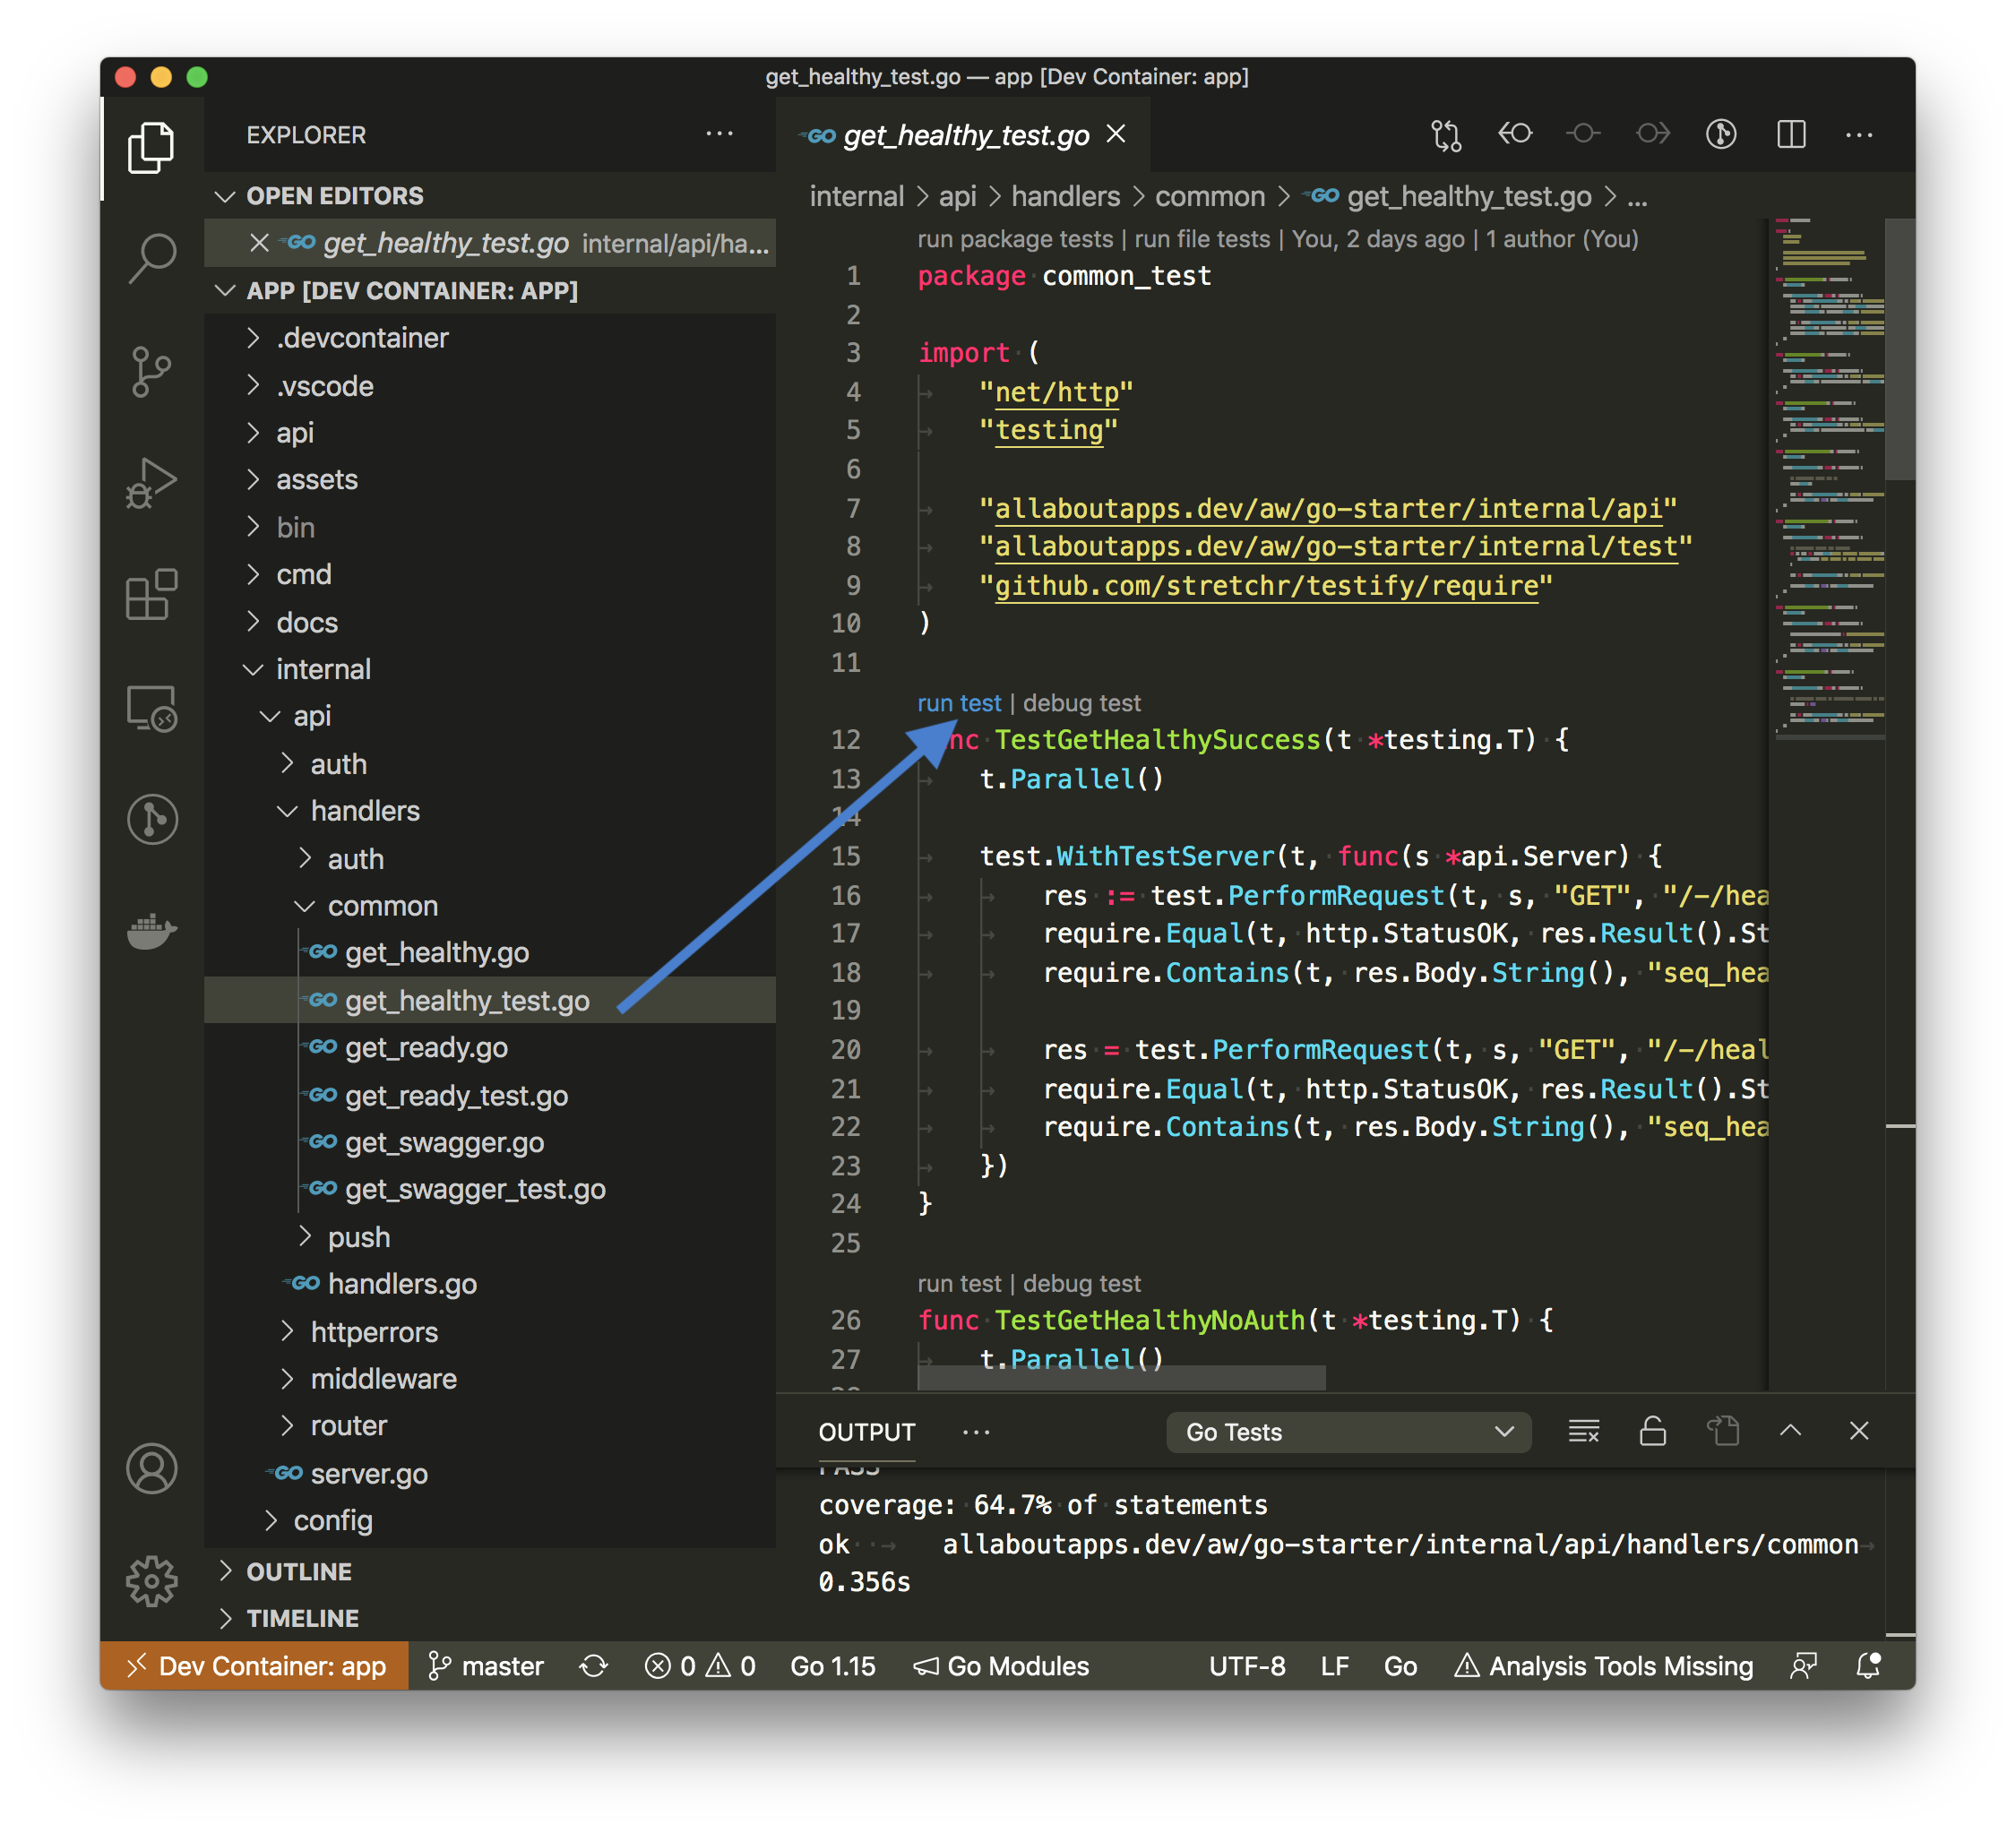
Try to open a terminal inside VSCode, you are automatically attached to the docker container.

If you work within VSCode Remote-Containers (which you should!), all VSCode go-related extensions install their binaries into <your_project>/bin (which is .gitignored).
If you encounter issues with installing / upgrading your go-related VSCode extensions (especially if it's been a while working within your project), try this:
- Remove the
<your_project>/binfolder (don't worry, it will be regenerated)! - Open the command palette in VSCode (
CMD+SHIFT+P) and chooseGo: Install/Update Tools. - Let all go-related extensions finish their reinstall (binaries will reappear within
<your_project>/bin)... - Reload VSCode (cross your fingers). Extension-related problems within VSCode should now be gone.
- Don't forget to run
make allagain, your compiledappbinary is also written into the<your_project>/binfolder.
📖 This section is all about the structure of our source code and how you will actually work with it.
It should be a pretty default layout of a go project as we are based upon golang-standards/project-layout.
If you are unsure why a certain folder exists, refer to the README.mds in each subfolder:
-
/api: OpenAPI/Swagger specs, JSON schema files, protocol definition files. -
/assets: Other assets to go along with your repository (images, logos, etc). -
/cmd: Main applications for this project. -
/docs: Design and user documents (in addition to your godoc generated documentation). -
/internal: Private application and library code (most of your Go code goes here). -
/internal/test: Private application test utilities. -
/migrations: Database migrations -
/scripts: Scripts to perform various build, install, analysis, etc operations. -
/web: Web application specific components: static web assets and server side templates.
Our
docker-compose.ymlfile is not meant to be used for production, it's solely defining our local and CI environments. Instead you should always use the final buildappimage layer for production!
Apart from the development image layer, we configure additional services, that are helpful while working on a project.
A PostgreSQL database is automatically started and exposed on localhost:5432.
Feel free to connect with your preferred database client from your host machine for debugging purposes or just issue psql within our development container.
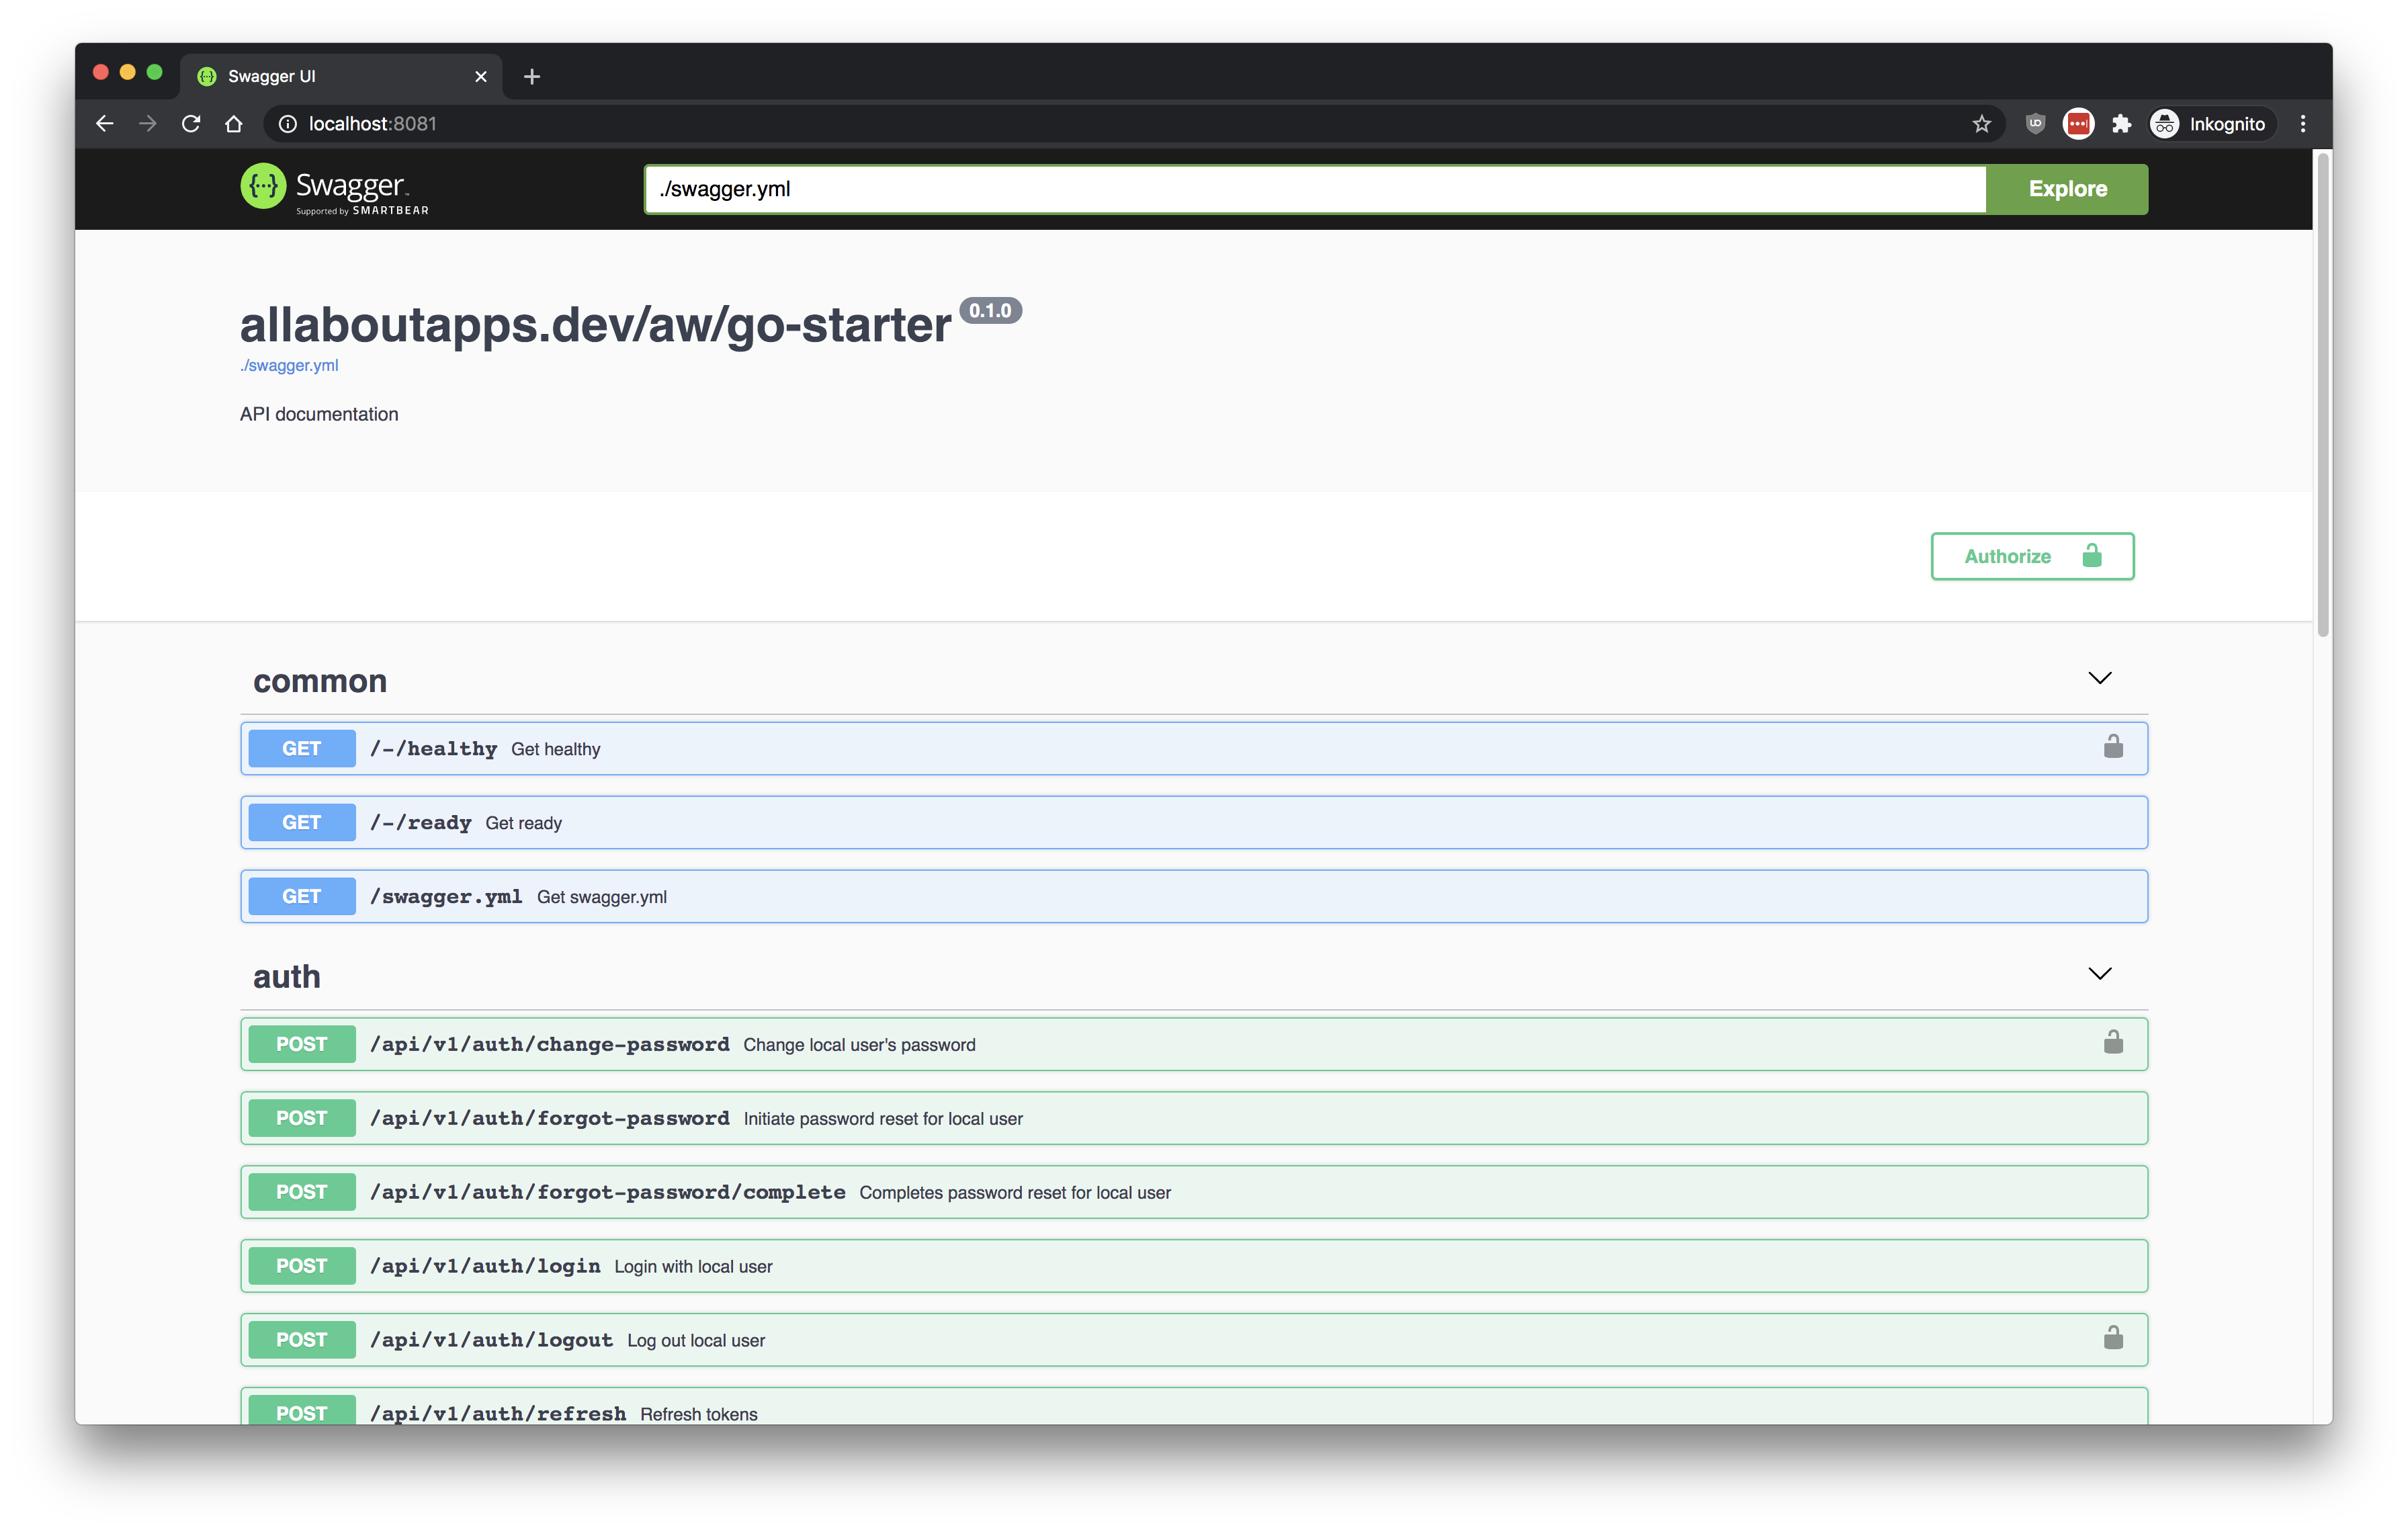
A Swagger-UI container was automatically started through our docker-compose.yml and is exposed on port 8081. Please visit http://localhost:8081 to access it (it does not require a running app server and can be used to interactively modify your api/**.yml swagger yamls).
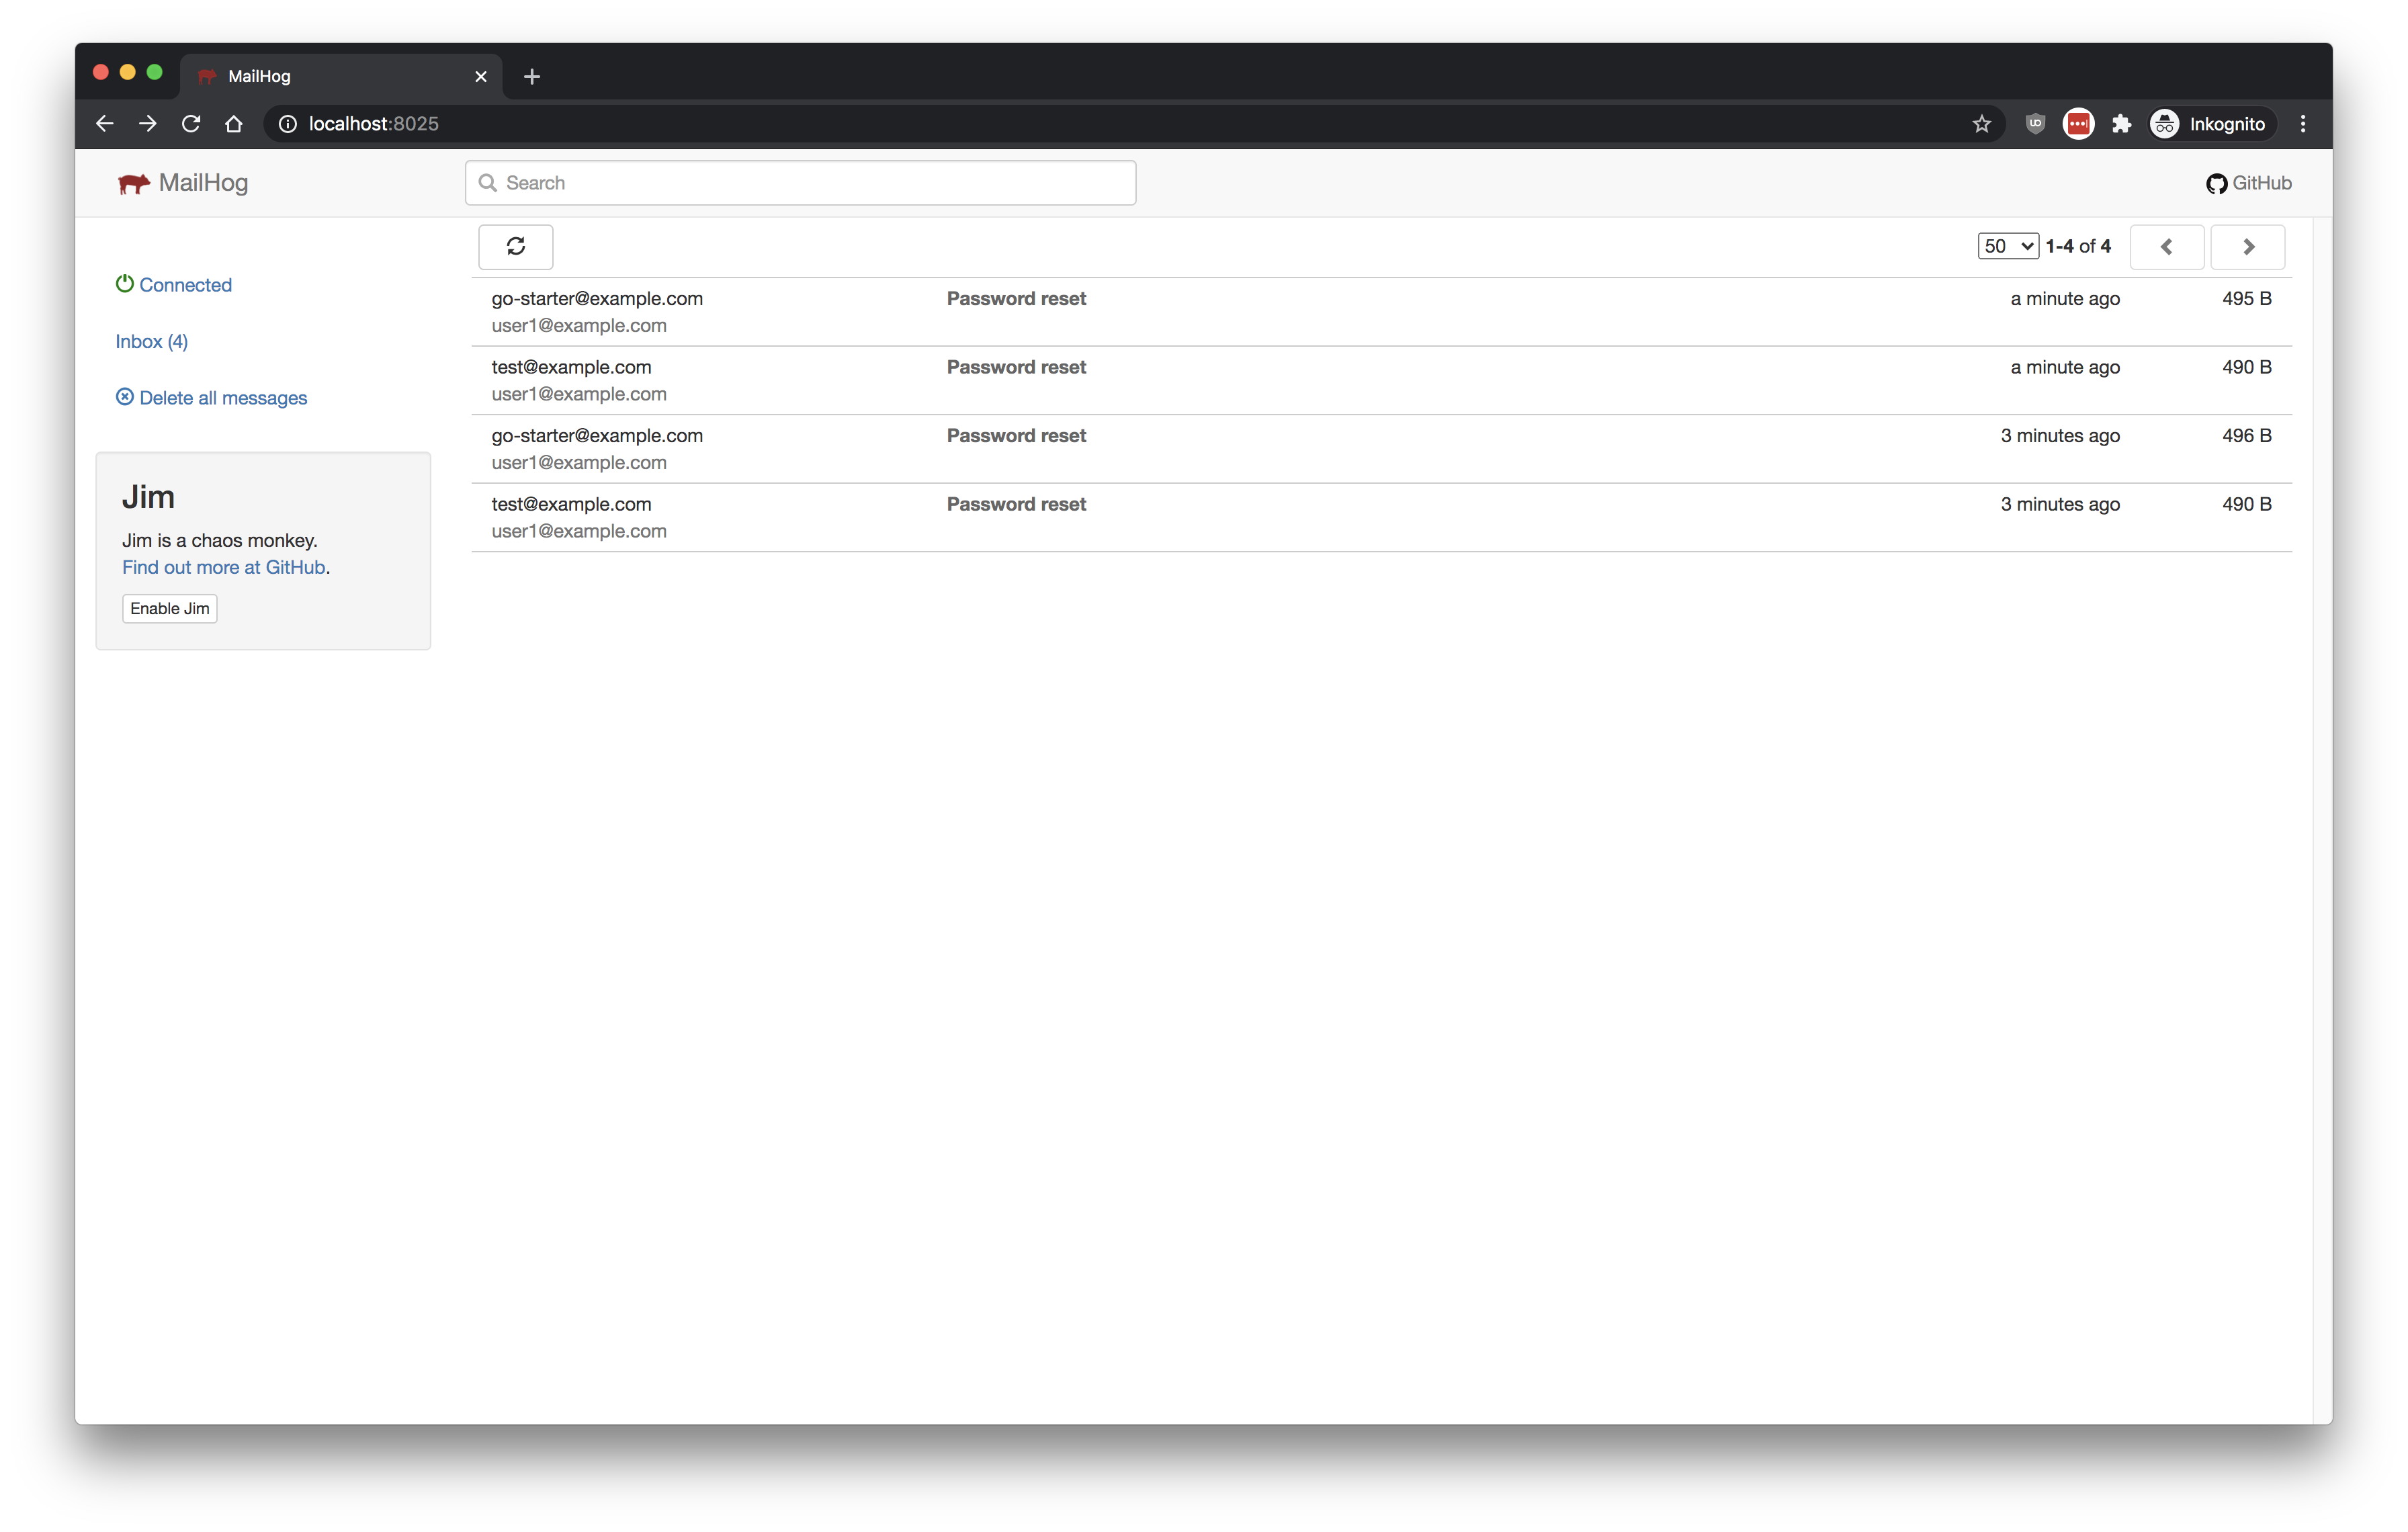
Mailhog is available to run email sending related tests. Please visit http://localhost:8025 to access it.
An IntegreSQL service is automatically started. It runs in the background to assist your integration test runs with PostgreSQL.
We already provide some database models for you to extend, we currently cover:
- auth tokens (access-, refresh-, password-reset-tokens),
- a generic auth-related
usermodel - an app-specific bare-bones
app_user_profilemodel, - push notification tokens and
- a health check sequence (for performing writeable checks).
The following diagram was generated via SchemaCrawler (as of 2020-11-04).
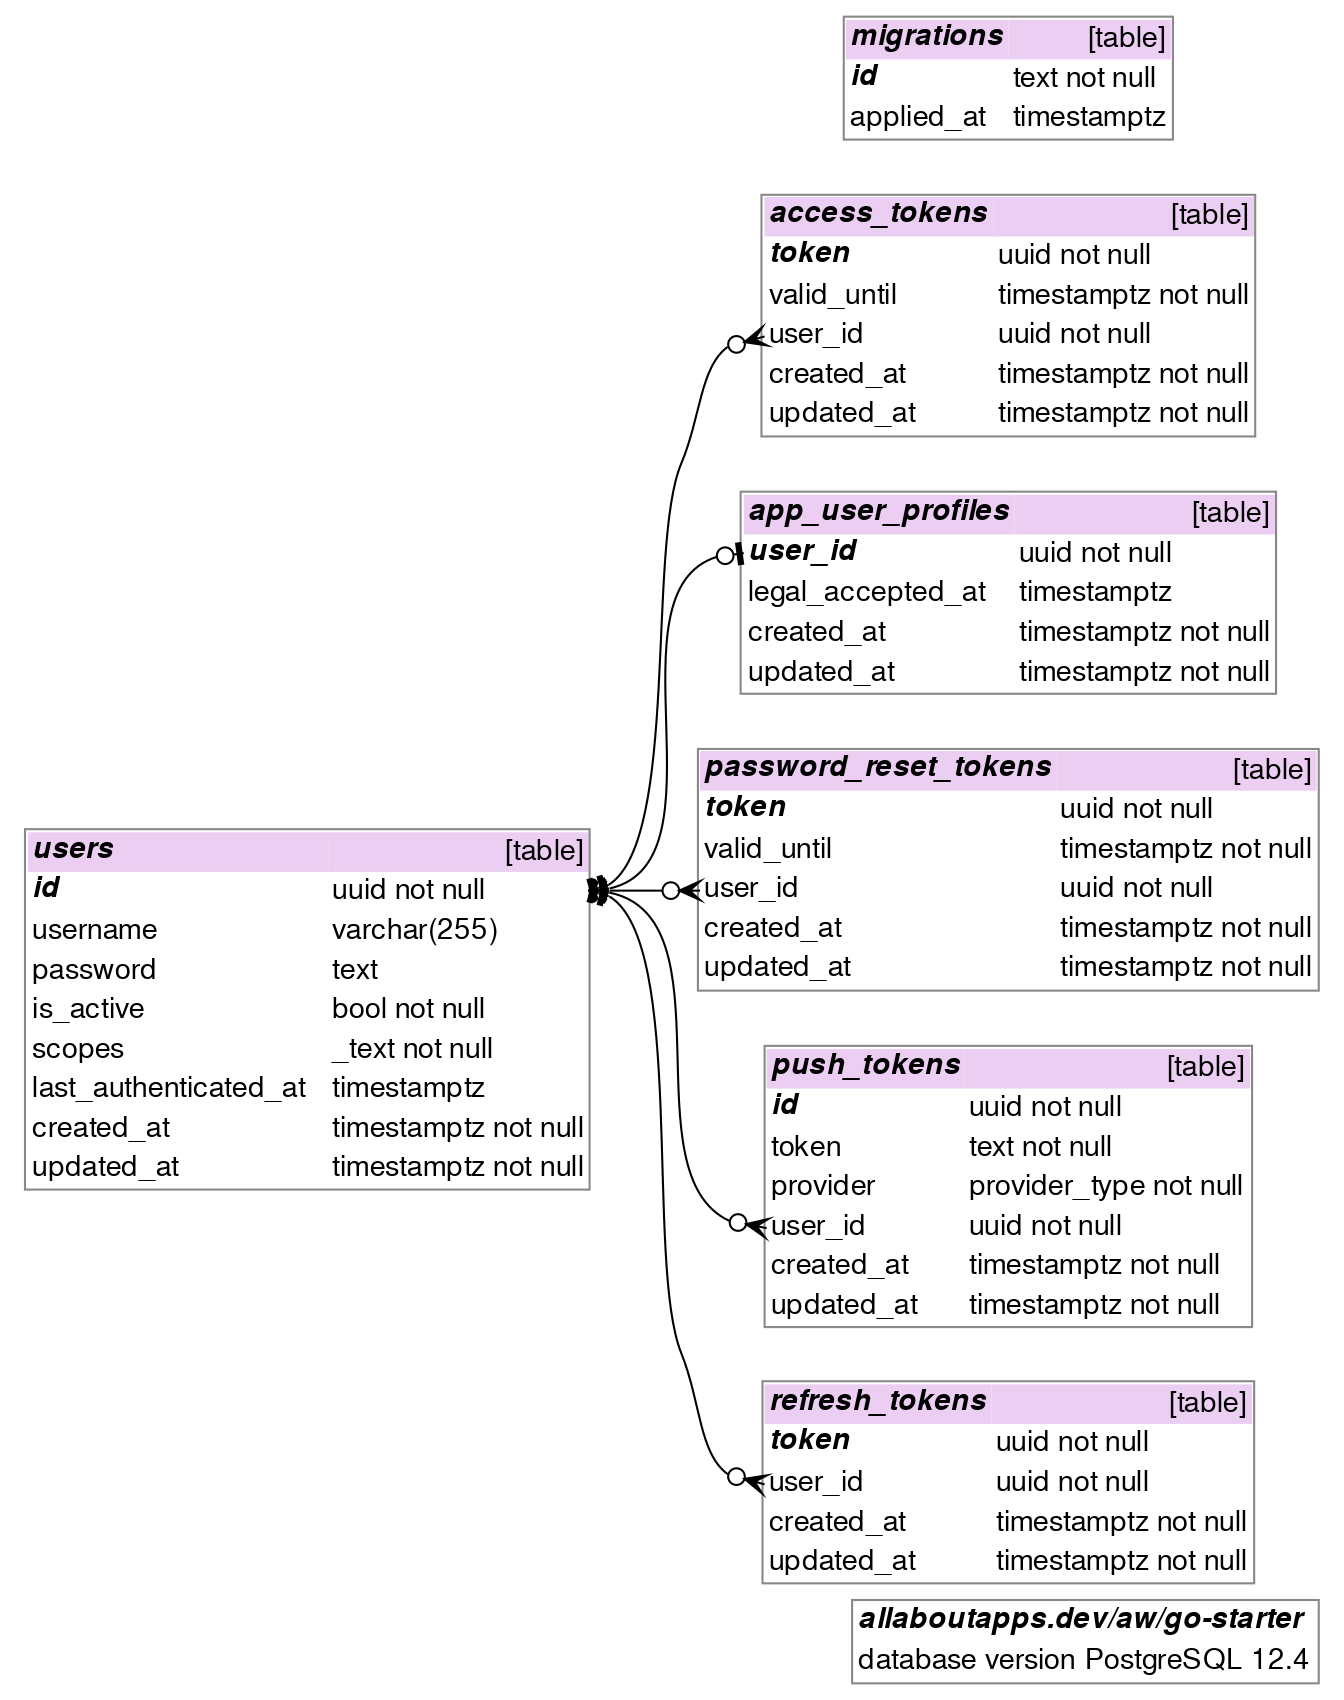
To easily (re-)generate such a pdf/png diagram on your local host machine, please visit /docs/schemacrawler for the specific docker run [...] commands.
Please run make help to get an overview of all available make targets. This should print something like the following (as of 2020-03-24).
make help
usage: make <target>
note: use 'make help-all' to see all make targets.

all                    Runs all of our common make targets: clean, init, build and test.
build                  Default 'make' target: sql, swagger, go-generate, go-format, go-build and lint.
clean                  Cleans ./tmp and ./api/tmp folder.
force-module-name      Overwrite occurrences of 'allaboutapps.dev/aw/go-starter' with current go module-name.
get-embedded-modules   Prints embedded modules in the compiled bin/app.
get-licenses           Prints licenses of embedded modules in the compiled bin/app.
get-module-name        Prints current go module-name (pipeable).
git-merge-go-starter   Merges upstream go-starter master into current HEAD.
go-test-print-slowest  Print slowest running tests (must be done after running tests).
help-all               Show all make targets.
help                   Show common make targets.
info                   Prints info about spec db, handlers, and go.mod updates, module-name and current go version.
init                   Runs make modules, tools and tidy.
lint                   Runs golangci-lint and make check-*.
set-module-name        Wizard to set a new go module-name.
sql-drop-all           Wizard to drop ALL databases: spec, development and tracked by integresql.
sql-reset              Wizard to drop and create our development database.
sql                    Runs sql format, all sql related checks and finally generates internal/models/*.go.
swagger                Runs make swagger-concat and swagger-server.
test-by-name           Run tests, output by testname, print coverage.
test                   Run tests, output by package, print coverage.
watch-sql              Watches *.sql files in /migrations and runs 'make sql-regenerate' on modifications.
watch-swagger          Watches *.yml|yaml|gotmpl files in /api and runs 'make swagger' on modifications.
watch-tests            Watches *.go files and runs package tests on modifications.
Unless you are debugging this Makefile, you won't need any commands flagged as (opt) (these targets become visible via make help-all), as they are already executed by a more general make target like: make [build], make all, make test, make test-by-name, make init, ...
Our docker-helper.sh script does its best to assist our docker-compose-based local dev workflow:
# you may attach to the development container through multiple shells, it's always the same command
./docker-helper.sh --up

# if you ever need to halt the docker-compose env (without deleting your projects' images & volumes)
./docker-helper.sh --halt

# if you ever change something in the Dockerfile and require a rebuild of the service image only
./docker-helper.sh --rebuild

# if you ever need to wipe ALL docker traces (will delete your projects' images & volumes)
./docker-helper.sh --destroyHave a look at DefaultServiceConfigFromEnv() to get an overview of available environment variables and how their binding variables use them further throughout the codebase.
Note that this configuration through ENV_VARS is intentionally our sole mechanism to configure applications. We don't intend to add additional means (e.g. viper), we want this to be as simple as possible.
See Package Management With Go Modules: The Pragmatic Guide.
Typically you don't need to explicitly install any go module by go get, just use the module by importing it in a *.go file.
Be aware that any installed go modules that are not used within your project will be automatically wiped by go mod tidy, which is executed as part of our make pipelines (as part of make init, make all and make tools).
As unused modules are automatically removed from the go.mod by go mod tidy you need to import CLI-only tools somewhere. We provide the /tools.go file for this purpose, furthermore make tools (as part of make init and make all) automatically installs tooling CLIs from this file.
Look for apt-get installs in our Dockerfile (especially any installs between -- START MANDADORY -- and -- END MANDADORY --. Other CLI-only that are only required for development (mostly tooling related) are installed by wget/curl also in this Dockerfile (e.g. pgFormatter, gotestsum, golangci-lint, goswagger).
Refer to the /.devcontainer/devcontainer.json configuration. After changing this file, you need to rebuild the image you run on (and reattach to the docker container). Either do this by executing ./docker-helper.sh --rebuild or by using VSCodes containers features.
Usally you should not change the /.vscode/extensions file, as these are only extension recommendations for your hosts' VSCode installation.
For convenience and better diffing.
- We can't regenerate
/internal/modelswithout having a PostgreSQL database to introspect. - Taking a look on the final
/api/swagger.ymlin the repo should be possible for any developer without having to build anything. - Having a repository where it's not possible to just execute
go build ./...after cloning feels wrong. - Diffing generated code (SQLBoiler in
/internal/modelsand go-swagger in/internal/types) is possible, we can actually see changes after go module version updates.
Within the Go ecosystem, this is not a controversal move, it's rather the case.
Limitations
As mentioned above, the go command is not a general-purpose build tool. In particular, it does not have any facility for generating Go source files during a build, although it does provide go generate, which can automate the creation of Go files before the build. For more advanced build setups, you may need to write a makefile (or a configuration file for the build tool of your choice) to run whatever tool creates the Go files and then check those generated source files into your repository. This is more work for you, the package author, but it is significantly less work for your users, who can use "go get" without needing to obtain and build any additional tools.
See About the go command.
One of the biggest risks with this approach is that local and remote (pre-generated) sources can become out of sync. We mitigate this problem through mandadory regeneration and a subsequent git diff --exit-code in our CIs.
Additional discussions specific to the golang ecosystem can be found at Reddit.
You may use the make git-* targets (see our Makefile) to easily merge the upstream go-starter git master into your current git HEAD.
Merging with the original go-starter repository through this workflow is only possible if you have the full git history of the go-starter project in your own repository. Typically you want to run make git-merge-go-starter immediately after setting up your project (so you can immediately resolve problems with unrelated git histories).
# Note that you typically want to do this on your host maschine, not inside the container
you@host:project

make git-merge-go-starter
# [...]
# Commits away from upstream go-starter master:
# 133
# [...]
# Git log:
# 6315aa3  Wed Sep 23 16:22:35 2020 +0200 (23 hours ago)	 Mario Ranftl: upgrade go.mod deps
# 5a27598  Wed Sep 23 16:06:32 2020 +0200 (23 hours ago)	 Mario Ranftl: loosen probe internal test to context deadline err or waittime err, better fs util test which err is expected
# [...]
# Attempting to execute 'git merge --no-commit --no-ff go-starter/master' into your current HEAD.
# Are you sure? [y/N]
y
# git merge --no-commit --no-ff go-starter/master
# [...]
# Done. We recommend to run 'make force-module-name' now to automatically fix all import paths.
You may now go ahead and resolve any git conflicts (make force-module-name to fix all imports). If you are overwhelmed simply run git checkout -f to undo any merge changes, nothing is commited/pushed yet.
We provide an additional helper for go-starter merges, that you typically want to execute before manually resolving most "both modified" conflicts (typically to fix the import paths again):
development@94242c61cf2b:/app$ # inside your development container...

# Overwrite occurences of 'allaboutapps.dev/aw/go-starter' with your current go module-name
make force-module-nameKeep in mind that changes to the Dockerfile, docker-compose.yml may not be automatically reflected in your container (e.g. go compiler updates, new ENV_VARs). Run ./docker-helper.sh --rebuild (or Remote-Containers: Rebuild Container from VSCode's command palette) to rebuild the development docker container. Use ./docker-helper.sh --up to reattach again.
Heads-up!: Ensure to use the same PostgreSQL version in local development and live.
We will update the used version of PostgreSQL in go-starter (minor and major versions). This means, you need to take special care when you merge changes into your project and look for changes to the postgres versions.
The easiest way to do so, is to explicitly check for changes within the docker-compose.yml file:
postgres:
image: postgres:12.4-alpine # should be the same version as used in .drone.yml, .github/workflows, Dockerfile and liveFor initial setup and caveats, see
I want to compare or update my project/fork to the latest go-starter masterabove.
If you have set up everything, merging the next go-starter stable tag into your own project is just a command away!
We recommend to upgrade in small steps, merging the next available go-starter git tag into your project is the way to go. So choose a go-starter-YYYY-MM-DD tag and run:
# merge with the go-starter git tag `go-starter-YYYY-MM-DD`
GIT_GO_STARTER_TARGET=go-starter-YYYY-MM-DD make git-merge-go-starterIf you simply want to upgrade your project to the latest go-starter master run:
# merge with the go-starter git master
make git-merge-go-starterIf you want to merge a specific (pre-release) go-starter branch or commit into your project, you can do so by :
# merge with a specific branch (heads up! it's `go-starter/<branchname>`, e.g. `go-starter/mr/housekeeping`):
GIT_GO_STARTER_TARGET=go-starter/mr/housekeeping make git-merge-go-starter

# merge with a specific go-starter commit (e.g. `e85bedb94c3562602bc23d2bfd09fca3b13d1e02`)
GIT_GO_STARTER_TARGET=e85bedb94c3562602bc23d2bfd09fca3b13d1e02 make git-merge-go-starterRegardless if you chose option a or b or c, this will try to merge the upstream go-starter changes into your project without committing anything. After this is done the command will yield:
Done. We recommend to run 'make force-module-name' to automatically fix all import paths.
- Do so. Run
make force-module-namewithin your development container. - Continue to fix other git merge conflicts (
git status). - Take a look at the
CHANGELOGagain, especially for BREAKING changes. - Finally try
make build, rebuild your development container./docker-helper.sh --rebuildand trymake allfrom a fresh new container again. - After everything works again within your local dev container (it builds and tests), feel free to commit.
📖 Swagger (OpenAPI v2) plays a big role in our dev workflow (see FAQ: How does our dev workflow work?). This section provides some tips to use it wisely.
-
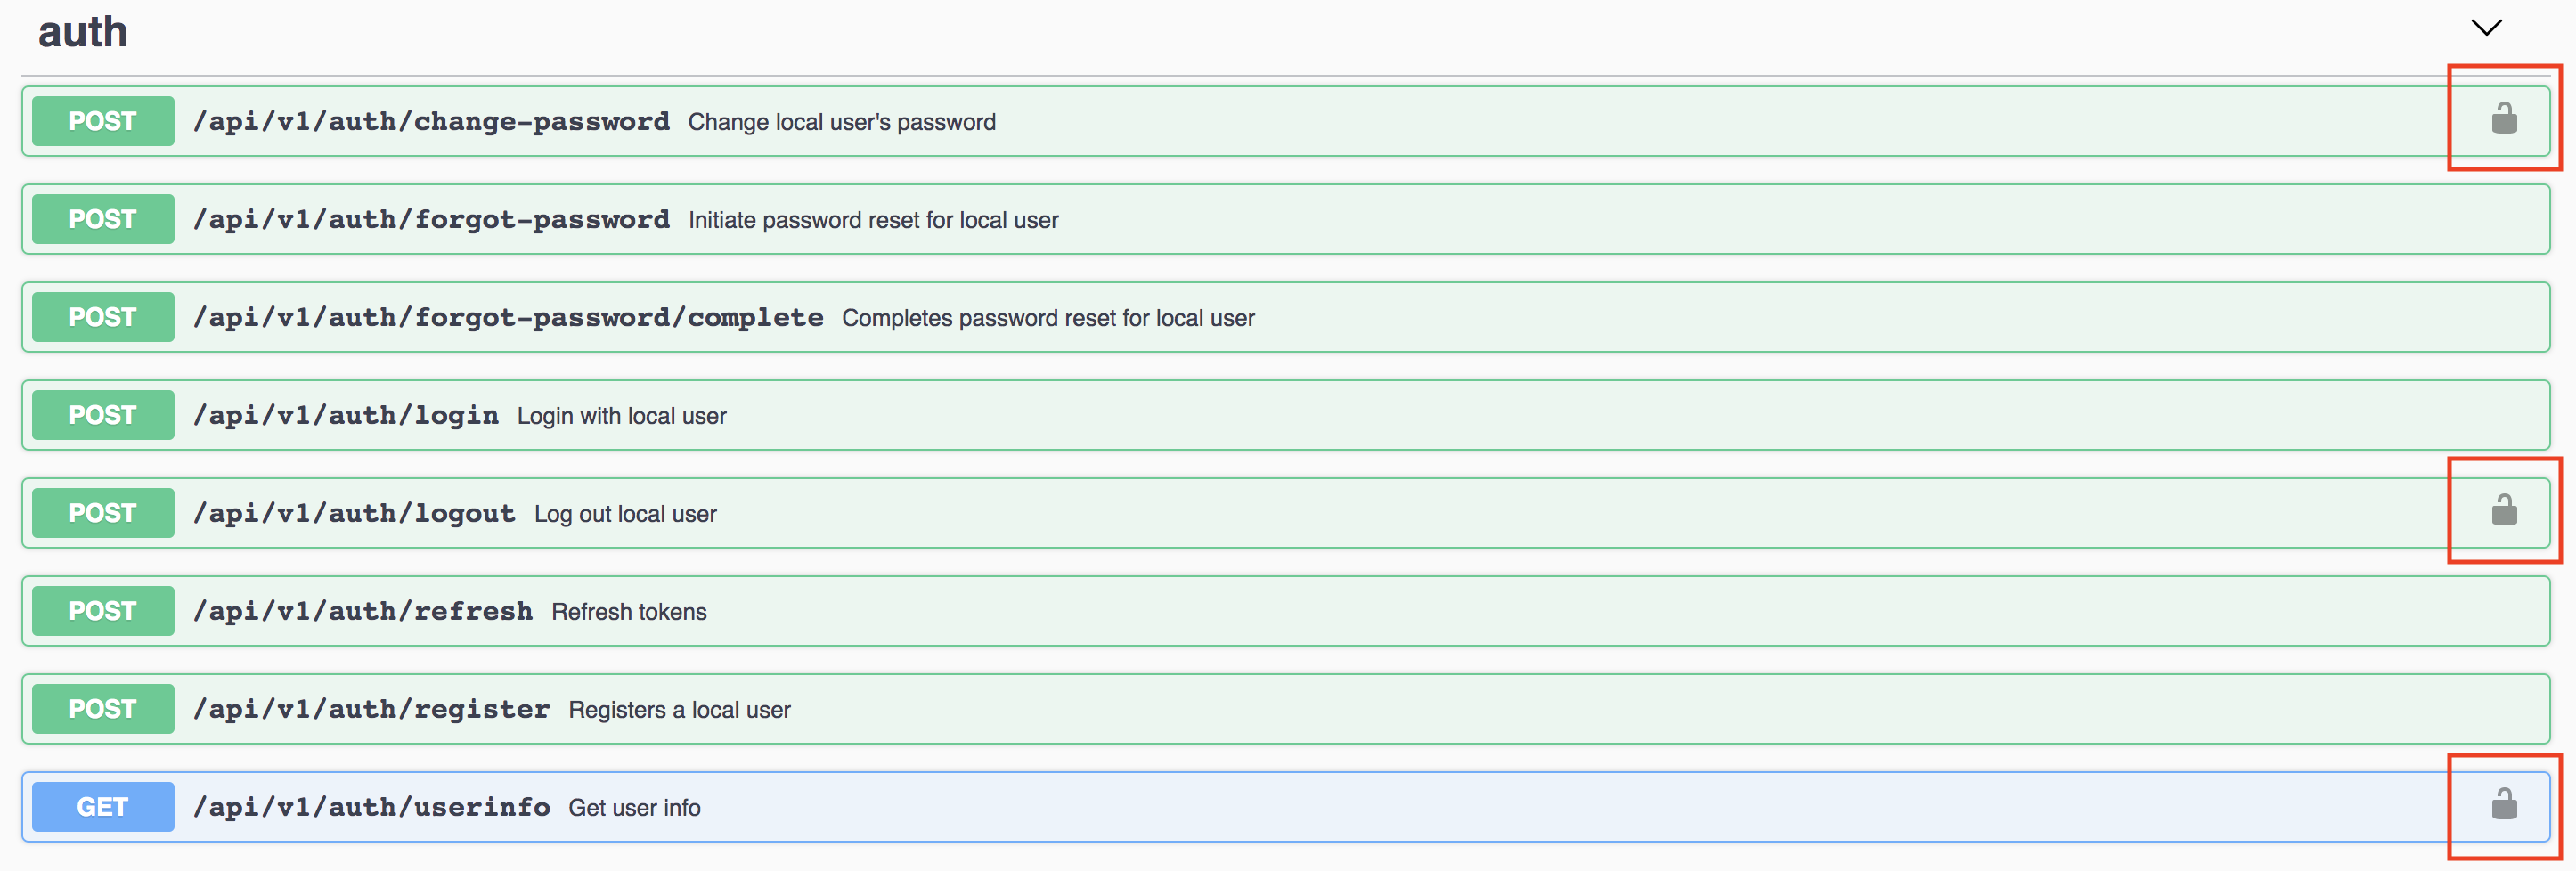
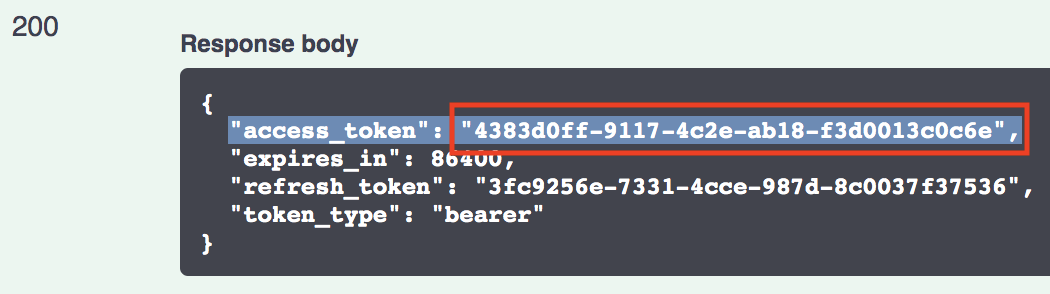
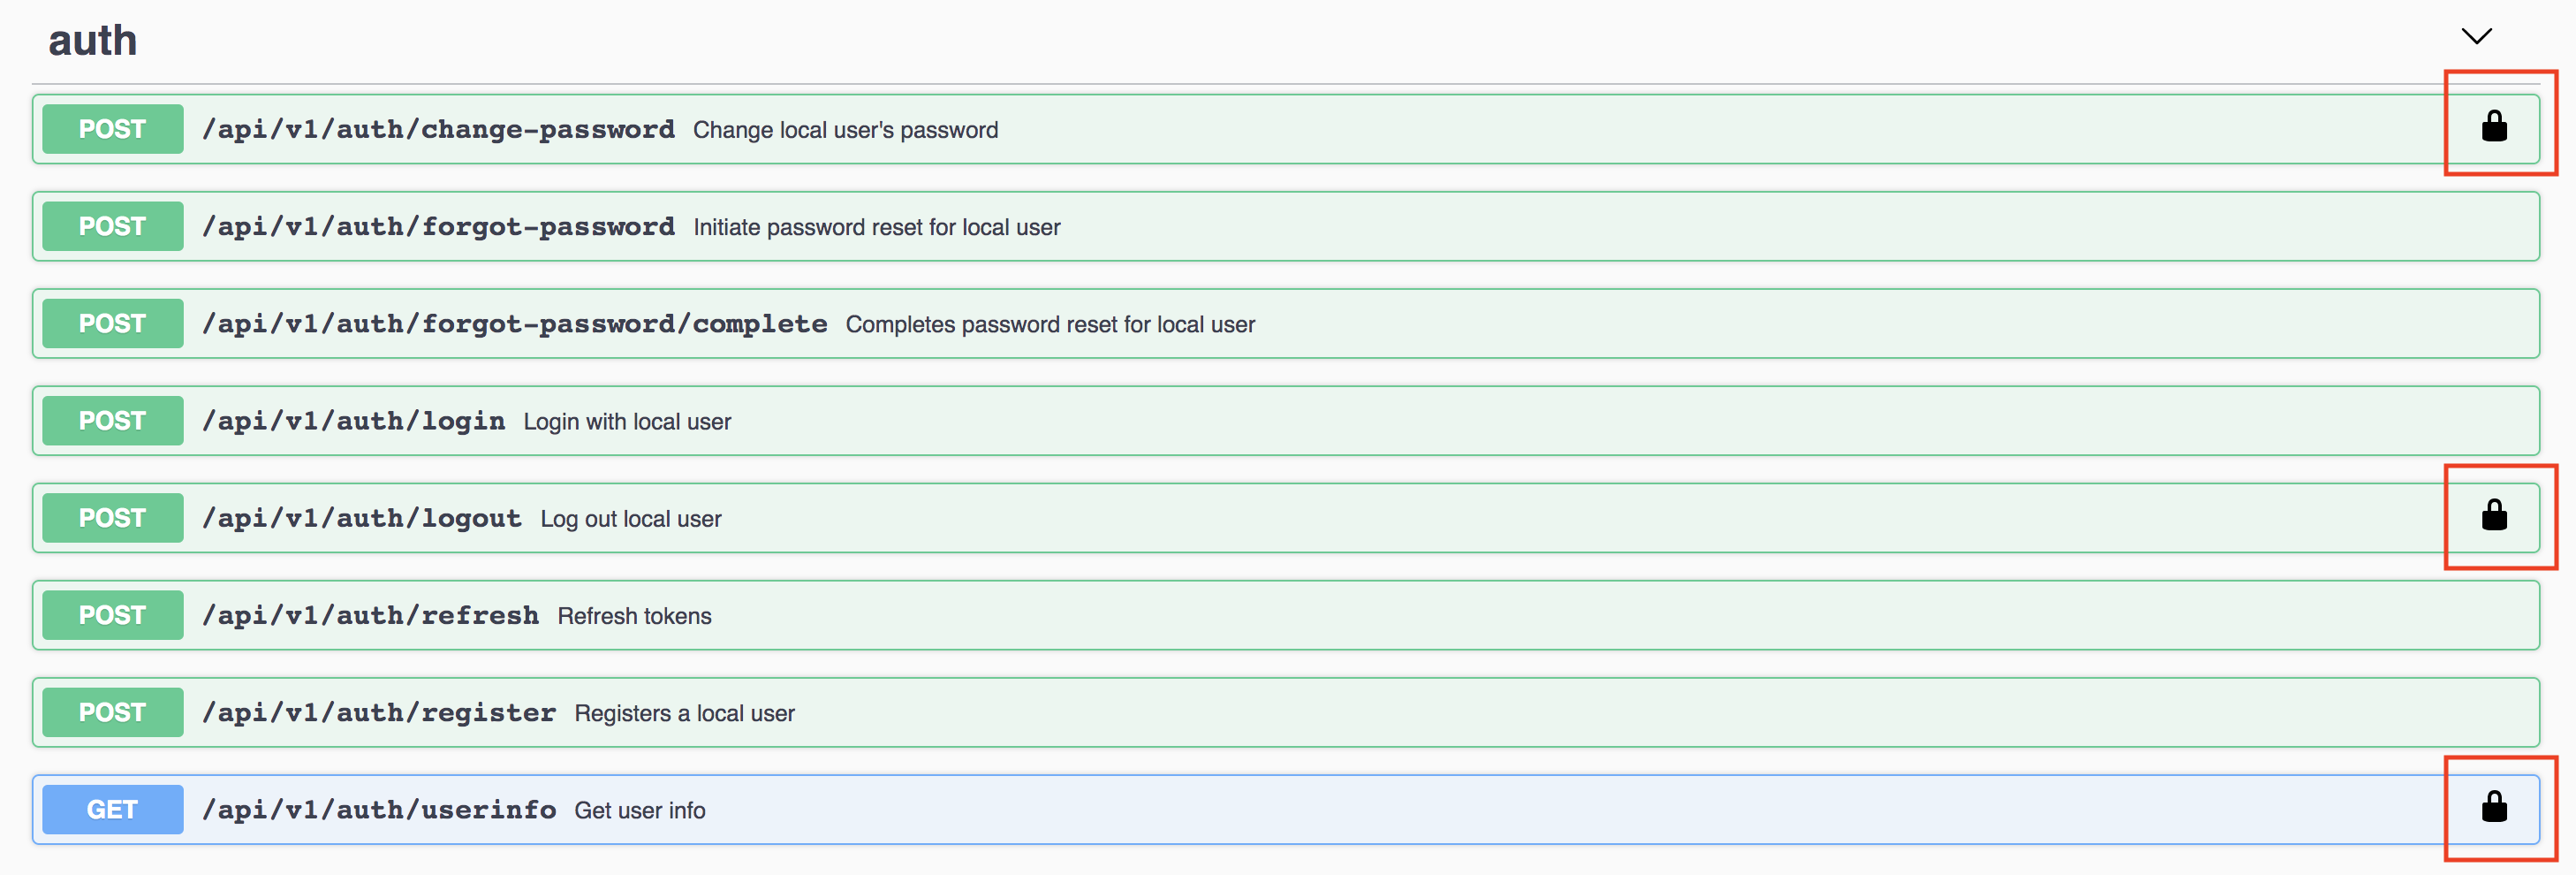
Certain endpoints require authentication, those will be marked like this.
-
You will first need an
access_tokenthrough on of your endpoints (typically from/api/v1/auth/loginor via/api/v1/auth/register). -
Copy the above
access_tokenand click the "Authorize" button within Swagger-UI. -
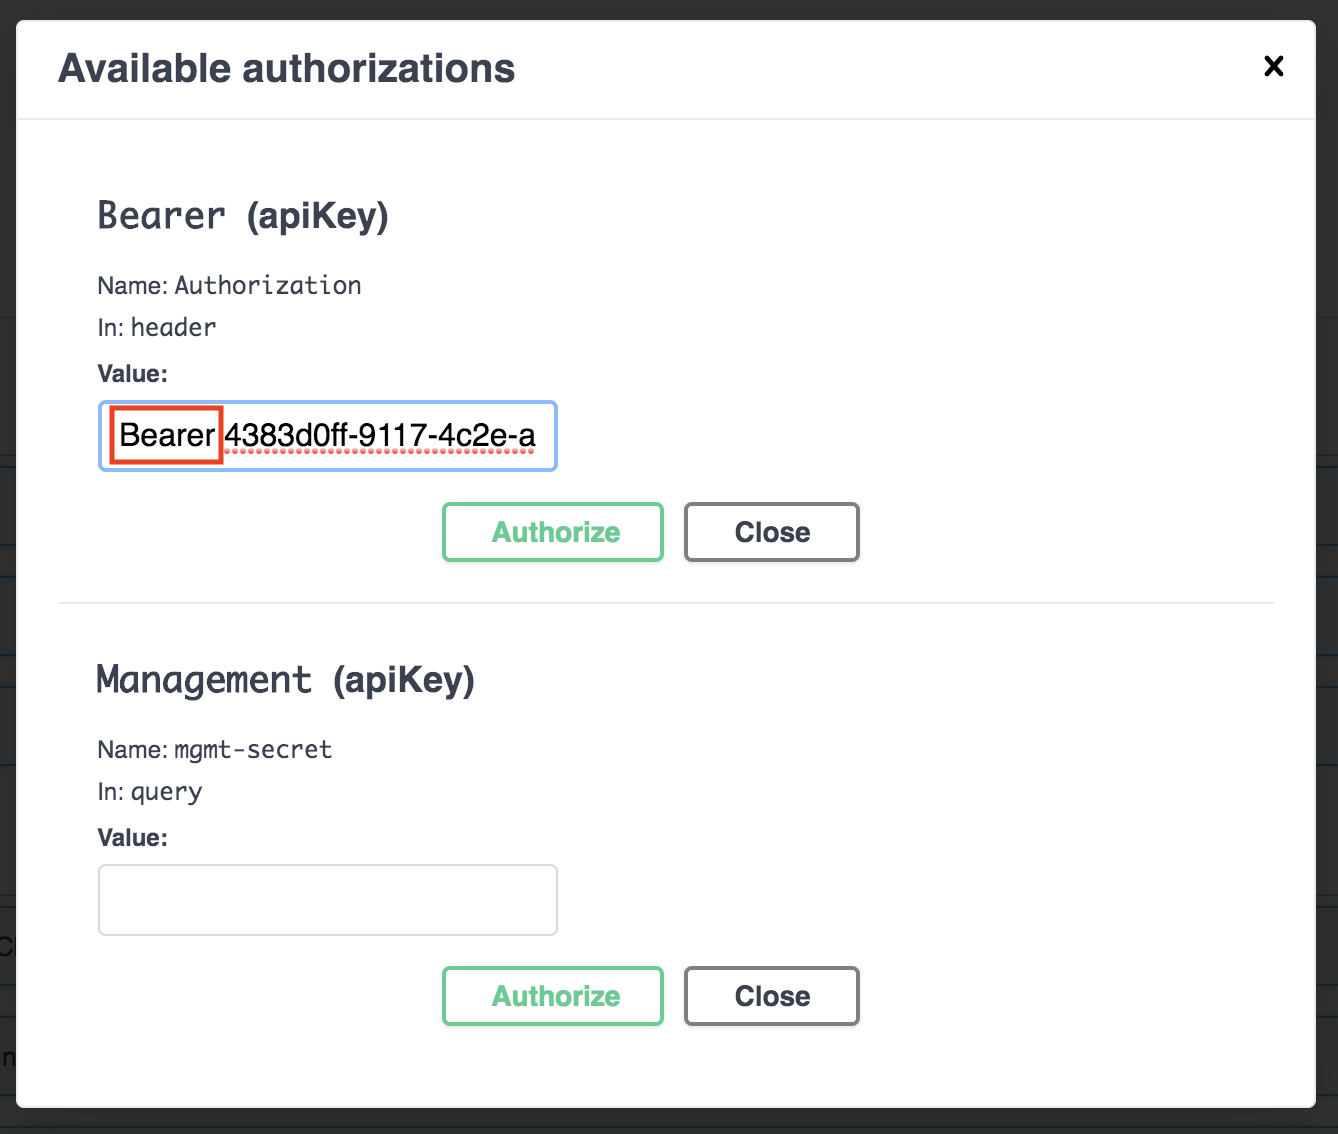
Paste the
access_tokeninto the input box in a format like"Bearer <your_access_token>". -
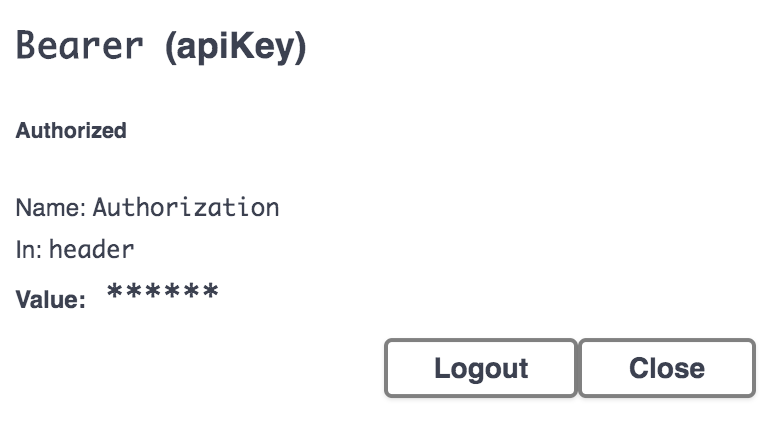
Hit "Authorize".
-
You should now be able to call all authorized endpoints.
TL;DR: Use the official swagger v2 spec and go-swagger: Schema Generation Rules as your primary information source.
Anything in the official swagger v2 spec is supported. Specifically have a look at the YAML examples in Basic Structure and Paths and Operations. Just ensure you are still using v2 syntax (go-swagger does not support Swagger/OpenAPI v3).
A detailed look into supported schema features by go-swagger is available here: go-swagger: Schema Generation Rules.
Swagger types are rendered as follows by
go-swagger:
Swagger type go type string(no format)stringbooleanboolnumberfloat64number format doublefloat64number format floatfloat32integerint64integer format int64int64integer format int32int32integer format uint64uint64integer format uint32uint32fileio.ReadCloser(server) orio.Writer(client)string format binaryio.ReadCloserorio.Writerstringwith other formatscorresponding type exported by go-openapi/strfmtThe
filetype is exposed as aio.ReadCloser(orio.Writer) interface. The actual implementation in a runtime server or client is provided by the [go-openapi/runtime/Filetype][File].
An overview about additional supported string formats (for usage in the format property) can be obtained here: goswagger strfmt README.
TL;DR: We prefer camelCase with a lowercase first letter for all payloads.
Choose meaningful property names. Property names must conform to the following guidelines:
- Property names should be meaningful names with defined semantics.
- Property names must be camel-cased, ascii strings.
- The first character must be a letter, an underscore (
_) or a dollar sign ($).- Subsequent characters can be a letter, a digit, an underscore, or a dollar sign.
- Reserved JavaScript keywords should be avoided (A list of reserved JavaScript keywords can be found below).
- These guidelines mirror the guidelines for naming JavaScript identifiers. This allows JavaScript clients to access properties using dot notation. (for example,
result.thisIsAnInstanceVariable). Here's an example of an object with one property:{ "thisPropertyIsAnIdentifier": "identifier value" }JSON maps can use any Unicode character in key names.
Certain property names are reserved for consistent use across services.
Array types should have plural property names. All other property names should be singular.
Avoid naming conflicts by choosing a new property name or versioning the API.
One exception from this rule is if you need to comply to a 3rd-party specification e.g. OAuth2 identifiers / payloads are standardized and must be snake_case.
See:
An detailed look into supported schema features by go-swagger is available here: Schema Generation Rules.
Since this project currently uses OpenAPI/Swagger 2.0 it lacks the oneOf, anyOf, allOf and not keywords.
As a workaround you can use additionalProperties and specify {} for it (additionalProperties: {}). This transforms the final struct type into an Go interface{}, effectively allowing any type.
Please still only use pointers where appropriate and if you need them.
The following is goswagger specific:
Required strings without a set minLength are represented as a pointer, as otherwise it would be impossible to distinguish "" and nil (not supplied) values. Go has zero values.
Here are the rules in goswagger that turn something into a pointer:
- structs
-
x-nullable,x-isnullable: explicit override to accept null values (otherwise not accepted by Swagger) - required property
- extending with
allOfa schema with another schema with justx-nullable(or other extensions, but no new properties) turns the schema into a pointer
Primitive types (number, bool and string) are turned into pointers whenever we need to validate valid zero values vs unset (i.e. the zero value is explicitly checked against validation)
See:
You may use the allaboutapps/nullable pkg in combination with go-swaggers' x-go-type for that. The api/definitions/nullable.yml should give you a good starting point.
These data definitions are especially useful for building PATCH endpoints, e.g. to explicity patch an optional field through a payload to null|nil.
📖 We ❤️ PostgreSQL at all about apps. This section provides some tips how you may want to interact with it and hopefully answers some design choices of our setup.
Why are you using separate spec, integresql_* and development PostgreSQL databases while developing locally?
For sanity and convenience (to have better ways to debug).
The spec database is our introspection target for SQLBoiler , it's always automatically wiped + migrated up + introspected when you run make. This is useful as you will immediately see your resulting /internal/models from your /migrations modifications (and any *.sql syntax errors). You won't typically directly interact with the spec database.
The integresql_template_* and integresql_test_* databases are automatically created and removed by IntegreSQL and assigned to your tests. Each test execution always automatically uses the latest database /migrations.
If you want to debug the database state after running a specific test, you may want to use the -v flag for go test or execute a test directly from VSCode to get the actual database name that this test has used (it should also be available after a test failure). Just connect to it using psql or your favourite database client.

The development database is never automatically migrated up. Instead you must run sql-migrate up or app db migrate to apply your migrations. This is useful as at this point (after running make build and make test), you should be fairly sure that your migrations now work.
You may also use the development database to import a dump from your live databases and migrate up with your new /migrations locally to test-drive them here.
Nope, it's just a tiny RESTful JSON server that runs beside a PostgreSQL database. It provides a language-independent way to work with isolated and fast PostgreSQL databases while running your (parallel) tests.
You'll never have to worry that one test leaks data into another test.
For further information see allaboutapps/integresql.
Our db utils in /internal/util/db define various utility functions to work with your PostgreSQL database (based on the stdlib database/sql interface). One of these utility functions is WithTransaction:
func WithTransaction(ctx context.Context, db *sql.DB, fn TxFn) errorYou may use this like the following:
return dbutil.WithTransaction(ctx, db, func(tx boil.ContextExecutor) error {
  fixtures := data.Upserts()
  for _, fixture := range fixtures {
    if err := fixture.Upsert(ctx, tx, true, nil, boil.Infer(), boil.Infer()); err != nil {
      return err
    }
  }
  fmt.Printf("Upserted %d fixtures.\n", len(fixtures))
  return nil
})
Note, that you were not expected to explicitly db.BeginTx, db.Commit and db.Rollback the db transaction:
-
db.BeginTxhappens automatically before the beginning of yourTxFn, you'll receive adb.Transactionas atx boil.ContextExecutorin the scope of theTxFn.. Use that to make your db queries! -
db.Commithappens automatically if you returnnil. -
db.Rollbackhappens automatically if you return anerroror if your funcs panics (we will auto-recover and return theerr).
This helper frees you to manage the lifecycle of the db transaction and is our recommended practice for 99% of any db transaction related usecase as:
- It frees you from the
db.BeginTx,db.Commitanddb.Rollbackboilerplate and thus makes your code more readable. - It ensures you properly handle panics (especially for anything in
/internal/api/handlers). - It puts an emphasis on the
txobject.-
Note: We will enforce using
WithTransactioninstead of manually managing the life-cycle of db transactions through a custom linter in an upcoming change. This linter will also check that you never usedb database/sqlif you already have atxavailable in your current func scope (which is a pretty common issue). -
Background: It's currently too easy to mistakenly use a
db database/sqleven though you already spawed a database transactiontx. These problems are very hard to spot and even harder to debug - your db operation does not run in the db transaction in a side channel,.Commit|.Rollbackhave no effect.
-
Note: We will enforce using
We disallow that and many other potential misuses of DEFAULT in combination with SQLBoiler (because of go zero values). Please read the commented section in /scripts/sql/default_zero_values.sql
Because most of the time, they are simply forgotten otherwise and lead to performance problems later as soon as your database starts getting bigger. We check for missing FK indices through /scripts/sql/fk_missing_index.sql.
See:
development@94242c61cf2b:/app$ # inside your development container...

make sql-drop-all
DROP ALL:
 DROP DATABASE "development";
 DROP DATABASE "spec";
 DROP DATABASE "integresql_template_*";
 DROP DATABASE "integresql_test_*";
 ...
Are you sure? [y/N] y
Resetting integresql...
Drop databases...
...
Done. Please run 'make sql-reset && make sql-spec-reset && make sql-spec-migrate' to reinitialize.📖 Without tests, your project will be (or already is) doomed 😭. [period!]
No feature is done at all about apps without having automated tests in place. We strive for ~80% code coverage, but are not that strict about TDD procedure (you don't have to write your tests first, free free to prototype first).
We are mostly focusing on integration testing. For this we provide a fast (isolated) PostgreSQL testing strategy and have several helpers already set up to make writing tests a breeze.
This section covers some typical things you will encounter while testing the hell out of your code.
Every test gets its own isolated Server to use within a test. As soon as want to test an handler/router, you are actually expected to write an integration test at allaboutapps.
Inside the closure you provide to WithTestServer, you have access to newly initialized components of your service (including an isolated PostgreSQL database provided by IntegreSQL).
Please refer to the /internal/test/test_*.go files to get an idea how we provide the integration testing initialization handling.
Don't forget to call
t.Parallel()as first statement!
See:
- Does go test run unit tests concurrently?
- Parallel test execution in Go
/internal/test/test_server.go
These are our commonly used go test ./... flags and are set both within the Makefile and within the VSCode .devcontainer/devcontainer.json configuration.
-
-race: The Data Race Detector is super important while testing, even though it put's a significant performance penalty on go test runner. -
-coverand-coverprofile: See Command Cover, for computing the code coverage of our tests. -
-count=1: See Package test, the idiomatic way to disable test caching explicitly. As our tests are typically integration tests and include database calls, we can't gurantee that cached test results (e.g. only db migration changes, no binary changes) are still valid. Thus, caching tests is always disabled.
While our WithTestServer and all other WithTest* helpers are totally safe for parallel test execution (you get an isolated server and database for your test), we have run into pretty high test timeouts CPU/IO-Load when using t.Parallel() excessively in bigger projects. Furthermore, we use -race -cover -count=1 -coverprofile for all of our test runs, which actually puts an additional burden on test performance.
make test (which is nothing more than a supercharged go test ./... command) already executes tests per package in parallel. It actually compiles a special test executable for each package and runs it. Thus:
- The parallel execution of these test binaries per package is super important for us, and we don't want to ever touch the defaults here. This is controlled by
-p nwhich by default, is set to the value ofGOMAXPROCS. - All tests in a specific package run serially by default, unless you explicitly call
t.Parallel()in this very test. This parallel execution within a test package is furthermore limited by-parallel nwhich by default, is set to the value ofGOMAXPROCS.
We don't want to explicitly set a static value to
-parallel n, nor change the default of-p n.-parallel n Allow parallel execution of test functions that call t.Parallel. The value of this flag is the maximum number of tests to run simultaneously; by default, it is set to the value of GOMAXPROCS. Note that -parallel only applies within a single test binary. The 'go test' command may run tests for different packages in parallel as well, according to the setting of the -p flag (see 'go help build').
Regarding parallel test execution we recommend the following:
- The default serial test execution within a test (while having the default parallel package test execution) is typically enough for us and properly prevents high CPU/IO-Load especially with our
-race -cover -count=1test flags. - Feel free to use
t.Parallel()in some of your tests if- its checks are "heavy" / "slow" and you actually gain a speed improvement for the whole test package execution (as other tests can run in the meantime) or
- you specifically want to ensure that your implementation / testcode's execution is actually isolated from other tests.
-
Use
t.Parallel()carefully as it may bite back throughtimeoutshigh CPU/IO-Load when your project grows bigger.
We typically don't want to change the default
-timeout(especially think of weaker computers here).-timeout d If a test binary runs longer than duration d, panic. If d is 0, the timeout is disabled. The default is 10 minutes (10m).
Regarding test timeouts, we recommend the following:
- Don't mess with the package global test
-timeoutflag combined withgo test ./...(ormake testin our case)!-
-timeoutcontrols a whole package test binary execution and defaults to10m. - As you add additional tests to your package, your likelyhood to hit a smaller customly set
-timeoutwill increase. - Also think about weaker computers / CI systems running the test suite. Test timing target values will vary depending on the system used.
-
- Test progress, not timing.
- If you really need to test timing behaviour, only test for it explicitly inside a test (and not globally for the whole package)!
-
Explicitly implement a timeout for specific tests when you really need it. Yes, that's cumbersome to setup, there is no
t.Timeout(). - Use testifys
.WithinDurationor.Eventuallyinstead.
-
Explicitly implement a timeout for specific tests when you really need it. Yes, that's cumbersome to setup, there is no
We are recommending that most tests utilize blackbox testing and also check this via the testpackage golangci-lint linter, meaning you will typically have to use the package <pkg>_test format.
See:
Using test.WithTestServer or test.WithTestDatabase helpers actually requires you to use the blackbox-testing technique. This is done by appending _test to the package name for your *_test.go files. Otherwise you will most likely encounter problems with cyclic dependencies.
If you want to unit-test otherwise private package functionality, you must use the same package name for your *_test.go files, as otherwise you can not consume anything that's private within this package. Your test file has to be named like *(export|internal)_test.go to make the testpackage golangci-lint happy.
Golden files can be created by using the Snapshoter.Save(t TestingT, data ...interface{}) method and should be solely used within tests. Subsequent test runs will compare the new data against the previously saved snapshot of data within the .golden file and fail automatically if there is a diff.
Our Snapshoter can be configured to force an update, use a different replacer function or to set a different file location and suffix for the snaphot.
It can be updated by either:
- Calling the
Update(true)method. - Using the global override to update all snapshots by either:
- Using
make test-update-goldenor, - setting the environment variable
TEST_UPDATE_GOLDENtotrueand running the appropriate commands (e.g.TEST_UPDATE_GOLDEN=true make test).
- Using
Snapshots / .golden files should always be checked into your git repository!
Our snapshoter's .Save(t TestingT, data ...interface{}) method will t.Fatal if:
- it is the initial (auto-) creation of the snapshot's
.goldenfile or - an update (via
.Update(update bool)orTEST_UPDATE_GOLDEN=true) of the snapshot's.goldenfile.
This is expected. We want you to know, that something has happened to the .golden file (which the snapshoter has created / modified). Subsequent test runs will then automatically pass if there is no diff to the snapshot.
If the snapshot is different to before, .Save(t TestingT, data ...interface{}) always will t.Error(diff).
For further information about snapshot testing see:
- Golden Files — Why you should use them
- The Untold Story of Golang Testing
/internal/test/helper_snapshot.go
We do not have a single variable that holds the information about the current environment (e.g. "development", "test", "production"). We do however provide a variety of util methods to read environment variables and store them in a config (see server_config.go for examples).
Based on the values in the config, a different implementation or setting for unit tests (mock), production, etc. can be used. Please refer to the /internal/test/test_*.go files to get an idea how we provide the integration test initialization handling (for the "test" environment).
See here, all the following related environment variables default to the boolean false: SERVER_LOGGER_LOG_REQUEST_BODY, SERVER_LOGGER_LOG_REQUEST_HEADER, SERVER_LOGGER_LOG_REQUEST_QUERY, SERVER_LOGGER_LOG_RESPONSE_BODY, SERVER_LOGGER_LOG_RESPONSE_HEADER.
Testing: Run your tests with the verbose flag -v on (e.g. SERVER_LOGGER_LOG_RESPONSE_BODY=true go test ./... -v -race -count=1). Note that the -v flag is always activated when running in VSCode, thus, it's pretty common for us to first interactively set the env in your container and then trigger the respective test from VSCode to finally directly inspect the log output in VSCode's console.
Running: SERVER_LOGGER_LOG_RESPONSE_BODY=true app server.
There are 3 layers (SQLBoiler -> lib/pg -> PostgreSQL service) where logging may make sense, let's review them...
SQLBoiler:
You may annotate your handler code with ctx = boil.WithDebug(ctx, true) and use this ctx (context) directly in your queries.
TODO: We need to provide a way to set this through
ENV/server_config.goand easily enable generated SQL query debugging in testing scenarios (verbose mode). Let's automatically provide these logs at thetraceLVL via ourzerologinstance.
See:
- Printing out SQL queries
- PR #597: Add per-context debugging configuration
- Issue #390: Feature Request: Log sql execution duration in debug mode (closed)
lib/pg:
Unfortuately lib/pg does not support any special logging facility out of the box and SQLBoiler does not further inject anything into the database adapter.
See:
PostgreSQL:
Set log_statement to all (you may want to set this in your docker-compose.yml). This option is typically not preferred, as you now need to inspect 2 separate log streams (go-starter and postgresql services).
See: How to log PostgreSQL queries?
Ensure you are running make (or specifically make go-generate) after adding a new file/handler to /internal/api/handlers. The /internal/api/handlers/handlers.go file is autogenerated and by default looking for implemented handlers to attach in /internal/api/handlers/**/*.go.
An implemented handler to attach to /internal/api/handlers/handlers.go should be named like Get|Put|Post|Delete|Options|Head|Patch*Route and return an *echo.Route.
Also see our go generate script /scripts/handlers/gen_handlers.go.
How does IntegreSQL assign test-databases? How does it know about changes to my migrations / fixtures?
IntegreSQL does not know anything by itself!
Our test utilities in /internal/test control this behaviour. Multiple / concurrent IntegreSQL template databases creation attempts (which are translated to PostgreSQL) are itself cached / mutex locked in IntegreSQL. However, you need to have some ID to uniquely identify a template database in the first place (and recreate it if this ID changes). We compute a hash over all db migrations/fixtures related directories/files for this behaviour.
The flow is something like the following, see /internal/test/test_database.go:
  // ---
  // PUBLIC: This is the test helper you will use, maybe via WithTestServer
  // ---

  // Simply get and use a new PostgreSQL database based on the template database
  WithTestDatabase(t *testing.T, closure func(db *sql.DB)){
    // use the db (test database)...
  }

  // --------------------------------------------------------------------------

  // ---
  // PRIVATE: This is what (high level) happens internally in the test_database.go file
  // ---

  // 1.
  // We will compute a hash over the following dirs/files
  migDir   = filepath.Join(pUtil.GetProjectRootDir(), "/migrations")
  fixFile  = filepath.Join(pUtil.GetProjectRootDir(), "/internal/test/fixtures.go")
  selfFile = filepath.Join(pUtil.GetProjectRootDir(), "/internal/test/test_database.go")
  h, err := util.GetTemplateHash(migDir, fixFile, selfFile)

  // 2.
  // A new PostgreSQL template database is created (via the IntegreSQL client)
  // OR we will reuse the previous if we already have that exact same hash cached.
  client.SetupTemplateWithDBClient(ctx, hash, func(db *sql.DB) { /**/ })

  // 2.1
  // We have a new PostgreSQL template database?! We need to migrate and seed it with our fixtures!
  err := applyMigrations(t, db)
  err = insertFixtures(ctx, t, db)

  // 3.
  // A new test database is created from the template (speedy) and passed in the closure from WithTestDatabase
  // (yes, you get a new database each time you call WithTestDatabase, any modifications will stay in the assigned database in isolation)
  testDatabase, err := client.GetTestDatabase(ctx, hash)
  connectionString := testDatabase.Config.ConnectionString()
  db, err := sql.Open("postgres", connectionString)
  closure(db)
How this PostgreSQL template caching and recreation is done internally and which endpoints are actually triggered through the IntegreSQL client, is best viewed in the IntegreSQL README.md section Final approach: IntegreSQL.
📖 In the end, it's not enough that your service runs locally, you will want to deploy it to somewhere, hopefully via a Docker image. This section covers everything related to actually hosting go-starter-like services.
A demo app service is deployed at https://go-starter.allaboutapps.at for you to play around with.
There are some limitations:
-
No frontend is available, you need use the RESTful JSON API directly, either through our Swagger-UI, or directy via
curlor other API-clients (e.g. for Postman, simply import ourhttps://go-starter.allaboutapps.at/swagger.yml). - You are not encouraged to post real or plausible user data to this demo service. We will periodically delete all data!
- Emails are not actually sent (e.g. from a
POST /api/v1/auth/forgot-password), instead these emails are globally available at https://go-starter.allaboutapps.at/mailhog/ for anyone to read! - Push Notifications are not actually sent (e.g. from
GET /api/v1/push/test) as only themockprovider is activated. - We won't grant you access to the
mgmt-secretto trigger/-/healthychecks (liveness). These checks actually hit our database and our filesystem mounts. A typical200response would be the following:
Ready.
Probe db: Ping succeeded in 451.809µs.
Probe path '/app/assets/mnt': W_OK check succeeded in 22.907µs.
Probe db: Next health sequence succeeded in 544.929µs, seq_health=26010.
Probe path '/app/assets/mnt/.healthy': Touch succeeded in 3.121546ms, modTime=1600871081.
Probes succeeded.
That's quite simple, inside your working directory do the following:
docker build . -t <img-tag>

# Default entrypoint and command is `/app/app server --migrate`.
docker run <img-tag>

# You may supply custom commands to the `/app/app` binary directly by passing them.
docker run <img-tag> help
docker run <img-tag> probe readiness -v
docker run <img-tag> db migrate
docker run <img-tag> db seed
docker run <img-tag> env
docker run <img-tag> server
docker run <img-tag> server --migrate
docker run <img-tag> server --probe --migrate --seed
docker run <img-tag> server -pms
Note that you may want to attach env-vars via --env-file or -e. See docker run.
We heavily utilize docker multi-stage builds. Our Dockerfile defines 3 build stages:
-
development: Thedevelopmentstage is referenced in our docker-compose.yml and thus also used by VSCode. We use it to get a full (local) development environment for our codebase. It defines everything needed to build our system and uses the officialgolangdocker image as its base. -
builder: This stage directly depends on thedevelopmentstage and executes all build commands required to get the final go binaries. This stage is particulary useful in CI environments. -
app: The final docker build stage produces an production-ready image that may be deployed e.g. within Kubernetes, swarm, docker-compose or simply throughdocker run <img>. This stage is fully detached from the other stages (a new base image) and should be as minimal as possible. It no longer holds a full golang development environment from any previous build stages, instead the compiled binaries from thebuilderstage are copied in. Your compiledappbinary acts as theENTRYPOINTfor this image.
It depends in which environment you are.
Use may use sql-migrate to migrate up the development database. This is especially useful, are you don't need to rely on your final app executable (you can migrate up, even if the app binary is not compiled).
sql-migrate is no longer available, instead the database commands are baked into the final app executable for you to use (refer to the app db subcommands).
As your final image may not even provide a shell, you may want to automatically migrate up the database before the server starts. This is our default command: app server --migrate.
You may add --seed to your docker entrypoint (change CMD ["server", "--migrate"] to CMD ["server", "--migrate", "--seed"]). Don't forget to:
- Update the
ApplyTestFixturesfunction withininternal/test/test_database.goto upsert your seed data (=fixtures) into your test databases (make test). - Update the
applyFixturesfunction withincmd/db_seed.goto add your actual fixtures upserts into live databases (make build && app server --migrate --seed).
Both distroless/base-debian10 and debian:buster-slim provide a minimal Debian 10 (Buster) docker base image. Distroless base images are even slimmer images without access to apt-get and provide no shell by default (though :debug optionally provides a Busybox /sh executable).
Our general recommendation is the following:
- Prefer
distroless/base-debian10unless it's no longer working for you. - Use
distroless/base-debian10:debugif you really a shell in your final production container (e.g. to attach to it and run commands manually there). Note that the provided Busybox shell in distroless is not available at/bin/sh, only at/sh! - If you need any of the following, switch to
debian:buster-slim:
-
RUNcommands within theappstage in theDockerfile: as mentioned,/bin/shis not available, docker depends on that to execute commands while building an image. -
RUN apt-get ...to install OS-level dependencies. -
CMDconsisting of multiple shell commands. As the is no/bin/shprovided, this is not possible.
If you want to get an even higher baseline security, you may even want to switch to distroless/static-debian10. We don't want to do this by default as it means that:
- Any go binaries must be build via
CGO_ENABLED=0 go buildas libc is no longer supported. If you fail to do this, you will be greeted bystandard_init_linux.go:211: exec user process caused "no such file or directory"errors when trying to run your image. - No
:debugvariant of this image exists. - Testing is typically done in the
builderstage within a CI. There may be missing OS-level dependencies in thestaticdistroless image, that will only become visible during runtime.
Further information about the differences between distroless/static and distroless/base can be found here.
We use a multi-staged Dockerfile. The final stage (called app) is a barebones minimal Debian image with all compiled executables and assets.
Typically you either:
- Forgot to also install the apt-get dependencies in the final stage - search for
-- START MANDADORY --in the Dockerfile or - Forgot to copy over additional assets or other files - search for
COPYstatements in the Dockerfile.
We do not include a final docker-compose.prod.yml file on purpose as we want you to manually create one for your desired use-case. Here is a starting point (you may want to name this something like docker-compose.prod.yml):
version: "3.4"
services:
  service-prod:
    # image: <your built Docker image>
    # or use the following to build inline until the final docker stage.
    build:
      context: .
      target: app # we build the final app image (final stage)
    ports:
      - "8080:8080"
    volumes:
      # only mount the uploads directory
      - assets-mnt:/app/assets/mnt
    depends_on:
      - postgres-prod
    restart: on-failure
    environment:
      # required: env for production database, service
      PGDATABASE: &PGDATABASE "production"
      PGUSER: &PGUSER "dbuser" # TODO: change me if you are running this live!
      PGPASSWORD: &PGPASSWORD "dbpass" # TODO: change me if you are running this live!
      PGHOST: &PGHOST "postgres-prod"
      PGPORT: &PGPORT "5432"
      PGSSLMODE: &PGSSLMODE "disable"

  postgres-prod:
    image: postgres:12.4-alpine # should be the same version as used in .drone.yml, .github/workflows, Dockerfile and live
    expose:
      - "5432"
    ports:
      - "5432:5432"
    environment:
      POSTGRES_DB: *PGDATABASE
      POSTGRES_USER: *PGUSER
      POSTGRES_PASSWORD: *PGPASSWORD
    volumes:
      - pgvolume-prod:/var/lib/postgresql/data

  swaggerui-prod:
    image: swaggerapi/swagger-ui:v3.28.0
    ports:
      - "8081:8080"
    depends_on:
      - service-prod
    environment:
      URL: "http://127.0.0.1:8080/swagger.yml"
      VALIDATOR_URL: ""

volumes:
  # postgresql: declare a named volume to persist DB data
  pgvolume-prod:

  # assets: declare a named volume to persist uploads (at /app/assets/mnt/*)
  assets-mnt:
You can test this locally via docker-compose -f docker-compose.prod.yml up, just ensure to call ./docker-helper --halt when running this beside our main docker-compose.yml.
To attach to this running minimal container use docker-compose -f docker-compose.prod.yml exec service-prod sh (no bash available in distroless).
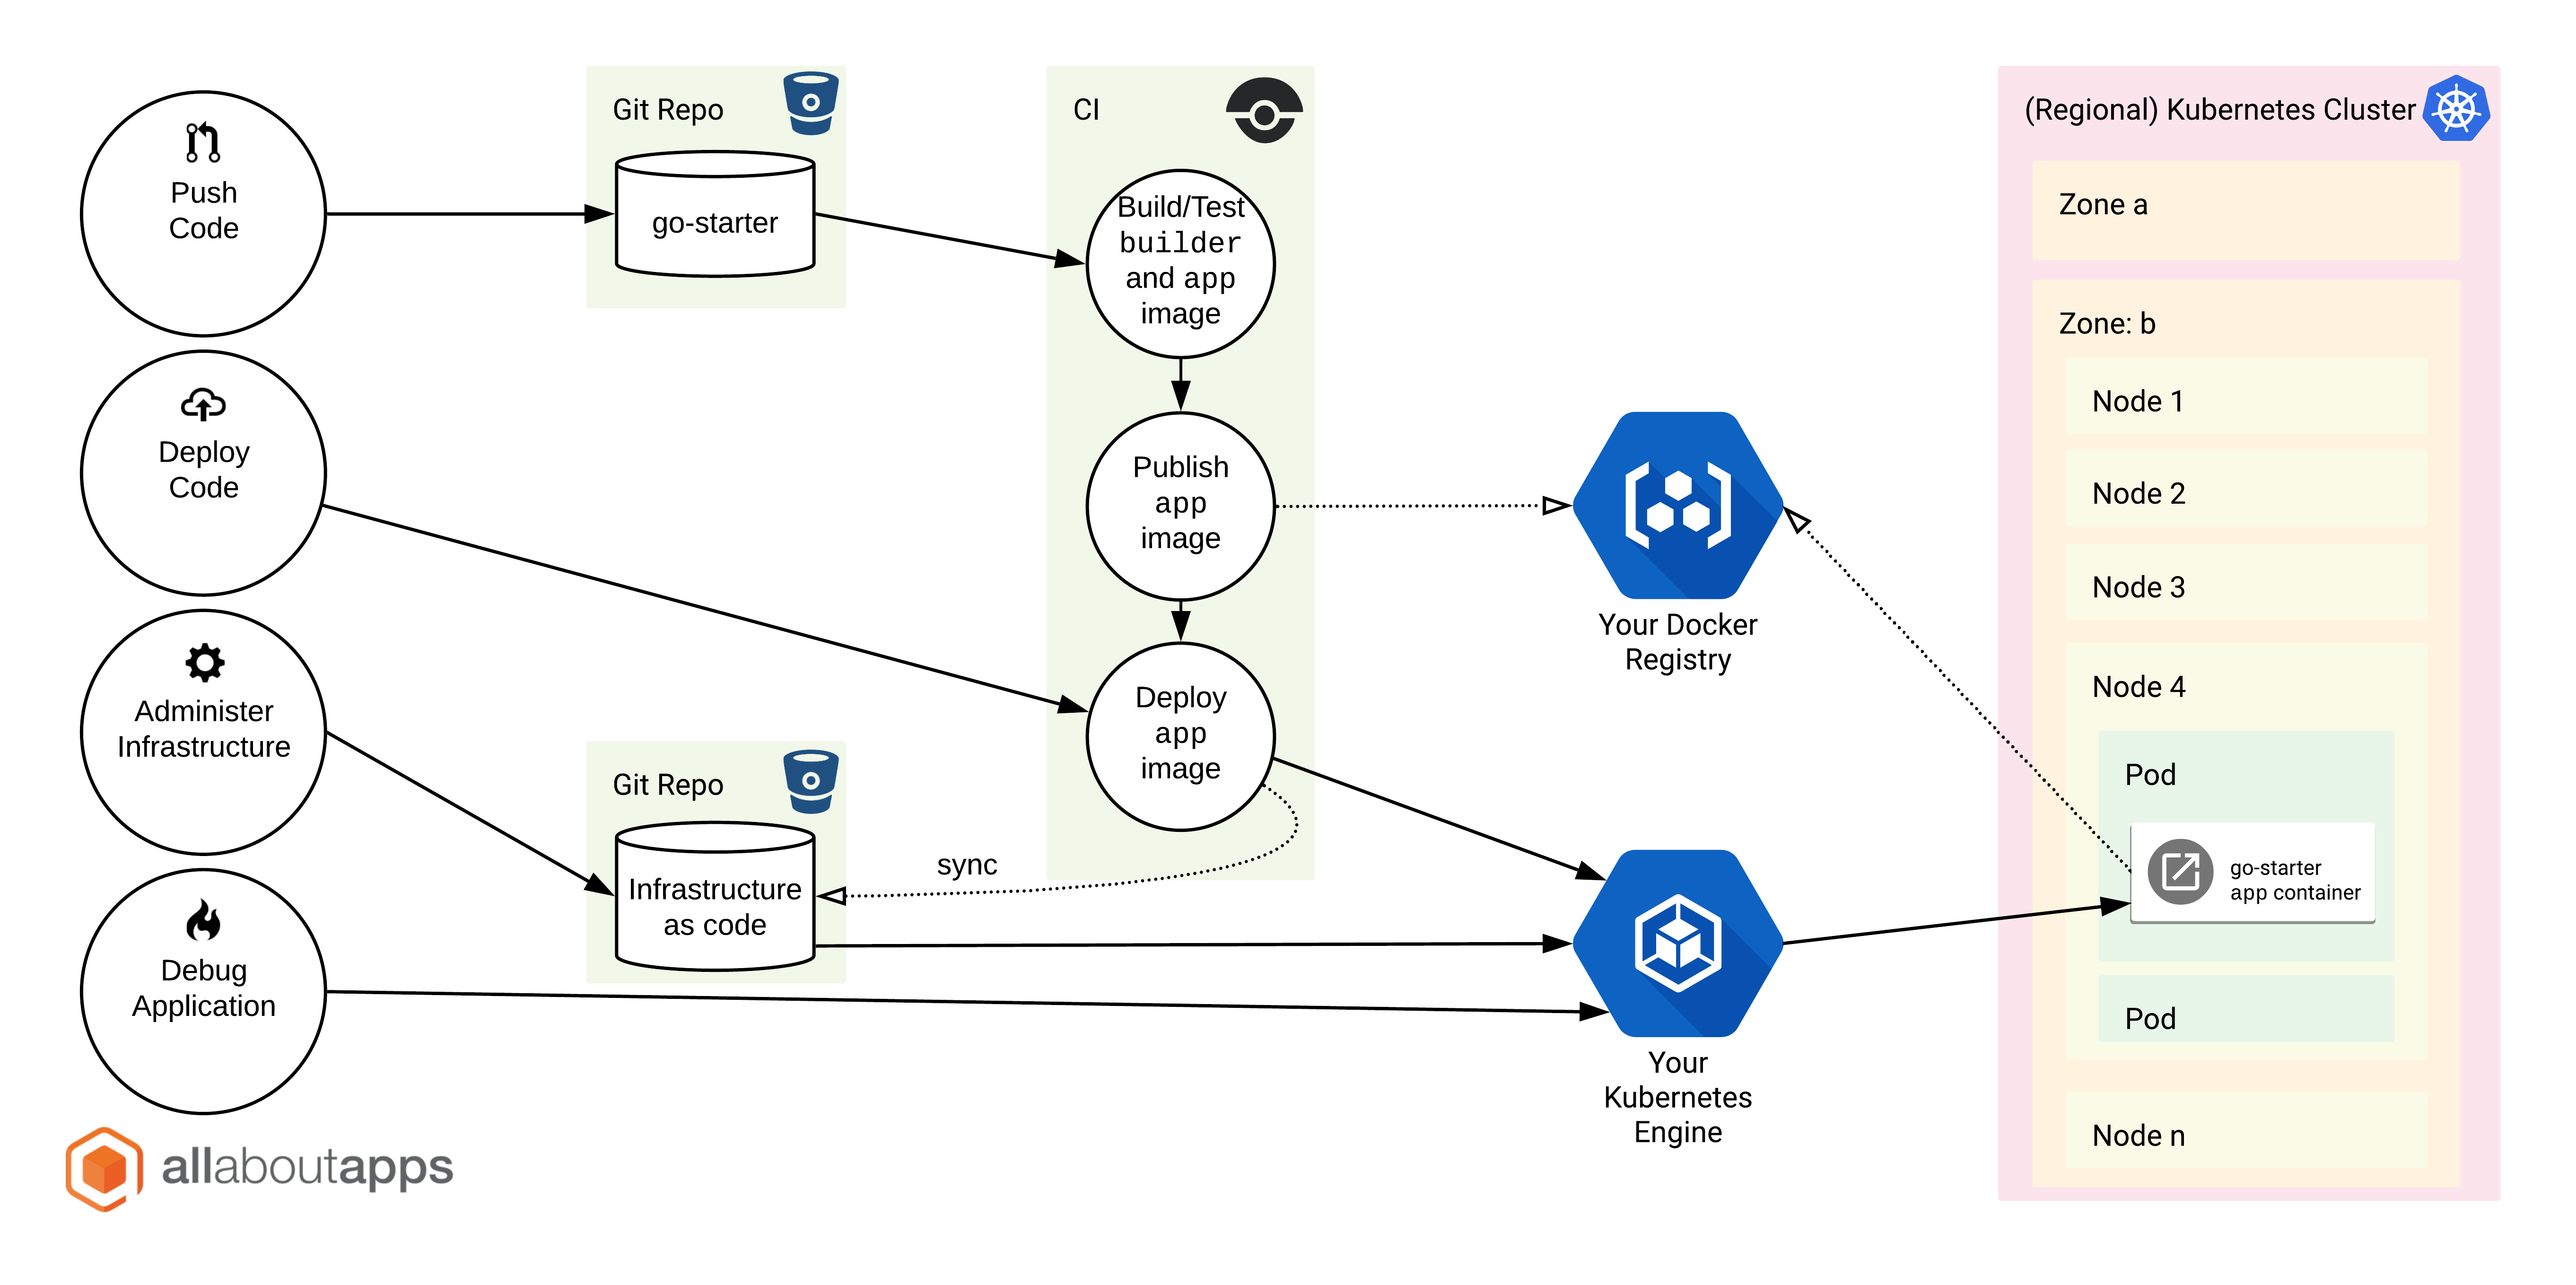
When you want to deploy the resulting app-stage Docker image to a k8s cluster, you will typically strive for an architecture like the following (go-starter == "Backend Pods"):

We currently use the following .yml manifest to the run 1..n replicas of these stateless go-starter pods (app.deployment.yaml), which you may use as a template:
apiVersion: apps/v1
kind: Deployment
metadata:
  name: app
  namespace: <NAMESPACE>
spec:
  replicas: # <n>
  strategy:
    type: RollingUpdate
    rollingUpdate:
      maxUnavailable: # <n-1> # the old replica must be kept running until new replica is fully operational
      maxSurge: 1 # 1 old and 1 new replica can be active at the same time during deployments
  selector:
    matchLabels:
      app: app
  template:
    metadata:
      labels:
        app: app
    spec:
      affinity:
        podAntiAffinity:
          # prefer to *not* schedule pods on the same *host* where we are already running again
          preferredDuringSchedulingIgnoredDuringExecution:
          - weight: 1
            podAffinityTerm:
              labelSelector:
                matchExpressions:
                - key: app
                  operator: In
                  values: ["app"]
              topologyKey: kubernetes.io/hostname

      containers:
      - image: # <YOUR IMAGE>
        name: app
        env:
        - name: PGHOST
          value: # <YOUR PG_HOST>
        - name: PGPORT
          value: "5432"
        - name: PGSSLMODE
          value: disable
        - name: PGDATABASE
          value: # <secret>
        - name: PGPASSWORD
          value: # <secret>
        - name: PGUSER
          value: # <secret>
        - name: SERVER_MANAGEMENT_SECRET
          value: # provide something random
        ports:
        - containerPort: 8080
          name: app
        # Stop servicing traffic after being unresponsive for 25sec
        readinessProbe:
          httpGet:
            path: /-/ready
            port: 8080
          timeoutSeconds: 5
          periodSeconds: 5
          failureThreshold: 5
        # Kill pod after 90sec of failed readiness + actual write checks
        livenessProbe:
          exec:
            command: ["./app", "probe", "liveness"]
          timeoutSeconds: 10
          periodSeconds: 10
          failureThreshold: 9
        # Delay all other probes until the startup probe succeeds once (5*60 = 300s = 5min max.)
        startupProbe:
          httpGet:
            path: /-/ready
            port: 8080
          timeoutSeconds: 5
          periodSeconds: 5
          failureThreshold: 60
        # Our default mnt-point (e.g. we use a NFS mount here)
        volumeMounts:
        - name: mnt
          mountPath: /app/assets/mnt

      volumes:
      - name: mnt
        persistentVolumeClaim:
          claimName: mnt
This will be very different depending on what infrastructure you have available. Generally at all about apps our deployment flow looks like this:
It's of course possible to also host go-starter through a single static binary, via docker-compose or other tools like podman and dokku.
By setting SERVER_PPROF_ENABLE to true, the path /debug/pprof/ becomes available on your server.
Note that by default, everything under /debug/* is protected by the mgmt-secret (same as the liveness /-/healthy endpoint), you need to supply ?mgmt-secret=<secret> (you can turn this key-auth off via SERVER_PPROF_ENABLE_MANAGEMENT_KEY_AUTH=false).
Our defaults are:
SERVER_PPROF_ENABLE=false
SERVER_PPROF_ENABLE_MANAGEMENT_KEY_AUTH=true
SERVER_PPROF_RUNTIME_BLOCK_PROFILE_RATE=0
SERVER_PPROF_RUNTIME_MUTEX_PROFILE_FRACTION=0
You will want to run pprof directly out of our development image, as this has all the required tools already installed (including Graphviz).
Examples:
# -----------------------
# Inspect profiling results **within the CLI**:
# Note: If you want to try out profiling your application within your development container, simply exchange "YOUR-TARGET-SERVER" with "localhost:8080".

# The pprof tool to look at the heap profile:
go tool pprof "https://YOUR-TARGET-SERVER/debug/pprof/heap?mgmt-secret=mgmtpass"

# Visualize heap (Graphviz) the above via '-png' redirecting to a file "out.png"
go tool pprof -png "https://YOUR-TARGET-SERVER/debug/pprof/heap?mgmt-secret=mgmtpass" > out.png

# Or to look at a 30-second CPU profile:
go tool pprof "https://YOUR-TARGET-SERVER/debug/pprof/profile?seconds=30&mgmt-secret=mgmtpass"

# Or to look at the goroutine blocking profile, after calling runtime.SetBlockProfileRate in your program:
# SERVER_PPROF_RUNTIME_BLOCK_PROFILE_RATE=1 app server
go tool pprof "https://YOUR-TARGET-SERVER/debug/pprof/block?mgmt-secret=mgmtpass"

# Or to look at the holders of contended mutexes, after calling runtime.SetMutexProfileFraction in your program:
# SERVER_PPROF_RUNTIME_MUTEX_PROFILE_FRACTION=1 app server
go tool pprof "https://YOUR-TARGET-SERVER/debug/pprof/mutex?mgmt-secret=mgmtpass"

# The package also exports a handler that serves execution trace data for the "go tool trace" command. To collect a 5-second execution trace:
wget -O trace.out "https://YOUR-TARGET-SERVER/debug/pprof/trace?seconds=5&mgmt-secret=mgmtpass"
go tool trace trace.out

# ---------------------------------------------------------
# Inspect profiling results on a locally started webserver:
# Note: We typically recommend running this result pprof server on port 0.0.0.0:8080 within your go-starter development container, as this port is already auto-exposed to your local host. This of course only make sense if you profile a remote service, not the development service (which is also typically running on port 8080).

# 30-second CPU profile:
go tool pprof -http=0.0.0.0:8080 'https://YOUR-TARGET-SERVER/debug/pprof/profile?seconds=30&mgmt-secret=mgmtpass'

# 30-second execution trace:
wget -O trace.out "https://YOUR-TARGET-SERVER/debug/pprof/trace?seconds=30&mgmt-secret=mgmtpass"
go tool trace -http=0.0.0.0:8080 trace.out
See:
- https://golang.org/pkg/net/http/pprof/
- https://software.intel.com/content/www/us/en/develop/blogs/debugging-performance-issues-in-go-programs.html
- https://jvns.ca/blog/2017/09/24/profiling-go-with-pprof/
- https://blog.golang.org/pprof
📖 This section is most likely only relevant for go-starter repository contributors.
Some CHANGELOG entries may be flagged as BREAKING and require special attention for applying. Thus they come with their own WIKI page, see here:
-
BREAKING 2022-02-28: Manual migration for
user.username, which must be free of spaces and lowercased now!
First make sure that you have updated our CHANGELOG.md within the Unreleased section and submit your PR. The repository maintainers may ask you do to the following (or do it on their own):
- Explicitly mark BREAKING changes
- Create a new
YYYY-MM-DDentry within the CHANGELOG with your changes. - After your changes got merged into our
master, we will also create a new git tag referencing the above in the formatgo-starter-YYYY-MM-DD.
git tag -a go-starter-YYYY-MM-DD -m "go-starter-YYYY-MM-DD, see CHANGELOG.md"
git push <origin> go-starter-YYYY-MM-DD