This project is based on and a containerized version of KBOT project https://bkstar123@bitbucket.org/bkstar123/kbot.git. KBOT is a chatbot built with Botman framework to provide the following capabilities:
- Check TLS/SSL certificate information for a list of domains, email the result in csv format (it can then be imported to Excel)
- Check DNS A/CNAME records for a list of domains, email the result in csv format (it can then be imported to Excel)
- Decode TLS/SSL certificate data
- Decode Certificate Signing Request (CSR)
- Extract unique root/apex zone from a list of domains
The application UI is as follows:

Note:
This demo project is not designed for micro-service deployment, it was actually containerized from a monolithic-designed source code (https://bkstar123@bitbucket.org/bkstar123/kbot.git). The main objective is to be focus on Docker's perspectives where it shows how to containerize an application, break it into services and deploy them to either standalone containers or to a Swarm cluster. Therefore, this project ignores all aspects of micro-service design and the rationality of the scaling plan. The application works well in case of having a single replica/task for each service kbot-web, kbot-worker, kbot-db.
The containerized KBOT appplication consists of the following services:
- kbot-web: A frontend interface for users to interact with the application. This service can be created using the Docker image bkstar123/kbot-web: (See details in https://hub.docker.com/repository/docker/bkstar123/kbot-web)
- kbot-worker: A worker to check the queue for dispatched jobs and execute them. This service can be created using the Docker image bkstar123/kbot-worker: (See details in https://hub.docker.com/repository/docker/bkstar123/kbot-worker)
- kbot-db: A MySQL database server to store the dispatched jobs in queue. This service can be created using the Docker image bkstar123/kbot-db: (See details in https://hub.docker.com/repository/docker/bkstar123/kbot-db)
Alternatively, you can re-build all the above images using their respective Dockerfile files provided in this project and push them to your Docker registries/repositories. To do so, perform the below steps:
git clone https://github.com/bkstar123/containerized-kbot.gitto a location in your machinecd containerized-kbot/db && docker image build -t kbot-db .cd ../web && docker image build -t kbot-web .cd ../worker && docker image build -t kbot-worker
The service connection diagram is as follows:

Firstly, create a custom bridge network in your Docker host (bridge network is used to connect containers in the scope of a single host):
docker network create -d bridge kbot-net
(Note: If you want to use overlay network to connect standalone containers over multiple hosts, the overlay network must be created with the flag --attachable)
Then, You must deploy kbot-db service before the other services since they depend on it to start.
docker container run -d  --name kbot-db \
-e MYSQL_ROOT_PASSWORD=<your_desired_root_password> \
-e MYSQL_DATABASE=<your desired name of database> \
-e MYSQL_USER=<your desired name of user for above database> \
-e MYSQL_PASSWORD=<your desired password for the above user to access above database> \
-v kbot-db-data:/var/lib/mysql \
--network kbot-net bkstar123/kbot-db
Example deployment:
docker container run -d  --name kbot-db \
-e MYSQL_ROOT_PASSWORD=mysecretpassword \
-e MYSQL_DATABASE=kbot \
-e MYSQL_USER=kbotuser \
-e MYSQL_PASSWORD=kbotuserpassword \
-v kbot-db-data:/var/lib/mysql \
--network kbot-net bkstar123/kbot-db
Note:
- kbot-db image defines one mount point to export the MySQL data (under
/var/lib/mysql), you can specify a named volume in the Docker host to link with this mount point
Example deployment:
docker container run -d  --name kbot-web -p 8000:80 \
-e APP_NAME=KBOT \
-e APP_ENV=production \
-e APP_DEBUG=false \
-e APP_URL=<http(s)://your-URL-to-KBOT-app> \
-e APP_TIMEZONE=Asia/Ho_Chi_Minh \
-e DB_HOST=kbot-db \
-e DB_DATABASE=kbot \
-e DB_USERNAME=kbotuser \
-e DB_PASSWORD=kbotuserpassword \
-e MAIL_DRIVER=smtp \
-e MAIL_HOST=<your SMTP service> \
-e MAIL_PORT=<your SMTP service port> \
-e MAIL_USERNAME=<your_email\
-e MAIL_PASSWORD=<your email password> \
-e MAIL_ENCRYPTION=ssl \
-e MAIL_FROM_NAME=KBOT \
-e MAIL_FROM_ADDRESS=<your from address> \
-v kbot-web-logs:/var/log/apache2 \
-v kbot-web-application-logs:/var/www/html/kbot/storage/logs \
--network kbot-net bkstar123/kbot-web
Note:
- The value of the environment variable
DB_HOSTmust be matched with the name of kbot-db service - The value of the environment variable
APP_URLis the URL of your appplication - The values of the environment variables
APP_ENV&APP_DEBUGmust be set toproductionand false for the production deployment - If you want to send application logs to your Slack webhook, then pass the
-e LOG_CHANNEL=stack -e LOG_SLACK_WEBHOOK_URL=<your-slack-webhook> -e LOG_SLACK_USERNAME=KBOTenvironment variables todocker container runcommand - kbot-web image defines two mount points to export the web access/error logs (under
/var/log/apache2) and the application logs (under/var/www/html/kbot/storage/logs), you can specify named volumes in the Docker host to link with these mount points
Example deployment:
docker container run -d  --name kbot-worker \
-e APP_ENV=production \
-e APP_DEBUG=false \
-e APP_TIMEZONE=Asia/Ho_Chi_Minh \
-e DB_HOST=kbot-db \
-e DB_DATABASE=kbot \
-e DB_USERNAME=kbotuser \
-e DB_PASSWORD=kbotuserpassword \
-v kbot-worker-logs:/tmp/supervisord \
--network kbot-net bkstar123/kbot-worker
Note:
- The value of the environment variable
DB_HOSTmust be matched with the name of kbot-db service - The values of the environment variables
APP_ENV&APP_DEBUGmust be set toproductionand false for the production deployment - If you want to send application logs to your Slack webhook, then pass the
-e LOG_CHANNEL=stack -e LOG_SLACK_WEBHOOK_URL=<your-slack-webhook> -e LOG_SLACK_USERNAME=KBOTenvironment variables todocker container runcommand - kbot-worker image defines one mount point to export the worker logs (under
/tmp/supervisord), you can specify a named volume in the Docker host to link with these mount points
Assuming that, the URL to your app is http://containerized-kbot.acme.com. You may want to place the kbot-xxx services behind a reverse proxy so that you can access the frontend interface by pointing browser to http://containerized-kbot.acme.com instead of http://containerized-kbot.acme.com:8000 (i.e via the published port on the Docker host).
Example Deployment:
docker container run -d --name reverse-proxy --network kbot-net -v reverse-proxy-config:/etc/nginx -p 80:80 nginx:latest
Then, on the Docker host, run the command docker volume inspect reverse-proxy-config to find out the volume location. Go to that location, and then to conf.d and edit the configuration file by running vim default.conf & placing the following:
server {
    listen 80;
    server_name containerized-kbot.acme.com;
    location / {
        proxy_pass http://kbot-web;
    }
}
Finally, stop/start the reverse-proxy service.
Assume that we have 3 nodes with the following information:
NAME    ACTIVE   DRIVER       STATE     URL                         SWARM   DOCKER      ERRORS
node1   -        virtualbox   Running   tcp://192.168.99.100:2376           v19.03.12
node2   -        virtualbox   Running   tcp://192.168.99.101:2376           v19.03.12
node3   -        virtualbox   Running   tcp://192.168.99.102:2376           v19.03.12
The deployment topology is as follows:
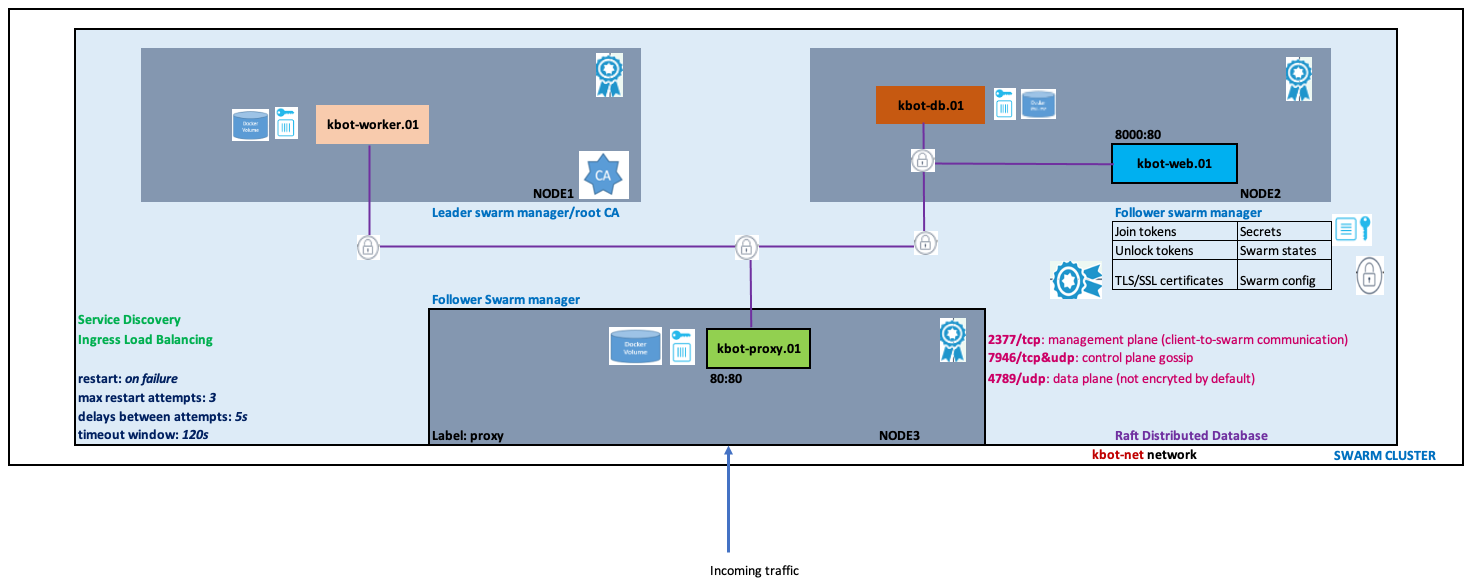
- Promote node1 to Swarm leader manager:
docker swarm init --advertise-addr 192.168.99.100 - Check the Swarm's join worker/manager tokens
docker swarm join-token manager=> take note of the joining manager tokendocker swarm join-token worker=> take note of the joining worker token - Go to node2, and join it to Swarm as a follower manager
docker swarm join --token SWMTKN-1-1xr1d9e17qefweycd2shccmyagui6df97bce6o0e47cojyfhl0-clc22y0mi8b3qhay2juxt4ztu 192.168.99.100:2377 - Go to node3, and join it to Swarm as a worker
docker swarm join --token SWMTKN-1-1xr1d9e17qefweycd2shccmyagui6df97bce6o0e47cojyfhl0-3r14g6tw2mgweq5t4xqy647d1 192.168.99.100:2377
Note: The architecture with 02 Swarm managers & 01 Swarm worker is not recommended in terms of fault tolerance (see https://docs.docker.com/engine/swarm/admin_guide/#add-manager-nodes-for-fault-tolerance for further explanation). The above setup is to show you how to create a cluster and join some nodes as managers, whereas others as workers. Finally, we should promte node3 to manager as well. The best practice is to have an odd number (3,5 or 7) of swarm managers in the cluster.
Promote node3 to manager by running the following command on the node1 (leader manager node):
docker node promote node3
And only use node3 for running traffic proxy/load balancing service. To do so, add a label to it:
docker node update --label-add proxy=yes node3
docker network create -d overlay kbot-net
Note: If you intend to connect a standalone container to this overlay network, you must create the network with the flag --attachable
Run the following commands on node1 (leader manager):
echo "xxxx" | docker secret create db_root_passwd -
echo "xxxx" | docker secret create kbot_db -
echo "xxxx" | docker secret create kbot_db_user -
echo "xxxx" | docker secret create kbot_db_user_passwd -
echo "xxxx" | docker secret create mailuser -
echo "xxxx" | docker secret create mailpass -
We will force the tasks for kbot-db, kbot-web, kbot-worker to be created only on node1 and node2 as node3is used for running proxy service.
docker service create --name kbot-db \
--secret db_root_passwd \
--secret kbot_db \
--secret kbot_db_user \
--secret kbot_db_user_passwd \
-e MYSQL_ROOT_PASSWORD_FILE=/run/secrets/db_root_passwd \
-e MYSQL_DATABASE_FILE=/run/secrets/kbot_db \
-e MYSQL_USER_FILE=/run/secrets/kbot_db_user \
-e MYSQL_PASSWORD_FILE=/run/secrets/kbot_db_user_passwd \
--mount type=volume,source=kbot-db-data,destination=/var/lib/mysql \
--replicas 1 \
--constraint 'node.labels.proxy != yes' \
--network kbot-net \
bkstar123/kbot-db
docker service create  --name kbot-web -p 8000:80 \
--secret kbot_db \
--secret kbot_db_user \
--secret kbot_db_user_passwd \
--secret mailuser \
--secret mailpass \
-e APP_NAME=KBOT \
-e APP_ENV=production \
-e APP_DEBUG=false \
-e APP_URL=http://containerized-kbot.acme.com \
-e APP_TIMEZONE=Asia/Ho_Chi_Minh \
-e DB_HOST=kbot-db \
-e DB_DATABASE_FILE=/run/secrets/kbot_db \
-e DB_USERNAME_FILE=/run/secrets/kbot_db_user \
-e DB_PASSWORD_FILE=/run/secrets/kbot_db_user_passwd \
-e MAIL_DRIVER=smtp \
-e MAIL_HOST=smtp.googlemail.com \
-e MAIL_PORT=465 \
-e MAIL_USERNAME_FILE=/run/secrets/mailuser \
-e MAIL_PASSWORD_FILE=/run/secrets/mailpass \
-e MAIL_ENCRYPTION=ssl \
-e MAIL_FROM_NAME=KBOT \
-e MAIL_FROM_ADDRESS=kbot-no-reply@gmail.com \
--mount type=volume,source=kbot-web-logs,destination=/var/log/apache2 \
--mount type=volume,source=kbot-web-application-logs,target=/var/www/html/kbot/storage/logs \
--constraint 'node.labels.proxy != yes' \
--network kbot-net \
bkstar123/kbot-web
docker service create  --name kbot-worker \
--secret kbot_db \
--secret kbot_db_user \
--secret kbot_db_user_passwd \
-e APP_ENV=production \
-e APP_DEBUG=false \
-e APP_TIMEZONE=Asia/Ho_Chi_Minh \
-e DB_HOST=kbot-db \
-e DB_DATABASE_FILE=/run/secrets/kbot_db \
-e DB_USERNAME_FILE=/run/secrets/kbot_db_user \
-e DB_PASSWORD_FILE=/run/secrets/kbot_db_user_passwd \
--mount type=volume,source=kbot-worker-logs,destination=/tmp/supervisord \
--replicas 1 \
--constraint 'node.labels.proxy != yes' \
--network kbot-net \
bkstar123/kbot-worker
We will force the kbot-proxy service's replica to be created on the node3 only (i.e use node3 only for traffic proxying/load balancing purpose)
docker service create --name kbot-proxy --network kbot-net --mount type=volume,source=kbot-proxy-config,target=/etc/nginx --constraint 'node.labels.proxy == yes' -p 80:80 nginx:latest
Find the node where the service task is running, then go to the volume path, place the following settings in conf.d/default.conf:
server {
    listen 80;
    server_name containerized-kbot.acme.com;
    location / {
        proxy_pass http://kbot-web;
    }
}
Restart the service's task: docker service scale kbot-proxy=0 && docker service scale kbot-proxy=1
Note: if you do not specify the option --replicas, then the service is default to create 01 replica/task
Fill in all environment settings in .env.example, and copy it as .env together with docker-stack-template.yml to the node1. Make a copy of docker-stack-template.yml as docker-stack.yml. Then, You can use it further for your own stack configuration.
Run the following commands on node1 (leader manager):
Create necessary secrets: Same as shown in the section 4.3
Create an overlay network named kbot-net: Same as shown in the section 4.2
Deploy the stack file:
env $(cat .env | xargs) docker stack deploy -c docker-stack.yml kbot
Remove .env & docker-stack.yml files after that:
rm -rf .env docker-stack.yml
Create kbot-proxy service as shown in 4.4 d
Note:
docker stack deploydoes not load .env file asdocker-compose updoes. So, we need to parse .env and pass all evironment variables to the context wheredocker stack deployrun as above.
Run the following command in the node1 (leader manager):
a) Enable Swarm auto-lock
docker swarm update --autolock=true
b) Set the certificate rotation period to more restrict value
docker swarm update --cert-expiry 720h (default to 90 days)
- To be written