COOJA Interface
Contiki comes with a sophisticated Wireless Sensor Network Simulator, COOJA, which is based on real hardware emulation and time-accurate WSN simulation. If you don't own sensor devices, we provide shortcuts to use COOJA to get started with experimentations with 6LBR.
In the following guide, we show how to interface a 6LBR compiled on a Linux PC with an instance of COOJA running on the same local machine. The only requirement to follow this example is to own a Linux (or Mac) machine and a little bit of time to read some documentation.
You need to setup a Contiki Toolchain, preferably one which supports MSP430-based platforms, since the ready-made examples that follow are based on the TMoteSky. Please refer to the official toolchain configuration guide to get started.
You need the right version of Java to get this working, i.e. the latest JDK from Oracle and NOT the openjdk project. There is a nice thread about how to use debian's update-alternative tool to have multiple versions of Java installed, should you need help with that. Note that you need this in the general case where you use COOJA when working with Contiki, it is not specific to 6LBR. You can check that you have the correct version installed with:
$>java -version
java version "1.7.0_25"
Java(TM) SE Runtime Environment (build 1.7.0_25-b15)
Java HotSpot(TM) Server VM (build 23.25-b01, mixed mode)
On linux:
sudo apt-get install bridge-utils
To get started, you need a working copy of the 6LBR source code.
git clone --recursive https://github.com/cetic/6lbr
cd 6lbr/examples/6lbr
In 6lbr source directory, do the following commands :
make all_native
make tools
Navigate to the 'test' folder inside the 6lbr examples directory:
cd examples/6lbr/test
This folder contains the full Python-based framework for 6LBR regression tests and performance tests. We are not going to use the test framework in this guide, we only want to setup a Simulated WSN and connect it to a 6LBR instance. To do so, there are ready-made Makefile targets for that:
Let's start simple:
make cooja-small
This will perform a few operations for you:
- generate a COOJA .csc file, based on an existing preset
- compile COOJA
- compile COOJA plugins which we require ( serial2pty , radiologger-headless... no need to worry about getting these, the source is already included in the 6LBR repo in tools/cooja/apps/)
- launch COOJA with the preset_1dag_10nodes.csc template
This will open up a COOJA simulation, like the one below:
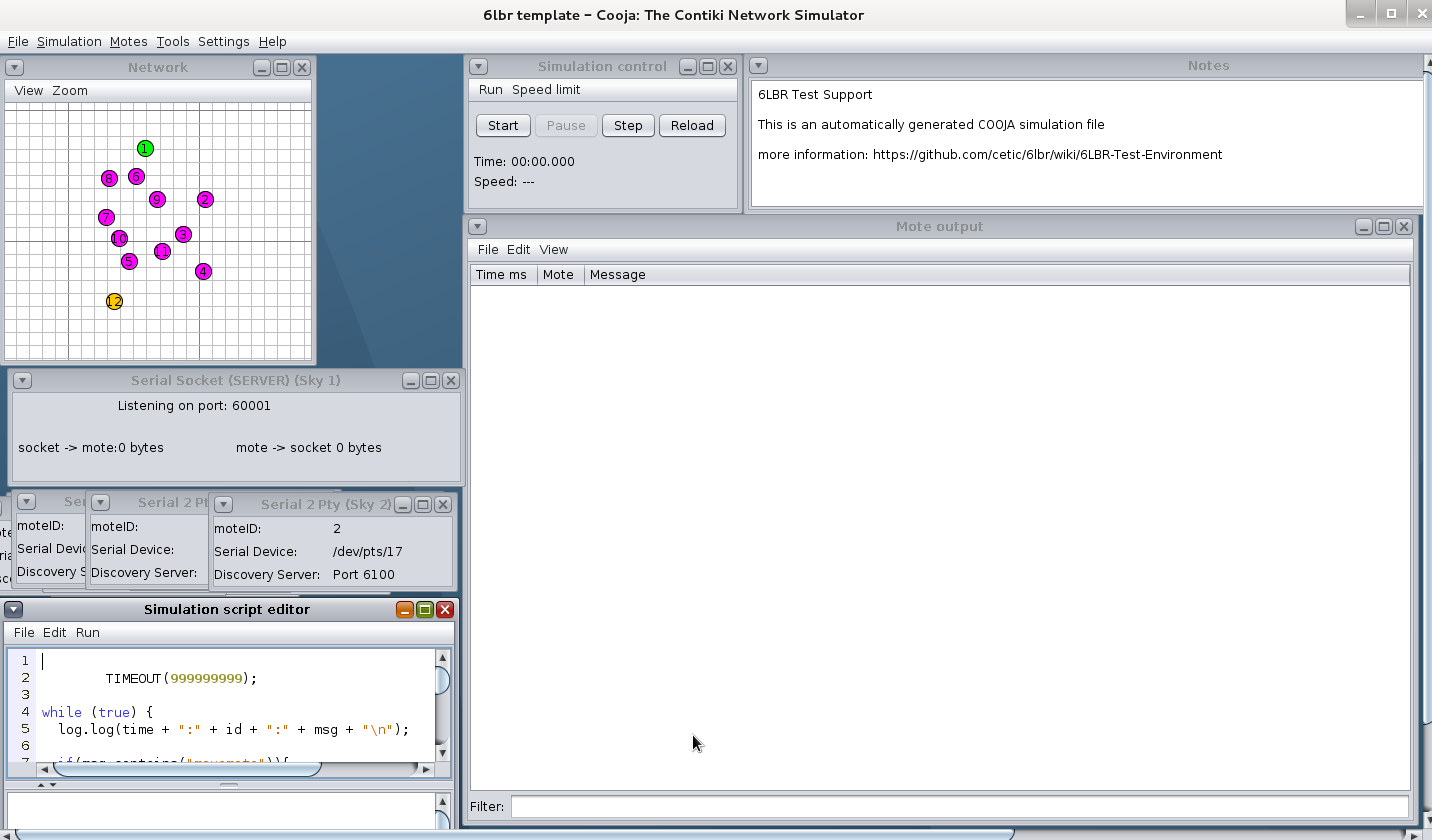
The simulation contains 3 types of motes:
-
In green (nodeid 1), there is a
slip-radiomote, which connects to an external border running in Linux. For those who are familiar with the sky-websense example of Contiki, it is the same mechanism. The slip-radio's serial port is connected to a COOJA Serial Socket Server, which listens for incoming connections from Linux on port 60000 + nodeid. In this case, it's port 60001. -
In pink (nodeid 2-11), you have a set of 6lbr-demo nodes, which are configured to run RPL.
-
In yellow (nodeid 12) is a 6lbr-demo-delay node configured to wait for a certain command on its serial interface before starting up the network stack. We use this a lot in our performance tests to delay the addition of a new node on a running network, for various different delays.
In the console which was used to launch COOJA, you will see the COOJA output, which should ending with a trailing:
DEBUG [main] (Serial2Pty.java:115) - serialpty;open;8;/dev/pts/25
DEBUG [main] (Serial2Pty.java:115) - serialpty;open;9;/dev/pts/26
DEBUG [main] (Serial2Pty.java:115) - serialpty;open;10;/dev/pts/27
DEBUG [main] (Serial2Pty.java:115) - serialpty;open;11;/dev/pts/28
DEBUG [main] (Serial2Pty.java:115) - serialpty;open;12;/dev/pts/29
These are the PTYs on which you can send serial commands from outside of COOJA directly to the motes. If you prefer, you can also send commands to a particular mote from within the COOJA interface (Right click a mote --> Show serial port of xx)
Open a second console:
cd examples/6lbr/test
sudo make launch-6lbr-router-1-cooja
This will start an instance of 6LBR, in Router Mode, and connect to a slip-radio on port 60001. If you are interested in reproducing this with your own setting, it is useful to open the Makefile and see what's in the target:
launch-6lbr-router-1-cooja:
    ../package/usr/bin/6lbr conf-templates/cooja-1-router.conf
As you can see, it calls the 6LBR launch script with a cooja-1-router.conf config file, which defines the following settings:
MODE=ROUTER
DEV_ETH=eth0
DEV_TAP=tap0
RAW_ETH=0
BRIDGE=1
CREATE_BRIDGE=1
DEV_BRIDGE=br0
ETH_JOIN_BRIDGE=0
SOCK_RADIO=localhost
NVM=conf-templates/test.dat
LIB_6LBR=../package/usr/lib/6lbr
BIN_6LBR=../bin
IFUP=../package/usr/lib/6lbr/6lbr-ifup
IFDOWN=../package/usr/lib/6lbr/6lbr-ifdown
LOG_6LBR_OUT=-
LOG_6LBR_ERR=-
The last two lines forces the 6LBR output to standard output, the console it was launched from. Otherwise, the logs are generated in /var/log/6lbr.log. If all goes well, you should see the 6LBR init trace in the console, ending with a repetition of:
Fetching MAC address
Fetching MAC address
6LBR gets its 802.15.4 MAC address from its attached slip-radio. It's not getting any response for now, as this slip-radio is node #1 in the COOJA simulation, and we haven't yet pressed 'start' in COOJA (at least, you shouldn't have if you have been following these instructions).
6LBR in Router mode sends RA with that route inside but by default Linux ignores them for security reasons.
You should either allow RA processing by using the two following commands (recommended):
sysctl -w net.ipv6.conf.br0.accept_ra=1
sysctl -w net.ipv6.conf.br0.accept_ra_rt_info_max_plen=64
or manually add the route :
route -A inet6 add aaaa::/64 gw bbbb::100
You have launched COOJA, and launched 6LBR. Now, go back to COOJA and press START to start the simulation.
You'll see some mote outputs in COOJA, and the 6LBR console will show you the rest of the init sequence
SLIP-DBG: Rime started with address 0.18.116.1.0.1.1.1
SLIP-DBG: MAC 00:12:74:01:00:01:01:01 Contiki-6lbr-1.1-rc0-1-g80bc248 started. Node id is set to 1.
SLIP-DBG: nullmac nullrdc, channel check rate 128 Hz, radio channel 26
SLIP-DBG: Starting 'Slip radio process'
SLIP-DBG: Slip Radio started...
Fetching MAC address
Got MAC: 00:00:00:00:00:00:00:00
Low2Eth adding prefix
Eth MAC address :  02:01:00:01:01:01
Opening nvm file 'conf-templates/test.dat'
Configured as DODAG Root
Tentative local IPv6 address  fe80:0000:0000:0000:0212:7401:0001:0101
Tentative global IPv6 address (WSN)  aaaa:0000:0000:0000:0212:7401:0001:0101
Tentative global IPv6 address (ETH)  bbbb:0000:0000:0000:0000:0000:0000:0100
Starting as RPL ROUTER
UDP server started
CETIC 6LBR Started
After a short while, you should be able to access the 6LBR webserver from any browser on your PC, just open
[bbbb::100]
in a browser:

Your simulation is running:
- All motes attach to the DODAG initiated by 6LBR (except node 12 which is still sleeping)
- You'll see DIOs / DAOs all over the Radiologs
- The
networktab in the webinterface will show all known routes in the 6LBR. - The
sensorstab in the webinterface will stay empty, because nodes are not sending any application messages at the moment.
You can order a mote to start it's UDP Application by sending it the following command on its serial port:
udp start
This can by done in 2 ways:
- graphically from inside COOJA by right-click the mote --> Show serial port on ...
- or from outside COOJA (manually in a socket or from a script), by opening the cocrresponding PTY (/dev/pts/xx), which you can discover by parsing COOJA's log (see above).
udp start will tell the mote to start sending UDP packets to the sink, containing a message number and the address of it's preferred parent. The Sink will display the DODAG topology in the sensors tab based on these messages. This application is mainly for a demo, and does not contain any actual sensor measurements.
If you don't want to have to send udp start to each and every mote, there is a compilation option which allows to auto-start the udp process.
To wake up node 12, send
start6lbr
On its serial port. This will start the uip stack and RPL, so the node will send out DIS messages and attempt to attack to a RPL DAG. It will do so when it receives a DIO from one of its neighbors.
Congratulations, you have just connected a 6LBR to a virtual WSN! But the Princess is in another castle... If you are up for it, move on to the Multiple-6LBR COOJA Simulations! (coming soon)