Swift on a Raspberry Pi 3 with Raspbian (Debian Jessie 8.0)
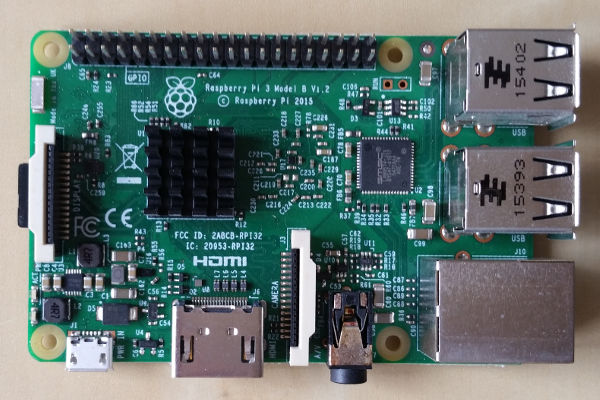
The Raspberry Pi 3 single board computer from the Raspberry Pi Foundation has a 1.2 GHz quad-core ARMv8 processor, 1 GByte main memory and a 10/100 Mbps Ethernet interface.
This installation tutorial explains the installation of a Raspberry Pi 3 device from scratch and the configuration of Swift on your computer.
Many stepts in this tutorial are taken from the script Swift on Pi, which is a bit outdated now (May 2017), but still very helpful. Other steps are taken from Swift All In One.
$ wget https://downloads.raspberrypi.org/raspbian_lite/images/raspbian_lite-2017-03-03/2017-03-02-raspbian-jessie-lite.zip
$ unzip 2017-03-02-raspbian-jessie-lite.zip
Check which one is the correct device! If you use an internal card reader, it is often /dev/mmcblk0, when using an external card reader, it is often /dev/sdX (replace X with the correct character).
# dd bs=1M if=2017-03-02-raspbian-jessie-lite.img of=/dev/mmcblk0 && sync
Default login of this image is pi/raspberry. To become user root, execute sudo su.
Older Raspian versions started the SSH server by default. Because of security reasons (as explained here), all Raspian versions since version 2016-11-25 (see the release notes) have the SSH server disabled by default. To get the SSH server automativally activated during boot time, create a file ssh with any content (or just an empty file) inside the boot partition (it is the first partition) of the micro SD card.
# mount /dev/mmcblk0p1 /media/
# touch /media/ssh
# umount /media/
Insert the micro SD card into the Raspberry Pi computer, connect it with the ethernet cable and the micro USB cable for power suppy and switch on the power supply. The operating system will try to fetch network configuration by using DHCP on the Ethernet interface per default. If you activated the SSH server, you can now log in via SSH.
The system used with this tutorial had these characteristics:
$ lsb_release -a
No LSB modules are available.
Distributor ID:     Raspbian
Description:        Raspbian GNU/Linux 8.0 (jessie)
Release:    8.0
Codename:   jessie
$ uname -a
Linux raspberrypi 4.4.50-v7+ #970 SMP Mon Feb 20 19:18:29 GMT 2017 armv7l GNU/Linux
This version of Raspbian expands the file system automativally during the first boot.
This is not required for running Swift, but the Raspberry Pi 3 has just 1 GB of main memory which is not much at all and there is no need to waste 48 MB.
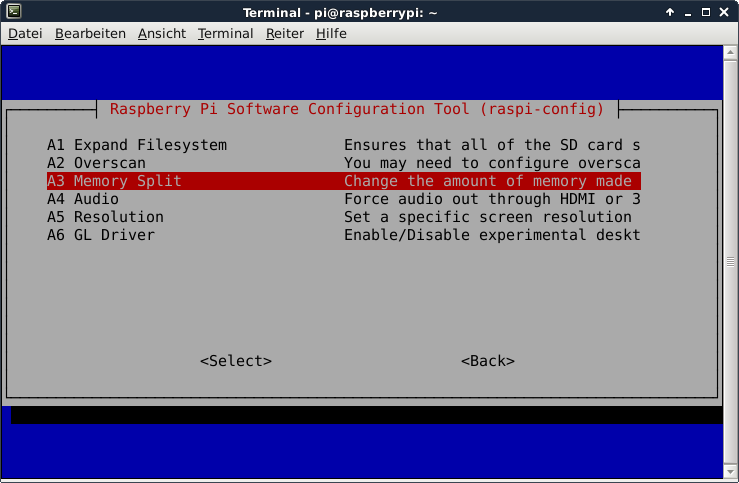
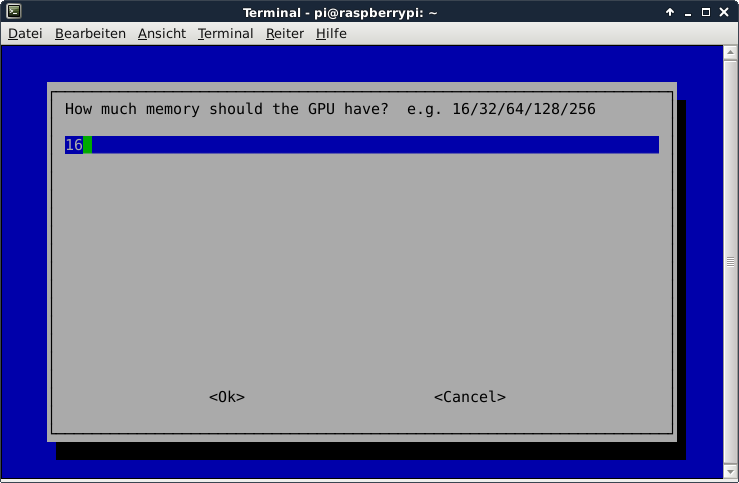
A part of the main memory (just 1 GB) is assigned to the GPU. A pure server does not need a GPU at all. The share can me specified via the raspi-config tool. The minimum value is 16 MB, which is more useful compared with the dafault value (64 MB).
$ sudo raspi-config
After the new value is specified and after a reboot, the new value should be visible:
# vcgencmd get_mem gpu
gpu=16M
This is not required for running Swift, but it is always useful to configure the operating system properly
$ sudo dpkg-reconfigure tzdata
$ cat /etc/timezone
Europe/Berlin
This is not required for running Swift, but it is always useful to have the correct time on a computer
$ sudo apt-get update && sudo apt-get install -y ntp ntpdate
Now the time sould be synchronized with several NTP servers.
$  ntpq -p
    remote           refid      st t when poll reach   delay   offset  jitter
==============================================================================
*clint.blazing.d 213.172.96.14    2 u   41   64   77   21.926   -3.339   2.084
-q.fu110.de      213.95.200.107   3 u   26   64  177   21.340    4.526   3.351
+ns2.customer-re 192.53.103.108   2 u    3   64  177   25.944   -2.742   2.175
-138.68.126.106  130.149.17.8     2 u    1   64  377   21.691   10.982   1.183
+fritz.box       192.86.14.67     3 u   65   64  177    0.443   -2.598   2.169
Check the time and date:
# date -R
Tue, 02 May 2017 14:49:07 +0200
Some of them are not required for the installation of Swift, but just nice to have and it just worked this way for me.
$ sudo apt-get install -y curl htop joe nmap git python build-essential

$ sudo apt-get install -y python-software-properties gcc memcached \
python-coverage python-dev python-nose python-setuptools \
python-simplejson python-xattr sqlite3 xfsprogs python-eventlet \
python-greenlet python-pastedeploy python-netifaces python-pip \
python-sphinx

$ sudo apt-get install -y git-core libffi-dev libssl-dev
In best case, as described inside the Swift All In One instructions, the latest Swift source code is fetched from the Git repository and used. Sadly, an error of unknown root cause made it impossble to upload objects into revision 2.14.0 of the service on the Raspberry Pi 3 (see here for more details). Thus, the only option was to use the outdated Swift revision 2.2.0, which is shipped with Raspbian.
$ sudo apt-get install -y python-swift python-swiftclient \
swift-account swift-container swift-object swift-proxy

$ wget http://ftp.us.debian.org/debian/pool/main/libe/liberasurecode/liberasurecode1_1.4.0-2_armhf.deb
$ wget http://ftp.us.debian.org/debian/pool/main/libe/liberasurecode/liberasurecode-dev_1.4.0-2_armhf.deb
$ sudo dpkg -i liberasurecode*

$ sudo pip install -U mock tox dnspython pyeclib pip setuptools
$ sudo mkdir /srv
$ sudo truncate -s 1GB /srv/swift-disk
$ sudo mkfs.xfs /srv/swift-disk
$ grep '/srv/swift-disk' /etc/fstab
$ if [ $? = 1 ]; then
sudo tee -a /etc/fstab >/dev/null <<EOF
/srv/swift-disk /mnt/sdb1 xfs loop,noatime,nodiratime,nobarrier,logbufs=8 0 0
EOF
fi
$ sudo mkdir /mnt/sdb1
$ sudo mount /mnt/sdb1
$ sudo mkdir /mnt/sdb1/1 /mnt/sdb1/2 /mnt/sdb1/3 /mnt/sdb1/4
$ sudo chown -R ${USER}:${USER} /mnt/sdb1/
$ for x in {1..4}; do sudo ln -s /mnt/sdb1/$x /srv/$x; done
$ sudo mkdir -p /srv/1/node/sdb1 /srv/1/node/sdb5 \
              /srv/2/node/sdb2 /srv/2/node/sdb6 \
              /srv/3/node/sdb3 /srv/3/node/sdb7 \
              /srv/4/node/sdb4 /srv/4/node/sdb8 \
              /var/run/swift
$ sudo chown -R ${USER}:${USER} /var/run/swift
# **Make sure to include the trailing slash after /srv/$x/**
$ for x in {1..4}; do sudo chown -R ${USER}:${USER} /srv/$x/; done
Add the following lines to /etc/rc.local (before the exit 0):
mkdir -p /var/cache/swift /var/cache/swift2 /var/cache/swift3 /var/cache/swift4
chown -R pi:pi /var/cache/swift*
mkdir -p /var/run/swift
chown -R pi:pi /var/run/swift
$ cd $HOME; git clone https://github.com/openstack/swift.git
Update the /etc/rsyncd.conf:
$ sudo cp $HOME/swift/doc/saio/rsyncd.conf /etc/
$ sudo sed -i "s/<your-user-name>/${USER}/" /etc/rsyncd.conf
Modify inside the file /etc/default/rsync the variable RSYNC_ENABLE from false to true:
RSYNC_ENABLE=true
Restart the rsync deamon:
$ sudo service rsync restart
Verify if rsync is accepting connections for all servers:
$ rsync rsync://pub@localhost/
The output sould be something like this:
$ rsync rsync://pub@localhost/
account6012
account6022
account6032
account6042
container6011
container6021
container6031
container6041
object6010
object6020
object6030
object6040
$ sudo cp $HOME/swift/doc/saio/rsyslog.d/10-swift.conf /etc/rsyslog.d/
Insert this line into the file /etc/rsyslog.conf in the GLOBAL DIRECTIVES section
$PrivDropToGroup adm
Create a folder /var/log/swift
$ sudo mkdir -p /var/log/swift


$ sudo chown -R root.adm /var/log/swift
$ sudo chmod -R a+rwx /var/log/swift
$ sudo service rsyslog restart
Populate the /etc/swift directory and update references in the Swift config files::
$ sudo rm -rf /etc/swift
$ cd $HOME/swift/doc; sudo cp -r saio/swift /etc/swift; cd -
$ sudo chown -R ${USER}:${USER} /etc/swift
$ find /etc/swift/ -name \*.conf | xargs sudo sed -i "s/<your-user-name>/${USER}/"
In /etc/swift/proxy-server.conf modify the value of the varioable bind_ip in order to make Swift accessible from outside
bind_ip = 0.0.0.0
Copy the SAIO scripts for resetting the environment:
$ mkdir -p $HOME/bin
$ cd $HOME/swift/doc; cp saio/bin/* $HOME/bin; cd -
$ chmod +x $HOME/bin/*

$ echo "export SAIO_BLOCK_DEVICE=/srv/swift-disk" >> $HOME/.bashrc

$ cp $HOME/swift/test/sample.conf /etc/swift/test.conf
$ echo "export SWIFT_TEST_CONFIG_FILE=/etc/swift/test.conf" >> $HOME/.bashrc

$ echo "export PATH=${PATH}:$HOME/bin" >> $HOME/.bashrc

$ . $HOME/.bashrc
$ remakerings
Device d0r1z1-127.0.0.1:6010R127.0.0.1:6010/sdb1_"" with 1.0 weight got id 0
Device d1r1z2-127.0.0.1:6020R127.0.0.1:6020/sdb2_"" with 1.0 weight got id 1
Device d2r1z3-127.0.0.1:6030R127.0.0.1:6030/sdb3_"" with 1.0 weight got id 2
Device d3r1z4-127.0.0.1:6040R127.0.0.1:6040/sdb4_"" with 1.0 weight got id 3
Reassigned 1024 (100.00%) partitions. Balance is now 0.00.
Device d0r1z1-127.0.0.1:6010R127.0.0.1:6010/sdb1_"" with 1.0 weight got id 0
Device d1r1z1-127.0.0.1:6010R127.0.0.1:6010/sdb5_"" with 1.0 weight got id 1
Device d2r1z2-127.0.0.1:6020R127.0.0.1:6020/sdb2_"" with 1.0 weight got id 2
Device d3r1z2-127.0.0.1:6020R127.0.0.1:6020/sdb6_"" with 1.0 weight got id 3
Device d4r1z3-127.0.0.1:6030R127.0.0.1:6030/sdb3_"" with 1.0 weight got id 4
Device d5r1z3-127.0.0.1:6030R127.0.0.1:6030/sdb7_"" with 1.0 weight got id 5
Device d6r1z4-127.0.0.1:6040R127.0.0.1:6040/sdb4_"" with 1.0 weight got id 6
Device d7r1z4-127.0.0.1:6040R127.0.0.1:6040/sdb8_"" with 1.0 weight got id 7
Reassigned 1024 (100.00%) partitions. Balance is now 0.00.
Device d0r1z1-127.0.0.1:6011R127.0.0.1:6011/sdb1_"" with 1.0 weight got id 0
Device d1r1z2-127.0.0.1:6021R127.0.0.1:6021/sdb2_"" with 1.0 weight got id 1
Device d2r1z3-127.0.0.1:6031R127.0.0.1:6031/sdb3_"" with 1.0 weight got id 2
Device d3r1z4-127.0.0.1:6041R127.0.0.1:6041/sdb4_"" with 1.0 weight got id 3
Reassigned 1024 (100.00%) partitions. Balance is now 0.00.
Device d0r1z1-127.0.0.1:6012R127.0.0.1:6012/sdb1_"" with 1.0 weight got id 0
Device d1r1z2-127.0.0.1:6022R127.0.0.1:6022/sdb2_"" with 1.0 weight got id 1
Device d2r1z3-127.0.0.1:6032R127.0.0.1:6032/sdb3_"" with 1.0 weight got id 2
Device d3r1z4-127.0.0.1:6042R127.0.0.1:6042/sdb4_"" with 1.0 weight got id 3
Reassigned 1024 (100.00%) partitions. Balance is now 0.00.
Because the installed Swift 2.2.0 has no support for copy and versioned_writes, remove these entries from the pipeline line inside the file /etc/swift/proxy-server.conf.
Otherwise, the proxy server will not start because of such errors:
Traceback (most recent call last):
  File "/usr/bin/swift-proxy-server", line 23, in <module>
    sys.exit(run_wsgi(conf_file, 'proxy-server', **options))
...
  File "/usr/lib/python2.7/dist-packages/paste/deploy/loadwsgi.py", line 659, in find_egg_entry_point
    for prot in protocol_options] or '(no entry points)'))))
LookupError: Entry point 'versioned_writes' not found in egg 'swift' (dir: /usr/lib/python2.7/dist-packages; protocols: paste.filter_factory, paste.filter_app_factory; entry_points: )
Because the installed Swift 2.2.0 has no support for policy_type in the storage-policy section(s), remove these entries inside the file /etc/swift/swift.conf or comment them out:
policy_type = replication

policy_type = replication

policy_type = erasure_coding
ec_type = liberasurecode_rs_vand
ec_num_data_fragments = 4
ec_num_parity_fragments = 2
Otherwise, Swift will not start because of such errors:
ERROR: Invalid Storage Policy Configuration in /etc/swift/swift.conf (Invalid option 'policy_type' in storage-policy section 'storage-policy:0')
Add inside /home/pi/bin/resetswift this line
$ sudo chown -R ${USER}:${USER} /var/run/swift
$ sudo chown -R ${USER}:${USER} /etc/swift/
$ startmain
WARNING: Unable to modify max process limit.  Running as non-root?
Starting proxy-server...(/etc/swift/proxy-server.conf)
container-server running (2089 - /etc/swift/container-server/1.conf)
container-server running (2090 - /etc/swift/container-server/2.conf)
container-server running (2091 - /etc/swift/container-server/3.conf)
container-server running (2092 - /etc/swift/container-server/4.conf)
container-server already started...
account-server running (2096 - /etc/swift/account-server/3.conf)
account-server running (2097 - /etc/swift/account-server/4.conf)
account-server running (2094 - /etc/swift/account-server/1.conf)
account-server running (2095 - /etc/swift/account-server/2.conf)
account-server already started...
object-server running (2099 - /etc/swift/object-server/1.conf)
object-server running (2100 - /etc/swift/object-server/2.conf)
object-server running (2101 - /etc/swift/object-server/3.conf)
object-server running (2102 - /etc/swift/object-server/4.conf)
object-server already started...
$ curl -i -H "X-Auth-User: test:tester" -H "X-Auth-Key: testing" http://10.0.0.254:8080/auth/v1.0/
HTTP/1.1 200 OK
X-Storage-Url: http://10.0.0.254:8080/v1/AUTH_test
X-Auth-Token: AUTH_tk88aa94c0a9d649e1962254219fc6e40b
Content-Type: text/html; charset=UTF-8
X-Storage-Token: AUTH_tk88aa94c0a9d649e1962254219fc6e40b
Content-Length: 0
X-Trans-Id: tx6d6030eebe604c1c8204e-005928c2b6
Date: Sat, 27 May 2017 00:05:10 GMT
$ swift stat -v -A http://10.0.0.254:8080/auth/v1.0 -U test:tester -K testing
                 StorageURL: http://10.0.0.254:8080/v1/AUTH_test
                 Auth Token: AUTH_tk88aa94c0a9d649e1962254219fc6e40b
                    Account: AUTH_test
                 Containers: 0
                    Objects: 0
                      Bytes: 0
Containers in policy "gold": 0
   Objects in policy "gold": 0
     Bytes in policy "gold": 0
                X-Timestamp: 1495842433.62607
                 X-Trans-Id: tx27a1e551e9ab40f8b67b0-005928c2ce
               Content-Type: text/plain; charset=utf-8
              Accept-Ranges: bytes
Fetching just the storage URL is possible via:
$ curl -i -H "X-Auth-User: test:tester" -H "X-Auth-Key: testing" http://10.0.0.254:8080/auth/v1.0/ 2>&1 | grep X-Storage-Url | awk '{ print $2 }'
http://10.0.0.254:8080/v1/AUTH_test
Fetching just the authentication token is possible via:
$ curl -i -H "X-Auth-User: test:tester" -H "X-Auth-Key: testing" http://10.0.0.254:8080/auth/v1.0/ 2>&1 | grep X-Auth-Token: | awk '{ print $2 }'
AUTH_tk88aa94c0a9d649e1962254219fc6e40b
It is possible to set the environment variables ST_AUTH, ST_USER and ST_KEY to simplify using the Swift client.
$ export ST_AUTH=http://<IP_or_URL>/auth/v1.0
$ export ST_USER=<username>
$ export ST_KEY=<password>
In this case...
$ export ST_AUTH=http://10.0.0.254:8080/auth/v1.0
$ export ST_USER=test:tester
$ export ST_KEY=testing
$ swift stat
                    Account: AUTH_test
                 Containers: 0
                    Objects: 0
                      Bytes: 0
Containers in policy "gold": 0
   Objects in policy "gold": 0
     Bytes in policy "gold": 0
                X-Timestamp: 1495842433.62607
                 X-Trans-Id: txfdf7189d752a4194a7421-005928c346
               Content-Type: text/plain; charset=utf-8
              Accept-Ranges: bytes
Create a bucket (container):
$ swift post testcontainer
$ swift stat
                    Account: AUTH_test
                 Containers: 1
                    Objects: 0
                      Bytes: 0
Containers in policy "gold": 1
   Objects in policy "gold": 0
     Bytes in policy "gold": 0
                X-Timestamp: 1495842433.62607
                 X-Trans-Id: tx6f9f81b2172a4612be078-005928c3d0
               Content-Type: text/plain; charset=utf-8
              Accept-Ranges: bytes
Upload a file:
$ echo "Testfile" > testfile.txt
$ swift upload testcontainer testfile.txt
testfile.txt
$ swift stat testcontainer
         Account: AUTH_test
       Container: testcontainer
         Objects: 1
           Bytes: 9
        Read ACL:
       Write ACL:
         Sync To:
        Sync Key:
   Accept-Ranges: bytes
X-Storage-Policy: gold
     X-Timestamp: 1495843781.99566
      X-Trans-Id: tx9e84baf733e94e47940a3-005928c421
    Content-Type: text/plain; charset=utf-8

$ swift list testcontainer
testfile.txt
Erase the file from the bucket (container):
$ swift  delete testcontainer testfile.txt
testfile.txt
$ swift  delete testcontainer
testcontainer
The Swift project includes two systems for authentication. Keystone Auth and TempAuth. Because in this tutorial, no Keystone service is installed, only TempAuth is possible. The user credentials when using TempAuth are specified inside the file /etc/swift/proxy-server.conf.
Up to now, it is not possible to interact with the Swift service via s3cmd because the API Swift implements is different to the S3 API. For interaction on command line, the Python client for the Swift API is a working solution. If the S3-API is mandatory, a middleware like swift3 needs to be deployed.