City2BIM Installation
Here you can finde the installation guide for the Revit Plugin City2BIM.
The installation can be done via the following two ways:
- Standard case - setup.msi (Condition: administrator rights)
- Developer (administrative rights not needed)
After the download please start the setup.msi. The plugin should be installed automatically.
By the next start of Autodesk Revit there should be the plugin available in the ribbon bar. If you will be asked whether plugin should be imported please click Always load.
If there is no plugin available your Revit installation is maybe not in the assumed folder:
[CommonAppDataFolder]\Autodesk\Revit\Addins\20XY. CommonAppDataFolder is in the most cases C:\ProgramData.
If so please navigate manually to the Addins folder of your installation and copy the addin-file City2BIM.addin and the folder City2RVT into the subfolder of version 20XY.
Note: Up-to-dateness: 03.06.2021; City2BIM-Version: 1.5 (If something does not work, please feel free to ask us!)
Requirements: Visual Studio & Text editor (e.g.: Notepad++)
(1) Download the latest "Source Code" folder and unzip it. After that save it to any location of your choice.
(2) Now use "Visual Studio" for further editing.
-
Navigate to the folder and open the "City2BIM.sln" file
-
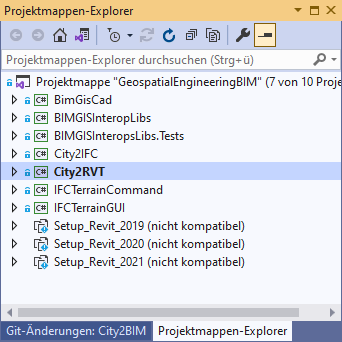
Your Solution Explorer (on the right side of the screen by default) should look like this:
-
First you need to change the Solution Configurations and Solution Platforms. You can find them in the standard toolbar:

-
Open the dropdown menu by clicking the downward pointing arrow behind Debug.
- Here you select the Configuration Manager... .
- In the Configuration Manager set the Configuration of the current Solution: to Release and the Active Solution Platform: to x64.
- Close the configuration window.
-
In Solution Explorer, open the context menu by right-clicking on the City2RVT project. Here you select "Create new".
-
Now the project is created.
Repeat this process for the City2IFC project.
Please note(!): If yellow triangles still appear in the projects in the References section, this is probably due to the update. Click once on one of these references, the yellow triangles should now disappear.
- Navigate to the References section in the City2RVT project.
- The Revit API is included with the two references: RevitAPI and RevitAPIUI.
- These must correspond to the Revit version you are using. (Recommendation: Revit 2020)
- If you want to use them, you can skip the next paragraph.
-
To include the Revit API of prefered version (e.g.: 2020), the references RevitAPI and RevitAPIUI must be removed first. To do this, RMB to these references and select Remove from Solution.
-
Then RMB to References and select Add reference....
-
In the Referral Manager - City2RVT click the Browse... button.
-
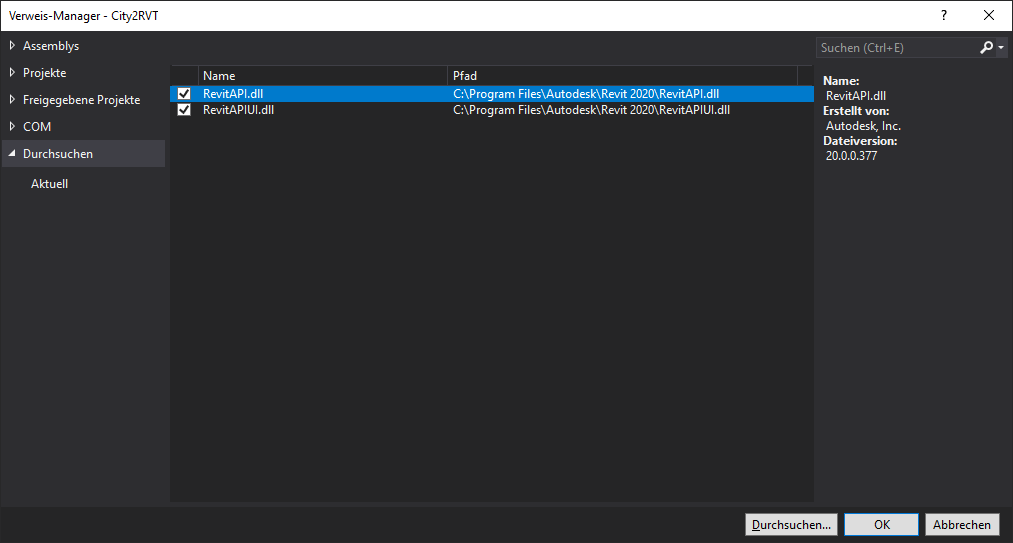
Now navigate to the files RevitAPI.dll and RevitAPIUI.dll and add them.
-
By default, the files are located under the path: "C:\Program Files\Autodesk\Revit 20XY*.dll". The result should look like this:
-
Close the Reference Manager by pressing the OK button.
-
The project City2RVT must now be created. To do this, RMB on the project and select Create new.
Now all arrangements are made in Visual Studio. After saving, Visual Studio can be closed.
- Navigate in the explorer to the plugin folder and in it to the City2RVT.dll file (path: "...\City2RVT\bin\x64\Release\City2RVT.dll").
- This path of the file should now be clipped. To do this, open the context menu by pressing Shift + RMB. Then click Copy as path.
- Now open the file City2BIM.addin (in the top subdirectory of the plugin folder) in a text editor.
- In line 10 the Assembly tag currently says "City2RVT\City2RVT.dll". You delete this expression now. Then paste the copied path of the City2RVT.dll file at this point.
- Delete the quotation marks (") at the beginning and end of the path. Save the file and close the editor.
Now it is necessary to include the file City2BIM.addin in Revit. In order for Revit to process this file automatically, it must be stored in one of two possible locations. The two possibilities are a user-specific and a non-user-specific location.
User-specific location
- Copy the file City2BIM.addin.
- Open the file folder "AppData". The easiest way is by using the search bar and type "%AppData%".
- Now navigate to the file folder "C:\Users\AppData\Roaming\Autodesk\Revit\Addins\20XY". Paste the copied file City2BIM.addin here.
- If you use this way you can skip the next paragraph.
Non-user-specific location
- Copy the file City2BIM.addin.
- Navigate to the file folder "C:\ProgramData\Autodesk\Revit\Addins\20XY". If you do not see the "ProgramData" folder (windows default setting), do the following:
- In order to make it visible under Windows, open the Folder Options window (View -> Options).
- Select the View tab and under "Hidden files and folders" and now check "Show hidden files, folders and drives" .
- Now paste the copied City2BIM.addin file here.
Now the plugin is integrated in Revit. When Autodesk Revit is started, the plugin should be present in the ribbon bar. If you are asked whether the plugin should be loaded when opening the program, please confirm this with Always load.
| HTW Dresden - Faculty Geoinformation - Friedrich-List-Platz 1 - 01069 Dresden Project head: Prof. Dr.-Ing. Christian Clemen >>>Back to github wiki main page: here! <<< |
|---|