IFCTerrain GUI
The IFCTerrainGUI application is for inexperienced users who have not worked with the converter before. In the following the essential functions are listed and explained.
Table of contents
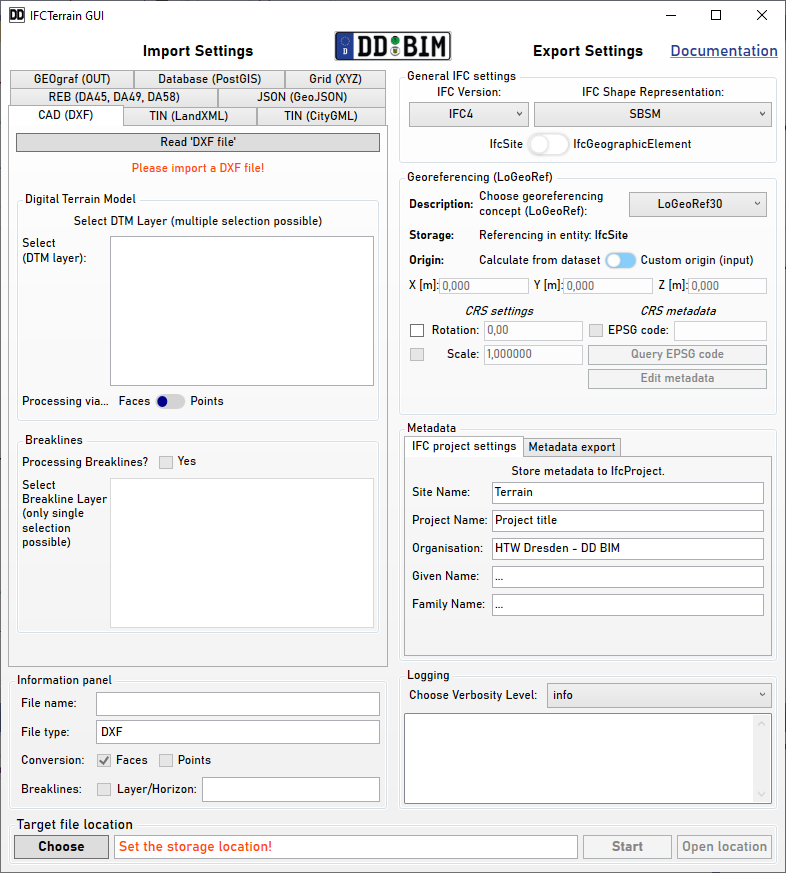
The main window of the IFCTerrain tool is separated in import and export settings.
The following workflow is recommended for conversion via GUI:
-
Import Settings [file reader]:
(1) Select the tab that contains their input record!
(2) Open the file and make all settings (within the tab - window)
-
Export Settings:
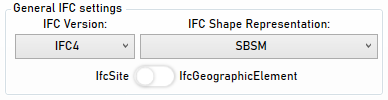
(3) IFC Schema / IFC Version
- Choose your target scheme! (may the supporting functions are different)
- If desired, switch the storage of the terrain to IfcGeographicalElelment.
(4) IFC Shape Representation
- Select the available shape representation!
(5) Level of Georeferencing
- Choose the Level of Georeferencing.
- Select the required settings (eg. default).
(6) METADATA
- Make the settings that you would like to use.
- Finally, you should set the wanted export
-
Logging
- Read the information in logging panel
- Change verbosity level (if needed - mainly for developer important)
-
Target file location
(7) Select the storage location!
(8) Select via the drop - down menu the target - file format (*.ifc; *.ifcxml; *.ifczip) can be changed
-
Start
(9) Start conversion process. The "current" settings are used!
In the tool you can navigate via the different tabs which data format you want to read. The following data types can be read, as long as they contain terrain information:
LandXML-files, mainly used in surveying (infrastructure) context.
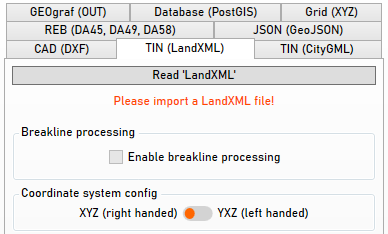
- Import your LandXML file (note: xml-schema validation will not be checked!)
-
choose if break lines shall be processed. These must be contained in the
<Breaklines>tag. - note: by schema definition a landXML file has a left handed CRS! (you can change with the switch)
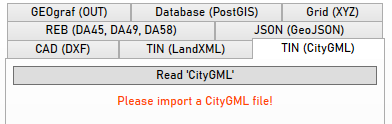
- Import your CityGML file!
Vector format, mainly used in CAD context.
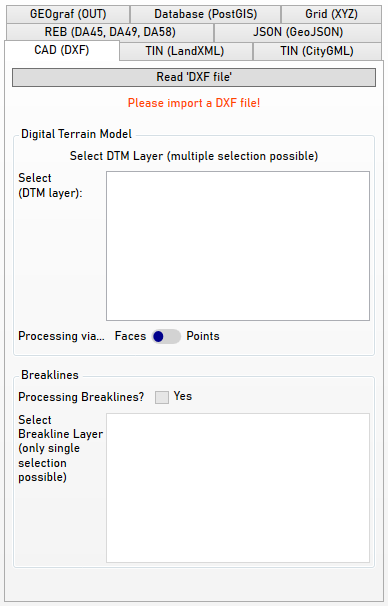
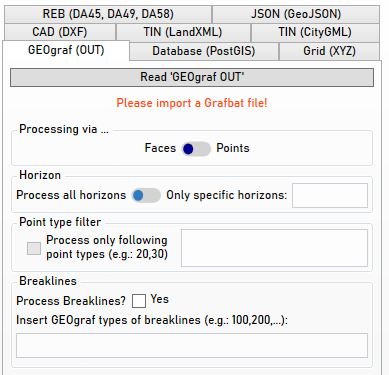
- Condition: the layers must contain points or faces (mesh). Otherwise: no conversion can be performed!
- Open the file and wait until all layers are listed up
- Select the layer in which the terrain information is stored
- Choose between: points OR faces
- if break lines are to be processed, this must be selected. Then select the layer in which the break lines are stored.
"Datenarten" - format, raster - format which contains layers
- Open the file
- Select the horizon in which the terrain data is stored
Grid, specifically an elevation grid consisting of points and a regular size of the grid "tiles" (simple .xyz data format)
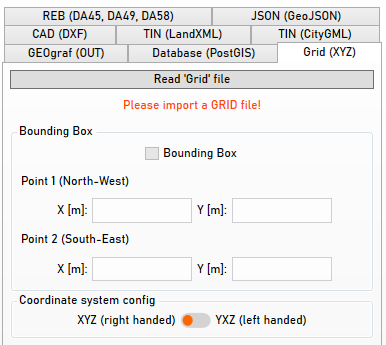
- Open the grid file (you may have to distinguish between: *.xyz and *.txt when opening)
- Furthermore, a bounding box can be set by ticking the field, entering the corresponding values (unit: metre)
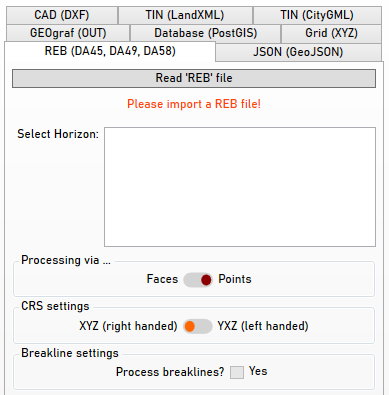
Project exchange format (*.out). Mainly used in GEOgraf A³ for project exchange. (Version independent!) The official documentation can be found here. (Only formatting according to this documentation is supported!)
-
Open the *.out - file!
-
Choose how the file will be processed:
- faces - The meshing is read!
- points - "artificial" calculation about the contained points
-
[Faces]: decide if just a specifc horizon should be processed and input via field
-
[Points]: Decide which point species are to be processed
-
Processing of break edges are available! Here a line type containing the break lines is still to be specified
Database - connection to an object-relational database and the PostGIS essay. (Other database types are not supported!)

-
Input information to connect to a database (you can test the connection via the button). An account is (mostly) required that can send a SELECT command for an existing PostGIS database. Note: no data such as passwords are stored by IfcTerrain! These are only required for establishing a database connection.
-
Choose if you want to use our template for a query OR a custom query
-
Switch the processing type points or faces
-
Prepared query (template) Input the follwoing information:
- DTM geometry: table & column
- DTM identifier: *column & TIN ID (value)
- The following command will be send:
SELECT [Attribut name] FROM [Schema].[Table] WHERE [Attribute name (PK)] = [Attribute name (PK)]
-
Enable breaklines if you want to process: Table, Column (for geometry)
and Column (for identity). The following command will be send:
SELECT ST_AsEWKT([Table_BK].[Attribute name BK]) FROM [schema].[Table_BK] JOIN [schema].[Table_TIN] ON ([Table_BK].[Attribute name BK (PK)] = [Table_TIN].[Attribut name TIN]) WHERE [Table_TIN].[Attribute name TIN] = [Attribute value TIN (PK)]
-
Custom query: you can input your custom query string here! And enable another string to query the breakline data!
Under export settings, the user can customize the IFC file that will be generated by the IFCTerrain tool.
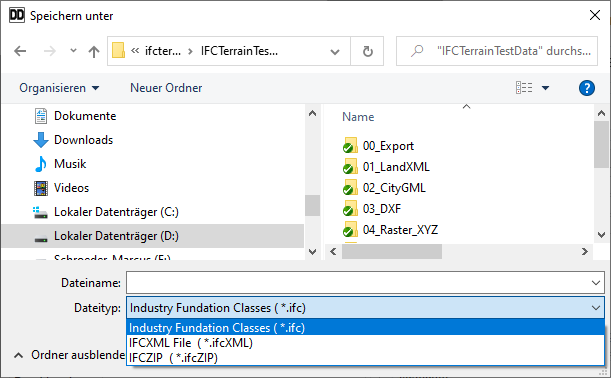
Currently supported export file formats:
- IFC (STEP Physical File (SPF) - ISO 10303-21)
- IFCXML (ISO 10303-28)
- IFCZIP (embedded IFC file in zip - especially recommended for very large file conversion!)
You can select them by the drop-down menu when choosing the storage location!
-
Select a Ifc version (more information)
-
Select a shape representation (more information)
Keep in mind: not every BIM authoring software is able to represent these different models in the same way. Which model type should be exported depends on the software that the generated Ifc file shall be imported in. (For more information use the blink above!)
-
Swtich if you want to store the dtm via entity IfcGeographicalElement (only above IFC2x3 supported)

You can read all the the necessary information: here
- Select LoGeoRef level: 30/ 40/ 50
-
Do your settings - as need!
- switch to use a custom orgin and input via the fields
- input your rotation (unit: degrees)
- ...
There is also a support of metadata stored directly in the IFC file or in a separate file (JSON). This can be read: here
You can do the following inputs:
-
Tab: "IFC project settings"
- stores directly in IFC file
- metadata about project (name & organization)
-
Tab: "Metadata export"
- check the wanted norms and open input box to set metadata
- check the storage options (at least one of them, if wanted)
Each conversion writes a config file (as JSON file) that can be reused by IFCTerrainCommand.
The config file will be written in the same location as the ifc file. The naming scheme is as follows:
config_[file format]_[ifc version]_[ifc shape representation].json
Keep in mind: each convert (with the same settings of file, version and shape representation) will override the setting file.
A log file is written for each export. This is always located at the storage location of the IFC file. If a conversion does not work as intended, the necessary information is saved here. The naming scheme is as follows:
[filename]_[date (month + day)]_[export time (min)].log
You can select between different verbosity level those are:
| verbosity Level | Description | Recommend for |
|---|---|---|
| Warning (default setting) |
reports only errors or warning (which may cause an error) |
user (which only want to convert an file) |
| Information | add reports about information & results | user (which need some more information) |
| Debug | add reports about the most important work steps | developer (default) |
| Verbose (SPAM ALLERT) |
add reports about all working steps | developer (if needed); Warning: it may will produce large files! |
GUI logging
The most important information will be shown in the gui. (Verbosity level are not supported here!)
| HTW Dresden - Faculty Geoinformation - Friedrich-List-Platz 1 - 01069 Dresden Project head: Prof. Dr.-Ing. Christian Clemen >>>Back to github wiki main page: here! <<< |
|---|