Various environment adjustments/improvements #49
Comments
ob01.cam Adjustment@Bigmanjapan may I ask you to adjust another .cam file for 16:9 usage? This happens if you stand around this area and use the Search button while looking up.
|

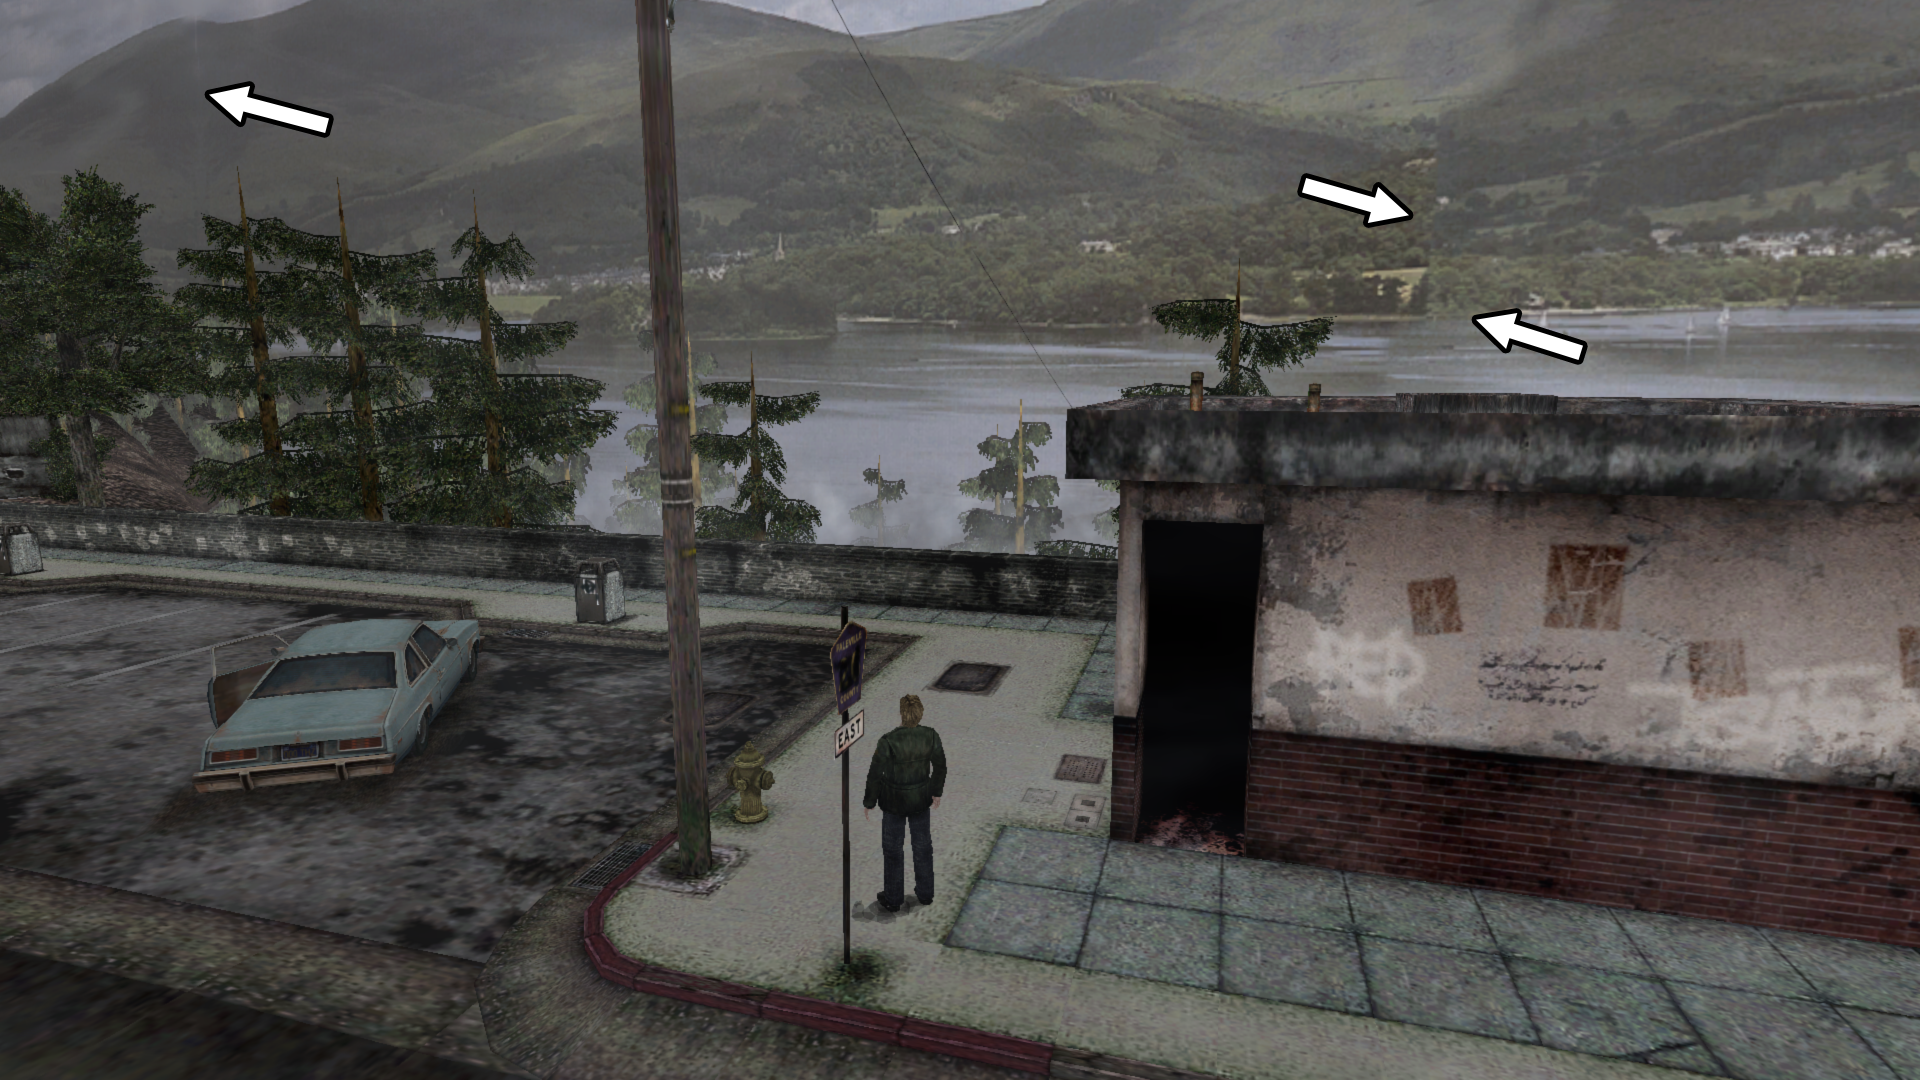
ob01.mapThis will be released with v1.0.3 of the "Enhanced Edition Essential Files" (not yet published) Okay, this will surely be a touchy one for some so I'm going to explain the changes in great detail for this. Before I begin, I'll say if you wish to NOT use this adjustment simply remove One thing I'm sure any veteran fan of this game has noticed over the decade is the poorly-seamed together Toluca Lake image at the beginning of the game:
While most of these oversights are never actually seen in-game there are a few of these problem spots that are very evident while playing:
So I decided to clean up this image for a more polished presentation: Before:
After:
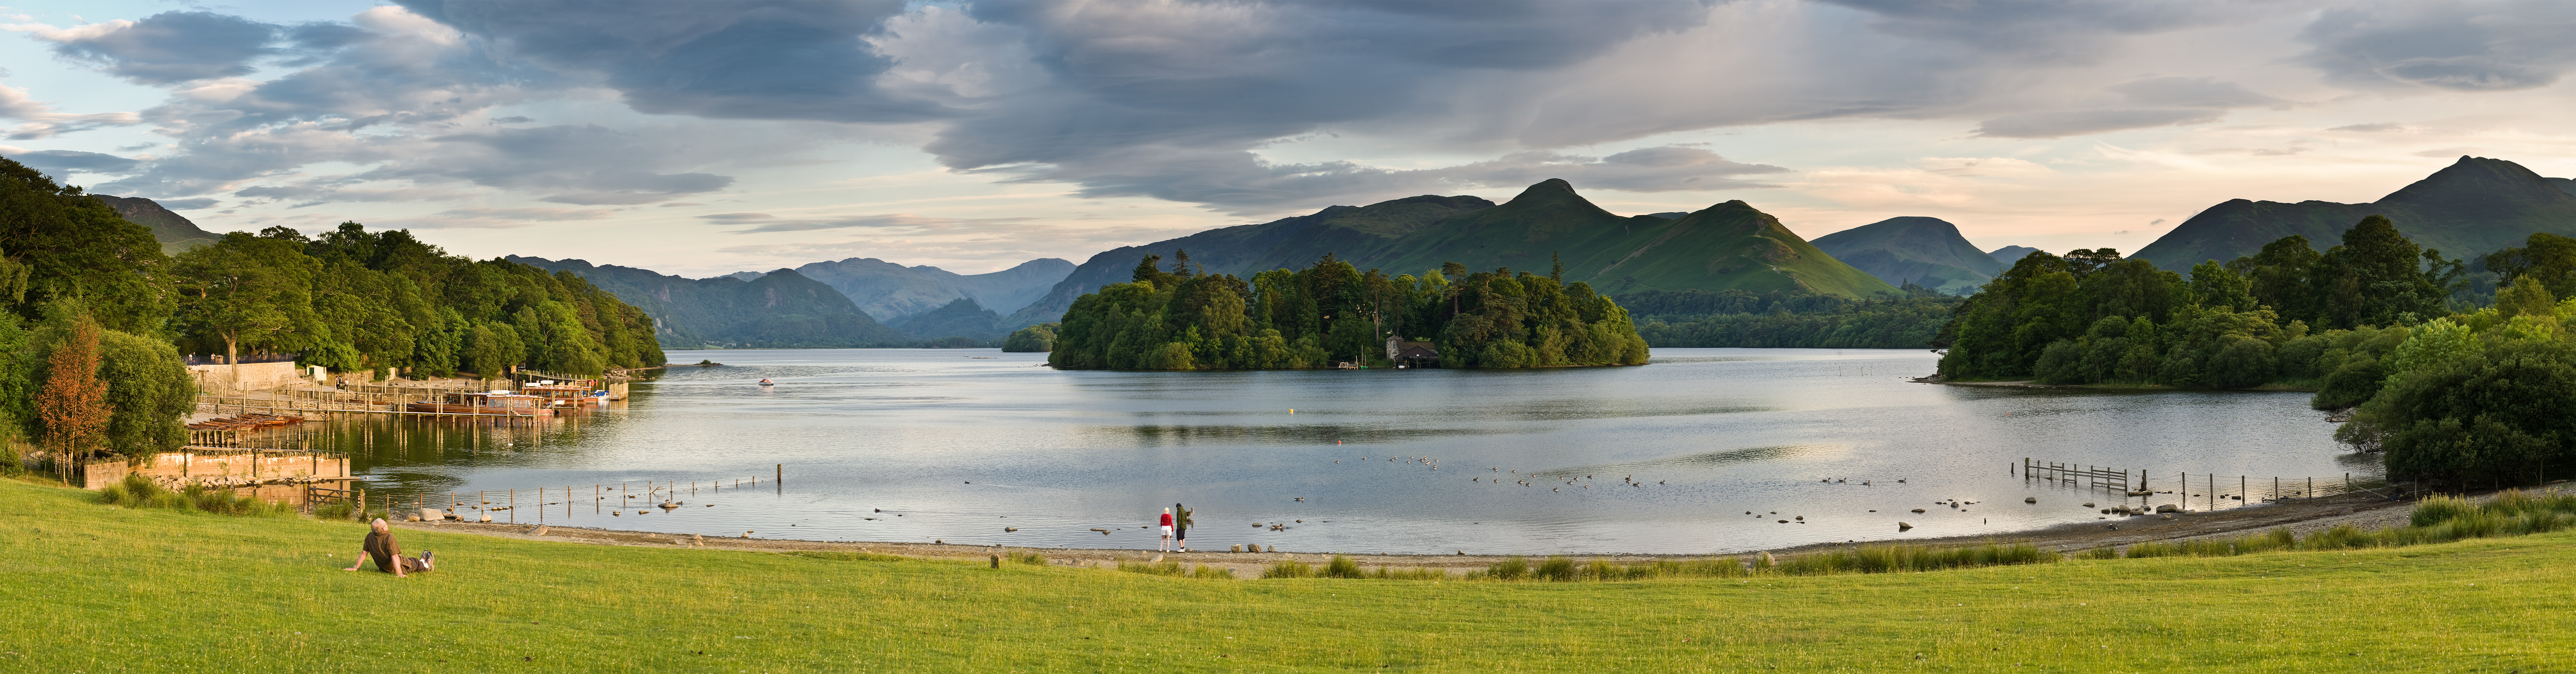
A couple things worth noting: The Toluca Lake image you see is based off a real life location. Specifically: Derwent Water in Keswisk, England:
So when creating this new image I only used actual photos of Derwent Water found here: The next thing to note is the bottom of the image: You pretty much never see any of this in the game. In fact, here's a visual breakdown of what you actually see of this texture while playing; the red regions are what you'd see in-game:
...and so this is all you'd see in the new image as well:
Because of this, I didn't worry much about how the bottom portion looked. I honestly didn't need to design anything down there but decided to make it look consistent with the rest of the image. In summary: Don't fret over the bottom part as you'll never see it while playing. Here are some in-game screen shots: Before:
After:
Before:
After:
Before:
After:
Before:
After:
Before:
After:
After (In-game Panorama)
And again: If you wish to NOT use this adjustment simply remove |


ps97.map@Bigmanjapan would you know what causes a portion of the wall to disappear/not render in this room? Below is a snapshot of the cutscene:
If you look behind Angela the left side of the wall simply isn't there. But if we look at this room in the Level Viewer we can see that part of the wall does indeed exist:
Any clue what the cause of this might be? |


ap84.map@Bigmanjapan another question: Is it possible to detect when a camera angle has switched within a cutscene and can we then initiate code (once it detects the camera change) for the remainder of the cutscene (until it ends)? Here's what I'm trying to fix:
This one cannot be fixed through texture editing because the floor is composed of many UV squares, so I cannot brush a black fade effect onto the texture. Because if I make a tile black for one area, it will also be black in an incorrect area as well:
I did find a solution, however. And this involves modifying addresses:
It will then look like this:
The problem is we cannot initiate these value changes for the whole cutscene, because it will ruin the visuals for the cutscene earlier on: So we must initiate it once the camera has changed to this view: ^ Once the camera switches to that view we can leave these addresses active for the remainder of the cutscene. We would then release these values once the cutscene ends. |


|
I understand that this is a very nitpicky things to nitpick, but I noticed that your take on Toluca panorama is a little more vibrant. Also, in the original, there is a distinct (albeit ugly) separation between land and an island on the left, while in your version it kinda blurs together by the trees. |
|
No worries at all. If you wish to not use this adjustment simply remove |
|
You can make the colors look more true to the originals by dropping vibrancy in photoshop by ~18.
|

|
Regarding ps97.map. The texture is loaded fully (https://youtu.be/Es5QJJ9wAlA) but there is a crotch in form of a black wall which is coloured only on one side (https://youtu.be/RPCJR0IxzHM). Probably done to hide the red tube that would be visible from that camera angle when camera shows Angela leaving the room. I might try to disable this black wall to see if that's true. Regarding ap84.map. It surely is possible to identify the moment of the camera angle switch but the easier solution might be to find a frames counter of the cutscene. I will look into it a bit later. |
Interesting. This was added in for the PC version (and maybe also the Xbox version?): Edit: It's also on the Xbox version so this is an oversight Team Silent tried to fix when they ported the game to the Xbox version: https://youtu.be/orrtK9GdThc?t=2h17m50s The black wall also isn't textured through an image file so I can't adjust it that way, either.
Thank you, sir. |
Frame cutscene counter is not a unified value like it is in SH3, so I suggest using other method. sh2pc.exe+1B7A7C4 (01F7A7C4) 4 byte — cutscene index Angela's mirror cutscene index value is 18 (decimal). sh2pc.exe+54E064 (0094E064) float - Angela's mirror cutscene camera X coordinate ancor point (changes with each new camera angle change) The camera X coordinate ancor point value you would want is 59354.36328 (decimal) / 5D DA 67 47 (formatted hex). The value is not repeated throughout the cutscene, so there should be no false triggers. Make a function that will change fog parameters when those two conditions are met (cutscene index and camera ancor point value). |
|
@AeroWidescreen in reference to Bigmanjapan's post directly above. Address/value information is found here. Thank you for any help with this. I don't believe the values get reset upon cutscene's end if we change them so they'd need to go back to 8,000 and 12,000 afterwards. |
ps97.mapThis will be released with v1.0.3 of the "Enhanced Edition Essential Files" (not yet published) I could paint a fake shadow-like effect on the wall that'll blend seamlessly with the black box. This may be the easiest/best solution, because either:
Update: I painted the fade effect as it was the most practical method of making the harsh edge from the black box look better.
|

Sounds straightforward. I'll give it a try today. |
|
@Polymega Try this: https://mega.nz/#!lbw13a4Y!_YSkF4Du2FTyYLQFj8BTEuJfmpPGdK91TLcZg9c6bWA
Edit: Never mind, read below. |
|
Thanks, Aero! Some notes:
Bigmanjapan's camera value is the correct one: It should activate at 59354.36328 whereas it's currently changing at 59776.9. Also, the fog values are reverting back to the default numbers before the cutscene ends (when camera X decimal changes to 60165.47266). The new fog values we use, once activated, should stay active until the cutscene ends (its index ID is no longer called). Once the cutscene index ID is gone, we then revert the fog values back to normal.
This should also cover our bases if someone presses Esc to cancel the cutscene after the new fog values were called in. |
|
To clarify: The screenshots I used above are just one angle that the new fog values fix. The first instance of the camera switching to show the floor abruptly ending is at 59354.36328 though. The majority of the remaining camera switches will keep showing that part of the floor until the cutscene ends. So once we activate the new fog values at 59354.36328 we just keep them active until the cutscene then ends. |
|
I see, my fault then. Try this: https://mega.nz/#!se40ySZL!DfHIPnSpalw2sEY-fDUjnDPRj_MF41mmKl6Cl8JQ0JY |
|
No worries, and that's the ticket!! Everything worked without a hitch, even when I cancelled the cutscene early after the fog values changed. Well done, Aero! |
ap72.map@Bigmanjapan the fog parameter addresses you've found have proven to come in quite handy. @AeroWidescreen if I may suggest another edit as well: Whenever ap72.map is loaded in (unsure of unique hex identifier) can the following occur:
This is the area in question:
Here's what the changes: Before:
After:
Before:
After:
|


ap80.mapThis will be released with v1.0.3 of the "Enhanced Edition Essential Files" (not yet published) Since I happened to be messing around in this area for the Angela cutscene I noticed the top/bottom rims of the second lamp shade for both light fixtures in Room 109 weren't textured. I also fixed a texture seam on the lampshades while I was at it. Before:
After:
|


The most I can do is change it based on the fog values, but that could easily affect other parts of the game. I need something else to identify that area; I was hoping @Bigmanjapan would have something to use, but if not then I'll check when I can. |
|
sh2pc.exe+1BB7DAC (01FB7DAC) byte — room index The room in question is 0x28. |
|
@Bigmanjapan You either have to re-enter the room, load a save with you already in the room, or toggle your flashlight from off to on again. This obviously won't be a concern when the fix is implemented. |
|
Great timing, Aero! I just booted up my PC to play around more with the game.
Worked like a charm. :) Wonderful work once again, sir!
Bigmanjapan is an absolute a wealth of knowledge with these things. :) Oh, and a heads-up, Aero: Bigmanjapan will be looking into a possible address fix for the Observation Deck, too. The two biggest areas in the game that look noticeably different than the PS2/Xbox versions are the Eddie boss rooms and the Observation Deck. The Eddie rooms are obviously fixed up perfect now thanks to all the amazing teamwork here, but the issue with the PC's Observation Deck is that everything beyond the brick wall is too bright (namely, the Toluca Lake image and 2D trees). I was able to darken the Toluca Lake image no problem. But the trees are an entirely different story... If you re-import the 2D tree image with SH Texture Explorer it corrupts the edges of the alpha channel. Namely, it leaves a black, "crusty" edge all along the trees. See image examples at the bottom of this post. Even if you export the 2D tree image, don't touch anything on the file, and re-import it through SH Texture Explorer it'll still leave those black crusty edges. Simply put: You cannot touch the 2D tree file otherwise it'll corrupt the alpha edges. I spent many hours trying to prevent this from happening but there must be some sort of special way the alpha channel is saved out on this particular image that is lost whenever the SH Texture Explorer exports out the file for editing. Beyond that, thanks to Bigmanjapan's help, I've now confirmed that the levels (brightness/contrast) for both the Toluca Lake and 2D tree images are the same on all three platforms (PS2, Xbox, and PC). This tells us that there must be something that is changing these image levels after-the-fact that the PC version isn't currently doing. Darkened Toluca Lake image, vanilla PC trees:
Darkened Toluca Lake image, darkened trees (leaves bad alpha edges):
PCSX2 image (reference):
Darkened Toluca Lake image, pure-white tree image (notice bad alpha edges, still):
|


|
are you sure that pcsx2 is completely accurate in terms of graphics? |
|
PCSX2 is the best method to base adjustments off of as we can do pure digital-to-digital comparisons. Meaning, we can't fully trust for accurate visual representation off of a composite/component signal from an analog source (PS2). To answer more specifically, yes, the trees are dark on the actual PS2 console as well: https://youtu.be/nH-cbmXymdw?t=408 |
It's a fair concern. I was going to ask the same question albeit for slightly different reasons. Hardware mode can be less visually accurate than software mode from my experience, so I was wondering how reliable these comparisons were as well.
But I guess there's nothing to worry about in this case.
I'm not familiar with these textures. Which ones are you changing? Maybe I can replace them manually if you send me the dds / png. |
|
Something to consider with the comparisons: Besides a few noticeable area differences (Eddie rooms, observation deck, etc) the PC version looks practically identical to the PCSX2 version in most areas. Same lighting, near-identical coloring, etc. Because of that, I personally feel it's a good source for reference. You run into these types of concerns (image example below), depending on what cables you use and how you capture it, when you try and compare a lossless, digital signal (PC/PCSX2) to a lossy, analog one (PS2). With that in mind, the most safe/consistent way to compare things like coloring and light levels would be through something like PCSX2. Other's opinions will, of course, vary. Notice differences in color and lighting levels between them all; they're not drastic, but there are differences: I haven't played this game fully in software mode on PCSX2 but the times I've switched between hardware/software I never noticed anything different (besides the resolution, of course): PCSX2 OpenGL hardware:
PCSX2 OpenGL software:
PCSX2 Direct3D 9 software:
Sure. The main file is If you extract the files via SH Texture Explorer it's the first one on the list: Here's the TGA and PSD (saved as Photoshop CC 2017) of this file, with the trees darkened. The PSD simply has a solid black layer set to 35% opacity to darken the tree layer underneath: ob01.map_tex_000.zip According to SH Texture Explorer, the image compression type for this particular file is DXT2 and, from what I can tell, the Nvidia DDS plugin will not let you save out as DXT2? Only DXT1/3/5. I've been doing a little research on this and the DXT format you choose will have an affect on the alpha channel. I'm thinking this is cause of the issue, then. |


|
Hmm, I don't think Texture Explorer is entirely the cause of the problem here. Apparently DXT2 and DXT3 are interchangeable, and indeed, hex editing the DXT3 into the archive does work, but the results are no different. I believe this is a technical limitation that is also present in your PCSX2 screenshot. The only workaround I'm aware of would be to color the edge of the texture the same color as the texture itself, which I'm willing to bet is what the developers did for the PC version. As for why Texture Explorer has so much trouble with this, my guess is that it's only using the alpha channel and subtracting everything outside of that. Maybe something wrong with its conversion process. Only my guess. Results Hex editing the texture into the .map file should be pretty simple. Save as DXT3, no mipmaps, then overwrite the .map data starting at line 0x00000070 with the .dds data starting at line 0x00000080. |


Thanks @AeroWidescreen, that is exactly what I needed. Not sure why I missed it! |
|
Thanks, Elisha! I tested the fix on all three executable versions. The The fix is working great for the first area (Angela cutscene) but doesn't seem to be affecting the second (Blue Creek room). If it helps, for v1.0, the room ID for Blue Creek Room 208-209 is 00000028. Lastly, after seeing the first part of the fix (the Angela in the apartment cutscene) in action, may I ask for the two float values that affect this cutscene to be changed?
This spaces out the fade effect of the fog-of-war more to look nicer but without having it "bleed" into the room still. Thank you, sir. |
|
Ok, try this one below. I was using cutscene ID rather than room ID. Test module: d3d8.zip |
Completely perfect for both areas now! Many thanks again, Elisha! There's one more ASM fix left in this thread that Aero_ will script out for you in the future. Once that's implemented, all fixes/adjustments for this thread will be accounted for! |
|
Checked in the code for |
You're going to need to use this address multiple times throughout the code. There's no other way as far as I know. And now for the actual code... |
|
Similar to the Eddie boss room fix, naming this fix will be important to not spoil anything. My recommendation:
|
|
@AeroWidescreen, for some reason I cannot get this ASM to work. This causes all the pistons to be frozen in place at all times while in this room. Can you take a look at my fix? Here is the download: d3d8.zip Note: the addresses are hard coded for this test build so you will need to use v1.0. |
|
This is what your code looks like: Line 6 and Line 23 are the main problem. You're basically doing [esi+01D83574], when it should be [esi*4+01D83570]. Here's how you can fix it: Line 5 and Line 22 should point to 01D83570, not 01D83574. Be careful here, because those aren't the only places you've used this pointer. You only want to change this for Line 5 and Line 22.
Then Line 6 becomes..
Then Line 23 becomes..
|
|
@AeroWidescreen, thanks for the comments! I have two questions:
|
I believe the confusion is that you think this is what's happening: The asterisks is known as a "scaling factor". Apparently it indicates the array size. I'm not too familiar with it myself, but you can read more about it here: http://www.c-jump.com/CIS77/ASM/Addressing/lecture.html A quote from the link in question:
This is how it works in our case:
02 + 01D83570
04 + 01D83570
08 + 01D83570
The function uses Whereas 01D83574 is the address that controls the movement of the specific piston we're trying to change. It's one of the many addresses the game gets from that pointer I mentioned above. We can't change this address directly due to it being overwritten constantly, so that's why we're using |
|
Thanks for the detailed explanation @AeroWidescreen! My total knowledge of ASM comes from about 2 hours of YouTube videos! :-) Anyways I think I have it fixed now. |
|
|
|
I managed to convert the DXT1 (1 bit alpha) butterfly texture to a DXT3 (explicit alpha) texture. This now allows us to use anti-aliasing for the alpha channel: Before:
After:
Here's what I did:I first opened I made a blank, dummy file in Photoshop with these requirements and saved it out. Then, I opened I was then able to open the DDS file in Photoshop. The RGB is a simple, flat color and here is what the alpha looks like for it:
As a quick test, I made a new alpha channel with anti-aliasing and saved this one out as a DXT3 DDS (with explicit alpha):
I then copied the header lines from
And searched for the lines within
Now that I found that, I pasted the new texture data into this area, which increased the texture data from a length of 800 to 1000 (due to bumping it up to DXT3). I ran the game and got this result:
Not so good... So I needed another texture to compare it to, because perhaps there's something in the header I need to update since I upgraded the texture to DXT3. The butterfly texture is 64x64 pixels, uses a 1-bit alpha channel, and is saved as DXT1. The footstep texture, Since the footstep texture is the same size as the butterfly texture and is already using the alpha type we want, I compared its header to
Next I compared each header, changing anything different in the I changed this particular byte to
It looks buggy, of course, but it at least looks better. Now, going off that particular byte, I played with the numbers until I used I'll do a more thorough play test of this later, to make sure it won't crash anything elsewhere by adding Edit: Here's the new alpha; taken from the PS2 version and slightly modified:
|


|
It's cool to see that you're getting better at this. Trial and error and data comparisons are usually how I do it as well.
I know from editing the map textures that you can increase their size by a small amount, but once you go too high it'll start corrupting other textures and then completely crash. I guess it depends on how much empty space there is between each chunk of data in memory, assuming there's any space at all. |
|
Hell, I don't know what's going on anymore with this one. I loaded many save files when I first improved the butterfly texture and there was no issue. Now it'll crash on an apartment save file load even using older builds of the project. So it's 100% the modified ap.map causing that and nothing else. |
|
Hi @FrozenFish24 , Question for you sir: When you alter/add geometry to the .map files as you've done it must surely change the length of data? If so, how are you able to change the file length without the game crashing from these memory size adjustments? Does it just happen to work without issue or are you changing something in the overall .map header? The reason I ask is because, if you look three posts up, I was able to restore the dynamic, flying butterflies texture back to how it should look by changing the texture type from DXT1 to DXT3. This allowed me to use an explicit alpha channel instead of a 1-bit alpha. Anyway, when I did this, it doubled the size of its texture data. At first nothing seemed wrong from doing this in my tests but that ultimately didn't turn out to be the case. If I load a non-apartment level save file then load into a save file that's within the apartment level the game will more-often-than-not crash during that load. The culprit being the modified ap.map file I made to fix the butterflies. Long story short: Is there a secret to changing .map data lengths while still having the game behave nicely? |
|
@Polymega In addition to your change you should probably also update these two fields in the texture's header, I believe these are the length of the texture data and the length of the data + 0x10 (padding bytes): |


|
Hmm... I still get crashes when using the edited ap.map file with these adjustments. Here's how I'm triggering the crash:
May I ask you to look over my work? The files below have already applied your suggested header edits:
Worth mentioning that this butterfly texture is also used in one other area: An attack by the final boss in the final area of the game located in |
|
That's pretty strange, your map doesn't want to crash my game. See if this change helps, it looks like this whole line might be a parent header containing another length field that needs to be increased: |

|
Nice! That seems to have fixed it. Thank you. :) For |
|
Great! Yep, the overall map header value will be different, here's the new value for ru.map: If you're wondering how I'm getting this, it's just the new total size of the MAP file (in bytes) as a little-endian 32 bit value. So |

|
Thank you again!
Excellent! Thank you for also explaining the method to finding the new overall .map header length. While I'm still very much a rookie in all of this, I like to try and understand the methodology as best I'm able. :) |
|
This monster thread has gone on long enough. When the time comes, we can make a new one to start fresh. Beautiful work by all involved here!! An update has been released with this fix in it. See v1.3.1340.0 |
hp37.map
This will be released with v1.0.3 of the "Enhanced Edition Essential Files" (not yet published)
This one has always bugged me as there is UV/texture stretching along the top of this room's ceiling. And the coloring at the very top of the ceiling is not solid black (may only be noticeable to you if you're using an LCD monitor). This is a problem because the ending cutscene in this room looks directly up at the sides of the ceiling:
Before:
This has now been fixed by editing the texture files within the
hp37.mapfile and will be included in the next release of the Enhanced Edition Essential Files (planned to be included in release 1.0.3).After:
Some other shots:
Before:
After:
Additionally, there were a few 3D assets that weren't at the correct levels compared to everything else in this room. Namely, their black levels weren't strong enough so I tweaked those as well, since I was already messing around in this file anyway:
Before:
After:
The text was updated successfully, but these errors were encountered: