Use Case: Custom Feedback
The experiment creator can override the existing feedback rendering. This is the screen shown to users after they respond to an experiment. Custom Feedback can be chosen from a set of options or written using html, javascript, and css to craft a completely unique response for the user.
In order to help with this feedback, the javascript environment will have access to the experiment's definition and the collected responses of the user. The javascript can use these to create responsive feedback predicated on the user's answers.
- Experimenter creates new experiment.
- Experimenter chooses a type of feedback for the experiment and defines the details:
- Static Message: Experimenter is shown a text field with the standard message, "Thanks for participating". Experimenter may modify this message.
- Reflective Feedback: This is a built-in html/javascript type that shows the user their last response and provides links to charts for each experiment input to allow the user to explore historical data for that input.
- Responsive Feedback: Experimenter is shown a form to define if/then rules for showing messages and responding to the user based on the user's responses.
- Custom Code Response: Experimenter is given a javascript/html/css editor in which they can type their own custom web page. The javascript environment includes access to the data for the experiment and the definition of the experiment itself. The javascript environment also provides an api to save data into the datastore for the experiment as well as launch a function to launch the email app.
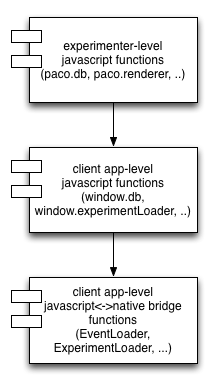
The javascript API is layered downwards as in the image. At top are js apis available to the researcher, mostly they are in the paconamespace.
Next, are the implementations in lower-level javascript of client versions of apis. This layer mxes with the next lowest layer which is the native bridge objects which provide access to client facilities like database storage, experiment definitions, email services and so on.
The javascript API available in the custom webview comes from the default.js and custom_base.js files, currently in the Android source directory. When a user uses the default feedback (currently the retrospective page) it is rendered by loading the default_feedback.html page in an embedded webview.
When a user creates a custom feedback page using html, or html and javascript, it is loaded in an embedded webview in the skeleton.html page.
The skeleton.html and the default_feedback.html should be unified at some point.
The custom_base.js and default.js define a javascript api for interacting with experiments and their events that is aimed at experimenters.
To make these apis work, a given client such as the Android app, the iOS app, or the web app, must make these javascript apis real by providing a bridge to the native environment (or server side in the case of the webapp). What follows is a brief discussion of low-level javascript apis that each client must implement to make the higher-level javascript api work.
On Android, these objects are defined in the FeedbackActivity class. These are the Java <-> Javascript bridge objects that allow access to the native app from Javascript and vice versa.
Javascript api
window.eventLoader.saveResponse(jsonString) - saves the jsonString which represents an event (set of responses) into the datastore.
window.eventLoader.getAllEvents() - returns all events as a JSON string.
window.eventLoader.getlastEvent() - returns the last response as a JSON string.
window.env.lastResponse - returns the last response event by the user as a JSON string. Most commonly used in existing experiments. Deprecated for new api.
Bridge object insertion code:
(Code from FeedbackActivity.java)
final Map<String,String> map = new HashMap<String, String>();
map.put("lastResponse", convertLastEventToJsonString(feedback, experiment));
map.put("title", experiment.getTitle());
map.put("experiment", experiment.getJson());
String text = experiment.getFeedback().get(0).getText();
webView.addJavascriptInterface(text, "additions");

webView.addJavascriptInterface(new JavascriptEmail(), "email");
webView.addJavascriptInterface(new JavascriptExperimentLoader(experiment), "experimentLoader");

JavascriptEventLoader javascriptEventLoader = new JavascriptEventLoader(experimentProviderUtil, experiment);
webView.addJavascriptInterface(javascriptEventLoader, "db");
webView.addJavascriptInterface(javascriptEventLoader, "eventLoader");

env = new Environment(map);
webView.addJavascriptInterface(env, "env");
Javascript api:window.experimentLoader.getExperiment() - returns the experiment object as JSON. Reconstitute in Javascript with $JSON.parse(experimentJSON); or similar call.window.env.title - returns the experiment title. A shortcut to the title string in window.experimentLoader.getExperiment().getTitle();
window.env.experiment - returns the experiment as a JSON string. Deprecated, but used by existing experiments.
Bridge object interface:
private class JavascriptExperimentLoader {
    private Experiment experiment;
    public JavascriptExperimentLoader(Experiment experiment) {
        this.experiment = experiment;
    }
    public String getExperiment() {
      return experiment.getJson();
    }
  }
If you need access to the custom feedback code itself, it is available on the experiment definition or as a directly bound object.
javascript api:
window.env.additions - returns the feedback custom code string. This is used by the default_feedback.html to render custom feedback.
Javascript api in default.js:
      function sendEmail(body, subject, tofield) {
          window.email.sendEmail(body, subject, tofield);
      };
Bridge Object:
  private class JavascriptEmail {
    public void sendEmail(String body, String subject, String userEmail) {
      FeedbackActivity.this.sendEmail(body, subject, userEmail); // launches Android app to send email with parameters
    }
  }
Flow:- User responds to experiment.
- User saves response.
- User is shown feedback page
- if feedback is default user is shown standard page.
- if feedback is custom, user is shown embedded webview with custom feedback definition.
If the custom feedback contains an alert, we currently intercept this by overriding the browser chrome and showing a native dialog window.
The back button (Android) should continue to work correctly if the feedback has internal links.
We do not currently allow custom feedback to link directly to the web. We intercept these calls and prevent them.